Creating an eLearning course is kind of like baking a cake. There are so many different flavors and toppings you can incorporate to make things more delicious—or more interactive, in the case of eLearning.
For example, you can always use the built-in drag and drop interaction in Storyline, but why not make it your own by adding sprinkles or a little extra vanilla?
I’m going to walk you through one way to customize a Storyline drag and drop interaction.
So, buckle up, put your creative gloves on, and let’s get started.
Prepare Your Ingredients
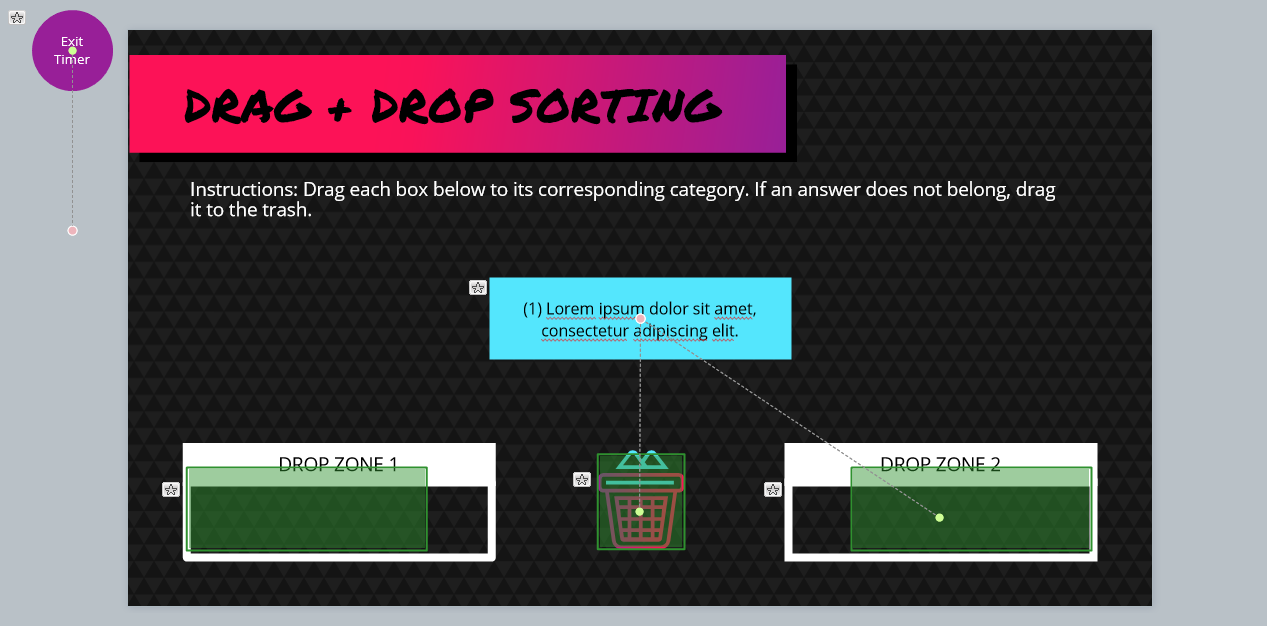
Gather all your ingredients (create all the components) that you will need for your drag and drop, including a correct feedback layer. Make sure you label all your objects for ease of customization. I cheated and downloaded a rockin’ template from the eLearning Brothers Asset Library.
If your drop objects are too close to each other, you’ll need to create hotspots for the drop zones. Then comes the fun part—adding the triggers to make it function the way you want. Adding triggers is like putting all the ingredients for a cake together and ending up with something amazingly delicious.
You can have all the drag objects displayed on the screen in the beginning or you can have them show one at a time. For this interaction, we’re going to go the extra step and have each drag object appear one at a time.
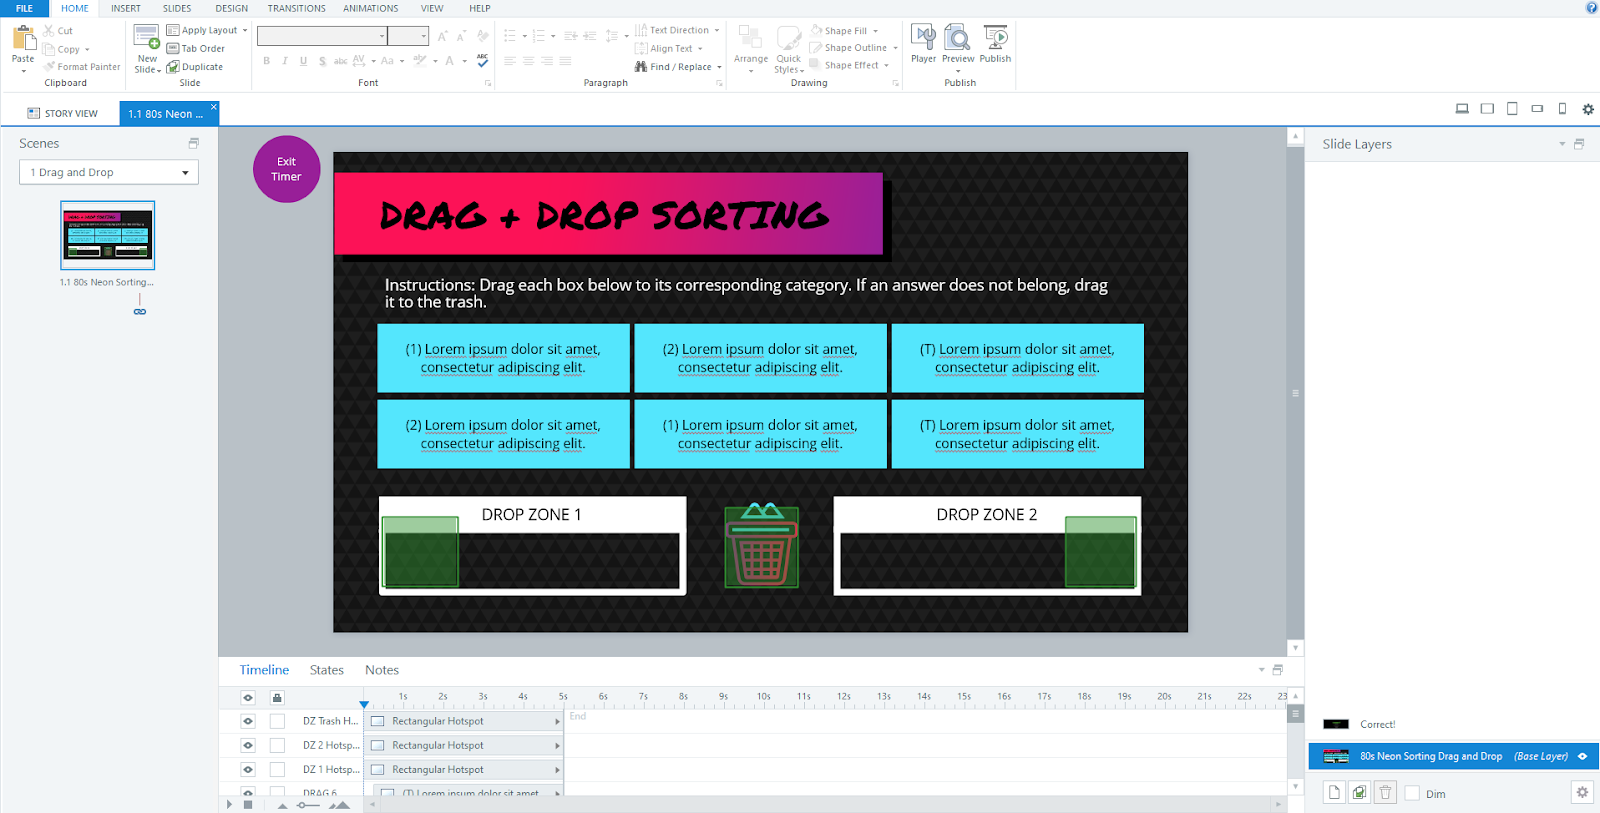
I like to add all the states to the interaction’s objects before I start adding functionality. It makes setting the triggers simpler.
For the drag ingredients, I usually have a hover and an incorrect state, but you can always add more. The incorrect state that I apply changes the object red, and I also have a state change for the drop zone when the dragger has been dropped correctly—typically green.
Extra Sprinkles
One extra enhancement I like to do is add a fade-in animation to the drag objects so when the current dragger is dropped correctly, the drag object that follows comes in nicely instead of suddenly appearing which can cause the user to question whether or not they got the first one correct.
You’ll need an object to act as a timer for the state changes of the drop zones and draggers. We’re using a circle on a motion path as our timer in this interaction. It’s called “Exit Timer.” Place this off to the side of the staging area and make sure the motion path does not move into view—you don’t want this to be seen when a student is using the interaction.
Add a Splash of Extra Vanilla (Motion Paths)
Choose which drag object that you want to have displayed first; that’s the one we’re going to add functionality to first. Place the dragger where you want it, then add a motion path (don’t forget to label the motion path!) for it to return to its original spot when dropped incorrectly. Place the green dot of the motion path on the incorrect drop and the red dot on the initial placement of the drag object.
Remember that we have three drop zones in this template and make sure you add two motion paths per dragger for the two incorrect drop zones.
Time to Mix the Ingredients (Add Triggers)
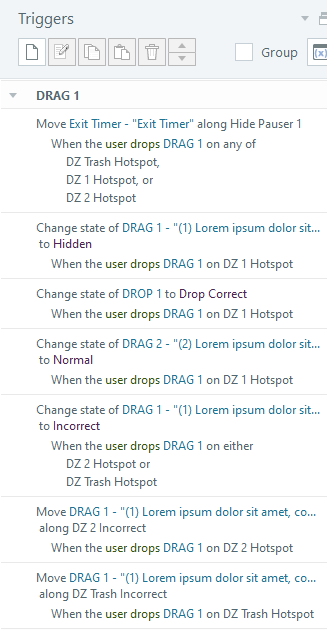
We want to add triggers to activate the motion path on incorrect drops and state changes. I like to start with setting triggers for the “Exit Timer” because this object applies to all the drop zones. You’ll need to create two triggers for the “Exit Timer” for each drag item that you have, but I like to do all the triggers for each dragger one at a time.
- The first trigger you want to create is to Move “Exit Timer” along its motion path when the user drops DRAG 1 on any of the Drop Zones.
- The second trigger is to change DRAG 1 to Normal when “Exit Timer” motion path animation completes if the state of DRAG 1 = Incorrect.
- Another trigger that will need to be added is to change the state of the drop zones by changing the state of DROP 1 to Normal when “Exit Timer” motion path animation completes. You’ll want to create this trigger for each drop zone (i.e. DROP 1, DROP 2, Trash) which can all be done at this moment in time.
For each dragger, you will add the same following triggers; however, you can duplicate the triggers for each drag item after you have created all of them for one dragger. Let’s start with what happens when the drag object is dropped correctly.
- You want DRAG 1 to become Hidden when the user drops DRAG 1 onto the correct drop zone—in this case, it’s DZ 1 Hotspot.
- You also want to change the state of DROP 1 to Drop Correct when DRAG 1 is dropped on DZ 1 Hotspot, and you want the next dragger, DRAG 2, to change to Normal when DRAG 1 is dropped on the correct drop zone.
- Obviously, the last drag object will not have another dragger following it, so you won’t need that last trigger on the last drag item, instead, you will need it to be Show layer Correct! when DRAG 6 is dropped on the correct drop zone.
Now, for what happens when the dragger is dropped on the incorrect drop spots.
- You want the state of DRAG 1 to change to Incorrect, or what you assigned for the incorrect state, when it’s dropped on either of the two incorrect drop zones (DZ 2 Hotpot or DZ Trash Hotspot).
- You also want DRAG 1 to Move along the Motion Path that is assigned to each incorrect drop zones (i.e. Move along DZ 2 Incorrect when dropped on DZ 2 Hotspot).

Repeat for each drag object.
Tip: You can use the Animation Painter to duplicate the motion paths for each drag object. Be careful when doing so because not all the draggers have the same incorrect motion paths.
This is just one of many ways you can customize a Storyline drag and drop interaction to add extra sprinkles to your eLearning recipe.
If you are more into cake mixes than baking from scratch, the simplest and most efficient way to have a customized drag and drop—or any interaction—is to use the rapid eLearning templates provided in the eLearning Brothers Asset Library!
Log into your account now or sign up for a 7-day free trial to access all the interactions, layouts, stock assets, and more in the eLearning Brothers Asset Library.