[ e x p l o s I o n ] The Case for Video Captions & How to Create Them
The Case for Captions
If content is king, then video is the supreme, not-going-away-anytime-soon, dictator. Don’t take my word for it—a 2017 Cisco study predicts video will constitute 80% of all web traffic by 2019.¹ But despite video’s overwhelming popularity, the majority of producers and marketers continue to neglect a major facet of video: captions. Research shows that there is a correlation between captioned video and success for its producers. In other words, if you’re not providing captions for your videos, you’re missing out on more views, improved search engine optimization, and the maximum potential return on your investment.
One might tend to regard accessibility as the the sole purpose of video captions, and traditionally that’s been the case. It’s certainly a worthy cause — approximately 466 million people worldwide are affected by mild to severe hearing loss.² The Americans with Disabilities Act did much to guarantee the civil rights of millions but, since it was ratified in 1990, the ADA’s reach is largely limited to the physical realm. It wasn’t until a 2010 lawsuit brought against Netflix by the National Association of the Deaf that aspects of the ADA actually became applicable to online businesses. Even today, however, requirements for captioning remain relatively non-existent.
This lack of federal mandate for captioned video means that many companies don’t even think about using captions in their online media. At present, streaming video is ubiquitous among the most popular social platforms, including Facebook, Instagram, and LinkedIn. Just to give you some idea of the impact of these platforms, social media advertising represents a $67 billion industry growing steadily by approximately 28% each year.³

While captions have been estimated to increase viewership by upwards of 40%, it’s a minor mystery why producers continue to forgo the relatively simple and inexpensive task of reinforcing dialogue with on-screen text.⁴ According to Facebook’s own data, 41% of the videos uploaded to its platform are essentially useless without sound, and most users have videos muted when scrolling through feeds on mobile.⁵
Both YouTube and Facebook offer auto-captioning that uploaders can toggle on or off. It’s a step in the right direction, but unfortunately this functionality offers only 60–70% accuracy.⁶ As it stands, auto-transcription remains a less-than-accurate solution that occasionally yields hilarious results. Manual captioning will be a thing of the past sooner rather than later. In the meantime, producers can utilize some free tools to make their videos accessible to wider audiences.

Options for Captioning
Video producers with deeper pockets can quickly and easily reap the benefits of captioning by contracting a third party. Services such as Rev.com and GoTranscipt take the legwork out of the transcription process while providing a reliable solution. These are just two examples of professional transcription resources; interested producers are encouraged to explore more options.
For the rest of us, there are a variety of avenues for creating industry-standard closed captions (as opposed to open captions which can’t be toggled on or off by the viewer). Most exist within various post-production software. However, a number of free, web-based utilities allow manual transcription regardless of your editing software or intended destination, whether it be YouTube, Vimeo, or Facebook.
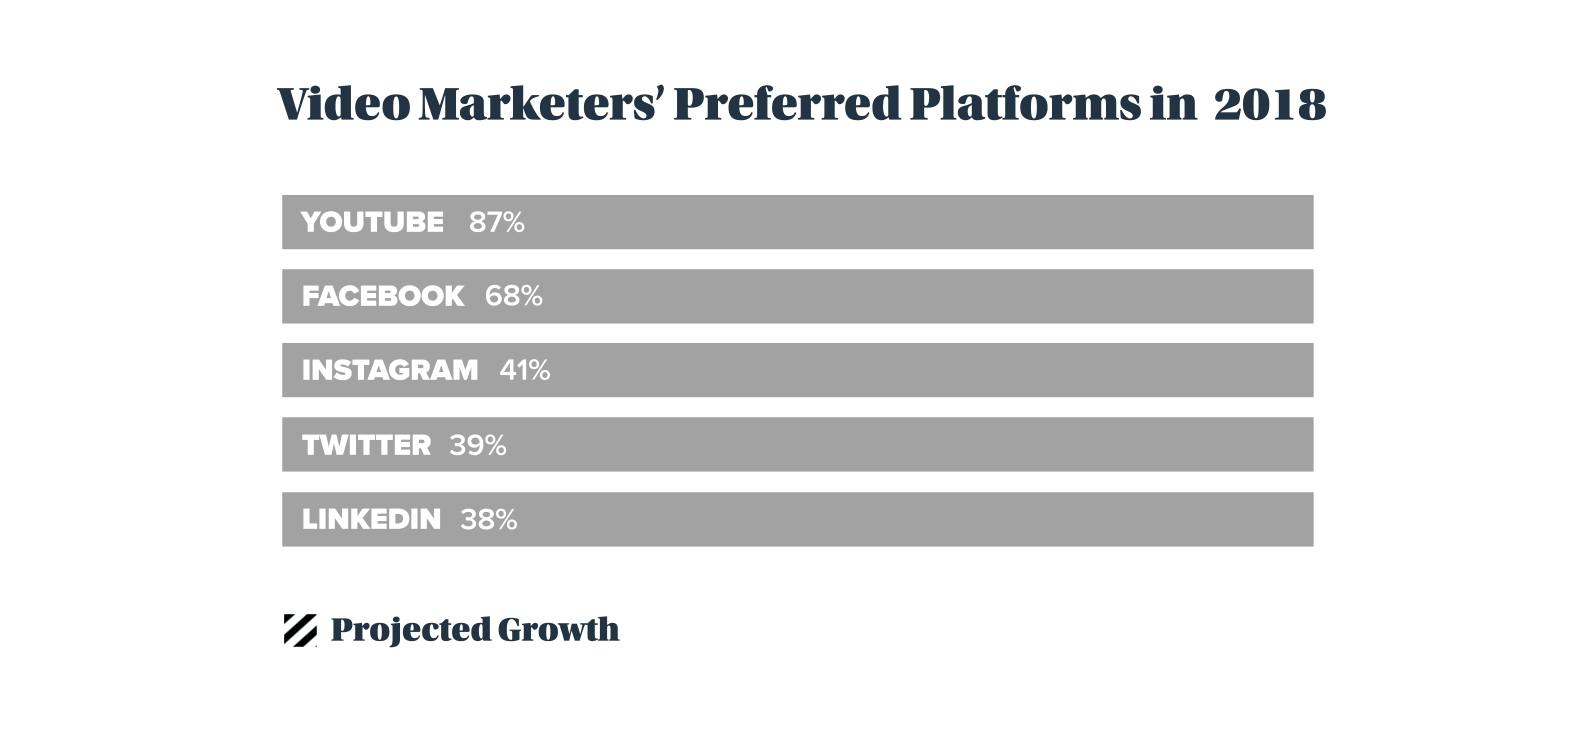
Unfortunately, if you’re looking to post video captions to Linkedin—currently it’s the fastest growing video marketing platform⁷—the process requires an additional step. Because LinkedIn only launched its native video uploader in the early half of 2018, presumably a more robust solution is on the horizon.
Video captions come in a variety of formats, so a bit of over-simplification is required here: When captioning a video, you’re creating what’s essentially a small text document, separate from the video file itself, called a SubRip (.SRT) file. Sometimes it’s called a sidecar file, since the caption data is independent from the video. YouTube, Vimeo, and Facebook all accept SRT.
For LinkedIn, at least right now, you’ll have to take this one step further by importing the SRT back into your video editing software for an open caption-type of solution. This is also called the burn-in option, meaning the captions are actually part of the video itself.
But back to creating that .SRT file to begin with: Closed Caption Creator is a web-based captioning tool that’s free to use. Its developers release updates with added functionality on a regular basis, and they’ve included some handy tutorial videos to help you get started. Alternatively, the steps below outline the basics of transcribing for YouTube, Vimeo, and Facebook. Note that you can also create multiple versions of a caption file to support additional languages.
Advances in voice recognition technology and artificial intelligence mean the days of manually transcribing your videos are numbered. Until then, it’s worth the extra effort for video producers and marketers to spend the time (or money) to provide captions. Not only does this additional undertaking serve millions of deaf and hard-of-hearing individuals, for advertisers it’s an asset in an increasingly saturated and competitive marketplace.
The Free Caption Creator
Closed Caption Creator, a free web-based tool, makes it easy to transcribe and caption your videos, whether they’re on Vimeo, YouTube, or Facebook. See below for a detailed tutorial.

How to Create Closed Captions
Start a new project from the file menu and enter your project’s title and framerate. If you’re not sure of your video’s framerate, open it in Quicktime and select “Show movie inspector” from the “Window” drop-down menu (⌘I on Mac).
You can either upload a file or import an existing video from YouTube, Vimeo, or Facebook. CC Creator supports a number of formats, notably MP4. Click the “Create” button to get started.
Let’s not sugar-coat this: transcribing a video can be a tedious process. Since there’s no auto-save functionality, it’s a good idea to save early and often to prevent losing any progress.

Up next, you can start transcribing, setting “incodes” and “outcodes, or timestamps in the format 00:00:00:00 (Hours:Minutes:Seconds:Frames) for each section of text. One of the toughest aspects of transcribing dialogue is with timing, finding a reasonable words per minute (WPM), in particular. According to the BBC, the general rule of thumb is to aim for 180 WPM.⁸ This can be especially challenging if you’re transcribing the words of a fast-talker, such as a radio ad announcer or auctioneer. If this is your case, I’m sorry and good luck.

Once you’ve completed transcribing, export your captions from the File menu. From the format dropdown, select “SRT” and click “Export” to download the file to your hard drive. This is also a good opportunity to go ahead and save that CC Creator project itself if you haven’t already done so. This last step will allow you to easily make future changes and edits.
From there, it’s easy to upload that SRT file to Vimeo, YouTube, and Facebook.
Vimeo

From the settings page of your video, click on Advanced from the left-hand menu.
Under Upload Captions & Subtitles, select Choose file to upload the SRT file from your hard drive.

Check the Status box to ON. Select the caption language, and choose Captions from the Type menu. Be sure to Save your changes from the bottom of the page.
YouTube

Access the Subtitles/CC tab from the settings page of your video.
Select Add new subtitles or CC and then choose the appropriate language. Click Upload a file to upload the SRT file from your hard drive. Be sure to choose Subtitles file before uploading. Click Publish to save changes to your video.
Access the Subtitles & Captions settings from the Edit Video page.

Select a language from the dropdown menu. Click Upload to upload the SRT file from your hard drive. Click Save.


References
- https://www.cisco.com/c/en/us/solutions/collateral/service-provider/visual-networking-index-vni/complete-white-paper-c11-481360.html
- http://www.who.int/news-room/fact-sheets/detail/deafness-and-hearing-loss
- https://www.statista.com/outlook/220/100/social-media-advertising/worldwide
- https://cielo24.com/2016/12/7-benefits-of-captioning-videos-for-media-and-enterprise/
- https://www.facebook.com/business/news/updated-features-for-video-ads
- http://www.d.umn.edu/itss/classroom/captioning/youtube_autocap.html
- http://www.lemonlight.com/blog/60-video-marketing-stats-2018/
- https://www.bbc.co.uk/rd/blog/2015-09-how-fast-should-subtitles-be


