


I’ve been making explainer videos for over five years on YouTube. I have used Adobe Captivate Video Demo and I’ve also used Adobe Presenter Video Express. This article is my attempt to show the pros and cons of each tool and talk a little about what I might be using in the future.
Adobe Captivate
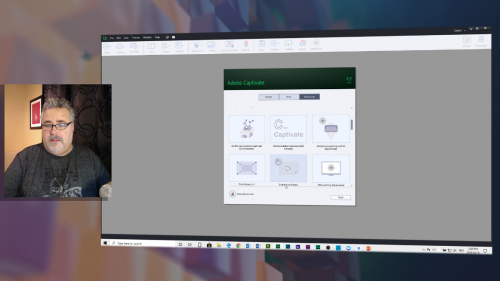
The first tool I used to make my explainer videos was the Video Demo feature in Adobe Captivate. Captivate is a great tool to rapidly record on-screen tutorials if you need to get a short tutorial out with limited time. Video Demo lets you record and not have to think about the decisions you can make later. The resulting Video Demo can be spliced to keep just what you need in your video. You can also zoom in and out and add some of the noninteractive objects that you can typically add to regular Adobe Captivate projects. In my earliest YouTube videos, I would splice the footage between the introduction and the tutorial itself and then add a full-size image of the video thumbnail and attach theme music to create my branding. It worked well and was easy to do. Because I was using Adobe Captivate to record Adobe Captivate it could be cumbersome to manage which instance was recording and which instance was for demonstrating. This is likely a problem unique to me, however.
Adobe Presenter Video Express
About three years ago I was introduced to Adobe Presenter Video Express. It slowly took over as my recording tool for my YouTube videos. The advantage it offers is that it’s a simple interface that does a small number of things quite well. It simultaneously records your webcam and your desktop screen, and once the recording is completed, you can edit the resulting video using nondestructive processes. At the simple click of one of three icons, you can switch the view between webcam, desktop or a stylized mixture of both.
It has a beautiful series of interfaces for adding markup tools for the desktop recording and branding for your videos as well. Its simplicity reminds me of an iOS app in that it does a small handful of things well. There is little you can customize, but that keeps the complexity of the tool to a minimum. The disadvantage of Adobe Presenter Video Express is that it doesn’t record system audio and the webcam recording is only at 15 frames per second. While you can get away with lower frame rates for your desktop recording, your webcam shows the quality loss of the lower frame rate. While most of my tutorials don’t require system audio, about once or twice a year I need to capture system audio. At those times I need to consider another way to record those videos.
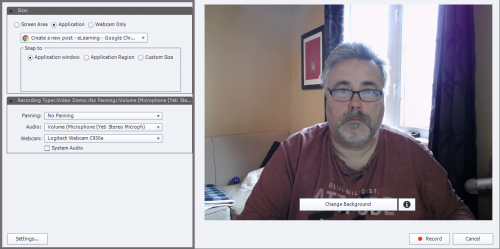
Fast forward to the release of Adobe Captivate 2019 where Adobe introduced webcam recording in Video Demo. I thought this would allow me to return to Adobe Captivate Video Demo and still enjoy the simple and easy interface of Presenter Video Express. Unfortunately, the quality of the webcam recording is just not enough of an improvement. When you enlarge your webcam view to full screen, you realize that the webcam is even poorer quality than Presenter Video Express. I do like that Captivate allows me to add noninteractive objects to my videos and gives me the ability to edit the audio and record system audio, but since the release of Captivate 2019, I’ve continued to use Presenter Video Express.
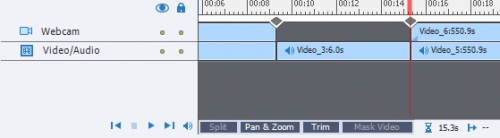
The 15 frames per second webcam recording has always been an issue for me, regardless of which tool. Adobe has consistently stated that the reason for the lower frame rate is because of the strain on system resources of recording two things at once. Recently I decided to test this out using other software. In my last couple of YouTube videos, the tool I’ve used in Adobe Captivate Video Demo to record my desktop, while I used the standard Windows 10 Camera app to record my webcam. I end up with two videos, one of me and one of my desktop. I then import these into Adobe Premiere Pro CC and complete my editing there. Premiere Pro allows me to easily synchronize the two videos so I can have a single audio track that is persistent throughout the entire video, but I can splice the two videos back and forth. I lose the stylized webcam/desktop view that is so nice in Presenter Video Express; however, the full HD resolution video at 30 frames per second is worth it.
I suspect that Adobe Presenter Video Express will disappear at some point as more of its features end up in Adobe Captivate. I’m okay with that as my primary tool continues to be Captivate. I guess the advantage is that it’s forced me to learn Premiere Pro. I know it well enough to keep making my videos. If you would like to see what I’ve been capable of doing with Adobe software, check out my latest videos on my YouTube channel at https://YouTube.com/PaulWilsonLearning.
I wish Adobe Presenter Video Express was still an incentive.
Camtasia is a good program; and if you’re in education, you can typically find a nicely discounted price on it at AcademicSuperstore.com
You know what I haven’t. When you get Adobe Software for free, is hard to swallow $300. That said, having it might save me time each month with all the videos I do. It certainly would be a justified business expense. Thanks for the suggestion.
Hi Paul, have you tried Camtasia software. What’s your opinion?
You must be logged in to post a comment.


