Analyzing The Process Of Producing App Tutorials
Consider that what is required to create quality video tutorials relies on three key parts much like a three-legged stool. The first article in this series, Update To Creating a Quality eLearning Home Office Studio, covered the hardware and working environment. The second article, Recording Professional App Training Videos, demonstrated using software tools to record screens and voiceovers.
This last installment, the third leg of the stool, is the most challenging and the most important. With careful planning and a consideration for design, you can optimize the execution of a video making project. Lack of planning can result in re-recording, poor quality, disjointed flow, and lots of wasted man-hours. I would venture to say that LinkedIn Learning (Lynda.com) spends an unusual effort in planning. This ensures that the actual act of recording and production is effortless. Competing, lower-cost education video training providers haven't figured that out. Yet.
Preparation For Recording
There are 4 planning steps that can help any video project:

- Brief
This simple document is the heart of the project. If you are familiar with Simon Sinek’s brilliant Start with Why, this is the document that should explain the benefits, target audience, passion, and goal of the project. Without this stated focus, prepare to struggle with completing your work on any timeline. I’m serious. And if you are entertaining outside funding for your work, you’ll need this document. - Script
Few of us take the effort of scripting seriously. Most of us prefer to "wing it". Because I move the sequence of video parts, I’d be lost without a killer outliner app. The outline holds each topic's voiceover script. PC (Windows) users are going to not like this, but I swear on using OmniOutliner on the Mac or iPad. Especially for closed captioning, you’ll need to simplify sentence structure. Use the Hemingway desktop app to help your script hover no higher than an eighth-grade reading comprehension level. - Storyboard
Although this is optional, visually-intensive recordings (like PowerPoint) may use a series of sketches showing transitions and artwork. The most impressive tool I’ve found is Autodesk’s Sketchbook app available on PCs, Macs, and iPads. For some odd reason, this fabulous software is free. - Video component
Now we’re getting into something interesting. Think in terms of video shorts composed of video parts or components. Read on…
Planning For Reusable Components
Over the years, I became passionate about reusable, object-oriented programming. There are many benefits to examining the functionality of code as black boxes with published interfaces. Design it once, and reuse everywhere. Test it once, and reap the benefits of long-term quality. Ensure consistency among your projects to establish a common look. App building becomes easier by stitching together components thus removing the need to reinvent the wheel on every project.
The same approach works with video production.
I found that some parts were common between "how to" tutorials, product overviews, and even crowdfunding video shorts. In fact, some of these video snippets could be shared among all of my eLearning projects.
Examples include prologues (introduction) and epilogues (closing). Using the powerful Camtasia app (PC or Mac), you can develop a multitrack component and save it as a library item. Whenever you start a new project, drag it on the timeline, and customize it as you see fit.
Use the same approach to construct common components like lower-third animation and slide backgrounds. In producing two distinct crowdfunding projects, many parts of both videos can be stitched together as a sequence of components:
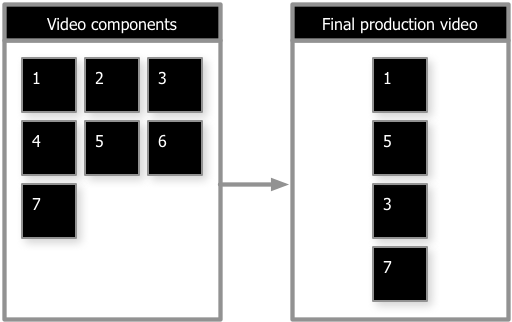
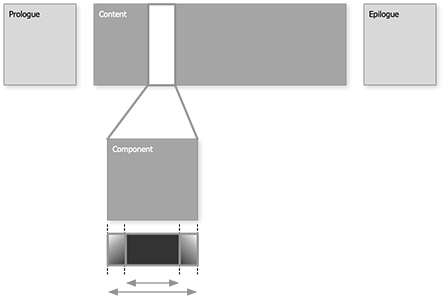
This has worked wonders for one of my apps has simplified the creation of a crowdfunding pitch, product overview, and a how-to instructional video. To vary the introduction tuned to a specific audience, I created three types of prologues (abbreviated, normal, and longish version with a countdown) for fun.
As in movies, sometimes clips abruptly switch between them and other times they fade to black. For that reason, Camtasia makes it easy to add transitions at the beginning and ending to any video clip. By splitting tracks and adding fade in and fade out markers, each component has two variations: one with fades and one without:
Feature-rich Camtasia makes professional video production possible for us novices. For example, transitions, animations, and closed-captioning is a breeze with Camtasia.
It is good practice to ensure that you don’t discourage any potential customers by embedding closed-captioning. Designing for flexibility in the planning phase of your work gives you a lot of options.
Personalization: The Human Connection
In marketing and especially crowdfunding videos, rule #1 is to establish a rapport with your viewers. There’s a reason LinkedIn Learning films the course instructor talking directly to you at the beginning of a training video. That human connection is absolutely necessary!
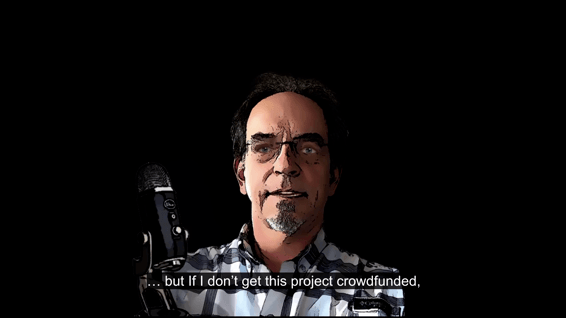
I invested in a green screen and high-quality webcam just for that reason until I realized a better, if not riskier, technique. With the assistance of AI and software gaming rendering technology, it is now possible to create realistic live recordings using facial animation. Being used by a Chinese state-run news agency, I decided to try it out with an absolutely amazing tool called CrazyTalk from Reallusion.
With a frontal photograph and some clever facial animation configuration, a personalized voiceover can be rendered in a very lifelike way.
In recording PowerPoints, or demonstrating how an app runs, I struggled with what I call the "bobblehead syndrome". I know that sounds rather funny, but my audio recording quality suffered as my eyes darted between the screen and the mic. I asked the noted eLearning video recording expert, Chris Mattia, about the problem. His suggestion was to record the audio separately. That seemed illogical, but I tried it anyway. Surprisingly, it was actually easier! Practice the voiceover script and record the script as a voiceover using the PromptSmart app on your iPad. Then record the screen (app or PowerPoint) similar to the pace of your voiceover. Camtasia makes it easy to align the voiceover with the screen recording.
Organizing The Assets To Your Process
It can be easy to forget where your file assets (sounds, videos, components, graphics, and recordings) are located on your computer. It is also very frustrating to look at computer files and not have a clue how they were created. For example, which computer did you record the PowerPoint on? What display resolution was used during the recording?
Often, file assets are exported from one procedure and used in another step of the process. Keeping all of this straight is no fun at all. The best approach I've found is to use a numbered folder system that mimics the steps you use. This folder hierarchy represents the sequence of steps I use:

If a screen capture is used as a still in the video, you should include the source in the file name: App Main Screen Capture (144ppi, MBPR13-MOS1014).png. This means that the app's screen capture was taken on a Retina (144 pixels per inch) display and not on an external 720p display monitor. The computer was a MacBook Pro 13 and its operating system was macOS 10.14). You get the idea.
There’s one more thing!
Don’t forget to take version backups of your project work. We’ve all suffered when key files were accidentally overwritten or corrupted.
I do hope this article helps you organize and plan your next recording project.
