
6 min reading time
ADDIE: 5 Steps To Effective Training

The Addie model is an instructional design methodology used to help organize and streamline the production of your course content. Developed in the 1970’s, ADDIE is still the most commonly used model for instructional design. Why? – It’s simple and effective! In this post, we take a look at the various stages involved and also how you can begin using ADDIE today.
Contents:
Addie Explained
Addie is an acronym for the five stages of a development process: Analysis, Design, Development, Implementation, and Evaluation. The ADDIE model relies on each stage being done in the given order but with a focus on reflection and iteration. The model gives you a streamlined, focused approach that provides feedback for continuous improvement. 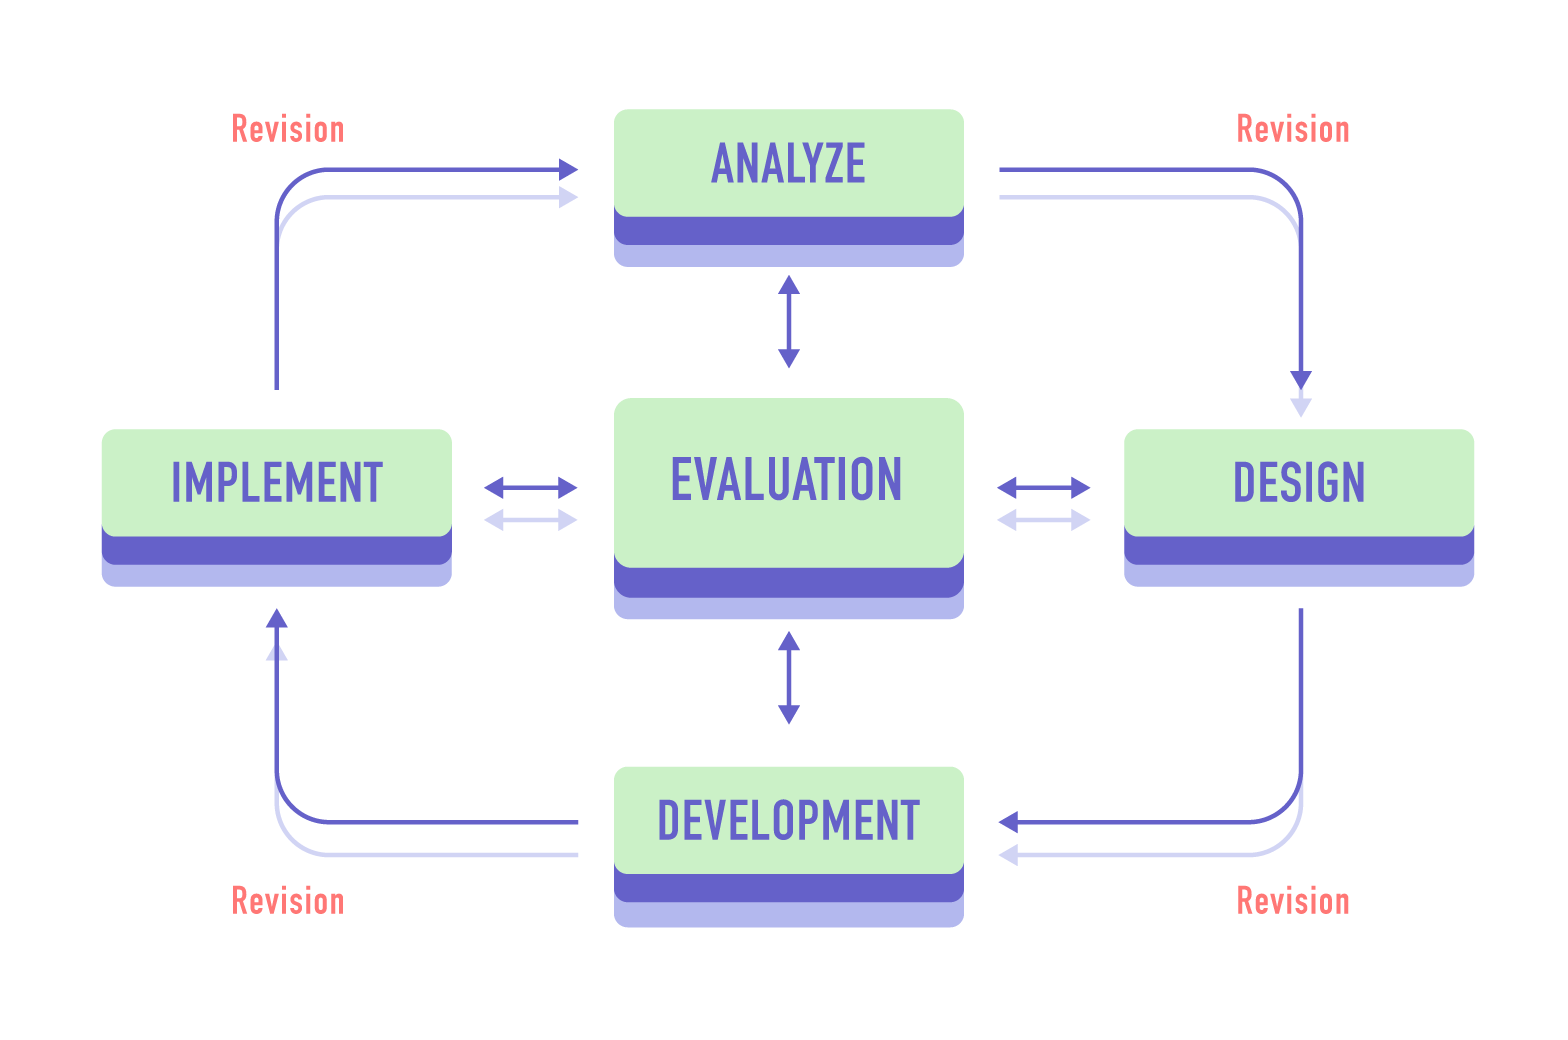
The 5 Steps of The Addie Process
Step 1: Analysis
Before you start developing any content or training strategies, you should analyze the current situation in terms of training, knowledge gaps etc. Start with a series of questions to understand the current situation and to also understand what is the goal of the training itself. This influences a huge amount of decisions later in the process.
One very common question is: What is the point of the training? Why are we doing it? What type of behavioral change is desired? Will training actually help? This phase should be a full audit of the audience, business goals, training methodologies used, media types used, etc. Once this is done, you can generate a training plan that addresses:
Who, What, When, Where, Why, How?
The core of your training plan will be “How can we improve the situation and achieve business goals through training?”. You will use this question as the foundation for the rest of the process. You should come out with: an analysis of training needs and a training plan
Step 2: Design
With your training plan done, you then get to the design phase – this is where you take all of the learnings of the previous phase and use it to make practical decisions. This includes a strategy, delivery methods, structure, duration, assessment, and feedback. The next step is to storyboard your ideas and/or create a prototype. You are creating a blueprint for your courses, and by making a prototype you can quickly communicate with other stakeholders the value of the training.
An initial testing phase of the prototype is always a good idea, this is a sanity check that is carried out prior to moving too far forward.
You should come out with: an overview of the course design and storyboards/prototypes.
Step 3: Development
At this stage, you can begin to create the courses. You will be heavily guided by the prototype/storyboards at this point. Each element of the course should be developed to match the design phase. The core of the content has already been decided. All you need to add is a level of detail and polish to the courses.
This is done by adding graphics, choosing colors and deciding on fonts. To some, this may seem trivial, but it has a huge bearing on how engaging the course content is.
The careful selection of these elements allows you to present the course in a manner that will appeal to the audience (which may become apparent with an analysis of the audience in the first phase). The development process should be iterative. Once you have created a course you should test it to ensure there are no basic errors – grammar, spelling, syntax etc. Testing should also look at the mechanics of the course. A key consideration at this stage is navigation.
The vast majority of problems that learners encounter are related to how the course was built in the authoring tool. The frustrating thing is that it can often be something very simple that the instructional designer misses because they did not test the course.
Testing the course is not flicking through it – it is a systematic check on the accuracy of the content and the utility of the navigation. Can a learner progress in the way I designed? – even if they make unexpected decisions. Building upon that should be a check on the flow of the content. Is it engaging, how is the length etc?
You should come out with: Course Content
Step 4: Implementation
Once you have completed your courses and you are satisfied that they are fully tested, it’s time to share them with the learner. The decisions made in the design phase will influence how this is actually carried out. In the majority of cases, the courses are uploaded to an LMS and the delivery options are set up – who are enrolled, how much time are they given, pass marks for assessments, and the collection of feedback. The delivery, tracking, and reporting are all handled by the LMS.
The instructional designer should monitor the situation for any teething issues. One of the best was to prevent against any problems in the implementation phase is to conduct a pilot of a course before unleashing the content on the entire group.
You should come out with: Your courses are live in the LMS and learners can start to take and complete courses
Step 5: Evaluation
ADDIE’s main goal is to provide a structured method of creating training programs. It is also, however, a powerful model for improving the way in which future iterations are created. Getting feedback on every aspect of the courses is really important so that you can improve and revise the content. What to focus on:
- Did we meet the goals as set out in the analysis phase?
- Take feedback and place back into the analysis phase.
- Identify other training requirements.
- Possible change in media types or approach.
A great way to get feedback is to ask learners to complete surveys at the end of their course. This can be done within the course (using your authoring tool) or as by the LMS. Create survey questions specific to the points above but, also encourage learners to give feedback in a free text box so that you are aware of any gaps you may not have thought of.
You should come out with: An evaluation report and actionable changes for the current or future courses
Other versions?
Many of our customers use ADDIE as the core of their course creation strategy. If you are new to ADDIE and feel that it is lacking in particular areas you should be aware that there are many iterations on the structure – PADDIE adds in a planning phase and PADDIE+M adds a maintenance stage.
How to implement the ADDIE Model today?
Trello
One of the best ways to manage the ADDIE model is a software tool like Trello. This provides you with a structured method for tracking the movement between the stages and it’s also a great way to document any developments or takeaways from each stage.
This is particularly important if there are multiple instructional designers working on a project. Alternatively, you can use a good old-fashioned whiteboard and post-it combination! Here is an example of a kanban board set up for ADDIE that you can copy into your own Trello account.
Storyboarding
When you get to the storyboarding stage I recommend using a powerpoint template – it’s a great way to create storyboards quickly and easily and it also can be imported into your authoring tool once the storyboards have been approved.
LMS
With a learning management system (LMS), like LearnUpon, you can easily upload (or create) course content and deliver training to your learners. You can make use of powerful features like reporting to evaluate uptake, completion, and performance. It will allow you manage enrollments and to set up due dates to adhere to the training plan and schedule.
As mentioned previously, you can also create surveys to get feedback from learners during the course or as a follow-up. All of this information will feed back into the analysis phase again so you can continuously improve and get the best results from your training.
Simplify Your Training Delivery Today
Train your employees, partners, and customers with LearnUpon. The powerful learning management system that has the features and a knowledgeable team you need to achieve training success. Get your free trial and demo today!