One of the features of Adobe applications for rapid e-learning content development is their facility to import audio metadata (commonly known as markers) into the authoring environment. I received a query from a Krishna, a subscriber to the E-Learning Curve Blog who asked:
How do you insert markers and how do you synchronize with captivate slides?
So over the next few days I'm going to outline the process of using markers in audio files, and how these markers can be used to simplify the process of synchronizing audio narration with visual content in presentations created not only in Captivate, but also in Presenter too.
Now read on...
In this post, I am going to focus on using audio markers in Sony Sound Forge, a professional sound-editing program or non-linear editor (NLE).  The Sound Forge audio editing suite is the most powerful in a range of audio editing programs owned by Sony and originally developed by Sonic Foundry. I have been using Sound Forge in one form or another since the late 1990’s and in my view, it is the most flexible and adaptable tool in the audio editing market space (see Figure 1). Sound Forge includes a diverse and powerful set of digital audio signal processing tools, as well as many effects for manipulating audio.
Many e-learning professionals use other NLEs (including the open source program Audacity) to create and produce their audio. I would recommend any of the tools I mention in this article as acceptable for audio content creation.
Figure 1. Sound Forge waveform editor UI (click to enlarge)
Sound Forge software allows you to edit, record, encode, and master nearly all forms of digital audio including WAV, AIFF, and MP3. According to the Sound Forge website, the application has tools for:
- Sound Design and Mastering
- Stereo and Multichannel Recording
- Audio Editing and Workflow
- Powerful Effects Processing
- Audio-for-Video
- Dolby Digital AC-3 export
I'm not going to discuss the fundamentals of audio editing here, but we can say that to a great extent, audio editors are like 'word processors for sound.' All the good ones, including Steinberg WaveLab, Audacity and Adobe Audition employ the same user paradigm, and as a result the features of one are pretty much replicated in all the others.
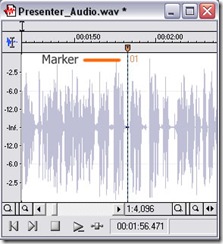
In audio editing, the purpose of a marker is to highlight a specific moment or event on the timeline so that you can return to it later. You may want to highlight a extraneous noise like a cough or click for deletion, or mark two points in a selection to copy or remove it. In audio narration, markers are typically used to set the transition between two sentences, slides or onscreen event (see Figure 2).
Figure 2. Sound Forge marker (click to enlarge)
Using Sound Forge
Some basics…
Opening a File
Sound Forge can edit WAV, MP3, AIFF and a range of other file types. To open a file, just click FILE-> OPEN. The file will open in either mono or stereo, depending on the specific file format.
Controlling Playback
Open a sound file. Use all of the buttons highlighted in Figure 1 (don’t forget to zoom in and out).
Selecting Sounds
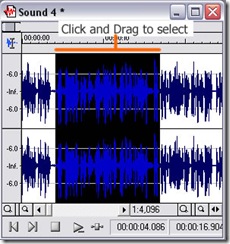
Its easy to select a particular sound area. Just click and drag over it. If selecting a stereo sound, drag between the left and right channel to get them both (see Figure 3).
Figure 3. Click and drag to select audio - stereo instance (click to enlarge)
You Try:
- Practice selecting areas of the wave.
- Adjust the selection by dragging at the point where the selection ends.
- Play the selection.
- Copy and paste the selection to the end of the sound
- Delete sections by selecting them and hitting delete on your keyboard.
You can also select in smaller segments (right down to the single bit level) by holding SHIFT on your keyboard and using the LEFT or RIGHT arrow keys. The more you zoom in to the waveform, the higher the level of precision you can achieve.
Markers
Markers enable you to choose edit points and to help you to accurately events in the waveform timeline. To add a marker:
- Click a point in the waveform.
- Select SPECIAL >> INSERT MARKER from the menu, or press the M key
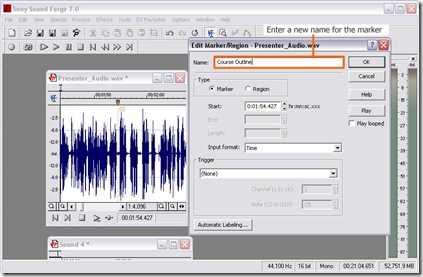
If you have many markers in your audio file, it's useful to name them. It’s typical for audio narration for e-learning presentations to have many slides or events, and by extension quite a number of markers. I suggest that you name the markers for the slide or event that the following narration describes. To name a marker, right-click its handle and select EDIT... (see Figure 4). Enter some appropriate text in the dialog box - here, I have called the marker "Course Outline."
Figure 4. The Edit Marker dialog box (click to enlarge)
Marker Navigation
You can automatically navigate from marker to marker by pressing CTRL + LEFT ARROW to go back, or CTRL + RIGHT ARROW to move forward through the timeline.You can select the waveform between markers by pressing SHIFT + CTRL + LEFT / RIGHT arrow.
You Try:
Using your sound editor of choice, try out the activities described in today’s blog post. Click the link to download a fully functional 30-day trial version of Sound Forge.
Saving Markers
Markers are automatically included when you save your audio file. Some professional audio editors also enable you to save the markers as metadata in a separate file called an Edit Decision List (EDL) which is useful when you’re creating video presentations, but that as they say, is another story…
Next: Using markers with Adobe Presenter.
Soon: Using markers with Adobe Captivate.
--
Technorati Tags: Adding Markers,Adobe Captivate,Elearning,E-Learning,Audio,Narration,Content,Captivate,Adobe Presenter,Sound Forge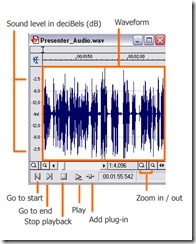




1 comment:
Thanks for the blog Michael.
Waiting for your next blog.
Post a Comment