In yesterday's post, I began discussing some advanced audio editing and rapid e-learning synchronization features of Adobe's applications Presenter and Captivate.
Now read on…
This post will cover how to integrate your audio-with-metadata files into Adobe Presenter. In my next article I will discuss using markers to generate content for Captivate - the processes are different. While the process is quite straight-forward, it's easier to show you this process in a demo than describe it in a linear fashion using text and images (after all, this is an E-learning blog, folks!).
First some background: as you probably know, Presenter enables you to publish Microsoft PowerPoint-created content in a Web friendly format. The Presenter Audio Editor supports editing voice-over narration via its functionality in PowerPoint.
As well as using an external audio program, you can perform basic audio and animation editing tasks within your PowerPoint presentation, including:
- Viewing the presentation audio, including slide and animation markers
- Playing, recording, deleting, and editing audio, including adding silence
- Inserting commands to control playback
- Adjusting volume and processing options
Using audio markers
Adobe Presenter displays a visual representation of a presentation’s audio, along with markers that represent commands for controlling playback. Audio is edited incrementally, one slide at a time.
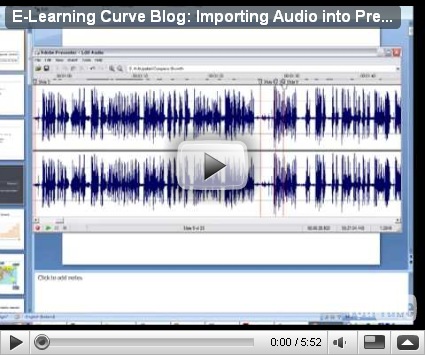
To view audio markers, open the PowerPoint presentation you want to edit. Click the Adobe Presenter menu or ribbon and click the Audio Edit button. The Audio Editor is displayed (see Figure 1).

Figure 1. The Audio Editor in Presenter(click to enlarge)
Using the Slide Navigation drop-down list, you must select a slide to edit its audio (see Figure 2).

The Audio Editor displays a visual representation of the audio file called a waveform. Markers along the top of the waveform represent commands you can use to control the timing of slide transitions, animations, and other events during playback of your content.
In Presenter, you can add four types of markers in the Audio Editor (see Table 1):
Table 1. Markers applied to the Audio Editor
| Type | Name | Marker color | Description |
| Slide | Slide (#) | Gray header with solid red line | Designates slide transitions. Each slide marker is numbered. |
| Mouse-click animation | Click (#) | Blue | Designates when a mouse-click animation will be triggered. These markers are numbered within each slide boundary. |
| Automatic animation | Auto | Faded gray | Generated when using the Automatic setting in PowerPoint presentations. |
| Command | Wait for User or Goto… | Green | Enables playback control. There are two types: 1. Wait for User: When this location is reached, playback automatically stops. The viewer must click on Play to continue the presentation. 2. Goto: When this location is reached, playback automatically jumps to the designated slide. |
Playing, recording, deleting, and editing audio
Use the playback controls in the Audio Editor to review the audio for the presentation. You can also record new audio, delete selected sections, and insert silence.
Adjusting volume and audio processing options
The Adjust Volume dialog box is used to adjust audio playback levels. Adjust Volume also enables you to undertake basic digital signal processing (DSP) options including normalization (finding the optimal audio volume) and signal boost to enhance quiet audio. The default settings should be fine if you’ve recorded your audio properly. I suggest that you experiment with these settings to understand how changes to these options affect the audio quality of your rendered presentation.
You Try:
To adjust audio volume and digital signal processing options:
- Click the Tools menu in the Audio Editor and select Volume. The Adjust Volume dialog box is displayed.
- Adjust the settings and click on OK.
- Click the File menu and select Exit.When you exit the Audio Editor, Adobe Presenter prompts you to save your changes.
- Click Yes to close the dialog box and return to PowerPoint.
Adding Audio with Marker to Adobe Presenter
Note: Even though this demo is about adding audio to a presentation, for copyright reasons there is no narration track associated with this file.
Next: Importing audio in to Captivate.
--


No comments:
Post a Comment