


How to make the second step of the Submit process more intuitive by the appearance of a Continue button and disappearance of the Submit button.
Intro
Probably the tweak asked for the most on the forums since I daily answer questions (started in 2009). “I don’t like that the learner has to press Y or click the slide to continue”. When you use CP2019 and have tried out the new VR projects, you will probably have seen that the overlay quiz slides have a slightly different Submit process! It is still in two steps, first step shows feedback but playhead remains paused as usual. But instead of the message about clicking or pressing Y a nice Continue button appears and replaces the Submit button. For sure, more friendly and intuitive than the second step in normal quiz slides. Crossing my fingers that we have the same button appearing in future versions for all quiz slides.
In this post I will try to explain how you can replicate that behavior within the present workflow.
Continue button – Step-by-step
Since the first step in the submit process cannot be used as trigger for any action – only shows feedback message or image – we need to get rid of that first step. It is possible by deleting all the feedback messages. Let us keep it simple for this workflow: only the Correct and Failure message will be used, for quiz slides with only one attempt. No Retry message, not Partial correct message, no message warning that an answer has to be chosen. The messages will be replaced by custom feedback, which can be very flexible: text, image, video, or combination of items. In this simple workflow I will use two shapes as feedback: a green start shape, and a red down arrow shape.
Step 1: change Master slide(s)
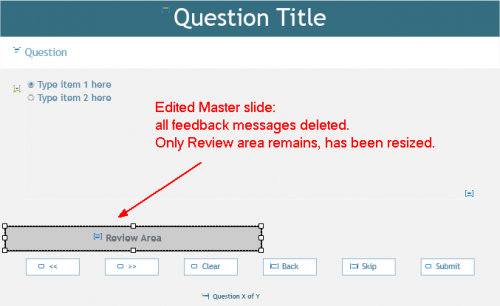
Duplicate the quizzing master slides you need, and delete all the messages. You can leave the Review area, eventually resize it. In the present Review design it is only used in case of skipping a question. If you apply this edited master slide to a quiz slide the result will be that no feedback appears, the playhead is released and the actions defined for Success and Last Attempt will be done.
Step 2: Create quiz slides, apply master slide
Create the quiz slides, either using Quiz, Question slides option with its dialog box, or by using GIFT or CSV import. Apply the edited master slide(s). You can do that by selecting all the quiz slides using same master slide in the Filmstrip and using the dropdown list in the Properties panel. That list will be filtered to show only the master slides fitting for that type of questions.

Step 3: Continue button creation
Create a Continue button with exactly the same ‘look’ as the Submit button. It needs to be a shape used as button, because the old button types are not allowed on quiz slides. However the Default Quiz button style used in Captivate’s packaged themes are Transparent buttons. This makes it impossible to use the style of the quiz buttons for that shape button. You’ll have to create it manually, based on the properties of the Submit button. It is possible to style a shape button exactly the same way as a transparent button. Create a new object style for that Continue button, may be useful in the future. You can save the Theme as a custom theme, it will include the edited master slide(s) and this new object style. Definition of that object style will prove very useful in step 4.
Do not forget the Rollover and Down state for the Continue button. Do not bother about custom states, Visited state nor custom states are available for Quiz buttons. Use the Align functionality to align and resize the new Continue button with the Submit button. Since it is a custom button it will automatically get under the Submit button (embedded objects have priority in the z-order). You see it in this screenshot, because I am in the Object State view:

You need an individual Continue button on each slide, use Copy/paste; which can be done in one action. Edit eventually the names of the buttons, although it is not really necessary since they will not be used in any action.
Step4: Timing Continue button
In the Timeline panel you see that the default pausing point of the quiz slide has not been changed: 1.5secs. The Continue button has to be timed to appear at 1.5secs, for the rest of the slide, and with a pausing point as close as possible to the slide pausing point. I choose to pause at 0.1secs from the start of its timeline:

To apply the same timing to all the Continue buttons on the quiz slides, use the hamburger menu in the Timing Properties panel, with the option ‘Apply to all items of same style’

Step 5: Feedback items
Create the feedback items on the first quiz slide. I used two shapes, for Success and Failure, and grouped them (see Timeline panel in step 4, they are set to be invisible there on the stage). You can time those items for the rest of the project, always on top. But they have to be hidden with the On Enter action on each quiz slide. Same for the score slide, and eventually content slides after the score slide.

Step 6: Actions in Quiz Properties
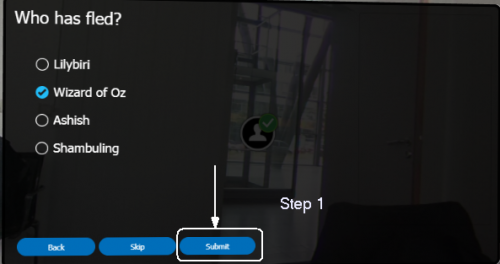
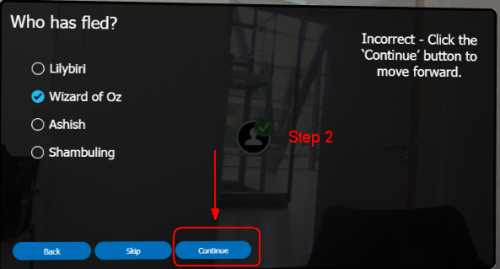
Apply these actions in the Quiz Properties panel. You see that there is no Failure message, since we deleted all the feedback messages on the master slide(s). First step of the Submit Process is skipped, so the action will be executed immediately after clicking the Submit button: in this case the correct shape will appear:

Step 7: Custom Effect for Submit button
We have to get rid of the Submit button after it has been clicked. Since it is an embedded object, that cannot be done with an action because the Submit button has no ID. It has not only to become invisible, to get the Continue button to the foreground, but really has to get off the slide. While looking for a solution (have been trying lot of scenarios) I found that a combination of two effects worked best:
- Alpha effect: to make the Submit button invisible by applying Alpha = 0 as quickly as possible after it had been clicked. But it remained active.
- Exit effect to get it off the stage, also as quickly as possible. The exact motion path is not so important.


Since those two effects have to be applied to all the Submit buttons, you can save time by creating a custom effect to apply to each button. More details about creation of a custom effect can be found in Custom Effects.
Apply that effect to the Submit button on each quiz slide.
Finished! Try it out….
Fluid Boxes
Almost same workflow can be used in Fluid Boxes projects. Of course, like I explained in the article about Images as Feedback, you may have to edit the Fluid Boxes structure depending on the type of feedback you will use. One problem will be the Continue button, it cannot be located exactly in the same location as the Submit button because stacking is not allowed even when items are not visible at the same time. You will have to cope with another position for the Continue button, but it can be added to the fluid box reserved for buttons.
Not being able to group objects is another limitation. This means that to hide the feedback items you will probably need an Advanced or Shared action to be used On Enter for the quiz slides.
You must be logged in to post a comment.


