
There are many elements that contribute to or detract from a great video and lighting is one element that can make or break it. Because cameras don’t capture light in the same way that the human eye does, it is crucial to learn how to get the best lighting for video recording.
In order to have the image on the screen appear natural your set will need a lot of lighting. But not just any lighting will do – there are specific ways to manipulate the light for optimal results and bad lighting can be very distracting. So distracting in fact that it can cause your message to get lost, or worse yet, it can make people stop watching altogether.
Whether your goal is to look great on your next Zoom call or shoot a new video, the tips and tricks we’ll share in this guide will give you all you need to improve your video lighting.
Make amazing videos with Camtasia!
Download a free trial of Camtasia to quickly and easily edit your own videos.
Make amazing videos with Camtasia!
Download a free trial of Camtasia to quickly and easily edit your own videos.
Get started free!
Step 1: Optimize the lighting in the room for a video shoot
The best shooting environment is one where you have as much control over lighting as possible.
Get rid of clutter
A clear, distraction-free space is ideal for filming. When shooting in an indoor space like an office or home, be sure to complete a thorough decluttering of the space that will be seen on camera.
Anything that takes away from the message of your video should be removed. The goal is to create a crisp clean canvas that will help to keep your audience focused and engaged. Having photos and decorative objects in the frame can easily distract your audience and reduce the effectiveness of your video, so removing them is an easy way to set your video out on the right foot.
Pro tip: Take a photo before you start moving items so that you have a reference point for putting them back properly when filming is complete.
Clean the space
Anything that is selected to remain in your filming space should be given a thorough cleaning. Dust and smudges on frames or furniture can be distracting. Even the floor should get a thorough cleaning if it will be visible on camera.
Add props
This may seem odd after the decluttering step, but hear us out. The props used should fulfill a function and not distract from the message of your video. Here are a few ideas for props and how and why they should be used as part of your set.
- Blankets and throw pillows can be used in a living room or rec room setting to add some texture or a pop of color to a solid-colored sofa or chair
- Fresh flowers are a very popular addition to a set. Arranged nicely and placed in a vase they can add color and perspective to a neutral space.
- Shelves and tables should be styled, minimally and authentically, with books, plants, lamps, and other generic items. Always be careful not to use easily recognizable books or representations of licensed characters on your set.
- Any artwork used as part of the staging should be carefully curated. Only use pieces of art and photos that you have the right to capture and distribute on film. If you’re unsure about any of the pieces in your frame, check into the usage rights, consider other backdrop options or contact the artist directly to ask for usage rights.
Be considerate of mirrors
Filming in locations with mirrors can be difficult, not only from a lighting perspective but also because it can be tricky to ensure that no reflections of equipment or crew members get captured in them.
Make amazing videos with Camtasia!
Download a free trial of Camtasia to quickly and easily edit your own videos.
Get started free!
Step 2: Choose your video lighting type
There are several options to choose from when searching for the best lighting for a video. It’s a good idea to try a few different setups and learn which one works best for you. Some will work more effectively for face lighting and others for creative or dramatic effects. The best way to learn about how to get good lighting for videos is to practice!
Key light
Description: The key light is the brightest and most powerful light for your shot. It is your main light source.
Pros: Illuminates the subject of your video
Cons: LED options can be pricey, and must be used in conjunction with a fill or backlight
Who should use it: Live Streamers, and individuals using three-point light, two lights or four lights lighting schemes
Fill light
Description: Fill lights are used to eliminate any shadows caused by the key light.
Pros: Eliminates shadows
Cons: Must be used in conjunction with a key light and/or backlight
Who should use it: Individuals using a three-point light, four-light, or loop lighting scheme
Backlight
Description: A backlight shines on the subject from behind.It can be hung from above or placed directly behind or to the side of the video’s subject.
Pros: Creates separation between the subject and the background
Cons: Must be used in conjunction with other light sources
Who should use it: Anyone filming without a ring light
Ring light
Description: A ring of light, usually LEDs, which often comes equipped with a tripod and mechanism to hold your phone or camera in its center.
Pros: Can be used alone
Cons: Can be harsh to look directly into
Who should use it: Beginners or makeup tutorial creators
Who should use it: Beginners or makeup tutorial creators
Step 3: Choose a video lighting scheme
There are many ways to set up the studio lighting for your video. Three-point lighting is a popular lighting choice for video, but two lights, four lights, and loop lighting setups can be used effectively for video lighting as well.
Each of these options creates a slightly different result, so read below to learn more about which scheme you should use to get the best lighting for your videos. While you can, of course, find great lighting for video recording outside, we will be focussing on lighting schemes for videos filmed indoors.
Three-point lighting
Description: Three-point lighting uses three lights; a key light, a fill light, and a backlight. In this video lighting setup, the key light and fill light are positioned on either side of the camera, pointing toward the subject. The backlight is positioned either above or to the side of the subject.
Pros: Separates the subject from the background and creates nice highlights around the subject
Cons: Many pieces of equipment required
Who should use it: Youtubers and Streamers or any videos with one person speaking to the camera will benefit from this video lighting scheme.
Two lights
Description: The two lights scheme for video lighting uses a key light and a fill light. With the addition of a bounce card, this scheme can be amplified. Whether it is used alongside a natural light source or with your key light pointed at it, it will help to improve the video’s face lighting. The lights should be positioned above your subject’s height for the best lighting results.
Pros: Flexibility within a filming location
Cons: Reliance on natural light can limit the filming timeframe
Who should use it: This type of video lighting is good for use with subjects who may want to get up and move around.
Four lights
Description: This is an expansion of the three-point lighting system for video and introduces a background light. The background light is positioned at waist height behind the subject, pointing at the wall or backdrop they are in front of.
Pros: Brightens the wall behind the subject, offers a more creative exploration of the use of light in video
Cons: Longer setup and teardown, more equipment required
Who should use it: Video creators looking for more creative opportunities
The Marketer’s Ultimate Guide to Video
In our FREE ebook, we’ve put together practical strategies to get out of the woods and create engaging, powerful video content on your own that reaches your audience.
Loop lighting
Description: Loop lighting, another excellent option in lighting for video recording, uses two light sources, a key light positioned next to the camera and a backlight on the other side of the camera behind the subject.
Pros: Minimal equipment required
Cons: Movement is restricted with this lighting scheme
Who should use it: Those creating professional videos
One light
Description: A video lighting system requiring only one light. A ring light is the best choice for a one-light studio lighting setup.
Pros: Minimal equipment required
Cons: Less depth is created with this scheme than with multi-light options
Who should use it: Video creators who use their cell phones for filming
Step 4: Choose your light color temperature for video shoots
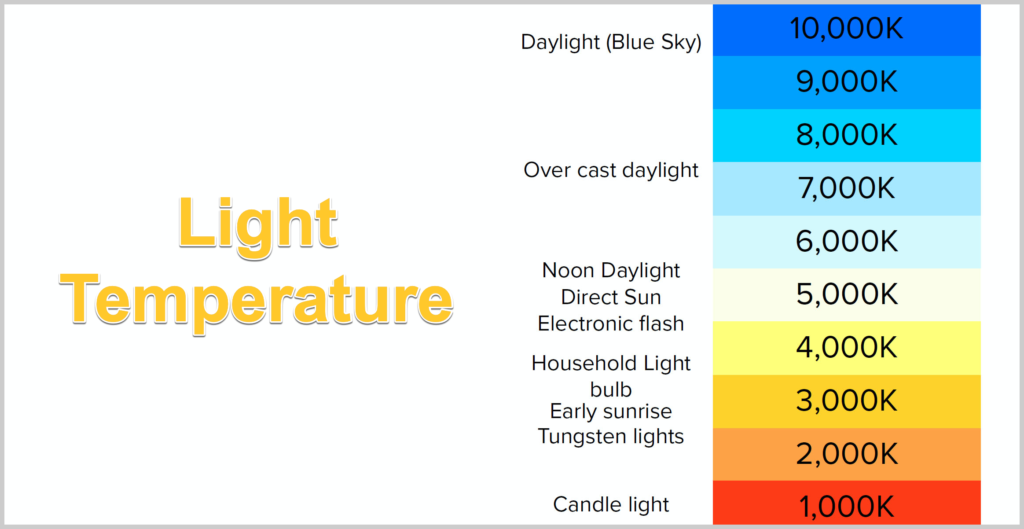
Not all lights are created equal. Based on the type of bulb, lights can appear “cooler” or “warmer” on camera. The human eye perceives this difference too.
Consider how a doctor’s office looks (cool fluorescent light) compared to a comfortable living room setting. Warmer light typically has a more yellow color, while cooler light has more white or light blue tones.
This concept is called color temperature, and can be measured on a scale of kelvin (see image below.)
As we stated earlier, it’s best not to mix lights of different color temperatures. I suggest finding daylight color bulbs, which are around 5000K.
For LED, it’s helpful to be able to adjust the color by temperature to ensure even coloration. Mixed temperatures can lead to improper color balance, which can lead to unnatural-looking footage.
Step 5: Fix glare, the enemy of video lighting
Glare on glasses can be a big issue, especially with fixtures that have harder, more direct light.
You can often fix it by raising your lights higher on their stands. If you have someone who can assist, have them raise the lights while you look through the camera viewfinder until the light is no longer visible in the glasses lens.
If raising the lights doesn’t help, try moving your key and filling the lights farther out, while keeping them relatively equal to one another.
In the three-point lighting image above, your key would be closer to 3:15, and your fill would be 8:45.
If your subject is comfortable with removing their glasses, that’s always a good last resort, but certainly not always an option — especially if they’re reading from a teleprompter.
It’s best to accommodate your shooting subject as best you can before asking them to adjust their appearance for a technical reason.
Make amazing videos with Camtasia!
Download a free trial of Camtasia to quickly and easily edit your own videos.
Get started free!
Video lighting FAQs
Video lighting can range widely in cost. It can be free if you have the option of using a window, or you can find bundles including a full studio lighting setup for around $200 USD.
The color of the bulb itself is up to you and what best serves the lighting needs of what you are filming. The important detail to remember is not to mix different colors of light, as that will create a low-quality video.
Repositioning your lights is the key to avoiding glare in your videos. If you notice a glare, you can either raise the lights until the glare disappears or try moving your key light and fill light further out.
Yes, you can! Too much light in the wrong places can cause undesirable shadows to appear.
Editor’s Note: This post was originally published in 2017 and has been updated for accuracy and comprehensiveness.
Share