


With the rise in HTML5 for multiple device enabled presentations, this project explores ways to modernize the older Rollover objects in Captivate.
The Issues:
The evolution to HTML5 has created a need to convert projects to HTML5 compliant works. My particular case is that I have 512 pre-quiz assessments that use 3-4 Rollover Captions where the question is on the screen and users hover the mouse over the question to see the answer. Rollover captions like mine are all Flash specific and in need updating to HTML5 compliance. What to do with no such option?
I created a project to explore some possibilities and there are both challenges and answers here. The project consists of four approaches and each will be discussed below. I am not going to show click-by-click documentation on the Advanced Actions, but I will note where you could click and see how those Advanced Actions are setup. Also, some of you might be a bit shy about Advanced Actions and the solutions are reasonable to implement. Finally, the project is attached below as a link and you can dive in and see what the setup looks like for each.
The Sample Project (click the link to get it):
Imagine that these buttons are questions and the goal is to have the answer appear on a click or when the mouse hovers over the button. Rollover objects did that with Flash, but now we have a need for HTML5 buttons (or maybe not). For this discussion, it is easier to give you the model and let you explore based on the discussion.
- The project has <Back and Next> buttons with some text notes to let you explore the runtime project.
- All buttons and answer rectangles are made from shapes and not buttons.
- Set the shape property to Use As Button
- Click the States View button in the top of the Style panel to change button state fonts and color
- Click the Exit State toolbar button (in the top toolbar button strip to the right side) to close States View
- Where “Groups” are noted, the objects were all highlighted and a right-click was used to group the objects.
- The Group uses a logical name
- Button Actions for <Back and Next> buttons use next slide and previous slide
- Button Actions for Home and EXIT buttons use GoTo Slide Name
- This is a Captivate 2017 CPTX project done in Captivate 2017.1:
Slide 1 – A Button Reveals the Answer Using Advanced Actions:
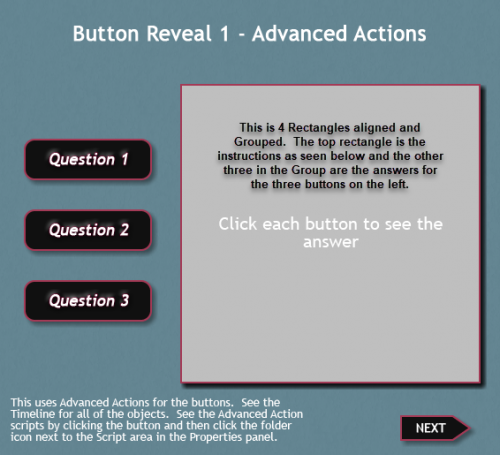
- This slide uses Advanced Actions to bring a rectangular object (my Pre-Quiz Assessment Answers) to the front.
- The rectangle on the screen that holds the instructions and answers is a group of 4 equally sized rectangle shape objects.
- The rectangles were all sized the same and grouped together. Each one has a unique name in the group.

- One for the instructions and then the three answers are underneath that.
- They are all Grouped as Answers_1_Grouped.
- This is important to note because the Advanced action hides the group before revealing the answer when the buttons are clicked, rather than having four lines of Advanced Actions that hide each rectangle.
- For the Advanced Action, it is easier to call the Hide action, but a bit more work to edit each item in the group
- hint – use the Timeline to turn off the ones that you don’t want to see and then edit what you need.
- Still time consuming

The button Action is set to run the Advanced Action:
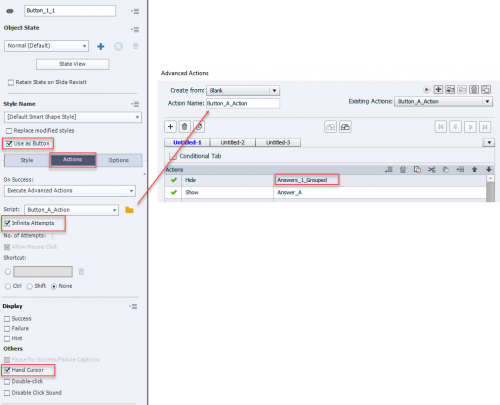
- The slide load action (click the slide/thumbnail to see the slide properties) is to bring the Instructions up so that any prior answers are hidden by the Instructions rectangle.
- The buttons link to Advanced Actions that first Hide the Group of answers.
- This is very important because it is like saying “completely hide this group so that nothing is there”
- The second line of the button Advanced Actions will then show the answer on the now “blank” answer area of the screen.
While control is good, the major drawbacks of this approach are:
- Advanced Actions are needed for much of the work and it creates many objects if you look at the timeline.
- Duplicating a slide only goes so far, you need to modify the advanced action for each slide and then point ot those advanced actions. That is a bit of work and a lot to maintain over time.
- This is all Click to see the answer stuff and it is not a flyover / hover solution.
Slide 2 – A Button Reveals the Answer Using Button States:

Using States is faster. In the above image there is just one rectangle drawn object and it contains the instructions (shown) and then three answer States.
Think of States as a container that has an initial maximum size and that it holds things that can be shown in that container shape and up to that size.
The additional states can be text, images, drawn objects, sound, videos, Etc. The buttons on the left use a special GoTo Action that calls up the State that you want from inside the States container. Remember, this is one rectangle and as many States as you need.

In this example, the Rectangle was named as AnswerStatesGroup, but it is just one rectangle object on the screen. It could be an image, a transparent rectangle, a text object, Etc.
Click the rectangle object and then The States View button. That will put Adobe Captivate into the State View editor mode.
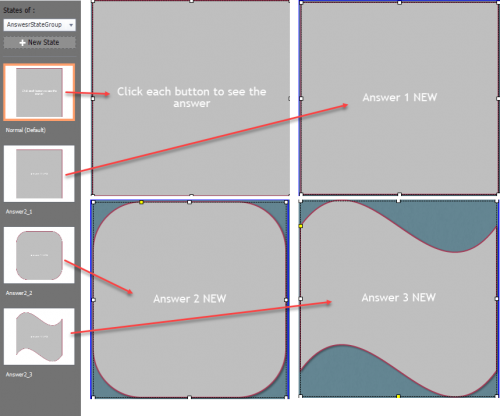
- For illustration purposes, the four States are shown. Note that this original object is not a button and thus you do not get hover states shown. A right-click can copy the first state thumbnail shown on the left (Right-Click and select Duplicate).
- Click the thumbnail on the left to select the object to edit.
- Click the main object displayed and now the color, font, Etc. Properties can be changed. The text can be changed, just type away.
- Users can add additional objects onto these containers (as long as it fits inside).
- Here a quick right-click allowed the object shape to be changed for each one. The font size, type, color, spacing, Etc. can be changed.
- Insert images, sound, video, Etc. into the selected State.
The right click options on the Thumbnails:

How do you get out of States editing? It is a button in the top flyover Toolbar on the right. Some users have complaints about this location, you get accustomed to it. Perhaps it belongs just above the Thumbnails as Exit State? (Adobe – just do it!):

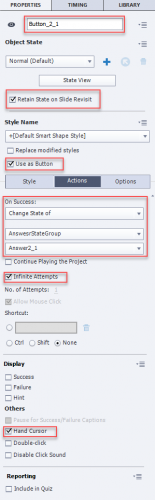
Now we need to link the buttons to the States. These buttons are just rectangular shapes and I copied them from Slide 1.
This image shows the Action from the first button on this Slide 2 presentation. It is linked to the State container and then the specific answer in the State (say it… “COOL!”).
This is faster than using Advanced Actions and you can right click on the slide thumbnail and select Duplicate with good results and no rework.
Other Considerations:
- The State View must be entered to edit the answers
- The buttons must be linked as shown
- This might be a better solution with bigger buttons and maybe just 1-2 questions and answers per slide
- This is all Click to see the answer stuff and it is not a flyover / hover solution.
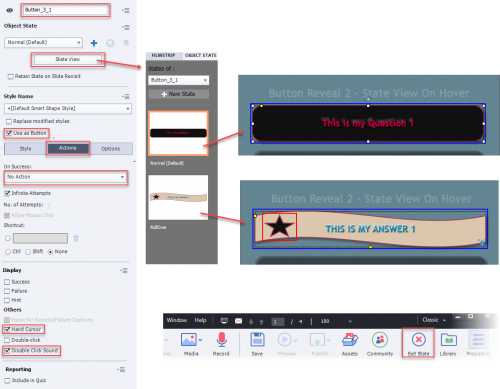
Slide 3 -Button States are Used to Reveal Button State Answers (A Hover Action!) :
YES – You can!

In this example, the four objects shown are drawn objects setup as buttons. Then, each of the buttons is setup as a State. The normal States of a button are Up, Hover or Down.
The button / container serves as the question, just type away inside the container. This could be an image, a visible drawn object or a drawn, but transparent object. Focus on the button idea for this presentation.
- This is set to Use as Button.
- When the mouse hovers over these, the answer is revealed. NO CLICK NEEDED!
- This slide can be copied and the new version is a duplicate. Just enter the State view and change the text, Etc.
This is my new solution to present quick pre-quiz questions to the users where they can hover the mouse over the question to reveal the answers. I’m hooked!
NOTE: The Preview is a bit flakey in Captivate 2017.1 It will not refresh properly. If you run the preview as HTML5 in a Web-Browser, then all is good.
The image below shows the State View thumbnail and edit of the thumbnail and a reminder of how to Exit State View (you remember that, right?)
Notice that the State container shape and size is coming from the original on the main Adobe Captivate screen. Once the State is selected, the font, color, size, shadow, Etc. can be edited in the Property panel. Notice that shape objects and a small Blogger button were added to illustrate that each State can hold other objects, images, sound, video, Etc.
It is important to note that the two states are Normal and Hover. In this example, the Selected (mouse Down) state was deleted. Just right-click to delete states that you don’t need.
OK, I said it once, I’ll repeat this again… say it…. “COOL.”
Slide 4 – What About Interactive Widgets like Accordion?:
 I had hoped that interactive widgets would work. Unfortunately is can’t work. It is a click event and not a hover. The header of each accordion section is limited to only so much text and then it overflows and cannot be read (It may crash form the overflow).
At runtime the accordion section header will expand to two rows, but then when you click on the first one, the others collapse to one row. Not a good choice to be able to read the question first.
There are some maddening spacing issues with these Widgets if you want to open up the space between accordions, you can’t.
This is good for “Show me more” types of discovery.
The flyover questions would make a great Interactive Widget perhaps we need to wait.
Conclusion:
There are still more solutions like advanced CSS (think fly-out menu) and JavaScript; it is all possible, but that is a lot of maintenance as a solution. For fly-over action needs, the State View area opens up fast development, simple slide cloning and reasonable results without the fuss of Advanced Actions. There is more to State Views and you can add more layers, but I hope this initial trip into the topic has you thinking of some of the possibilities with the basics. I’m sold on just the simple hover to reveal and I just have to say “COOL!” one more time.
Thank you for providing a solution.
I’m hoping that Adobe considers a more accelerated workflow for achieving interactivity. While this example is a suitable solution, I think some users would find this as a big time-cost. I have a large number of projects that include interactivity in every other slide and can’t imagine doing this in many of my courses without requesting much more time for setup, and testing. For now, I am using Animate CC and javascript frameworks with interactive components built in (Bootstrap, Foundation) to do all this.
Thanks for sharing your work!
I downloaded the example but it doesn’t open in Captivate 8. Perhaps it is only good for newer versions.
I have never had an issue converting any projects to HTML5 that previously had hover features. I publish them as html5 and all the hovering menus and reveals continue to work as before even though the HTML5 “Tracker” gives me a warning.
I understand that a mobile audience will have no way of interacting with the content but I didn’t design it for them in the first place. They are all PC users who still have a mouse and can hover.
You must be logged in to post a comment.


