What’s New in Captivate 6: The Little Things
There has been a lot written about the major changes in Captivate 6 since it was released in June, such as HTML5 publishing, new LMS integration features, Smart Interactions, etc. (If you aren’t familiar with them, check out these screencasts from Adobe and this article from Joe Ganci in Learning Solutions.)
Since I just finished up our E-Learning Uncovered: Adobe Captivate 6 book (available on Amazon), I became familiar with many of the little changes that aren’t getting as much press. Your decision on whether or not to upgrade will probably be based on the big changes and not the small ones. But if you have already decided to upgrade to CP6, it’s good to know these features are here. (And some of them are very well hidden!)
1. Undo Marker
While capturing a software simulation, press Ctrl + Shift + Z any time you take a capture that you don’t think you’ll need. When the file is created, those slides are automatically hidden and have a “Marked for Undo” text caption over them. This makes it easy to find and delete them. If you decide to keep them, you can just unhide the slide and delete the text caption.
2. Rollover Smart Shapes
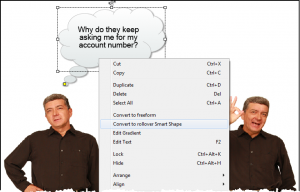
You may already know that you have more drawing tools in CP6 with the introduction of Smart Shapes (arrows, thought bubbles, etc.). If you right-click a Smart Shape, you can convert it to a rollover interaction. As with rollover images or rollover captions, you’ll get a hot spot to serve as a trigger, with the Smart Shape appearing when the student rolls over that trigger.
3. Styles for Runtime Dialog Boxes
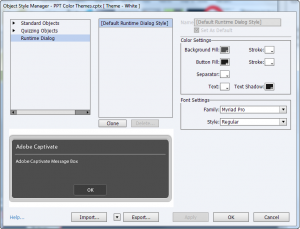
Styles have existed for several versions. In Captivate 6, you can create styles for runtime dialog boxes that display system-generated messages.
4. Fill Textures
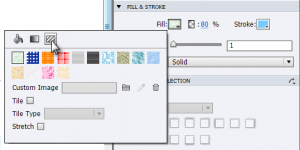
In addition to solid fill colors and gradient fill colors, you can now add textures to your shapes.
5. Text Effects
If you select a caption or Smart Shape with text, the Character panel has a new “T” button that lets you add text effects—similar to what you would find in PowerPoint. In addition to applying the supplied effects, you can click one of the plus buttons and create your own. (Note: The “T” button is only available when you select the whole object. It is not available when you are in edit text mode.)
6. Skins
There are several new features for project skin elements.
- Hide Playbar in Quiz: Check this box to have the playbar hidden on any quiz slide.
- Show Playbar on Hover: If you are using the overlay feature, check this box to have the playbar hide if the student’s mouse is inactive for two seconds. The playbar reappears if the student’s mouse moves again.
- Playbar Two Rows: Check this box to have the playbar elements divided up into two rows, such as the buttons on one row and the seekbar on another. This would be useful if you have a very small movie size.
- Stretch TOC: If you have a table of contents and a playbar, check this box if you want the table of contents to extend down as far as the playbar, rather than just extending to the bottom of the slide.
7. Quiz Master Slides
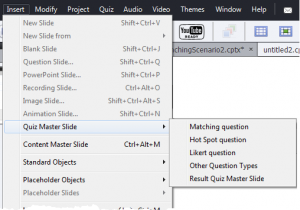
Master slides have been around for several versions. Now you can have master slides for quiz questions. You can use the quiz master slides that come automatically with the various themes or make your own.
What do you think? What are your favorite new features in Captivate 6?


 Previous Post


