Your brand is important. There you have it folks. No need to read any more! But seriously, your brand identity is represented in an ever-increasing number of channels and media formats. Printed collaterals, web sites, social media, video content and of course Microsoft Office documents. But how do you make sure your presentations, spreadsheets and documents are kept in line with your brand? Let’s find out.
Introducing the three amigos
The Microsoft 365 offering is all-singing all-dancing but since the dawn of time (…the 1980’s) three Office apps have stood together, arm in arm. Of course, we’re talking about PowerPoint, Excel and Word. Whether you’re creating a presentation, workbook, chart or document, you want the end results to look like they came from the same organisation. You also want to be able to easily copy content from one app to another, copying a chart from Excel and pasting it onto a PowerPoint slide for example, or taking the lovely illustration you created in PowerPoint and dropping it into a Word doc.
However, it can be all too easy to end up with slightly (or very) different versions of your brand across these three apps. Like very, very distant cousins rather than fraternal twins! The best case scenario is that you produce unprofessional looking documents, the worst is that you damage your brand identity in the eyes of potential and current clients.
The key to keeping everything consistent is twofold, starting with an Office theme and ending with templates for each of the Office apps.
What is an Office theme?
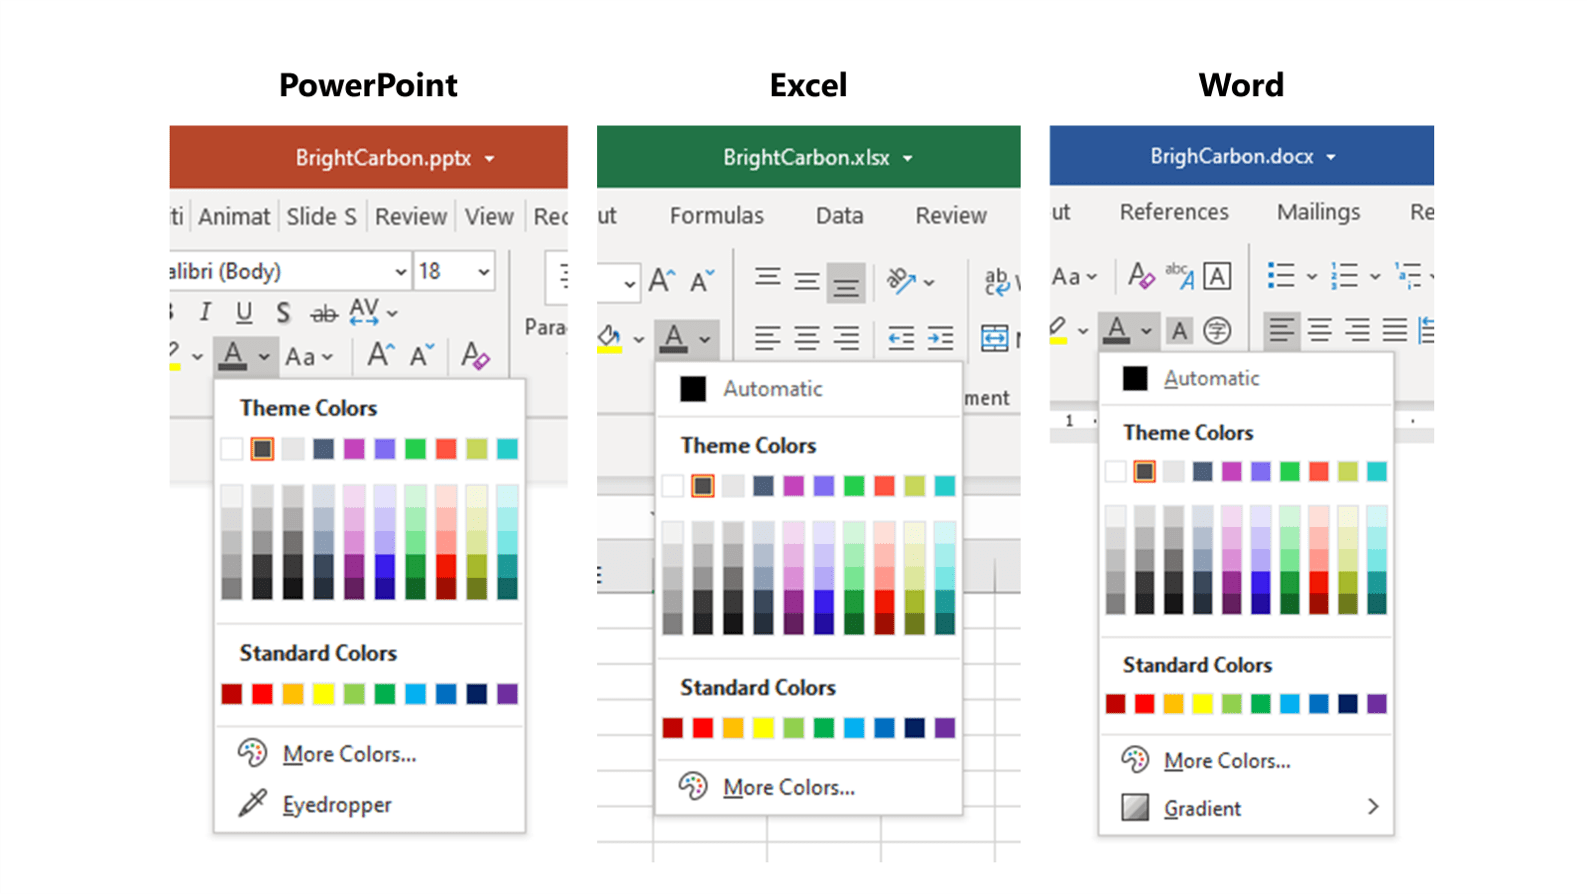
A theme tells an Office app how to style a document. It defines the colours, fonts and effects the document will have. Depending on the app themes can control even more, like the masters, layouts and background styles in PowerPoint.
In the example below you can see how one element of a custom theme, the colours, are consistently available across all three apps:
Note: if you program a Custom Colors section into your theme as described in this article, these additional colours will be available for text and shapes across all three apps, except Excel where Microsoft do not provide that part of the UI when formatting cell fills and cell text. Go figure!
So how do you create and deploy an Office theme?
How to create an Office theme
You can create a theme in any of the Office apps but you can only export it as a theme file, using the thmx format, from PowerPoint, on Windows (more about Mac later). There are other advantages of creating the theme in PowerPoint, such as being able to include important PowerPoint-specific theme features such as background styles, masters and layouts. These are then simply ignored when the theme is deployed in Excel or Word.
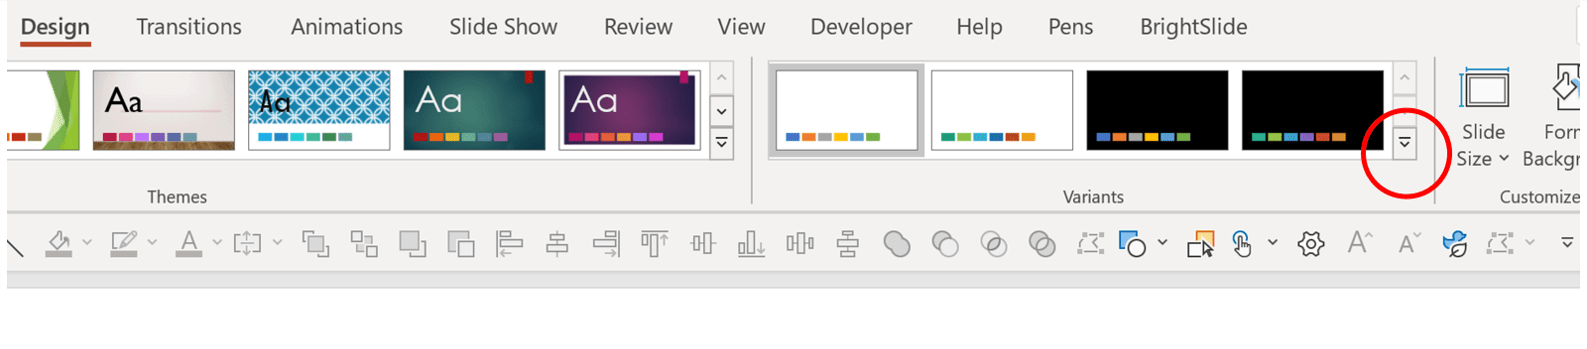
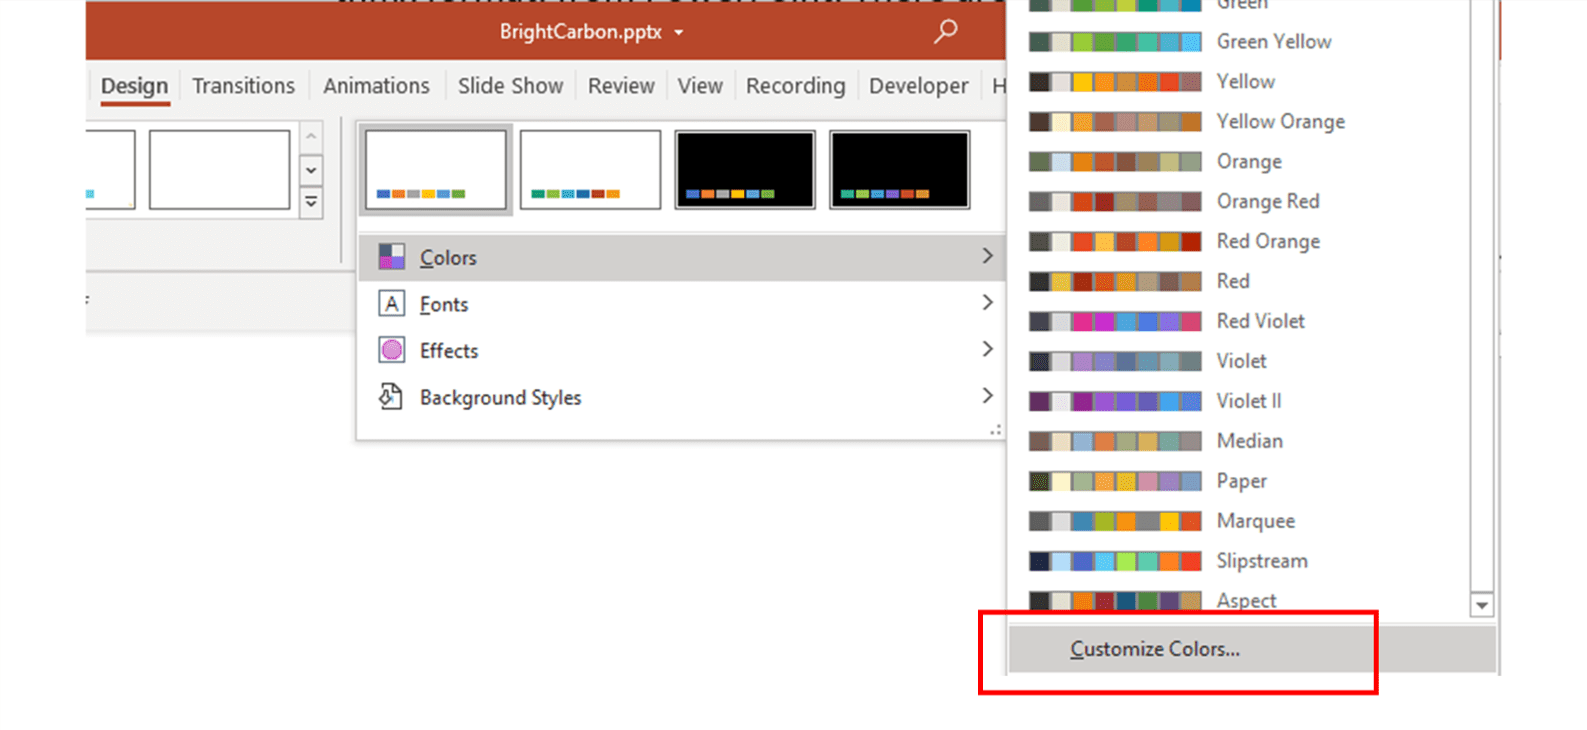
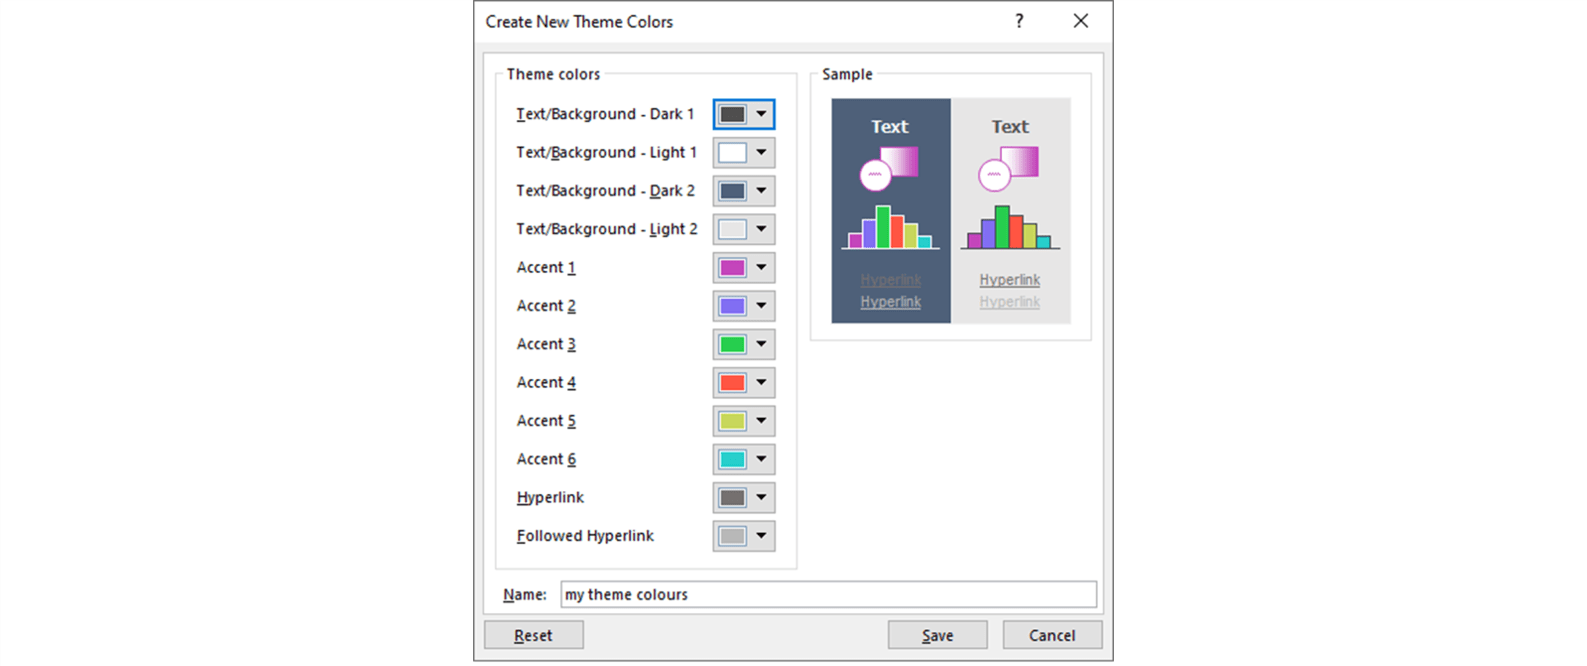
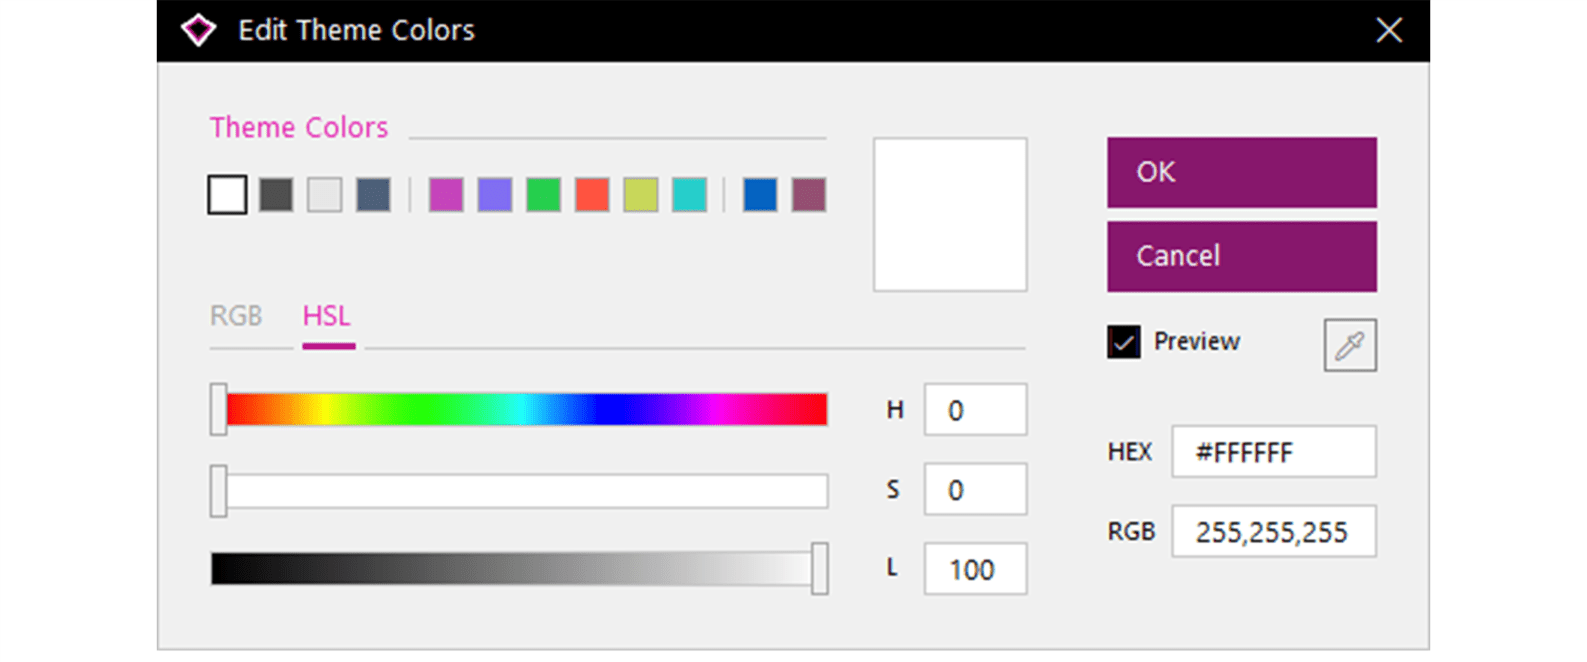
1. Set up your colour palette.
In the Designtab, open the dropdown menu in the Variants section and then select Colours> CustomizeColours.
Check out this super video for more detail on how to choose and set your theme colours.
You can then copy the colour values from your brand guide into each of the swatches by manually copying the three RGB values for each colour or, in newer versions of PowerPoint, the HTML hex code:
You can also use our free PowerPoint add-in BrightSlide to do this much faster. EditThemeColors has a handy colour eyedropper tool so you can pick up the colours from your brand guide directly:
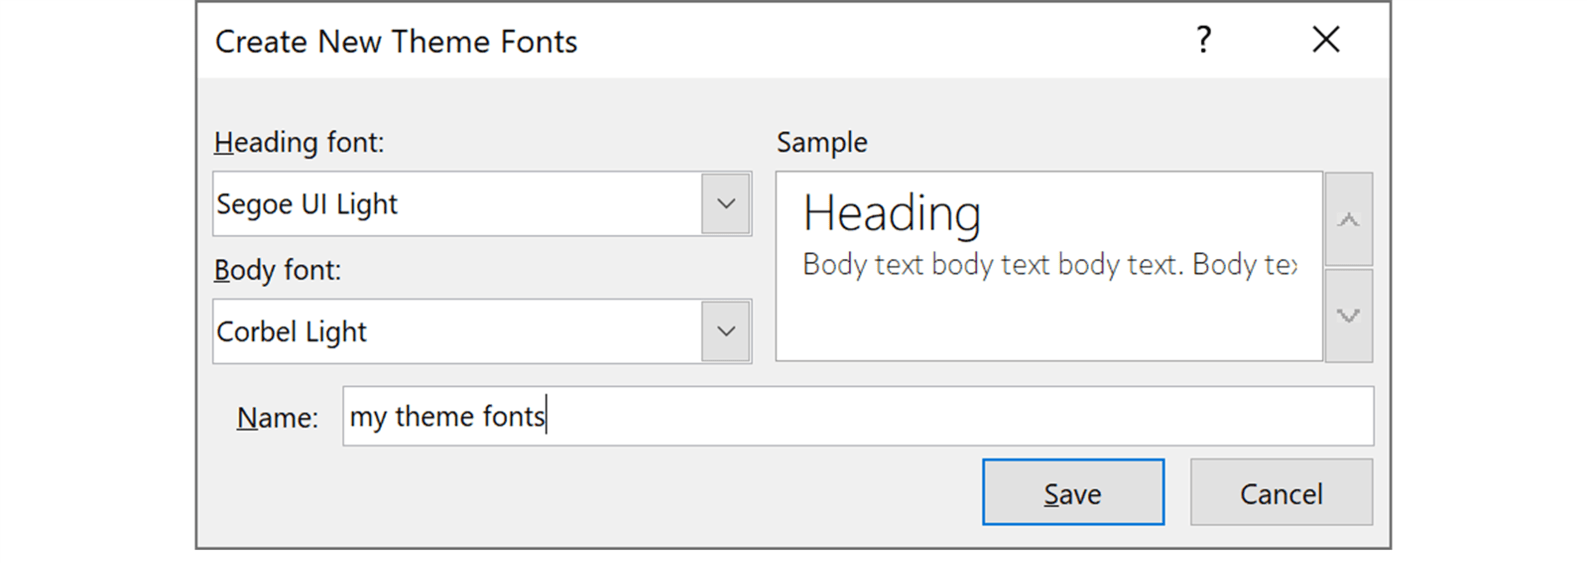
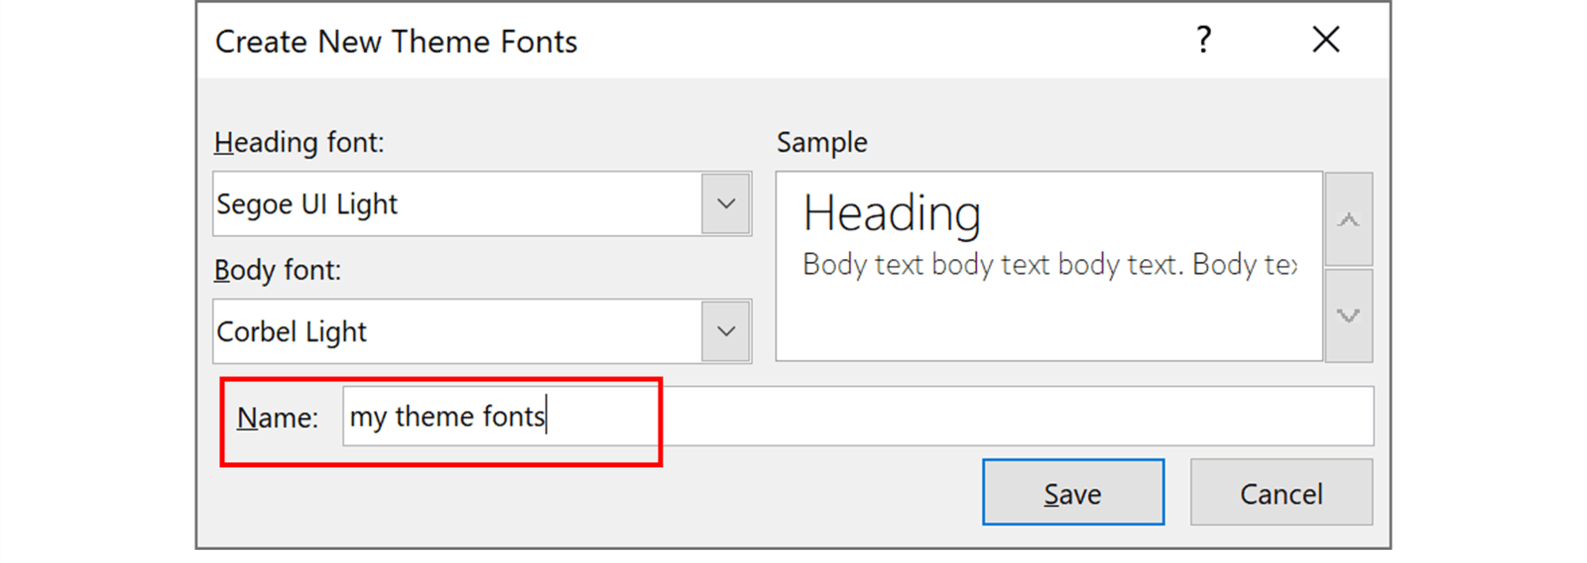
2. Choose theme fonts.
All Office themes have a pair of fonts, one for headings and one for body text. In the Design tab, select CustomiseFonts to open the font editor:
Depending on the number and type of Office language packs installed on your computer, you may see multiple sections in this dialog, corresponding to different parts of the world. For example:
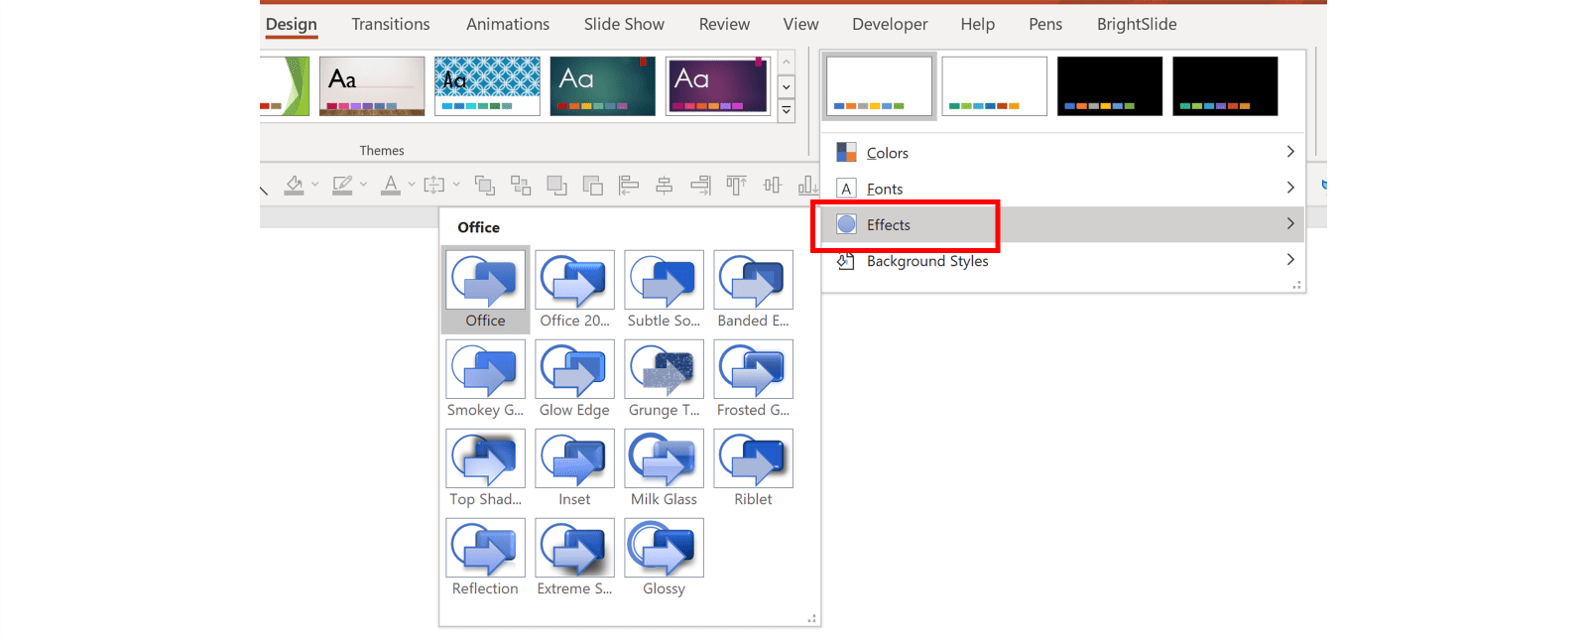
3. Avoid Office effects
In the next section of the dropdown menu, you have the option to change the dreaded Office Effects.
Using any but the default Office effect risks taking your content as far away from your brand as it’s possible to go, so we recommend just sticking with the default Office option.
4. Set background style
The final option on this dropdown menu allows you to set the background style. You might want to change the background style if your template has a mix of light and dark background master slides. If it doesn’t, or you’re happy with the default, just leave this selection as is.
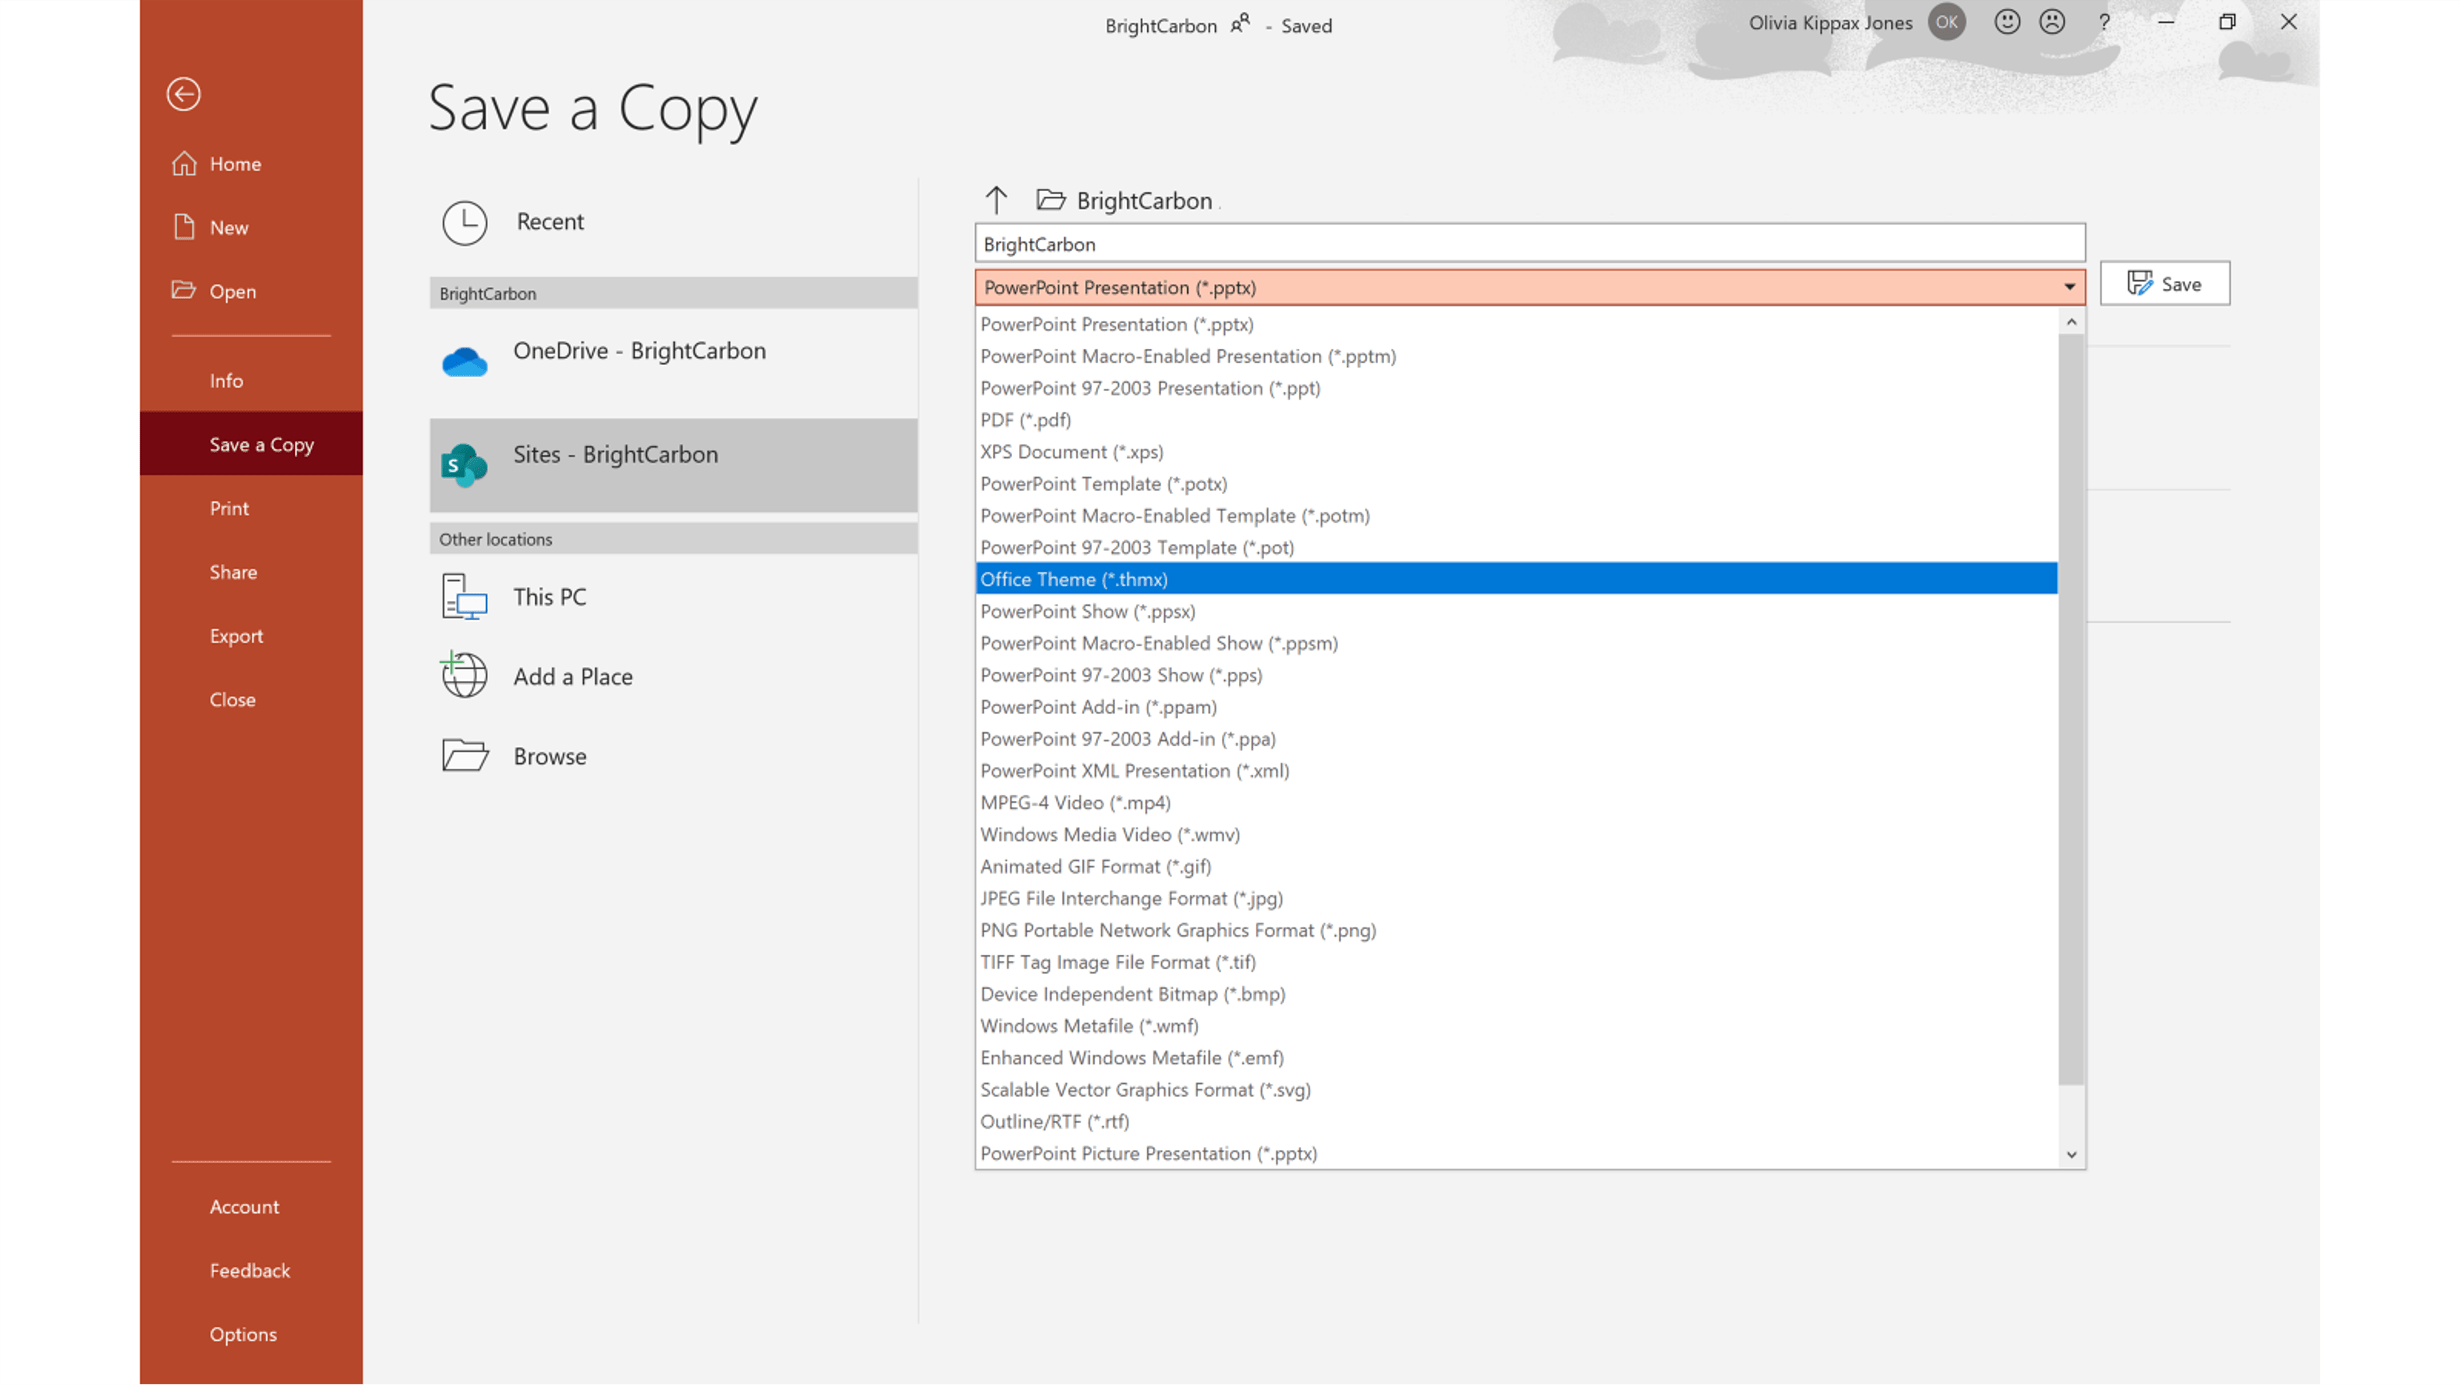
How to save an Office theme
Right then that’s your theme set up! The last thing to do is save it as a theme file in the thmx format. Click File >SaveAs and choose OfficeTheme:
When you do this, the folder will automatically change to the one used by Office to store its themes which is defined as this alias:
%AppData%\Microsoft\Templates\Document Themes
This alias will take you to your personally named folder here:
Note that there were various places during this process where you could name the elements of the theme, such as the colour and font schemes.
However, there was nowhere you could set the overall name of the theme. If you want to name your theme, you need to change the name of the first slide master in View>SlideMaster. Just a classic weird PowerPoint quirk!
Using the theme across Office on Windows
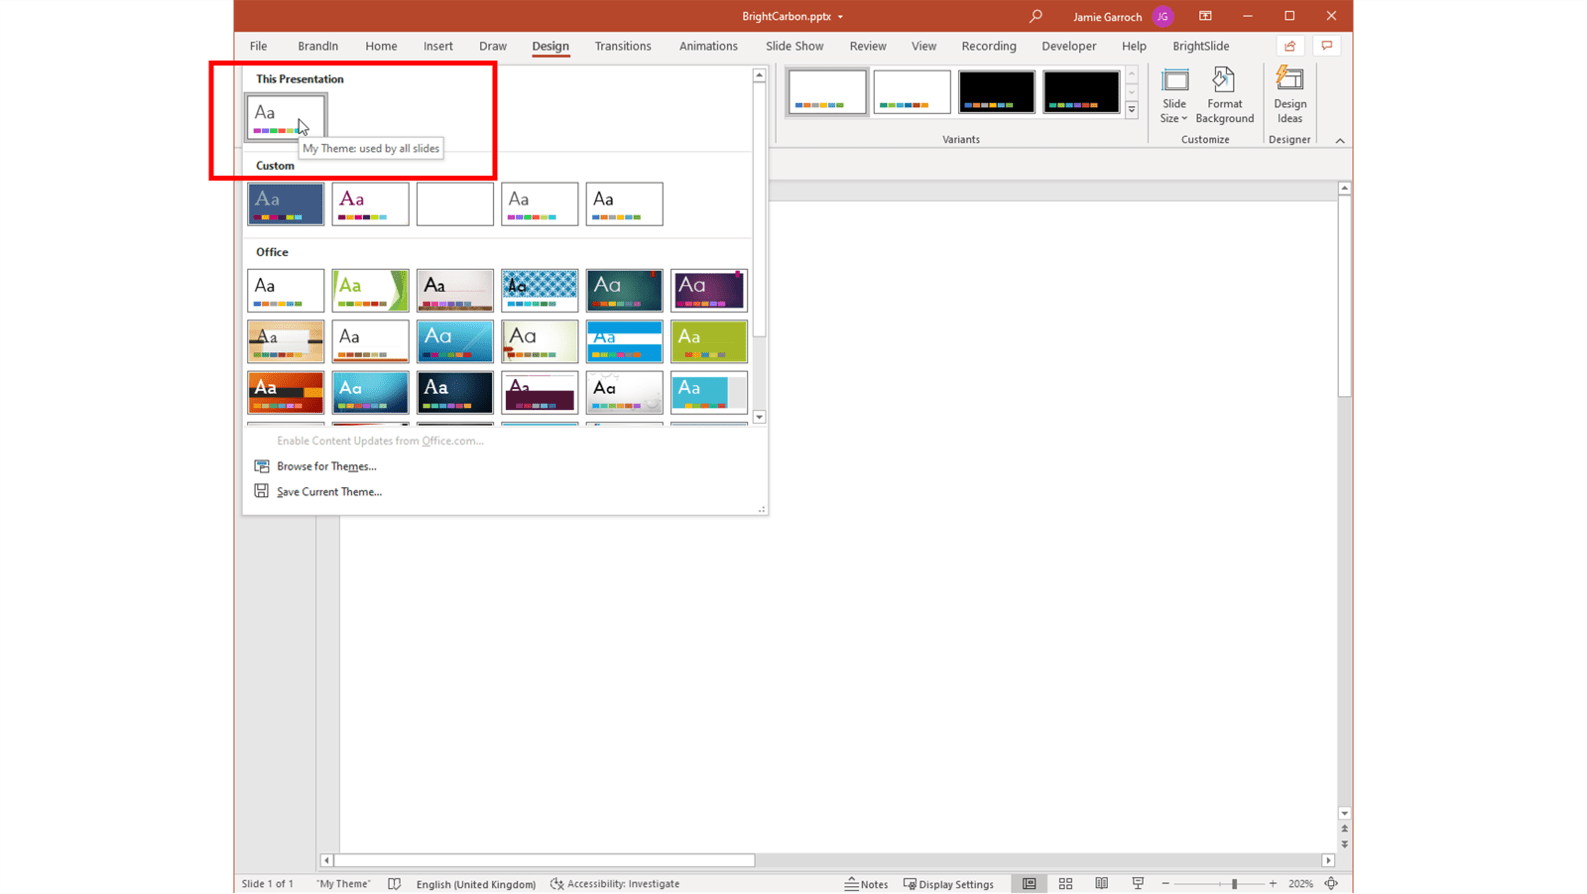
You can now choose this theme whenever you create a new document in PowerPoint, Excel or Word. You need to apply it from the right place, which is of course in a different place in each app!
For PowerPoint and Word, it’s in the Design tab. The theme we created above is visible as “My Theme” because we renamed the master:
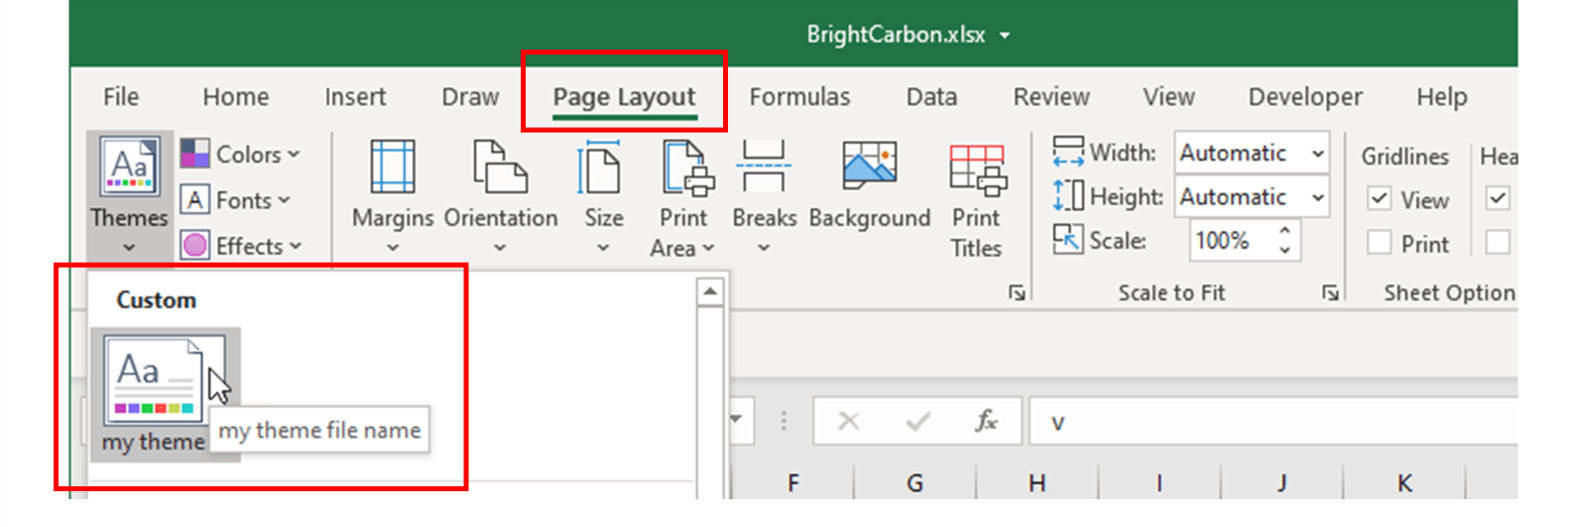
In Excel themes are in the PageLayout tab:
You can see here that Excel (and Word) uses the name of the thmx file rather than the slide master name that PowerPoint uses.
Okay, so you know how to apply an Office theme – great, but the process is tedious. You don’t want to have to apply the theme every single time you create a new presentation, workbook or document do you?
Setting the default theme in PowerPoint, Excel or Word
Every time you start PowerPoint, Excel or Word, a new presentation, workbook or document is produced. These files are created based on the default templates as specified for each application. The same happens when you create additional new presentations, workbooks or documents using File> New or the shortcut Ctrl+N, which is the same in each app (hurrah for small mercies!). But that’s where the commonality ends because the start-up mechanism is different for each app.
Where are Office themes stored?
Here’s what each app loads as it starts:
Feature
Default template name
Location
PowerPoint
blank.potx
%AppData%\Microsoft\Templates
Excel
book.xltx
%AppData%\Microsoft\Excel\XLSTART
Word
normal.dotm
%AppData%\Microsoft\Templates
So, if you want your shiny new theme to be used as the default for your three amigos, you need to save it within the template for the corresponding app.
Let’s take PowerPoint as an example.
Start PowerPoint and manually apply the theme you created in the Design tab. Add sample slides if you want to.
Save file as a template. To do this, click File>Save As or Ctrl+Shift+S and then click the Save as type drop to down to locate PowerPoint Template:When you do this, PowerPoint in its infinite wisdom will change the folder to where your personal templates are stored, something like C:\Users\Name\Documents\Custom Office Templates but this is not where the default template is stored!
To get to the right folder, type %appdata%\Microsoft\Templates in the file name field and then press enter:
Select the potx file and overwrite it as the new default template (and theme) to open each time PowerPoint starts:
And finally, some trip ups
Well, that’s all pretty straight forward, if not completely logical. But there are some things to watch out for. Here’s a couple without going into too much detail or claiming that this is everything that could cause problems!
PowerPoint
Themes need to be set up individually for every slide master you create in your template.
The notes master has its own separate theme. As does the handout master.
Excel
If you use chart templates (we’ll cover that in a separate blog post) and copy a chart from one PowerPoint presentation to another using a different theme, the original theme travels with that chart and can override the theme in the presentation you’re pasting it into. This mechanism is cunningly called “theme override” and can cause presentation designers and users to literally tear their hair out! In some cases, you may select a colour from the PowerPoint theme colour picker and the chart element is displayed in a completely different colour!
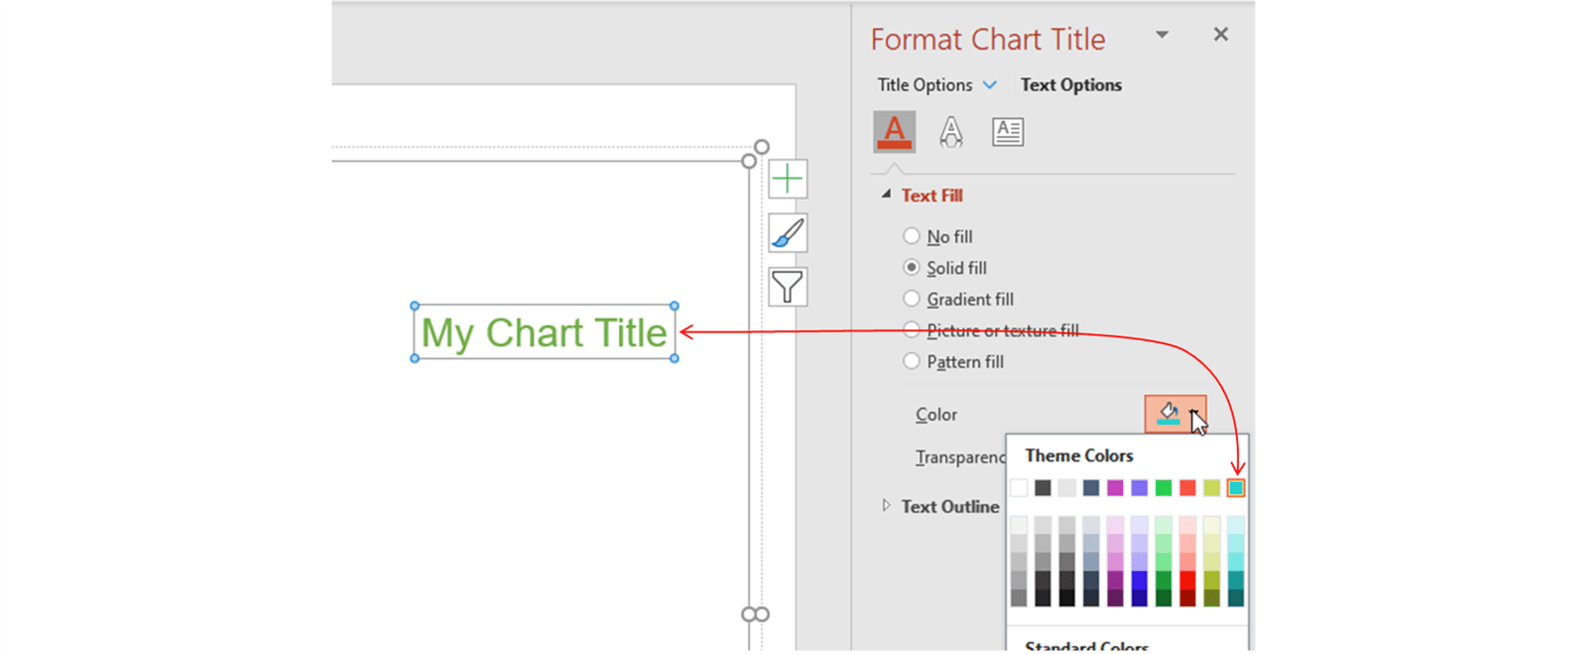
If you have custom colours in your theme, you’ll see them in PowerPoint and Word and sometimes in Excel, depending on what you’ve selected. Custom colours don’t appear in the Excel colour picker if you’re working in cells. That includes the text, fill and border colours.
PowerPoint for macOS
Things are slightly different on the Mac. There is no concept of a default template using the blank.potx method you saw above for Windows. But there is the concept of a Default Theme.thmx file. You can create a thmx file by saving your template as follows:
Windows:
Click File / Save As and select the Office Theme (*.thmx) file format from the format drop down
macOS:
Open your presentation or template file
Click the Design tab
Click the Themes gallery drop down
Click Save Current theme…
You can also use our handy VBA macro below.
To set it as the default on a Mac, save the file (or copy it from Windows) to this Office 365 sandbox location:
Once you do this, your theme file will be used each time you start PowerPoint and/or each time you click File / New Presentation from the menu bar. Note however that any slides you included in the potx template will be absent. This is because while theme files support, well… the theme, and slide masters and layouts, they don’t support slides.
VBA macro to create the Default Theme
No idea what VBA is or what to do with this macro? Check this out.
This simple VBA macro will export your current PowerPoint presentation file as a theme file in the folder PowerPoint checks as it starts, and looks in when you click File / New Presentation:
Public Sub ExportAsDefaultTheme()
       On Error GoTo ErrorHandler

       Const FILE = "Default Theme.thmx"

       Const FOLDER = "/Library/Group Containers/UBF8T346G9.Office/User Content.localized/Themes.localized/"

       Dim UserName As String, Path As String

010    UserName = MacScript("do shell script ""stat -f%Su /dev/console""")
020    Path = "/Users/" & UserName & FOLDER & FILE

030    ActivePresentation.SaveAs Path, ppSaveAsOpenXMLTheme

040    If Dir(Path) = FILE Then _
           MsgBox "Click File / New Presentation to confirm.", _
                vbInformation + vbOKOnly, "Default theme successfully set."
050    Exit Sub

ErrorHandler:
060    Debug.Print "An unexpected error " & Err; " ocurred on line " & Erl & " : " & Err.Description
070    Resume Next
End Sub
What about organisation-wide deployment of Office themes?
While themes and templates are easy to set up on your own computer, it’s more common for IT teams to deploy these files centrally using administrator tools such as Group Policy (GPO) or Intune for Window of Jamf for macOS. Alternatively, solutions such as our BrandIn add-in for PowerPoint can take the pain out of deploying both PowerPoint and Chart templates. This example shows how to use GPO to deploy templates:
Save the template files to a shared location that all users have read access to.
You’ll need to be an administrator logged on to a domain account to configure org-wide group policies.
Run the Group Policy Management Tools. If you don’t have them installed you can go to Windows / Settings / Optional Features and install RSAT: Group Policy Management Tools
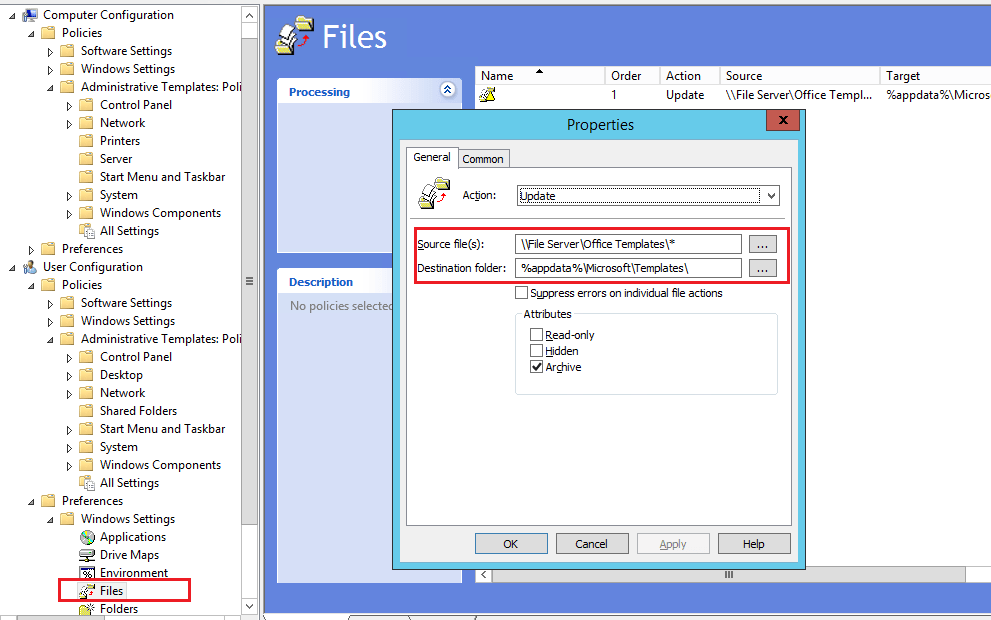
Navigate to User Configuration / Preferences / Files
Create a new policy to copy the templates from the shared location to the user’s template folder which is %appdata%\Microsoft\Templates noting that the default template for PowerPoint must be named blank.potx
Do the same for themes, using the target folder %appdata%\Microsoft\Templates\Document Themes
The changes will take effect when the user next logs on to Windows or you can force the update by running the command gpupdate /force
Do you need help with theme and template soup? We can help unmuddy your soup bowl so to speak! Just drop us a message from our contact page.
How do you make sure that your graphs and charts have consistent branding across Excel, PowerPoint and Word? Learn how to create and use custom templates that support your brand identity across Microsoft Office.
Tints and shades auto-generated by Microsoft from Theme Colors often take your content off-brand. How can you get the custom colors you want in PowerPoint? Read on to find out!
Hi Brian. BrightSlide is designed to work with PowerPoint only at present and some of what it does is only supported by PowerPoint. For example, the Guides feature, Animations etc. Are there specific features you’re interested in seeing in Word? If you want to discuss further, you can use the Contact page at the top of our website to send us an email.
I work as a consultant and so regularly find myself working for a new company and needing to create spreadsheets, slides and documents in their style and branding. Yet virtually every single organisation I’ve worked for has not used an Office Theme (let alone deployed one though policy) and so I inevitably end up these myself each time.
Although I’ve done this many times, I still picked-up one or two tips from your article that I will use forward — so thanks very much!…. Hopefully more people will read this (including more people in marketing and/or sysadmin, so that this can become more of a standard approach firms use).
Thank you so much for conducting our advanced PowerPoint training workshop. We will definitely use BrightCarbon in the future – we really think that we would be hard pressed to find anywhere better!


Appreciate the post on “How to consistently brand PowerPoint, Excel and Word documents.” Can you share information on deploying properly using a GPO?
Hi cape. That’s a great question. There are several ways of using GPO (or Intune) to deploy templates and we’ve updated the article to show just one example using the Files section of the User Configuration here: https://www.brightcarbon.com/blog/consistently-brand-powerpoint-excel-word/#GPO
Hi Jamie,
Is there a way to get the Brightslide ribbon in Word?
Hi Brian. BrightSlide is designed to work with PowerPoint only at present and some of what it does is only supported by PowerPoint. For example, the Guides feature, Animations etc. Are there specific features you’re interested in seeing in Word? If you want to discuss further, you can use the Contact page at the top of our website to send us an email.
Great article and guide Jamie!
I work as a consultant and so regularly find myself working for a new company and needing to create spreadsheets, slides and documents in their style and branding. Yet virtually every single organisation I’ve worked for has not used an Office Theme (let alone deployed one though policy) and so I inevitably end up these myself each time.
Although I’ve done this many times, I still picked-up one or two tips from your article that I will use forward — so thanks very much!…. Hopefully more people will read this (including more people in marketing and/or sysadmin, so that this can become more of a standard approach firms use).