
At a recent workshop I was chatting with someone about simple ways to speed up course design. Here are a few of the time saving tips we discussed.
8 Time Saving Tips: Build Template Slides
Start by thinking through the various screens common to elearning courses and then build the core structure. Don’t worry about the way they look because that will change based on the course topic. However the core features and functionality can be established upfront and then saved as a template slide.
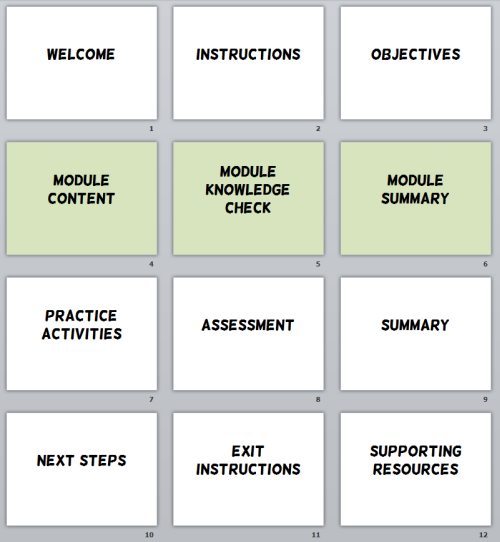
Here are a few of the screens common to most courses:
- Course Navigation: It’s common to have some course navigation guides as part of the course. And there are many ways to do it, some covered in this post on course navigation. Create a template and structure for navigation that you can quickly add to your course.
- Test Media Screen: This screen includes information on types of media, plugging in audio, and testing volume. Do this before they get to a slide with media that may be turned up to loud.
- Getting Started Screen: This screen explains details of the course, title, abstract, how long it will take, etc. Create an instruction screen with all of those details. Again, don’t worry about the way it looks. You can move the objects around and style them to meet your course design.
- Section Title Screen: All courses have a title screen. Many courses also have sections that require section title screens. How will those look different? What content generally goes there? Create a few variations of the section title screens so you have them on hand when you need them.
- Gate Screens: A gate screen serves multiple purposes. It stops the learner and orients them to something new. Some people use it prior to an interaction, others use it move persistent instructions to a single screen. You could even use it as a section title screen. Here’s a post on how to build gate screens.
- Resources Screen: After the course there may be all sorts of resources for the person to use. Some software comes with a resources tab, but you are usually limited to a title and link to the resource. If you want to add more, you’ll need a page. Like the other options, come up with a structure and determine the type of content. Perhaps it includes a table-like look with thumbnail image, title, and link.
- Final Instructions: What’s the next step when the person’s done with the course? Are there practice activities? Do they connect with a peer coach? Are they required to demonstrate something in the real world?
- Exit: When everything’s complete and the person’s ready to exit, what are they to do? If you don’t provide instructions you may come in on Monday to find that they sat at their desks the entire weekend waiting for exit instructions. Don’t risk upsetting their work life balance. Create a default exit screen you can plug into the backend of the course.
Bonus Time Saving Tip: Create a Course Starter Template
Build an elearning starter course template. There are a few core slides that are in most courses. For example, two are the navigation instructions and the final slide that tells the learners they’re finished and free to leave. Build those into a template and start all of your courses with those slides ready to go. And add in some of the ones we discussed above.
Here’s a post where I detailed the elearning starter kit.
The key point in all of this is that there are slides common to most courses. And most of the slides have the same type of content. Save time by creating those slides and adding placeholders for the content. Then the next time you start on a course you can add those pre-built slides.
Is something missing? Which screens would you pre-build and include in the list? Feel free to share your ideas by clicking on the comments link.
Events
Free E-Learning Resources


0
comments