


While I generally don’t recommend it, very often eLearning developers are called upon to create simple course modules very, very quickly. Often the basis for such courses is a Microsoft PowerPoint file. Captivate can import PowerPoint files on Windows machines, and Captivate 2017 makes it easy to create multi-state buttons to handle the course navigation.
The easiest way would simply be to leave the PowerPoint import settings alone, and let your learners click through the deck. But what if you don’t want to use a playbar, or you have reasons for adjusting the navigation? Captivate makes that really simple too. In the below video I walk you through the entire process of adding custom navigation buttons to a basic PowerPoint module. Along the way I provide some time saving shortcuts, including how to create an object style to use across multiple buttons, and how to use a Master Slide to add navigation controls to many slides at the same time.
Step 1: Create a project from PowerPoint
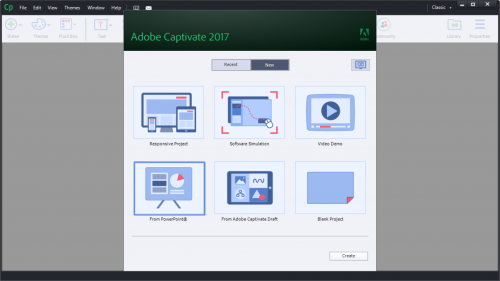
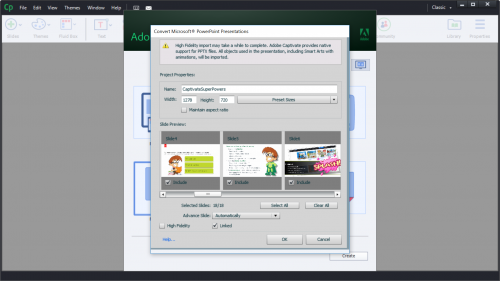
Just Click on the large ‘From PowerPoint” button on the Captivate launch screen. You’ll be asked to select a PowerPoint file. It can be either a *.pptx file, or the older *.ppt format. Once you have confirmed the file to import, Captivate will open an import preferences dialog like the one below. By default, Captivate will add an interactive click box to allow mouse clicks to move the project forward one slide at a time. In this case we are going to create our own navigation, so you’ll want to change that setting to Automatic advancement.
Step 2: Create a new master slide.
Select Window: Master Slide View to move to a master slide editing mode. Select the blank slide from the list of master slides on the left. Right click the blank slide, and select duplicate slide. In the property inspector on the right, change the name of the newly created slide to ‘Navigation.’

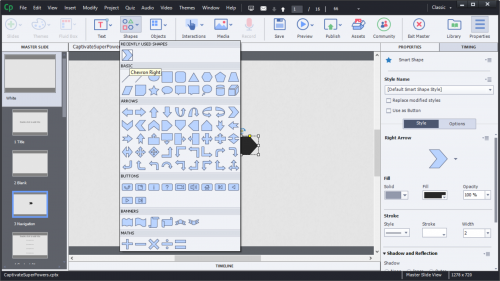
Step 3: Adding universal Navigation Controls
You will be able to add elements to the slide that will appear on the top of any slide that uses the new master as a template. The best way to make a button in Captivate is to use a smart shape, and enable the ‘use as button feature.’ To do so, select the shape tool from the large button bar. Now select a shape that you find appropriate for a next button. I like the right pointing chevron shape.
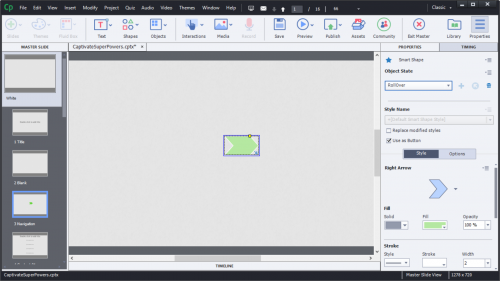
Step 4: Format your shape & Make it a button.
Select the shape you drew on the screen. In the property inspector, check the ‘Use as button box.’ This will convert the shape into a multi-state button. You’ll see a new ‘Actions’ tab appear in the property inspector. From the actions tab, select the ‘On Success’ drop down. Ensure that the action is set to go to next slide for the ‘Next’ button.

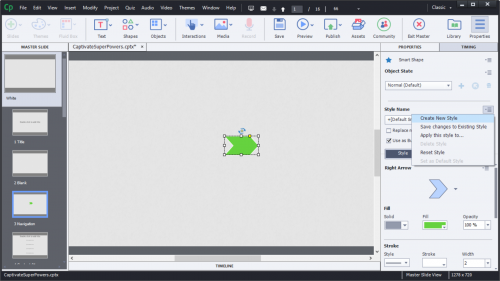
Step 5: Modify the style of the shape in each state.
Go back to the style tab in the property inspector and select the fill color you prefer for the default appearance of the shape. You can also add text at this point by double clicking inside the shape, and then typing your label. At the top of the property inspector you will find an object state drop down menu. Captivate will automatically add three states to buttons on master slides. (Default, Hover, & Down) Select the Hover state, and then change the color formatting of the shape in it’s hover state. Then change the state of the object to Down, and alter the color of the down state to meet your needs.
Step 6: Create a new style, based on the customization that you made to the shape.
You can save all of the elements of a shape’s style – from format, to fill color, line color and font size. To do this, select the tiny little menu button just above and to the right of the style menu. Select the ‘Create New Style’ option from the menu, and give the new style a name like ‘myCoolButton.’
Step 7: Create a back button
Repeat the process in steps 3, 4 and 5, changing the button success action to ‘go to previous’ slide for the back button. Change the text to ‘Back’ and change the direction of the back arrow to point to the left. You can use your ‘myCoolButton’ style now in the style menu to instantly update all of the style elements in the new button.

Step 8: Switch the master slide for slides 2 – 17 to ‘Navigation.’
Close the master slide view by clicking the x button on the right side of the big button bar. Shift select slides 2-17 using the thumbnail icons on the left hand side. In the property inspector on the right, select the ‘Master Slide’ icon. Find the ‘Navigation’ master in the list, and select it. Your navigation buttons should immediately appear on each of the slides selected.

Step 9: Copy / Paste the single buttons on the start and end slide
While you won’t want to put a back button on the first slide or a next button on the last slide, you can easily copy and paste these buttons one at a time from the slide master. Just go to the master slide view. Select the button that you want to copy, and CRTL + C to copy the button. Close the Master slide, and then go to the slide where you want to add the button. Use CTRL + V to paste a copy of the button.
Step 10: Disable the playbar and border in the Skins
Under Window; Select Skins. You will see a preview of the project you are creating, with any Table of contents, borders or skins visible. In this project we don’t want to use the playbar, but it is enabled in Captivate by default. In the settings menu on the left, deselect the ‘Show Playbar’ option. Then select the tiny border icon, and deselect the ‘Show Borders’ option.

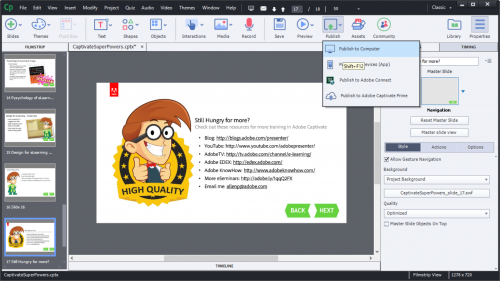
Step 11: Publish your project
Press the Publish button at the top on the big button bar. Then select Publish to Computer button. Complete the dialog, and press publish. You will be offered a chance to preview your project from here.
I’ve attached a sample of the output from this project in the zip file as well. ![]()
How do you expedite creation of PowerPoint based projects? Do you have tips to ease the process?
Alternative to navigation shape buttons on master slide, especially in situations where you want more control over those buttons, is to put them on the first slide where they are needed, and time them for the rest of the project. That will give them a unique ID, which means you can hide and show them whenever wanted.
You must be logged in to post a comment.


