PowerPoint has evolved into an app which is the Swiss Army knife of content creation, not only for presentations, but also printed collateral, videos and even interactive presentations.
Imagine you have to use a file containing all the slides you could possibly present to your audience knowing that you will only present a small subset of them at any one time. That’s where interactive presentations can be a powerful addition to your presentation arsenal. It’s a bit like visiting a website and only clicking on the pages you’re interested in as opposed to visiting every single page. Interactive presentations provide you with the ability to quickly react to your audience by jumping around your content live instead of having to say: “I’ll come to that later” and then forgetting!
The interactivity element provides the presenter with the ability to click on objects on their slide which then takes them to a specific location in the presentation.
Interactive presentations: The basics
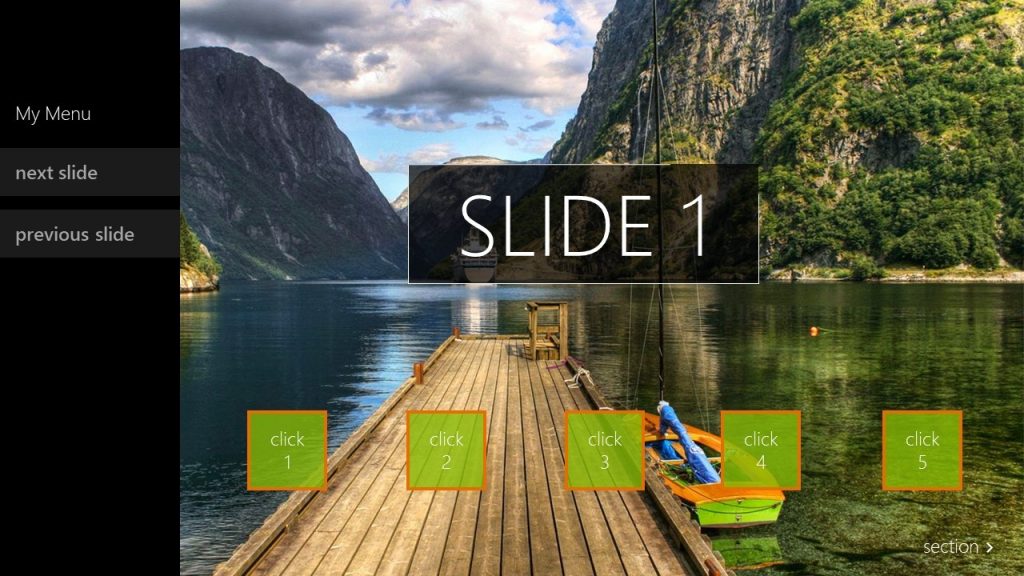
I’ll use a basic example like the slide below to show you how to add interactivity to your presentation. There is a menu on the left-hand side of the slide which we’ve built with various shapes. Let’s say you want use this to give the presenter the ability to jump to either the next or previous slide:
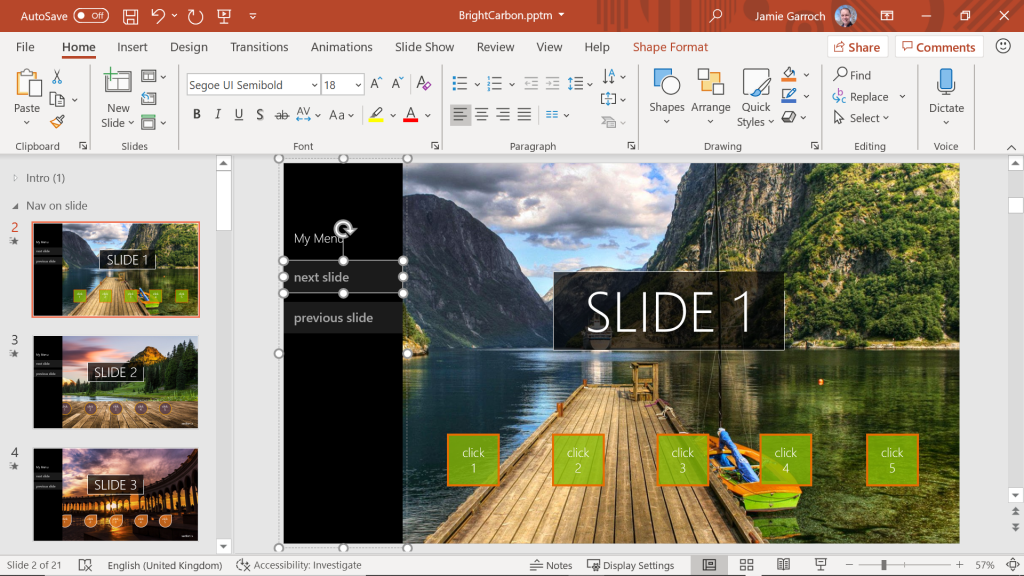
The first thing you need to do is select the object you want to make interactive:
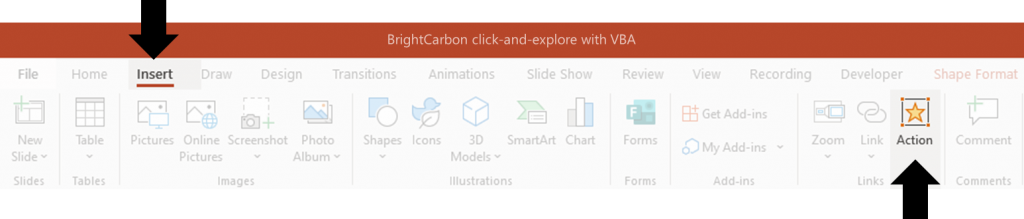
You then need to link it to another slide. The functionality required to achieve the linking is simple and utilises a long-standing feature of PowerPoint called Actions. You can find this feature in the Insert tab of the PowerPoint ribbon:
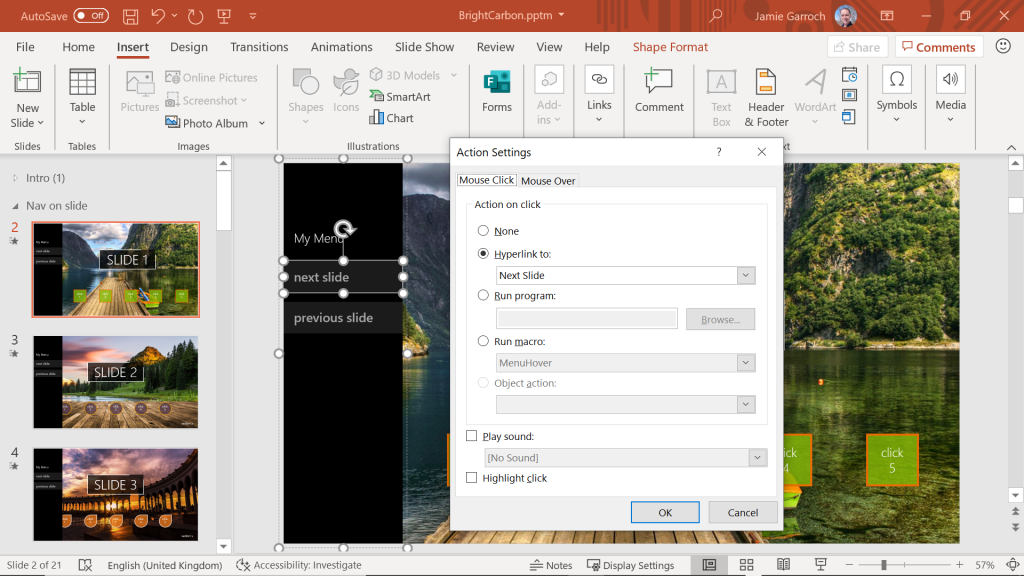
When you click the Action button, you get a plethora of options in two tabs as you can see:
These tabs allow you to set links for either or both of two mouse actions, MouseClick and MouseOver (or ‘mouse hover’).
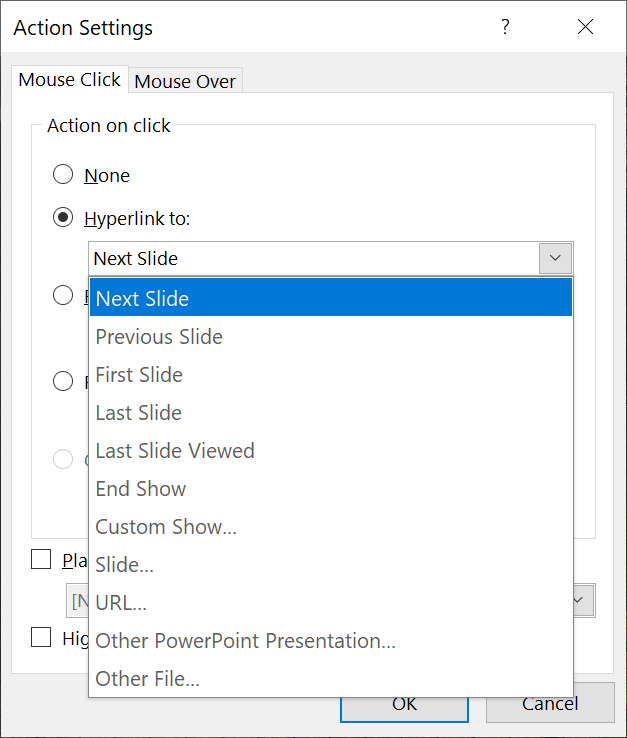
The one you’ll probably use the most is Mouse Click and you can use the Hyperlink to dropdown to link to one of several built-in navigation options:
Again, the ones you’ll probably use when creating interactive presentations are Next Slide, Previous Slide and Slide… where you can choose a specific slide to link to.
Once you’ve added the action to your object you can click on it in slide show mode and it will take you to whatever slide or content you chose to link to.
The Animation Challenge
One aspect of creating interactive presentations is that if you combine the above action technique with animation, the animations are not reset automatically when you return to a slide that has already been presented. This might be an issue if you want to either replay the animation sequence or if you’ve used animation triggers to show and hide your menu. In the later case, the menu would remain on screen when you return to a previously presented slide and that means the presenter must spend time hiding it again.
So, what can you do about this?
Technique 1: Duplicate Slide
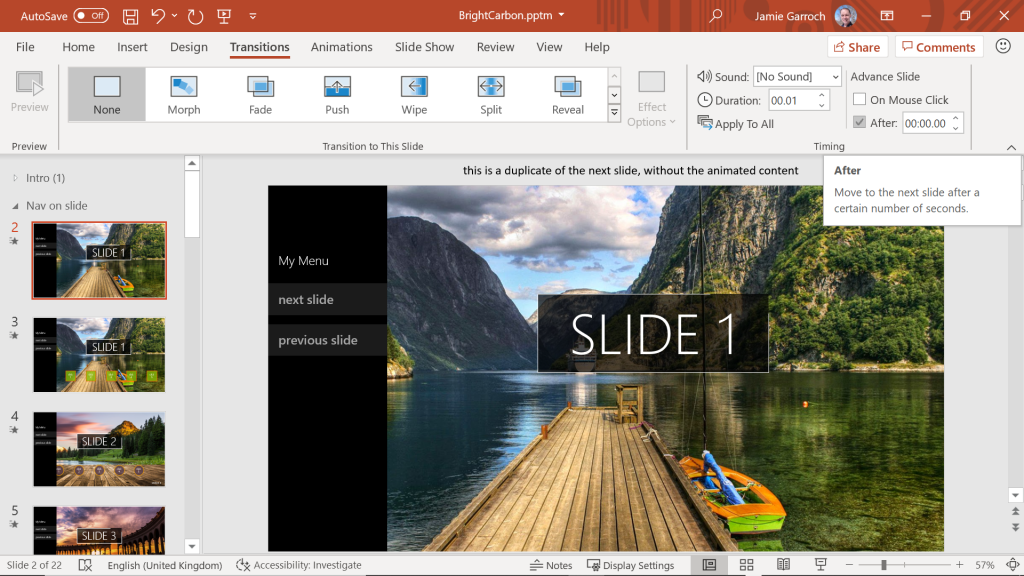
There is a native non-VBA technique you can use which is to create a duplicate of the slide without animations and set it to automatically transition to the next slide on zero seconds as seen in the top-right of the ribbon here:
You then change the action hyperlink to point to this duplicate slide instead of the one with the animations. This forces the animation on the slide you want to show to reset.
Technique 2: VBA Magic
The challenge with the above technique is that you must now maintain two copies of every slide in the presentation and secondly, remember to set the links to the auto-transition slide, not the slide you will present. This can make your interactive presentations into much more cumbersome files with more slides than is really necessary, subsequently making them more difficult to maintain.
You can avoid having to do this by adding a couple of VBA macros to our project. If you’re not familiar with how to add VBA to your presentation, have a look at our blog article showing you how to do it.
You’re going to create two VBA macros to go to the next slide and previous slide, both of which will reset the animations on the target slide. The full code is available at the end of this article.
Here is the VBA code for the next slide macro:
Public Sub NextSlide(ByRef oShp As Shape)

  Dim oSld As Slide

  Set oSld = oShp.Parent

  lIdx = oSld.SlideIndex + 1

  If lIdx = ActivePresentation.Slides.Count Then lIdx = 1

  SlideShowWindows(1).View.GotoSlide lIdx, msoTrue

End Sub
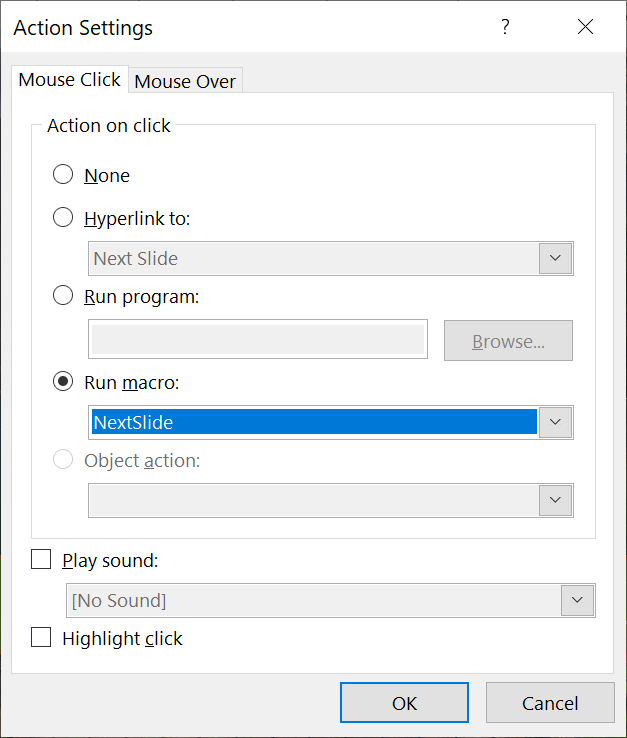
Once you have this code in our project you can go back to the Insert/Action dialog and change the mouse click action to run our custom macro:
How does it work?
The opening line of the macro passes the shape you clicked on to the macro:
Public Sub NextSlide(ByRef oShp As Shape)
This allows us to determine which slide you’re on by setting a reference to the shape’s parent object, which is the slide:
Set oSld = oShp.Parent
You can now find out what the slide index is for this slide and increment it by one:
lIdx = oSld.SlideIndex + 1
You need to handle what happens if you’re on the last slide and you’ve chosen to link back to the first slide in that case:
If lIdx = ActivePresentation.Slides.Count Then lIdx = 1
The last step is to actually tell PowerPoint to go to this slide:
SlideShowWindows(1).View.GotoSlide lIdx, msoTrue
The magic part of this is the tiny msoTrue on the end of the line. The GotoSlide method (think of a method as an action verb) takes two arguments. The first is the slide index you want to go to and the second is a boolean option to tell PowerPoint to reset the animation for that slide, or not.
Now when you click any object that has this macro assigned to the Mouse Click action, the slide show will go to that slide and reset the animations.
The final thing to do with your interactive presentations is to save the pptx file as a pptm file. The ‘m’ stands for macro-enabled presentation. If your organisation has a code signing certificate, you can optionally sign your VBA project to minimise security warnings and this is something we do as standard at BrightCarbon. If you don’t do this, you’ll need to make sure macros are enabled by clicking File / Options / Trust Center / Trust Center Settings / Macro Security:
Now that you know how to use VBA when creating interactive presentations, check out my post on restoring default slide master layouts with VBA. or discover our Click-and-Explore service to find out how we can help create your next beautifully-designed interactive presentation.
Full code for Next, Previous and Reset Animation macros
You can copy and paste the full code from below into your VBA project. The PreviousSlide macro works just like the NextSlide one with a small adjustment to loop to the last slide if you’re on the first slide.
There is also a simpler ResetCurrentSlide macro which you can assign to any shape on your slide or slide master or layout which just resets the animations for the current slide.
Option Explicit

Public lIdx As Long

' --------------------------------------
' Custom button to go to the next slide
' --------------------------------------
Public Sub NextSlide(ByRef oShp As Shape)
  Dim oSld As Slide

  Set oSld = oShp.Parent

  lIdx = oSld.SlideIndex + 1
  If lIdx = ActivePresentation.Slides.Count Then lIdx = 1

  ' Go to the specified slide, resetting the animations
  SlideShowWindows(1).View.GotoSlide lIdx, msoTrue
  End Sub

' --------------------------------------
' Custom button to go to the prev slide
' --------------------------------------
Public Sub PreviousSlide(ByRef oShp As Shape)
  Dim oSld As Slide

  Set oSld = oShp.Parent

  lIdx = oSld.SlideIndex - 1
  If lIdx = 0 Then lIdx = ActivePresentation.Slides.Count - 1

  ' Go to the specified slide, resetting the animations
  SlideShowWindows(1).View.GotoSlide lIdx, msoTrue
  End Sub

' --------------------------------------
' Custom button to reset animations
' --------------------------------------
Public Sub ResetCurrentSlide()
  With SlideShowWindows(1).View
    .GotoSlide .CurrentShowPosition
  End With
End Sub
Navigating to a specific slide
This concept can be taken further should you wish to navigate to a specific numbered slide. You need a way to pass the number of the slide you want to navigate to into the macro. A nice and easy way to do this is to use the name of the shape you assign the click action to. Open the Selection Pane by pressing the very secret shortcut Alt+F10 (or clicking the Home tab followed by Arrange / SelectionPane) and change the name of your clickable shape to “5” for example. Now link that shape to the macro below:
' ----------------------------------------------------------------
' Custom button to go to slide specified by the name of this shape
' ----------------------------------------------------------------
Public Sub GoToSlide(ByRef oShp As Shape)
  Dim oSld As Slide
  Dim lSld As Long

  Set oSld = oShp.Parent

  ' Check if the name of the clicked shape is a number
  If IsNumeric(oShp.Name) Then
    lSld = CLng(oShp.Name)
    ' Check that the slide number is valid
    If lSld > 0 And lSld <= oSld.Parent.Slides.Count Then
      ' Go to the specified slide, resetting the animations
      SlideShowWindows(1).View.GoToSlide lSld, msoTrue
    Else
      MsgBox "The specified slide number " & lSld & " is invalid.", _
             vbInformation + vbOKOnly, "BrightCarbon VBA Macro"
    End If
  Else
    MsgBox "The shape's name in the Selection Pane (Alt+F10) must " & _
           "be the number of the slide you want to navigate to.", _
           vbInformation + vbOKOnly, "BrightCarbon VBA Macro"
  End If
End Sub
How do you make sure that your graphs and charts have consistent branding across Excel, PowerPoint and Word? Learn how to create and use custom templates that support your brand identity across Microsoft Office.
You can do some really cool things in Microsoft Office with just a few lines of Visual Basic for Applications (VBA) - from creating your own custom formula in Excel to correcting branded content in PowerPoint to merging address data for a mail campaign in Word. And sometimes you need to share that VBA solution with colleagues and clients, via the Internet. A change that Microsoft rolled out at the end of March 2022 tweaks the process required by Windows users to gain access to this active content.
Thank you SOOO much for this — what a wonderful resource. Extremely well explained all the way through.
Question: is there a similar way to what you’ve described above that would allow me to target a specific slide number. I can see that i could do the math (+ or – X number of slides), but then i’d need a new macro for every slide. If there are any solutions for this, i would greatly appreciate it.
Hi Daniel. Glad it’s helpful for you. I think the easiest way to achieve this would be to use the name of the object and pass it to the navigation macro. For example, if you create a shape on a slide, change it’s name to “5” in the Selection Pane (Alt+F10) and then link it to the GoToSlide macro above then that would do what you want.
Thanks for all the great advice. I’m trying to create a PowerPoint where text entered on the first slide populates text boxes in later slides. Any suggestions?
Hi sufyan and thank you for the question. You can convert any PowerPoint file to a PDF regardless of the source file format e.g. a pptx or a code-enabled pptm, even a ppsx/ppsm slide show. But, any VBA code will be stripped out as Adobe doesn’t support it and hence the functionality provided by that code will be lost. I hope that helps.
Thanks for all the great advice. I’m trying to create a PowerPoint where text entered on the first slide populates text boxes in later slides. Any suggestions?
Hi Kieran. You could do that with VBA. One decision to be made upfront is what triggers the update. It’s possible to detect when users are editing text but that’s a very involved development. Alternatively, if it’s just you using the solution then a simple macro could work which you manually call using Alt+F8. The simple example below will copy the text from the selected object to any other shape with the same name (use Alt+F10 to open the Selection pane to name objects) that it finds in the presentation:
Sub CopyTextFromSelectionToSameNamedObjects() Dim oShpSrc As Shape, oShpTgt As Shape Dim strText As String Dim oSld As Slide
On Error Resume Next ‘ Error handling off!
Set oShpSrc = ActiveWindow.Selection.ShapeRange(1)
If oShpSrc Is Nothing Then Exit Sub
If oShpSrc.HasTextFrame Then strText = oShpSrc.TextFrame.TextRange.Text Else Exit Sub End If
For Each oSld In ActivePresentation.Slides For Each oShpTgt In oSld.Shapes If Not oShpSrc Is oShpTgt Then If UCase(oShpTgt.Name) = UCase(oShpSrc.Name) Then If oShpTgt.HasTextFrame Then oShpTgt.TextFrame.TextRange.Text = strText End If End If Next Next End Sub
If you’d like us to develop this further for you, please use our Contact form.


Best methods you have shared here to make interactive presentation in Power Point.
Thanks Aira!
You have come forward with the top methods to make interactive presentations with Power Point.
Thank you SOOO much for this — what a wonderful resource. Extremely well explained all the way through.
Question: is there a similar way to what you’ve described above that would allow me to target a specific slide number. I can see that i could do the math (+ or – X number of slides), but then i’d need a new macro for every slide. If there are any solutions for this, i would greatly appreciate it.
Hi Daniel. Glad it’s helpful for you. I think the easiest way to achieve this would be to use the name of the object and pass it to the navigation macro. For example, if you create a shape on a slide, change it’s name to “5” in the Selection Pane (Alt+F10) and then link it to the GoToSlide macro above then that would do what you want.
hii, thanks for that.
one question, in the end, can I convert my ppt to pdf or another format in a way that the content will be no edible ?
Thanks for all the great advice. I’m trying to create a PowerPoint where text entered on the first slide populates text boxes in later slides. Any suggestions?
Hi sufyan and thank you for the question. You can convert any PowerPoint file to a PDF regardless of the source file format e.g. a pptx or a code-enabled pptm, even a ppsx/ppsm slide show. But, any VBA code will be stripped out as Adobe doesn’t support it and hence the functionality provided by that code will be lost. I hope that helps.
Thanks for all the great advice. I’m trying to create a PowerPoint where text entered on the first slide populates text boxes in later slides. Any suggestions?
Hi Kieran. You could do that with VBA. One decision to be made upfront is what triggers the update. It’s possible to detect when users are editing text but that’s a very involved development. Alternatively, if it’s just you using the solution then a simple macro could work which you manually call using Alt+F8. The simple example below will copy the text from the selected object to any other shape with the same name (use Alt+F10 to open the Selection pane to name objects) that it finds in the presentation:
Sub CopyTextFromSelectionToSameNamedObjects()
Dim oShpSrc As Shape, oShpTgt As Shape
Dim strText As String
Dim oSld As Slide
On Error Resume Next ‘ Error handling off!
Set oShpSrc = ActiveWindow.Selection.ShapeRange(1)
If oShpSrc Is Nothing Then Exit Sub
If oShpSrc.HasTextFrame Then
strText = oShpSrc.TextFrame.TextRange.Text
Else
Exit Sub
End If
For Each oSld In ActivePresentation.Slides
For Each oShpTgt In oSld.Shapes
If Not oShpSrc Is oShpTgt Then
If UCase(oShpTgt.Name) = UCase(oShpSrc.Name) Then
If oShpTgt.HasTextFrame Then oShpTgt.TextFrame.TextRange.Text = strText
End If
End If
Next
Next
End Sub
If you’d like us to develop this further for you, please use our Contact form.