


This article is very nice i really like this article i’ll recommend to all of my friend to watvh your blog
How to Use Hotspots in Drag and Drop Interactions
April 18th, 2017
In an earlier post, we looked at three ways to use hotspots in your e-learning courses. In most cases, hotspots are used as invisible buttons for interactive e-learning. But today we’ll look at ways to use the hotspot feature in your drag and drop interactions where the hotspot isn’t a button.
Drag and Drop Basics
Generally, there are two main components to drag and drop interactions:
- an object that is dragged
- a target to accept the dragged object
I covered this in more detail when we looked at how to create drag and drop interactions.
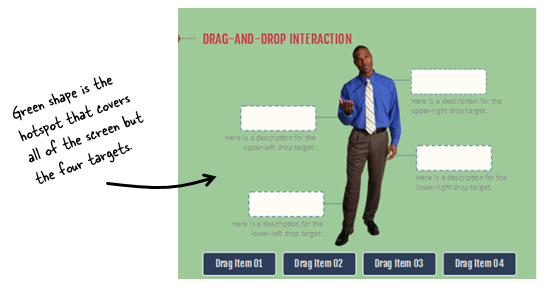
Use the Hotspot as a Catch-all Target
Usually, there’s an obvious correct or incorrect target for drag and drop interactions. But what happens when the object is dropped outside of one of the target choices? In most cases, the object gets kicked back to the starting point as in the image below.
Dropped object snaps back to starting point when dropped outside of the target.

In the above example, the dragged object can only be dropped on one of the targets. If it’s dropped outside of the target, it bounces back to the starting point. This is usually the default setting and most common in drag and drop interactions.
Dropped object triggers an “oops” layer when dropped outside of the target on the catch-all hotspot.
However, the hotspot feature can serve as a catch-all target to provide feedback when objects are dragged and dropped outside of the desired target. When an object is dropped on the catch-all target it triggers the appropriate feedback. In the example below, the catch-all target triggers an “oops, try again” layer.
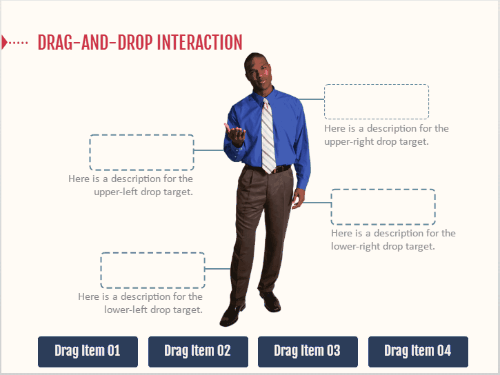
If you create a catch-all hotspot there are two things to do:
- Put the hotspot underneath all of the other targets. Otherwise, it covers the drop targets and the interaction won’t work.
- Determine how the dropped object responds. By default the object snaps to the center of the target; and since the target covers the entire screen, it looked weird sitting on top of the guy who’s in the center of the screen. In the example above I let it remain where it was dropped.
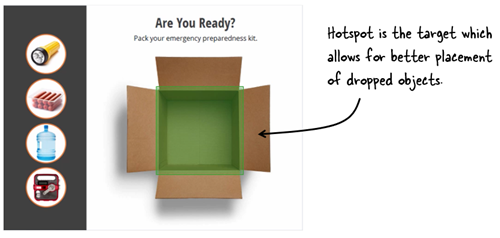
Use the Hotspot to Expand and Control the Drop Target
Another great use of the hotspot feature is to better manage the drop target area. Since the hotspot is transparent it can sit on top of other object and be sort of a surrogate drop target. Instead of dropping on what looks like the target, they’re actually dropping on the target hotspot.
By doing this, you can determine where the dropped object is displayed. Here are before and after examples.
Dropped objects align based on the target image and display outside of the box.

The objects are dragged to the box. By making the box image the drop target and tiling the objects, you can see that the objects actually align at the top of the box image.
Dropped objects align based on the hotspot target and align inside of the box.

In the example above, the box image isn’t the drop target. Instead, there’s a hotspot placed on top of the box image and centered over the opened box. This allows control of the alignment of the dropped objects to create the desired visual effect.
The hotspot is a great feature for creating interactive content. Most of the times it’s used as an invisible button. However, because it’s an easy-to-see green box (for production) and invisible to the end user, it’s a great feature to create large, catch-all targets. And it also works well for controlling how the dropped objects align and display.
Events
- Everyday. Check out the weekly training webinars to learn more about Rise, Storyline, and instructional design.
Free E-Learning Resources
 |
 |
 |
|
Want to learn more? Check out these articles and free resources in the community. |
Here’s a great job board for e-learning, instructional design, and training jobs |
Participate in the weekly e-learning challenges to sharpen your skills |
 |
 |
 |
|
Get your free PowerPoint templates and free graphics & stock images. |
Lots of cool e-learning examples to check out and find inspiration. |
Getting Started? This e-learning 101 series and the free e-books will help. |
You might also like:
2 responses to “How to Use Hotspots in Drag and Drop Interactions”
Thanks, Tom. Using the hotspot thus gives the learner a bit more feedback.


0
comments