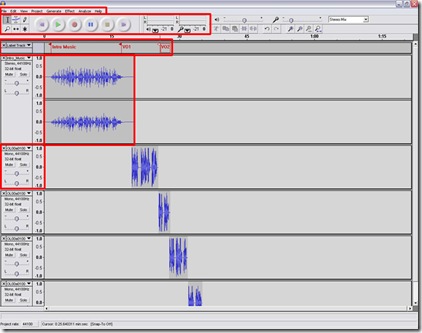
In my previous post, I discussed interface metaphors, and showed a video example of the process behind the analog tape-editing metaphor used by most media editing tools - including Audacity. Today, I will describe how this approach to editing is replicated virtually, via your computer's user interface. Figure 1 shows the primary menu options and functions of Audacity.
Figure 1 The Audacity UI
[Click to Enlarge]
The menu bar contains all of the functions for Audacity.
 Figure 2 The Audacity Menu bar
[Click to Enlarge]
You’ll see some familiar features – Open, Import, Copy, Cut, Paste, and so on. There are also a range of audio-specific functions including the facility to analyze the audio signal, generate white noise, a pure note tone, or a click track, as well as a range of audio effects including:
- Noise reduction (NR) to remove background noise
- Normalization (increasing or decreasing the amplitude of an entire audio signal so that the peak amplitude matches a desired target. Typically, normalization increases the amplitude of the audio waveform to the maximum level that does not introduce any new distortion – this “makes the audio louder”
- Equalization (EQ) - changing the characteristics of the audio – i.e. add bass or treble, cut or enhance certain frequencies
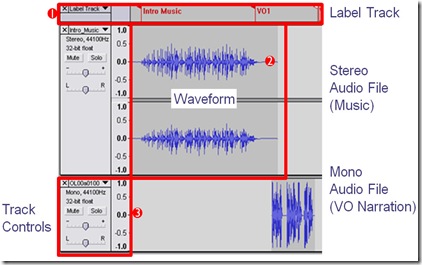
The features of the Audacity timeline (see Figure 3) are common across all audio editors.
Figure 3 The Audacity Timeline
[Click to enlarge]
- The label track enables you to insert information about events on the timeline. Here, I have indicated the point where the intro music begins, and the point where the first voice-over should start.
- Most important is the audio waveform itself. The waveform is a graph showing the amplitude (loudness) of the audio signal over time.
- The track controls allow you to control the characteristics of an individual track on the timeline.
There are two types of audio file in Figure 3: a stereo file which is typically used for music, and a mono file, which we use for narration. There is little point recording voice-overs in stereo – you only have one voice (or audio source), after all. If you record a voice-over in stereo, you only double the file size, for no gain in quality.
Using Audacity
These are the Rules of Audacity (according to SourceForge.net)
- One audio clip per track.
An audio clip is simply a piece of audio material, imported, recorded, split or duplicated from another track, one track can only carry one piece of audio at a time. You can extend it by pasting material or inserting silence in to it, or cut a piece away, but it will always be one continuous piece of audio. - Audacity always records to a new track.
This new track is opened at the lowest free track. You'll can zoom out and then resize the track view of the lowermost-most track to see what is recorded. You can actually use the window sliders at the bottom and right to do this after starting to record, but this way no performance will be lost to the windowing system.
Pressing CTRL+F displays all the tracks in your entire project. Note: this function only affects the horizontal zoom (left-right zoom); you must use the mouse and the magnifying glass icon to zoom out . - Edit/Duplicate will not create a new audio file.
This may not seem important, but it is useful to know this if you're editing a large recording. Audacity is a non-destructive editor (unlike the analog editing process): it works by referencing the original (or master) audio material: edits and other change you make affect the referenced file, not your master file.
One of the positive consequences of non-destructive editing is that you can undo/redo edits as many times as you need to even after you have saved your project, which is pretty cool.
Next Time: Setting Audacity Preferences
--


No comments:
Post a Comment