


First part of tips and tricks for use of 360 images/video: how to use Quiz Preferences, style overlay quiz/score slides, audio tips, workaround for test styled following the company design rules.
Intro
The ability to embed 360 images/video in an eLearning course is an enhancement (CP2019) which can be used in a lot of eLearning courses. As a civil engineer I think about the setup of a construction site, detection of lack of safety in a building etc. The most recent release of Captivate allows to use those assets in two different type of projects: either a full VR project, or on individual slides in a normal cptx project. Not yet possible in a Fluid Boxes project as far as I know.
A VR project will be created right from the welcome screen. It can only have slides with a 360 Image or Video. All other Slide types except 360 slide are dimmed under the big button Slides, and the menu Insert is completely dimmed. You can add hotspots to trigger several possible actions,to the 360 slides, and overlay Question slides (not KC slides) where two types are possible: T/F and MCQ). The score slide is available but will not show up as overlay for the 360 slide, you’ll have to define a background slide for it. I will offer some tips for the overlay Quiz slides, and for the Quiz Preferences.
If you use a 360 slide in a normal (blank) cptx-project, you’ll have the same hotspot functionality but will not be able to have overlay question slides. However you can use normal quiz slides and KC slides in the project. You’ll find more information about 260 slides in a future blog post.
In this article I will only talk about VR Projects using 360 Image slides.
VR project
Overlay Quiz slides – tips
Quiz Preferences
Quiz Preferences are available for the graded Overlay Quiz slides. But lot of the options are dimmed. Reporting setup is the same as in any other project with a quiz. In Settings options are limited to:
- add the Clear button
- add the Review navigation buttons if Review is allowed for the learner
- hide or show the Score slide
- allow Review
As usual for all Quizzes in Captivate, I strongly recommend to keep the Required field set to the default ‘Optional’ to avoid problems. You have same control over Quiz Result Messages and Quiz Review Messages as in any other quiz.
In Pass or Fail you can set the passing score (in % or points). But for the number of attempts on quiz level, you have only th choice between 1 or Infinite Attempts. In the last case you should activate the Retake button on the Score slide. There are no actions possible for Passing or Failing grade. No advanced actions are possible in a VR project, not only here for the Quiz, but also for the hotspots, for the On Enter events of any slide.
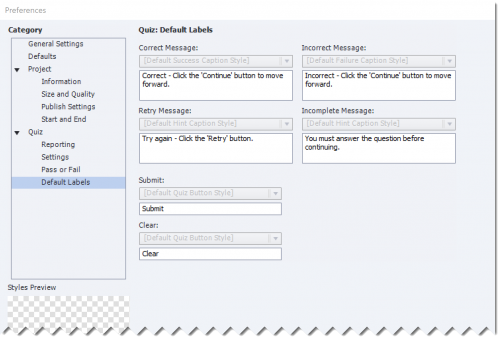
Default Labels are stripped out as you can see in this screenshot. It is impossible to change a style, only the Feedback messages, Clear and Submit button labels are available:
Styling the Quiz and Score slides
In a VR project, Themes are not available. Moreover the Object Style Manager cannot be used (as you did see in Quiz Preferences, Default Labels). That seems to be a show stopper if you want to implement the font and colors that are part of your company’s default styles. However it is possible, manually, to change the font and other features of the different text containers on quiz and score slides. You can even use Typekit fonts. It is of course more work than just applying another style, which is a pity. Maybe launch a feature request?
Score slide
Since the score slide needs a background slide, I tried to add slide audio to that background slide. However that audio played, but only for 1,5sec. As usual the pausing point for the sore slide (as for quiz slides) was set at 1,5secs. You can move that pausing point and increase the length of the slide. But I did not succeed to make the audio play in combination with the score slide showing up.
Hotspots and actions
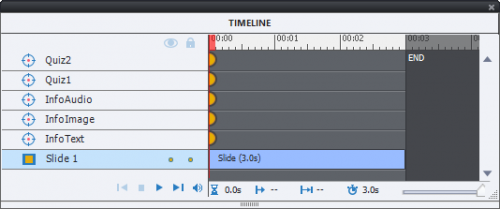
A hotspot is similar to a click box, but without a duration. It shows in the Timeline up as a brown circle. If you just add a number of hotspots without touching the timeline, they will all show up on the first frame of the slide, which means they’ll all be available to the learner at the same time, when in ‘Exploratory’ mode. If you prefer to use the ‘Guided’ mode, the sequence used to show a hotspot is following the stacking order: bottom hotspot shows up first, top hotspot last:
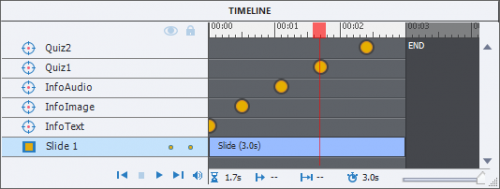
You can also scatter the hotspots over the timeline. But I will dedicate a separate article to the timelines of the 360 image and video slides in a near future:
Possible actions triggered by clicking hotspots are limited:
- Show/Hide Playbar
- Navigation commands: Go to Previous Slide, Go to Next Slide, Jump to Slide, Go to Last Visited Slide
- No Action, Continue, Exit
- Play Audio/Stop Triggered Audio. There are more ways to have audio playing in a VR project:
- You can add slide audio. There is no way to pause that slide audio however with a custom action triggered by a hotspot (Pause is lacking in the commands). The only way to pause or mute the audio is with a playbar that has the appropriate buttons.
- Hotspot audio: you can add audio to a hotspot like with any object. Be aware of the fact that this audio will play when the object becomes visible. This means that if the hotspots are all in the first frame, all audio clips start playing immediately (maybe even parallel with slide audio). If you scatter the hotspots, this is a way to combine a Display Text or Image command with audio. More info later in an article about the Timeline of a 360 Slide.
- I mentioned above that adding
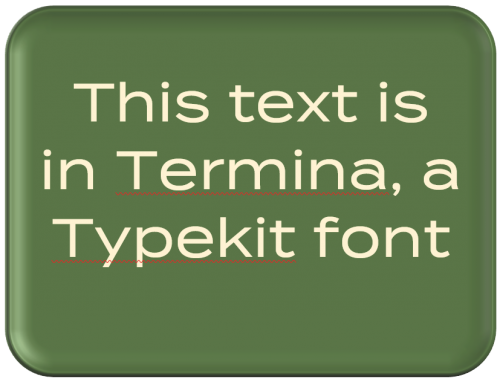
- Display Text: the text will always be in Times New Roman, no way to change the style at all. The only possible workaround I see at this moment is to create an image with text in the appropriate font, size and color. Beware: you need to have a background for the text, or it will not show up. You also have to take care of eventual have a lower opacity, which means you will be limited to PNG images, because JPEG doesn’t support transparency. Here is an example of a simple text image which I created in Word (text box, not simple text), captured with Snagit and lowered the opacity to 80% (this is not visible here, but shows well up in the VR project.:

- Display Image: can also be combined with audio as explained before, and is probably the most versatile way of adding information. I mostly use it also for Text display?
Zooming?
The question has appeared a couple of times in the forums. It is not possible to zoom in on the 360 image, hoping this will make it in a future release. At this moment, a possible workaround is to take a 2D enlarged image and insert it on a hotspot that displays that image. Not the real stuff of course. I used it to display a full shot of my kitchen appliances in a 3D image of my kitchen.
thanks!
thanks for the write up
Zooming would be a great addition, for an optional effect in a VR project intended for display on a normal device. (desktop, laptop, or tablet). But it would not work well for a project intended for a HMD.
Well-written article!!
Thanks! If you like VR slides and projects, I just published a blog in this portal about the Timeline for 360 slides, more tips and tricks.
Thanks for bringing up the importance of zooming in/out in VR. This is so fantastic I’ll be working on a project of the country I’m traveling to with 360 cameras. So great Adobe had made it easy to use 360 video/images in a learning environment. Trip will be March 1-17 and then the building in Captivate will begin! Thanks for making this possible… So excited…
I will add another blog post explaining the use of the timeline in a VR project or a 360 slide. Probably today.
Indeed, great enhancement, and I’m sure it will be improved in future releases
Hello Lieve,
thank’s for this article !
VR in captivate sounds good, I hope the next version will introduce the zoom and improve the available action into the hotspot.
Have a nice day,
Chris
Certainement qu’il y aurait des amèliorations!
Is it possible ad 2d videos in a hotspot? or launch a 2d video?
No, that is not possible.
Thank you for the post. I’m completely new to captivate VR. As for zooming, a hot spot with a 2D enlarged image you described is not a bad idea I think.
You’re welcome!
Invaluable information as always. Thanks for all your contributions to this community. I always learn something
You must be logged in to post a comment.


