Welcome to our comprehensive guide to handling legacy Flash eLearning content. This page has all you need to know to on how to rapidly republish or recreate your courses to adapt to the imminent end of Flash at the end of 2020.
How to use this article
This guide contains lots of helpful tips and tricks, and we’ve divided it into sections so you can work through the process of handling legacy Flash eLearning content from start to finish easily. We’d recommend starting at the beginning, but feel free to click below to jump to the content you need.
What is happening to legacy Flash eLearning content?
Why is Flash ending?
When desktop training reigned supreme, Flash-based eLearning courses were ubiquitous in the online training sphere. But, with learners branching away from desktop learning and exploring micro-learning on various mobile devices, Flash-based courses are becoming redundant:
Flash-based content is not supported by mobile devices or the latest browsers.
Flash content is CPU intensive, so drains a device’s battery.
Flash content also poses a security risk if the required plug-in Player is not regularly updated.
With Flash usage in websites down to 5.3% in January 2018 it’s no wonder that Adobe is finally pulling the plug on Flash at the end of 2020.
What is replacing Flash?
Despite its drawbacks, you likely have a lot of Flash content dotted around your organisation. This is usually older, legacy content that was created before Flash started to get outpaced by other software platforms. As there is so much Flash content out there in the world, you’d be forgiven for assuming that Adobe would provide a replacement to make sure this Flash content will still work after 2020. But you’d be sorely mistaken!
There is no replacement for Flash. Simply put, if you don’t update your existing Flash content to a newer standard, the content will no longer work. Your organisation’s learners will be met with broken links and error pages instead of useful training content. This will prevent them from getting the information and learning they need and give your team a headache.
So, what can you do to salvage your legacy Flash eLearning content? The answer depends on what your content is, what tools you have at your disposal, and what your learners need to get out of the content. Let’s take a look at some options…
Choosing what to do with legacy Flash eLearning content: 5 options
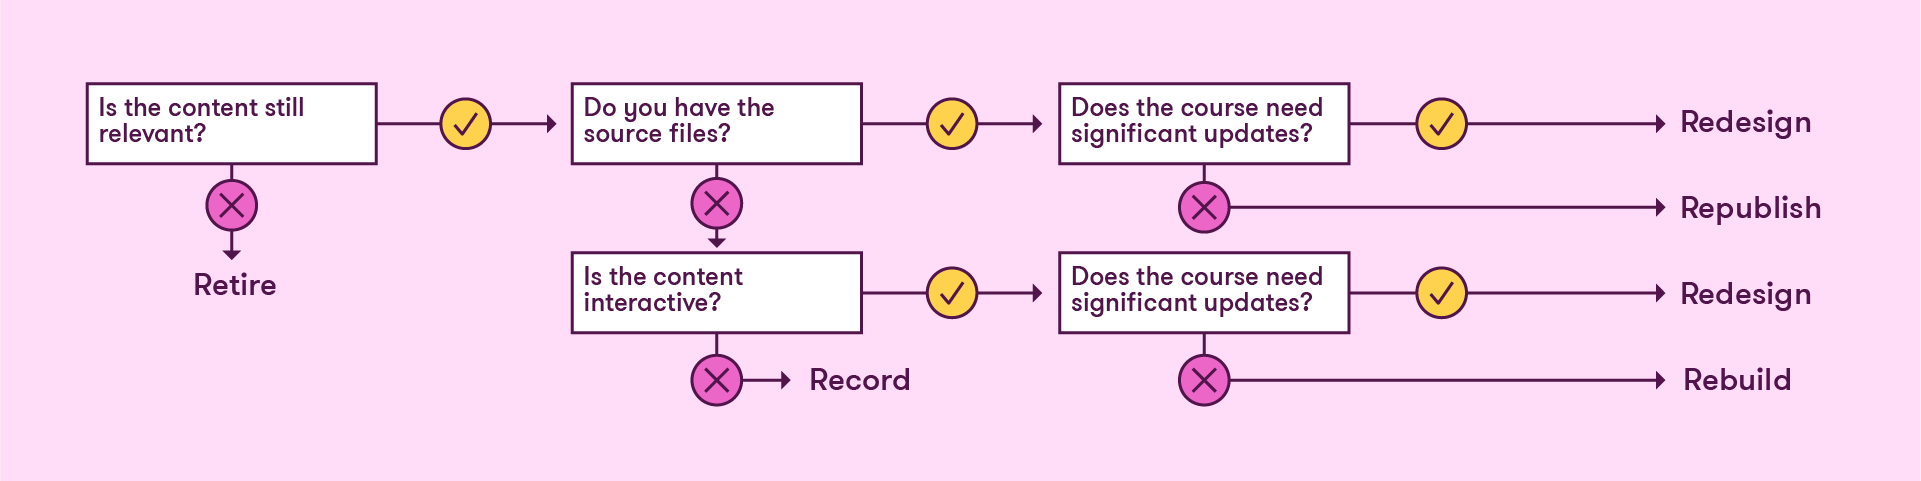
The first thing to do when dealing with legacy Flash eLearning content is take a critical look at what you have already. By investigating your content, you will be able to plan the best course of action and direct your time and energy to the areas which need the most work. We really like this guide from Dr RK Prasad of eLearning Industry. Dr Prasad outlines the four widely-agreed options for handling Flash content: record, republish, rebuild, redesign. We’d throw a fifth option into the mix: retire.
Here’s a handy flow chart to help you work out what to do with your content.
You can download a free summary PDF of this flow chart, with additional information about each of the five options to keep for reference after you’ve read the tips below. Now, let’s take a look at each of these decisions and options in a bit more detail.
Retire
At BrightCarbon, we talk a lot about making sure eLearning is relevant for your learners and business needs. Don’t be afraid to take a Marie Kondo approach to old courses. Instead of ‘Does this spark joy?’, ask yourself, your team, and your learners the following questions when reviewing your legacy Flash eLearning content:
Is this course still relevant?
Do the learning objectives still relate to our current learning strategy?
Is the content in this course up to date?
If the answer to all of these questions is ‘no’, it is time to retire the content. This might sound like an easy out, but by focusing your time and energy on content that is relevant and aligned with your learning strategy, you will end up with a library of courses that are useful for learners and serve your business goals. You will free up room on your LMS or training library for new training content, too!
You could also consider retiring only certain sections of a course and choosing another strategy for other sections. Be critical and deliberate in taking content forward into the brave new world that exists beyond Flash.
Record
If your course content is relevant and up to date, you will want to preserve it for learners to access after Flash retires. The choice you make here depends on the content you have access to.
If you do not have the source files for the course, or the course was built with obsolete software, recording the content as a video is a decent option. This works especially well for eLearning content with low-level learning objectives (e.g. recall, identify, list) and little-to-no interactivity. By recording the content as an MP4 video file, you can capture the information included in the course and deliver it to learners in a globally accessible format.
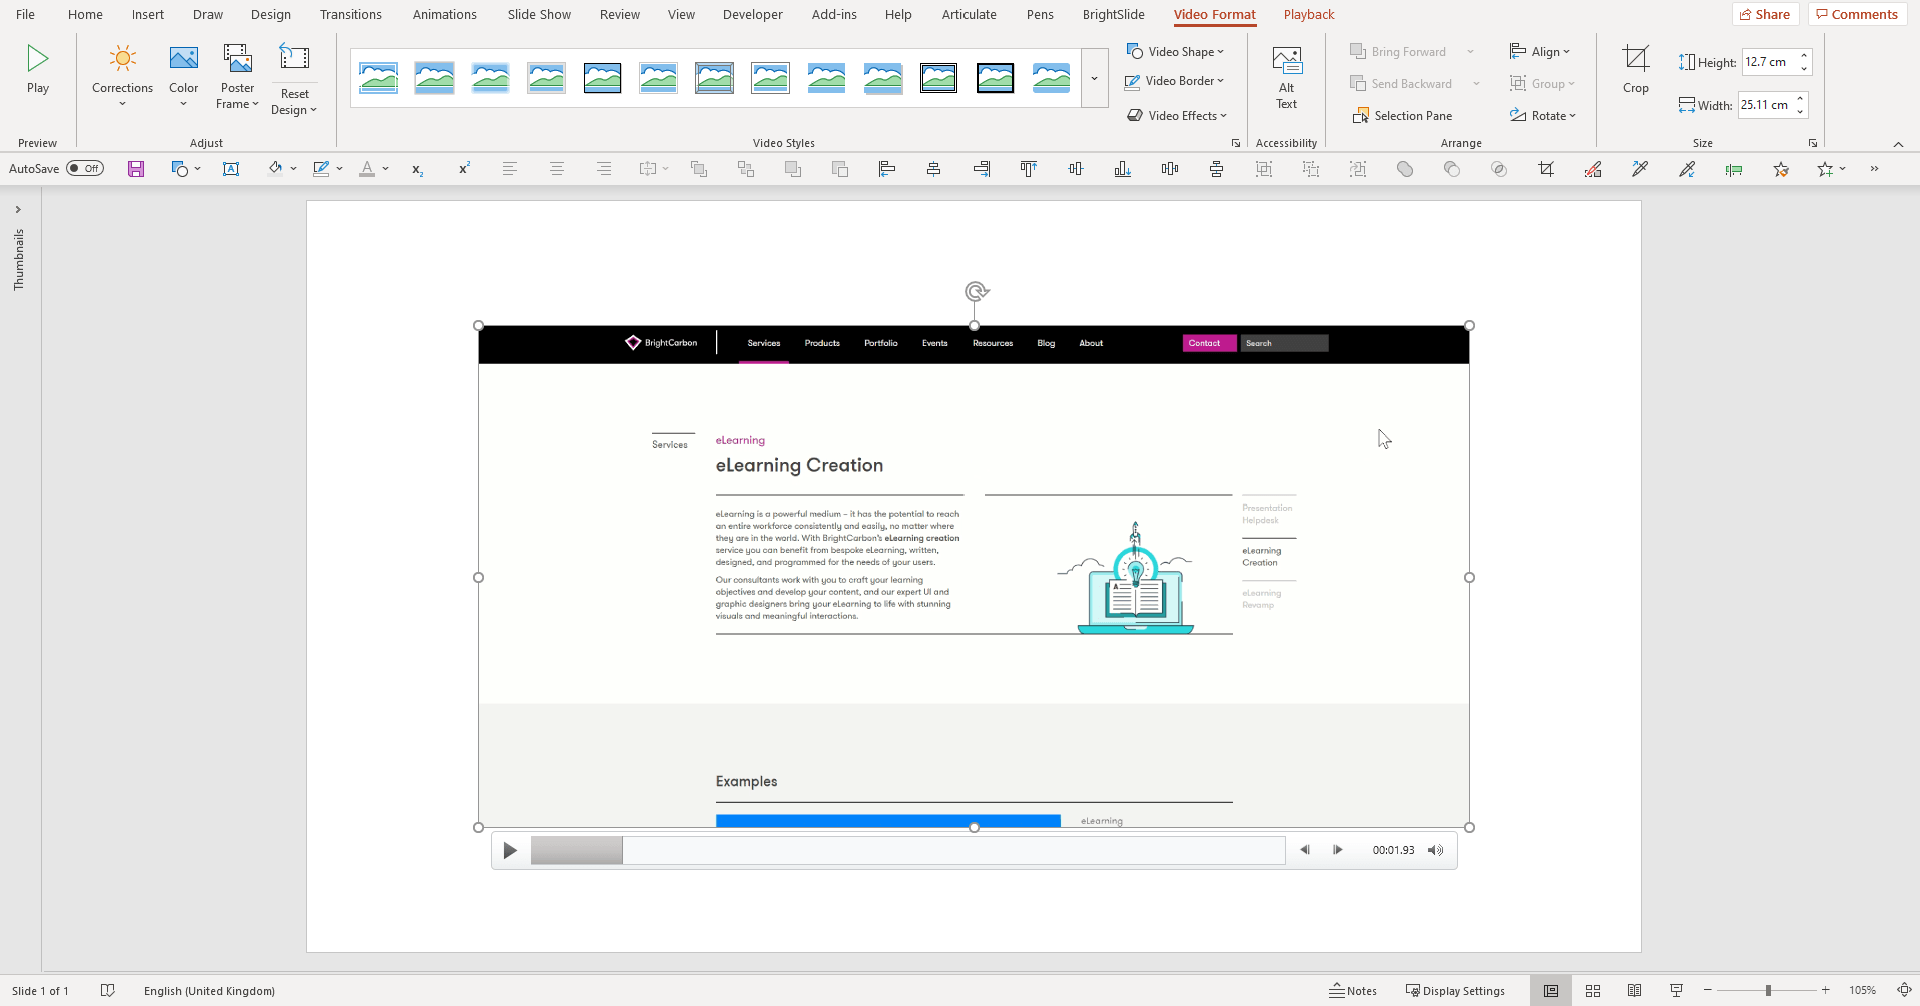
You don’t need any fancy software to record content made in Flash: you can use PowerPoint to record the Flash content quickly and easily. Here’s how:
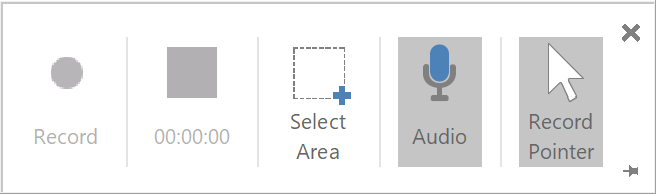
Open a blank PowerPoint file. Go to the Insert tab of the ribbon and select Screen Recording.
On the Control Dock, click Select Area. If you want to select the entire screen for recording, Office 2016 allows you to do this easily by pressing the Windows logo key+Shift+F. Otherwise, click and drag the cross-haired cursor to select the area of the screen you want to record.
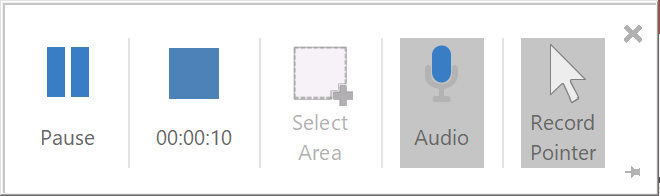
PowerPoint records the audio and the mouse pointer by default. To turn them off, deselect Audio and/or Record Pointer on the Control Dock. You will want to record audio if your course has narration or audio elements. You will want to turn off pointer recording to stop viewers being distracted by a cursor hovering around the video recording. An exception to this is if your course has interactive elements; recording the pointer will make the recordings of interactions clearer for viewers. Once you have the settings and area you want, click Record. The Control Dock will disappear unless you keep your mouse cursor at the top of the screen. Use the Control Dock to Pause your recording if you need to temporarily stop recording. You can then resume by clicking Record again.
When you are done recording, click Stop. The video will then appear on the slide. It may take a few seconds or longer to appear, depending on the length of the recording.
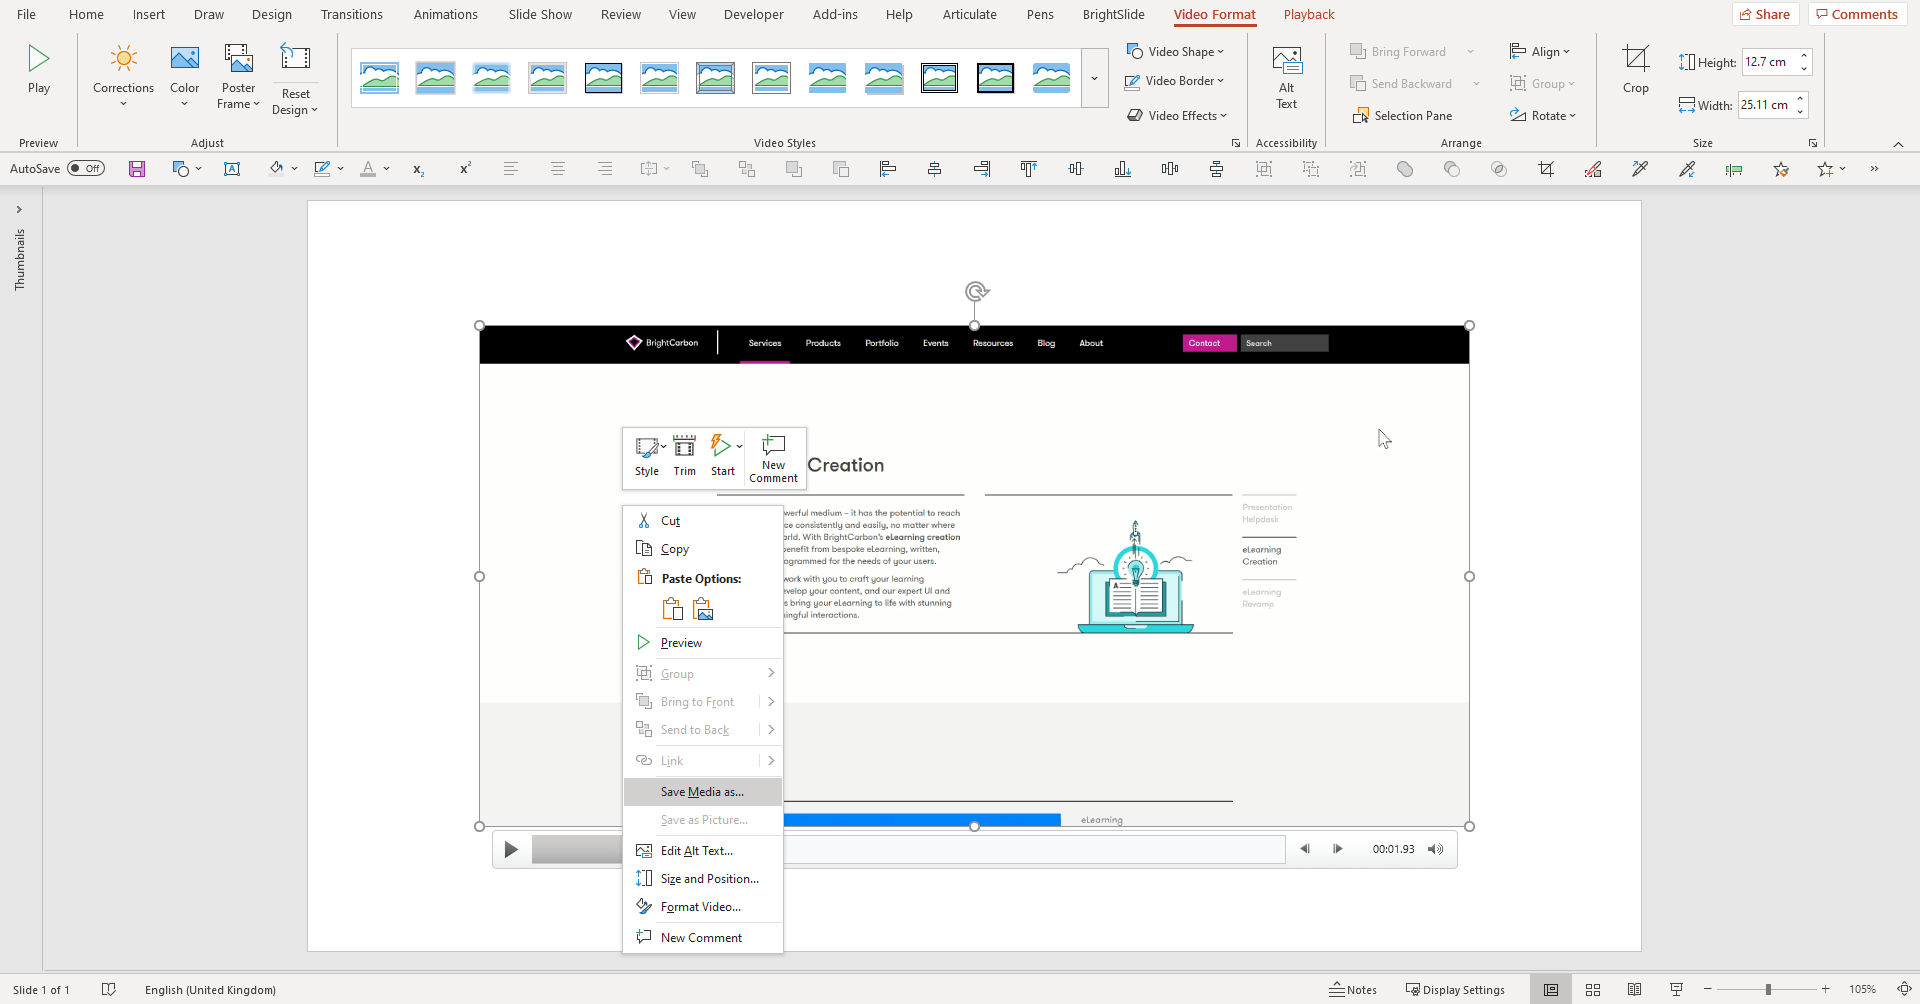
To save the recording, right-click the recording on the slide and select Save Media as. In the Save Media As dialog box, specify a file name and folder location, then click Save. Now you have a recording of your legacy Flash eLearning content that you can share with learners or embed in other training materials!
Before we move on, there’s one really important thing to mention. If you are going to record your courses, ensure that you schedule time to do this before Flash is retired at the end of 2020! In principle, if you don’t update your browser after Flash stops being supported then you could still access your content. However, out-of-date browser software can be a security risk and access to unsupported Flash content after 2020 is not guaranteed. Rapid recording is easy with Microsoft PowerPoint, but you need to give your team enough time to get it done. If you’re struggling to find capacity within your organisation, an external agency may be able to give you the help you need. Head to the section on working with an agency to find out more.
Republish
Recording ensures that content isn’t lost, but it doesn’t preserve interactivity or enable you to capture useful data for reporting to an LMS. Republishing is a good option if you have legacy Flash eLearning content that was developed in an older version of an authoring tool. If you have access to the source files for this type of content, and the right authoring tool to open and edit those files, then you’re in luck! Simply republish the course using the latest version of the authoring tool.
If you don’t have access to either the content or the authoring tool, have a peek at the next option: Rebuild.
So, that was simple. Just need to republish and then you’ll be good to go, right? But, wait! Not so fast… Republishing is a great opportunity to quality review your course and make any quick adjustments you can to improve the effectiveness of your legacy eLearning course.
Once you’ve decided that content is relevant, ask yourself, your team, and your learners the following questions before republishing your legacy Flash eLearning content:
Is this course low-quality? Consider this from the perspectives of instructional, user experience, user interface, and graphic design. Check existing scores and completion rates on your LMS, review with a critical eye, and/or get an expert opinion.
Have your needs changed? e.g. is the course not mobile-friendly, but now your learners use iPads for training? Is the course content only in one language, but you now have learners with other language needs?
Does any information need to be updated? e.g. are references and figures up to date?
Does the course design need to be updated to align with your latest brand and accessibility guidelines?
Clinging on to courses that are low-quality, don’t reflect your business needs, or have a lot of out-of-date content is unwise. These courses won’t have the desired effect on learning and business outcomes. When republishing, be sure to make the necessary updates for your course to be effective. If you have answered ‘yes’ to more than one of the questions above, a more thorough redesign will be necessary. We’ll get on to that shortly.
If you are happy with the content or have made the simple changes that are necessary to get the course up to scratch, then it’s time to republish. But if you aren’t publishing content as Flash, what should you publish it as?
You can publish courses as MP4 or PDF content using most eLearning authoring tools. However, both of these formats lack the meaningful interactivity that is so important for successful eLearning. That’s why many of us in the world of eLearning are turning to HTML5.
HTML5 content has a number of advantages, and it was already overtaking Flash as the standard for eLearning content before Adobe’s decision to retire Flash. HTML5 content:
is easily customized
supports interactivity
integrates with audio, video, and other multimedia content
works across many types of devices and browsers without the need for additional plug-ins
Most eLearning authoring tools have an option to publish to HTML5. Get in touch with your authoring tool provider, have a look at their website, or have a poke around the authoring tool to find out if this is possible for the content you have. If it isn’t, then you could consider recording your content or publishing it to another format. Or, if you want the benefits of HTML5 content (and who wouldn’t!?) read on to find out how to rebuild or redesign with HTML5 in mind.
Rebuild
If only it was as simple as just republishing legacy Flash eLearning content! We know that many organisations don’t have access to source files. Maybe the original files have been lost in time, department shuffles, or migration to the cloud. Whatever the reason, remember that all is not lost, and you are not alone. If you have courses that contain relevant content, but do not have the source files, it is possible to rebuild.
We’ll get on to some specific rapid rebuilding tips later in the article, but essentially the rebuilding process is very simple. The first thing you need to do is extract as much content as you can from your legacy Flash eLearning courses. The content in your eLearning courses may appear lost without the source files, but you can use a piece of software called a Flash decompiler to extract images, audio, video, animations, and text from Flash content.
There are many different Flash decompiler options out there. The right one for you will depend on your budget, the volume of eLearning content you need to decompile, and other features that you might need. One free option is JPEXS Free Flash Decompiler. Sothink SWF Decompiler is a paid solution, but includes a 30-day free trial. Eltima also offer a Flash Decompiler Trillix, another paid solution.
To use a Flash decompiler you will need to get access to the Flash SWF file for your course. If your course is hosted on an LMS or intranet, you should be able to find this file in the back end of the system. Look for a .swf extension at the end of the file name: this is the file you need.
Simply open the SWF file in your decompiler software and export the elements that you need. The elements will typically be exported to a local area on your computer. Be sure to back these up!
Flash decompilers are a great option if you can get your hands on the SWF file. However, this might not be possible. Maybe you only have the Flash output because source files are corrupted, not stored systematically, or simply weren’t provided to you from an external provider. If this is the case, then you may have to take a more manual approach. If you need some more creative ideas for extracting content without source files, CommLab India have some great tips over on their blog.
Once you have all your text, audio, video, and image elements exported from your original course content, you can start to rebuild the course using the authoring tool of your choice. If rebuilding is the strategy for you, jump down to the rebuilding legacy Flash eLearning content section to learn how to rebuild content rapidly using a range of authoring tools. But if your legacy courses are going to need significant graphic design updates, instructional design work, or conversion to a different format, then maybe a redesign is on the cards.
Redesign
If your legacy Flash eLearning content is still relevant, that doesn’t necessarily mean it’s in good shape to go straight into recording or rebuilding. The questions to ask yourself were covered in the republish section above. If you’re answering ‘yes’ to more than one of these questions, then your course may need significant work to update information, improve the design, and fit with your current learning and training strategy.
How you go about this is going to depend on the time, budget, and capabilities you have available. Redesigning will take more time and effort than the other options, so a good first step is extracting the content so that you have it all in a stable format before Flash gets retired at the end of 2020. Make sure you don’t lose all that content!
For some tips about managing a complete overhaul of content, read the managing and maintaining your eLearning content section of this article. And, if you have a lot of content that needs to be redesigned, the rapid rebuilding tips that we’ll share in the next section of this article are going to come in handy.
Rebuilding legacy Flash eLearning content
Before you get started with the rebuild process for legacy Flash eLearning content, it’s worth taking a bit of time to do some quality reviewing. Some things that are always worth a check are:
Text: Proofread all text, ensuring that the content is not only accurate but also grammatically correct and free of spelling errors.
Images, illustrations, and icons: Check that all the visuals are high-resolution. If they pixelated or watermarked, then source replacements. If you don’t have a corporate image library or stock image subscription, our guide to free design resources will help you find the assets you need.
Brand compliance: Ensure that the content aligns with your most up-to-date brand guidelines.
Templates and masters: Many eLearning courses are created without proper templates and masters in place. This makes errors and inconsistencies more likely and makes building content more time-consuming. Create templates and masters which are on-brand and provide the different layouts you need to use in your eLearning course before you crack on with building out content. We’ll touch on how to do this in different authoring tools in the next section of this article.
Localisation: Check that the eLearning content will be applicable to different geographies and cultures of your learners. This might be to do with language, visuals, and even design layout.
Accessibility: Does your content have closed captions? Alt text on images? Is it keyboard accessible? Make sure your content is aligned with the accessibility standard that you need to meet and, if it isn’t, be sure to update accessibility features during the build stage.
User interface: Do menus, buttons, and other navigation features work well? If you are adjusting your course structure as part of the rebuild process (for example, by deleting a chapter of content from a multi-chapter course) make sure that the relevant navigation elements are updated, too.
Meaningful interactivity: A lot of interactions in eLearning content fail to add value. The interactions are divorced from the learning objectives, difficult for learners to use, or distracting. Depending on the time and expertise you have available, you may be able to spend make some tweaks to interactions to make them more relevant to the learning objectives and easier for learners to engage with. Remember, if the interactive elements of your legacy Flash eLearning content need a lot of work, a full redesign of your content might be the way to go.
Quizzes and assessments: Do the questions in the eLearning assessment actually enable you to measure the learning objectives? Are they well written? Is the feedback robust and helpful? Do the assessments report the information you need to an LMS? Use this opportunity to improve the assessments in your course. Our articles on asking the right questions and creating effective eLearning feedback will help you!
These quality review tasks will also apply if you’re going to be republishing or redesigning your content, and are relevant to any authoring tool and format that you might be dealing with. If this sounds like a lot of work to manage, don’t fear! We have some tips for coordinating this type of work with your internal team or an external agency in the managing and maintaining your eLearning content section below.
Rapid rebuilding tips
At BrightCarbon, we make a lot of eLearning content for our clients. Creating quality eLearning courses, rapidly, is a challenge we face all the time. Luckily, our team of experts have a wealth of expertise and experience with this topic. We’ve put together our top tips for rebuilding rapidly using Microsoft PowerPoint, Articulate Storyline, and Articulate Rise. Depending on your needs, one or more of these authoring tools might be the way to go. Even if you aren’t using one of these tools, many of the tips below apply to a range of authoring tools. So, let’s get stuck in, starting with a BrightCarbon staple: the mighty Microsoft PowerPoint.
Building in Microsoft PowerPoint
PowerPoint might not be the first tool you think of for eLearning. But this authoring tool is ideal for creating visual, animated content quickly and efficiently. You can also make interactive content in PowerPoint (more on that later). PowerPoint has a wealth of export options that make it possible to create PDF, MP4 or HTML5 content (with a paid-for add-in) from the same file.
A big advantage of PowerPoint is that it is so ubiquitous: if you already have PowerPoint, you can get started with no additional software costs or licences. A caveat, though: if you want to export to HTML5, then you will need an add-in like iSpring Suite or Articulate Studio, both of which are subscription-based tools.
PowerPoint is easy to use, even if you’re a bit of a software novice – no programming know-how needed! There is a temptation to create some pretty drab slides though, so read on for tips and hacks to make your PowerPoint learning look like it was designed by a pro.
PowerPoint handles accessibility reasonably well – features such as alt text in images, open captioning capabilities, and a contrast checker, means you can meet some fundamental accessibility requirements with minimal effort. Bear in mind that alt text is not preserved when exporting content from PowerPoint, either natively from PowerPoint or through a HTML5 add-in. This limits the usefulness of this accessibility feature for eLearning content that needs to be exported as HTML5.
If you need to translate your eLearning courses you’ll probably want to explore another tool, however our PowerPoint experts behind BrightSlide have some tools in development that may be able to help you if you need to translate content in PowerPoint. Get in touch with us for more details if this is of interest!
So if you choose PowerPoint to rebuild your training content, where do you start and how do you make the most of what PowerPoint has to offer? Let’s look at some tips!
Ensure consistency: Most organizations have a PowerPoint template, so one easy way to keep all of your training on-brand is to use that as a starting point. No fiddly programming needed! If you don’t have a template, you can either make your own, or download a pre-made template online. We have a guide to the best free PowerPoint templates to help you find the right one for you! If your template has placeholders for text and images, you can import your course content directly into those placeholders. This makes pulling all your content together quick and easy. Be sure to use the Theme fonts and colours when building your content to ensure consistency. Using Theme fonts and colours means that if you need to change a colour or font in your course, it’s as simple as updating the Theme. Tidy slides are the biggest hack to making eLearning content look professional. Grids and guides that you set up at the beginning of your project will help you keep everything neatly aligned. We show you how to set those up here.
Create visual content quickly: You can create anything in PowerPoint – I’m not kidding, my colleague once made a 3D Death Star! PowerPoint is packed full of features to help you make beautiful slides, even if it does encourage you to start by adding text. Here are a few places you can bookmark on your journey to incredible slides:
Add narration and audio: You can easily add narration from your legacy Flash eLearning content to your newly rebuilt PowerPoint slides. Go to the Insert tab and select Audio, Audio on My PC, then find the audio file(s) for the narration. Select the file(s) and then Insert and the audio files will be added directly to your slides. You can then record your slide show timings to match your pre-recorded audio, following the steps we outlined in the record section above. Our top tip for smooth recording is to insert one clip of narration per slide, and record each slide separately. If you have one audio clip running across the entire presentation, you will have to re-record the whole presentation if you mess up on one of your clicks while recording. What a pain! Instead, split your narration files into separate clips – one per slide. You can do this using an audio editing program if you fancy but you can also trim files directly in PowerPoint. First, insert your audio file on every slide, then select the audio file icon on a slide and go to the Audio Tools Playback Select Trim and then use the red and green sliders to trim the audio file to the clip of narration you need. Do this for each slide and you’ll have perfect narration to time your animations to, without having left PowerPoint! When you’re done, make sure you go to File > Info > Compress Media to compress the audio files, removing the trimmed content and reducing your final file size. If you don’t have original audio files and need to rerecord audio for your eLearning project, you can record narration directly in PowerPoint. Again, a slide-by-slide approach is usually best for this task.
Create simple interactivity: At its most basic level PowerPoint offers users a prompt to add in some bullet points, at its most complex you can create all sorts of crazy interactions that will have your learners amazed and astounded. For entry-level interaction, check out this article and learn about hyperlinks and triggers – the building blocks for all interactive slides. If you don’t need your learning to report quiz answers to an LMS, this is a great way of creating tests and quizzes without needing additional software. If you do need to be able to track learners and report scores to an LMS, you have a couple of options, like iSpring Suite and Articulate Studio – both of which have pre-built assessment libraries you can add in without needing to build your own. One last interactivity hack is PowerPoint’s Slide Zooms feature. You can use it to dynamically move around your presentation, which not only looks great, but also makes for easy navigation.
Export to your preferred format: As I mentioned earlier, with a couple of clicks you can export your PowerPoint file as a PDF or MP4 – all of that is native to PowerPoint – no add-ins needed. Exporting to HTML5 is a bit more complicated, but still quick and efficient once you know what to look out for. As you can’t export to HTML5 within PowerPoint you will need an add-in. I mentioned iSpring Suite and Articulate Studio earlier. Whilst these add-ins aren’t free, they provide a super-fast way to publish your PowerPoint to HTML5 and various LMS standards. The tools preserve your PowerPoint effects and animations, and the HTML5 output works on multiple devices.
Building in Articulate Storyline
To build highly interactive eLearning content, quickly, Articulate Storyline is a favourite choice for many of us in the world of L&D. The learning curve with the program is not too steep if you’re already familiar with Microsoft PowerPoint since Storyline is also a slide-based authoring tool. You can create advanced interactions and custom branching learning paths in Storyline without any coding know-how, which is a real time-saver.
Articulate Storyline content can be exported easily as HTML5. The latest version of the tool also gives you different options for reporting course completion and can be published to a number of LMS standards: AICC, SCORM 1.2, SCORM 2004, and Tin Can API (xAPI). This means that integrating your HTML5 eLearning content with your LMS is a breeze.
Accessibility features abound in Storyline, and it lets you create courses that support Web Content Accessibility Guidelines (WCAG). Articulate has a comprehensive guide to the features and processes you need to make accessible eLearning over on their website.
Translation is a walk in the park with Articulate Storyline, as well. They have a simple system for exporting and importing course content for translation.
So, if you’re building highly interactive content with assessments and branching paths, Articulate Storyline might just be the rapid authoring tool for you. Articulate have some useful guidance on the end of Flash for their users, including how to republish courses. If you’re rebuilding using Storyline, though, our team of expert eLearning designers have these tips for using this authoring tool quickly and efficiently:
Set up for success: Articulate Storyline lets you set up slide masters and grids and guides at the beginning of the project, in a very similar way to how you would at the beginning of a PowerPoint project. Make sure to set up all your navigation elements in the Player at the beginning of your project so that you know what you’re working with up front. If you want to forgo the Player features in favour of custom navigation, that’s easy with Articulate Storyline, too! You can add recurring interactive elements (like next buttons) to the slide masters, so you don’t have to reprogram these again and again. And remember to get your design theme, including colours and fonts, sorted before you bring your content into the slides. This way, all the content you put into your rebuilt course will look consistent and work like a dream.
Import assets with ease: It is quick and easy to import images, audio, and video into Storyline. The Insert tab works much like PowerPoint, and you can pull in all sorts of media into your slides. One thing Storyline doesn’t handle super well is vector graphics. If you have graphics in the Windows Metafile (WMF) or Enhanced Metafile (EMF) format, they tend to work perfectly fine in Storyline, but Scalable Vector Graphics (SVG) won’t. You can use a tool like Adobe Illustrator to re-export SVGs to the WMF or EMF format, but an even quicker and easier approach is to simply open your SVGs in PowerPoint – which does support this format – and then copy-paste them straight from PowerPoint to Storyline. This article explains this handy hack in more detail. If any of the visual content in your legacy Flash eLearning course was a bit dated or cliched, Storyline 360 users can benefit from the extensive Content Library You can search for images, illustrations, videos, icons and more, add them into your slides quickly and easily, and swap them out simply by right clicking on the asset and choosing a new one from the Content Library. If you’re working in a team to rebuild multiple eLearning courses, and have an Articulate 360 Teams subscription, you can use the Team Slides feature to share slides across projects. This means you can share slides with commonly used layouts and/or interactions, then your team just swaps out text and images to make on-brand, consistent slides, fast!
Animate your content, quickly: To recreate animations from your legacy Flash eLearning content, use Articulate Storyline’s built-in animation features. There are many effects to choose from, including entrance animations to build in content gradually, motion paths to move content around, and exit animations to remove content from the screen. Even simple animation can help bring content to life, and once you’ve got some animations in your slides you rebuild really quickly by copy-pasting the same effect over multiple objects using the Animation Painter. This is super handy for rapid timing of animation to narration! Group your animation into builds and drag each group along the timeline to easily adjust the timing of the animation with your voiceover track. This approach also comes in handy if your animated eLearning content will be translated: simply move the groups of animations to the relevant sections of the translated audio, rather than retiming each individual animation. This article explains some of these handy tips for timing your animations to audio.
Create meaningful interactivity, fast: You can use Storyline’s built-in interactions and quizzes to create your interactive content without any need for programming. They have a whole bunch of question types, freeform question interactions, fancy widgets (like dials and sliders), and easy-to-handle interactive elements (like hotspots) which you can use to recreate the interactivity that your Flash course provided. When rebuilding interactive content, be sure to use layers and states to save time. Layers will be familiar to those with experience in Adobe Photoshop or Illustrator: they’re essentially multiple slides stacked up on top of one another. When you create interactions across layers instead of across multiple slides, you can easily edit and check content by toggling layers on and off using the eye icon. This makes it really quick and easy to dig around your interactions and get them working how you want! States are different versions of an object. Different states are triggered by different events, such as clicking an object or hovering over it. You can customize states of an object easily by double-clicking the object in Storyline. Another top tip is that you can copy all the formatting from an object’s states and paste them onto another object using the format painter Set up the states you want all your interactive elements to have at the start of a project or particular slide and then simply paste those styles across different objects with the format painter, saving lots of time!
Building in Articulate Rise
One huge benefit of newer HTML5 content over Flash is that it works on many different device types, including mobile devices. While you can use PowerPoint add-ins or Articulate Storyline to produce HTML5 content, Articulate Rise takes multi-device accessibility to the next level.
Articulate Rise is a rapid authoring tool which creates fully responsive, mobile-friendly courses: the content you make rearranges based on the dimensions of the device used to access it. This means wherever your learners are and whatever device they are using, your content will be accessible. Articulate Rise is easy to use and quick to learn.
The web-based authoring tool has limited customisation in terms of branding and design, but still allows you to make interactive multimedia eLearning really quickly. The built-in interactions include images with hotspots, multiple-choice quiz questions, and accordion menus. No programming is needed – you simply choose the interaction you want to use and put in the text, images, or other assets.
You can export Articulate Rise courses to HTML5 or as a PDF. You can export Rise 360 courses for AICC, SCORM 1.2, SCORM 2004, Tin Can API (xAPI), and cmi5 learning management systems.
Translation is simple with Articulate Rise: you can export all the course content as an XLIFF file for translation and then import it with just a few clicks. These files are standard for professional translators and can also be accessed by anyone with a number of free online tools.
In terms of accessibility, Rise courses do not meet Web Content Accessibility Guidelines (WCAG). Rise does have some accessibility features, though, including alt text for images, keyboard-accessible navigation, and closed captioning for videos. You can follow Articulate’s progress with making Rise accessible here.
Since Rise is so simple to learn and use, it’s a great choice for teams who are pressed for time. And it’s the only choice for responsive eLearning courses from the options we’ve listed. As a rapid authoring tool by nature, we don’t have too much to add, but read on for a couple tips for rebuilding your legacy Flash eLearning content quickly using in Articulate Rise:
Add subtle brand flourishes: You can set a theme colour and font in Rise to make the course look more aligned with your preferred branding. Choose a font from their library or upload a custom font. If using a custom font, ensure that your font is in the WOFF file format. OTF or TTF files are not supported. Articulate have some guidance on preparing and using custom fonts in courses here.
Use GIFs for animated details: While it isn’t possible to animate content in Rise, one way to add a bit of animation to your content is through the use of GIFs. You could use GIFs that already exist or create animations in PowerPoint and export them in the GIF format. To do this, just build your animation in PowerPoint then go to File, Export, and select Create an Animated GIF. The benefit of GIFs over MP4 video is that you can then upload these GIFs in Rise’s Image or Interactive blocks for added instructional value. This course from Tom Kuhlmann is an example of this technique used to teach a process.
Share what you’ve made with your team: Rise blocks can be customised: you can change font size, colour, background colour, and more. It’s quick and easy to do this, but if you’re using the same type of formatting again and again then Block Templates will make it easier for you to create content rapidly. Simply click on Block Templates from the Block Library options, then click New Block Template and choose a block that you’ve formatted to save it to the library. Now you can easily reuse it again and again within your course or in different courses. If you’re working in a team to create Rise content, use the Block Templates feature to share blocks you have made with teammates to ensure consistency and speed up the rebuilding process. Just check the Share with team checkbox and anyone in your Teams 360 account can access the blocks you create.
Preview in a pinch: HTML5 Rise courses work on many different types of device but because of the responsive nature of the courses, the content won’t look exactly the same on every device. To quickly and easily check that your content and formatting will work on different devices, you can use Rise’s Preview feature. You can do this at any time when building and editing your content. Once in Preview mode, toggle between desktop, tablet, and mobile views to get a sense of what your learners will see on different devices. While this isn’t a substitute for proper user testing, it can be a good, quick first step to make sure that content is behaving how you would expect.
Managing and maintaining your eLearning content
At this stage, you’re probably raring to go and ready to save your legacy Flash eLearning content from impending doom. While we’ve covered the different options for handling the content, and some tips for you to rebuild at speed, you might be wondering how exactly to go about managing this task. Here are a few tips for working with internal and external teams and making sure that you don’t have to go through the headache of handling legacy content again any time soon.
Designers: Graphic designers, user experience designers, instructional designers…there are lots of types of designer! Different designers may be able to assist with creating illustrations and icons, aligning content to brand guidelines, building course content, rewriting quiz questions, and more. The people in your organisation with these skills may not have the title of ‘designer’, but it’s important to find out who has these skills and get them on your team.
Subject matter experts (SME): SMEs understand the subject matter included in the eLearning course. They provide valuable insight on content accuracy and may be responsible for rewriting course content if needed.
Technical experts: Understand the technical requirements of your LMS, devices, or systems. They may work in training, IT, or another area of the business. Their input will be crucial when deciding what format to recreate your legacy Flash eLearning content in.
Learners: The learners understand their own needs and provide valuable insight on what will make a course successful. If you can’t get direct access to learners, the results from previous engagements with eLearning courses will be helpful (e.g. feedback forms, post-training surveys, quiz results).
Sign-off: This may be one person (maybe it’s you!) or a team, but it’s likely that someone needs to sign off on the project and on the final content. Find out who that is and ensure that you give them time to review the content before you need it to go live.
Proper planning and expectation-setting are key when working with an internal team. Make sure timelines are really clear and that anyone who has to review content has enough time to do that around their existing workload. Your budget, in terms of time available and resources at your disposal, will greatly impact the route you take with your content. If your team doesn’t have the skills or capacity to take on rebuilding or redesigning, for example, hiring an external agency could be a good option.
Working with an agency
It is possible to outsource the process of recording, republishing, rebuilding, or redesigning your content to an agency. When choosing an agency, first you need to ensure that they can produce what you want with the content you have. It may be that you just need one of the 5 options, it may be that you need a combination of them.
Ask lots of questions and make sure you understand the agency’s response; there’s often a lot of jargon to muddle through on agency websites, and if their sales rep can’t answer your questions in plain language then that’s definitely a warning sign. A good agency will communicate clearly about what they’re offering, ask you a lot of the questions we’ve outlined here. Clear communication is important for a good vendor relationship, especially under time pressure.
Beyond just the bare minimum of being able to produce your content, try to choose an agency who can add extra value to your legacy Flash eLearning content. Agencies with experience in instructional design will be able to help you create content that truly achieves your learning objectives; those with experience writing scripts and recording voiceover will be able to spruce up your narration; and agencies who create meaningful interactivity are more likely to programme interactions that really make a difference. Find out what value the agency can add, especially if you’re going for a rebuilding or redesigning option.
Once you’ve rescued your legacy Flash eLearning content from the dustbin, you’ll want to put your feet up and have a nice cuppa. But wait! One final thing before we finish up is to plan for maintaining your eLearning content in the long term.
The questions you asked yourself and your team when deciding what to do with the content way, way back at the top of this page are not to be asked just once. It’s important to schedule in regular check-ups of your eLearning content to ensure that it is working, relevant, and meeting your objectives. This could be every few weeks, months, or years depending on the type of course and who is using it.
Make sure that you know who is responsible for those regular maintenance check-ups, whether that is you, someone else in your team, or an external vendor. With properly planned maintenance you can pre-empt issues and constantly improve your eLearning courses, so your learners are delighted and your business goals are met!
Summary
We’ve covered a whole lot in this article, it’s really been a journey! To recap, there are 5 options available to you for handling your legacy Flash eLearning content. You can:
Finally, pick your team or agency wisely and plan for the future by scheduling regular maintenance of your eLearning courses. That’s all for now but feel free to leave your comments or questions below and don’t hesitate to get in touch with us if you need any help with your legacy Flash eLearning content. Good luck!
The final instalment of our four-part series on eLearning assessments takes us to Articulate Storyline, where we’re going to level up one final time by creating realistic scenario interactions!
Branching scenarios are a great way of providing authentic assessment in Articulate Rise. They offer learners a chance to put theory into practice, by facing realistic situations that they might encounter in real life and getting feedback on what they’ve done well or need to improve.
Interactive PowerPoint quizzes are a great way of levelling up your eLearning content. Whether used for formative or summative assessment, interactive quizzes help learners to have a more engaging experience, identify areas where they need more help, and retain more of what they learned in the course of their training. In this post we cover all the practicalities of creating interactive assessments in PowerPoint.