


Captivate allows you to quickly record software simulations in Demo, Assessment, Training modes.
Assets and samples
The procedures in this document require you to use assets such as images and sample Captivate project files.
Sample files for practice:
Create software simulations projects
Captivate allows you to simultaneously create software simulations in all the three available modes:
- Demo: Demonstrate a software procedure. The user is not required to perform any action.
- Assessment: Test the user’s knowledge of a procedure. Only inform the user if the step was incorrectly carried out.
- Training: Guide a user through a software procedure. The user is required to perform the steps in a procedure but with guidance at every step.
Let’s create a short software simulation of the steps required to create a new PowerPoint presentation. We will simultaneously create the simulations in the three available modes.
- When you open Captivate, in the New tab, click Software Simulation and then click Create.

- The dialog box provides you with the options to record the demo. Choose the following options:

-
- Application
- In the drop-down list choose PowerPoint
- Ensure that Application window is selected
- Ensure that the Demo, Assessment, and Training checkboxes are selected
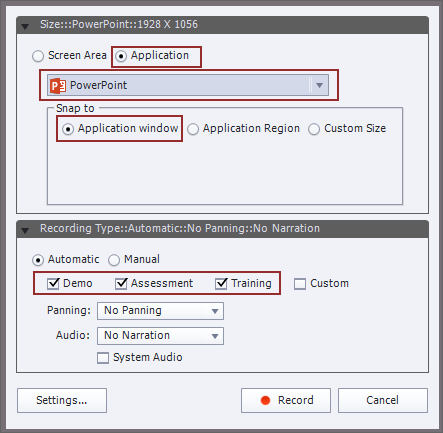
- Click Record.
After the counter counts down to 1, the PowerPoint application comes to the foreground.
- Perform the following steps in PowerPoint:
- Click File.
- Click New.
- Choose a theme.
- In the dialog box, click Create.
- To end your simulation:
-
- On Windows, click the End key on your keyboard
- On MAC, click the Captivate icon in the top bar
As soon as you end your simulation, Captivate comes to the foreground again.
A new project is created for each of the simulation modes:
-
- untitled_demo1.cptx
- untitled_assessment1.cptx
- untitled_training1.cptx
To see the difference between the three projects that Captivate has created for us, let’s preview them.
- In the toolbar. click and then choose Project to preview each of the projects.
 and then choose Project to preview each of the projects.
Demo: As the simulation progresses, the mouse pointer moves across the screen. The area around the clicked part of the screen is highlighted. Also, text captions display indicators as the area is clicked. The simulation without any user intervention.
Training: You need to perform each screen task. In our project, the first screen task is to click File. The simulation will wait till you perform this task. If you hover the mouse pointer over the File menu, a hint is displayed. If you click elsewhere on the screen, a failure caption tells you where you need to click. When you click the correct location, the simulation progresses to the next step.
Assessment: You need to perform each screen task. In our project, the first screen task is to click File. The simulation will wait till you perform this task. Because this is an assessment mode, you are not provided with hints if you hover the mouse pointer over the File menu. If you click elsewhere on the screen, a failure caption tells you where you need to click. When you click the correct location, the preview progresses to the next step.
Insert software simulations in existing projects
In the previous section, we created software simulation projects from scratch. However, you can also insert software simulations at any point within an existing project.
Let’s insert a short software simulation in Demo mode of the steps required to create a new PowerPoint presentation.
- Open the project in which you want to insert the software simulation.
Or create a new blank project. - In the toolbar, click and choose Software Simulation.
- In the Record Additional Slides dialog box, choose the slide after which you want to insert the software simulation and click OK.
- The dialog box provides you with the options to record the demo. Choose the following options:
- In the drop-down list choose PowerPoint
- In the Mode drop-down list, ensure that the Demo mode is selected
- Click Record.
After the counter counts down to 1, the PowerPoint application comes to the foreground. - Perform the following steps in PowerPoint:
- Click File.
- Click New.
- Choose a theme.
- In the dialog box, click Create.
 and choose Software Simulation.
- To end your simulation:
- On Windows, click the End key on your keyboard
- On MAC, click the Captivate icon in the top bar
As soon as you end your simulation, Captivate comes to the foreground again.
- In the toolbar. click and then choose Project.
 and then choose Project.
Manage slide timing
When you create a software simulation, Captivate creates a project that uses slides and objects that can be easily manipulated.
You can rearrange the order of slides, insert slides between the steps in a simulation, you can edit the properties of objects, and change the hints and error captions that are displayed. In a Demo project, you can even change the path of a mouse.
Besides the above editing changes, you can also use Captivate’s timing feature to adjust the timing on a slide.
- Navigate to the samples subfolder and open:
create-software-simulation-demo.cptx
Note:
It is not mandatory that you download the project file that ships with this tutorial. You can still follow along with the steps in this procedure. However, you will need to create a Demo software simulation project Captivate.
- Navigate to the following slide in the Demo:

- Let’s quickly preview this slide.
In the toolbar. click and then choose Play Slide.
As you step through the simulation of an application while creating a software simultion, Captivate sets the time for which a slide is displayed to the user. - Currently the caption on the slide is: Select the Atlas item.
Change the caption to the following:
PowerPoint displays the available themes that you can apply to the new presentation. Let’s use the Atlas theme for our presentation.
Select the Atlas theme.

 and then choose Play Slide.
- After making the changes to the text caption, let’s again check the slide.
In the toolbar. click and then choose Play Slide.
 and then choose Play Slide.
Notice, that the preview duration is the same as in step 2 above. However, since we have changed the contents in the text caption, we need to increase the duration for which the slide is displayed to users.
Let’s use Captivate’s Timeline panel to adjust the timeline for this slide and the object on the slide.
- In the Window menu, choose Timeline.
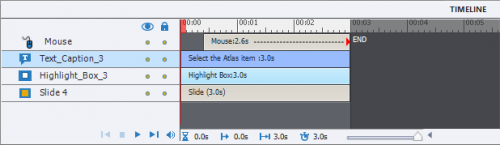
The Timeline panel displays the timeline for the current slide:

Let’s quickly discuss how each of these objects are represented on the timeline:
Mouse: Appears on the slide after about half a second and will continue to be displayed on the slide for the remainder of the slide duration (3s).
Text_Caption_3: Displayed on the slide for its entire duration.
Highlight_Box_3: Displayed on the slide for its entire duration.
The Timeline is not just informational. You can change the time duration for any of the objects on a slide. You can even change the time duration for the slide itself.
Let’s change the time duration of the slide to 8 seconds. That should be enough time for the user to read the updated caption. - In the Timeline panel, hover the mouse pointer over right edge of the slide duration.
The cursor changes into a double-sided arrow that allows you to slide the timeline to the right (to increase the duration) or to the left (to reduce the duration). - Drag the slide duration to the 7 second mark on the timeline.

Notice however, that the duration for the objects on the slide remain the same.
Let’s increase the duration for the text caption and the highlight box to the full duration of the slide. - To select multiple objects in the Timeline, keeping the Ctrl key pressed, click on Text_Caption_3 and Highlight_Box_3.
- Hover the mouse pointer over the right edge of the selected object and when the cursor changes into a double-sided arrow, drag the edge to the end of the slide.
Finally, we need to adjust the timeline for the mouse. The mouse pointer needs to be displayed till the end of the slide duration. However, we also need to ensure that it displays for the same duration (3s) as previously. So, let’s not increase the duration for the mouse. Let’s move it to the end of the slide duration. - Click on the mouse object in the timeline and drag-and-drop it to the end of the slide.
Let’s preview the procedure we’ve just completed.
In the toolbar. click and then choose Project.


 and then choose Project.
Notice how the slide that we changed above now remains for longer. Also, the mouse appears on the screen later.
The timeline is a useful tool when you want to make changes to the content on a slide in a software simulation project.
Thanks for the walkthrough
Has this changed drastically with Captivate 2019 (or the recently released update)?
Nothing has changed for software simulations (you did read my blog), although many users ignore the importance of Preferences and Themes for simulations. Video Demo (which I always use instead of Sims in Demo mode) has now the ability to be converted to an Interactive video. Have a look at:
Easy to understand. I’ll try.
Cool. Thanks for posting.
Hi,
I make software simulation on Captivate and I would like hide some element on my simulation (pictures, name…). Do you know if they are another solution that shape, because when the slide move it move the shape and the element is no longer hidden.
Thank you !
Normally you have to find the background in the Library and edit that background with a graphics app.
It depends on the individual slides within the simulation. If it’s a still shot, you can just put a box that is set to “end of slide” timing with No Transition, to cover whatever you need covered. However if it’s a slide that has scrolling on it, that becomes more difficult as the background moves. And of course, you can always take it to an external graphics program to cover up items and bring it back in but I find a simple 100% filled box that is the same color as the background does the trick 90% of the time.
Can any software be used to create these demos? E.g. Something other than PowerPoint or even a Linux software that has the screen being transferred to a windows based PC that Adobe Connect is on?
You can create a simulation for any type of software application, not just powerpoint. Just select the application (or use a pre-set size or select a browser, whichever is appropriate) then record and do what you do in the application to create your simulation. We create demos and simulations for multiple types of very large ERP, HR and IT systems. It works great for all of them.
Great article.
SInce the update to CP2017, recording a software simulation (or a Video Demo) is again made impossible on retina screens, without having to change an ini file. In the first release of that version that was possible, you only had to reset the display percentage back to 100%. Why is this done, please?
This is a wonderful resource that reminds me just how far Captivate has come. Software demo and responsive projects have made creating much easier. Like Lieve I wonder what new functionality will be next. 508 issues have always been a bit challenging but I am sure Captivate will continue to evolve.
Well written step-by-step process Dominic.
For HTML output I really regret that here is no easy way to replace the FMR slides by Video Demo slides. FMR slides tend not to play in HTML output. Any idea whether this workflow will be improved?
Thank you for this. For a newbie I can now record and edit a simulation by following the steps in the demo.
Thank you for sharing Pooja’s walk through with the step-by-step process. Simulations is one of the best features of Captivate!
Thank you for giving credit to Pooja! As a librarian, my first reaction to clicking play on the video was “This doesn’t sound like Dominic speaking, why is there no credit given to the video creator! Even if Dominic is an Adobe employee, shouldn’t there be credit given?” And now credit has been given!
Thank you. Very helpful.
You must be logged in to post a comment.


