Do you like to hack? We like to hack, too! We also like to share how to hack. You may have already discovered how to change your theme colors, and how to add spot colors to your PowerPoint presentation, template, or theme. But are ten colors enough? Would you like more? Well, the good news is you can have more. And we’re about to show you how to add custom colors in PowerPoint to your template themes.
Speaking the color lingo
Before we get started, let’s clear something up: color is defined and used in PowerPoint in myriad ways – everything from theme colors and tints and shades, to spot colors, recently used colors and custom colors.
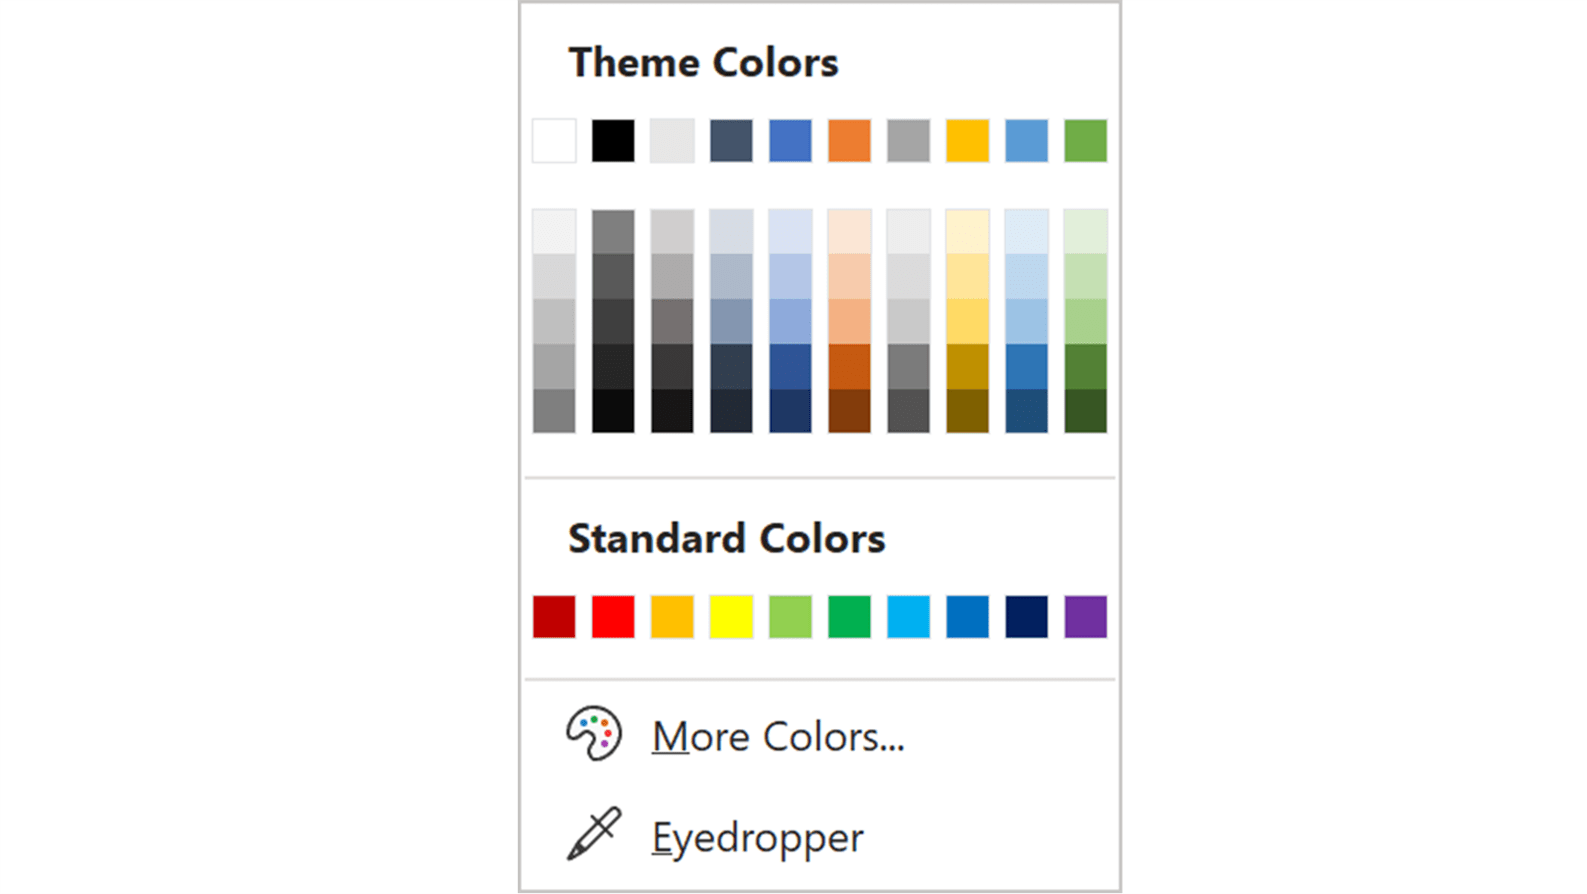
When you open the default Microsoft Office template and want to change the color of something, you see the standard PowerPoint color picker:
The ten colors at the top are Theme Colors. Check out our blog post on theme colors to find out how to change them.
The 50 colors underneath the theme colors are a set of automatically generated tints and shades. They seem to have been created by a top-secret Microsoft algorithm determined to take your content off-brand… Unless I wasn’t clear: avoid using these at all costs, especially if your brand includes pre-defined tints and shades.
Below the theme colors are ten Standard Colors – while these might appeal to kindergarten kids, they are probably too garish for your corporate presentation!
Changing or disabling the 50 tints/shades or standard colors is not possible. We’d encourage any brand-aware readers to put pen to paper and ask Microsoft what they were thinking?!
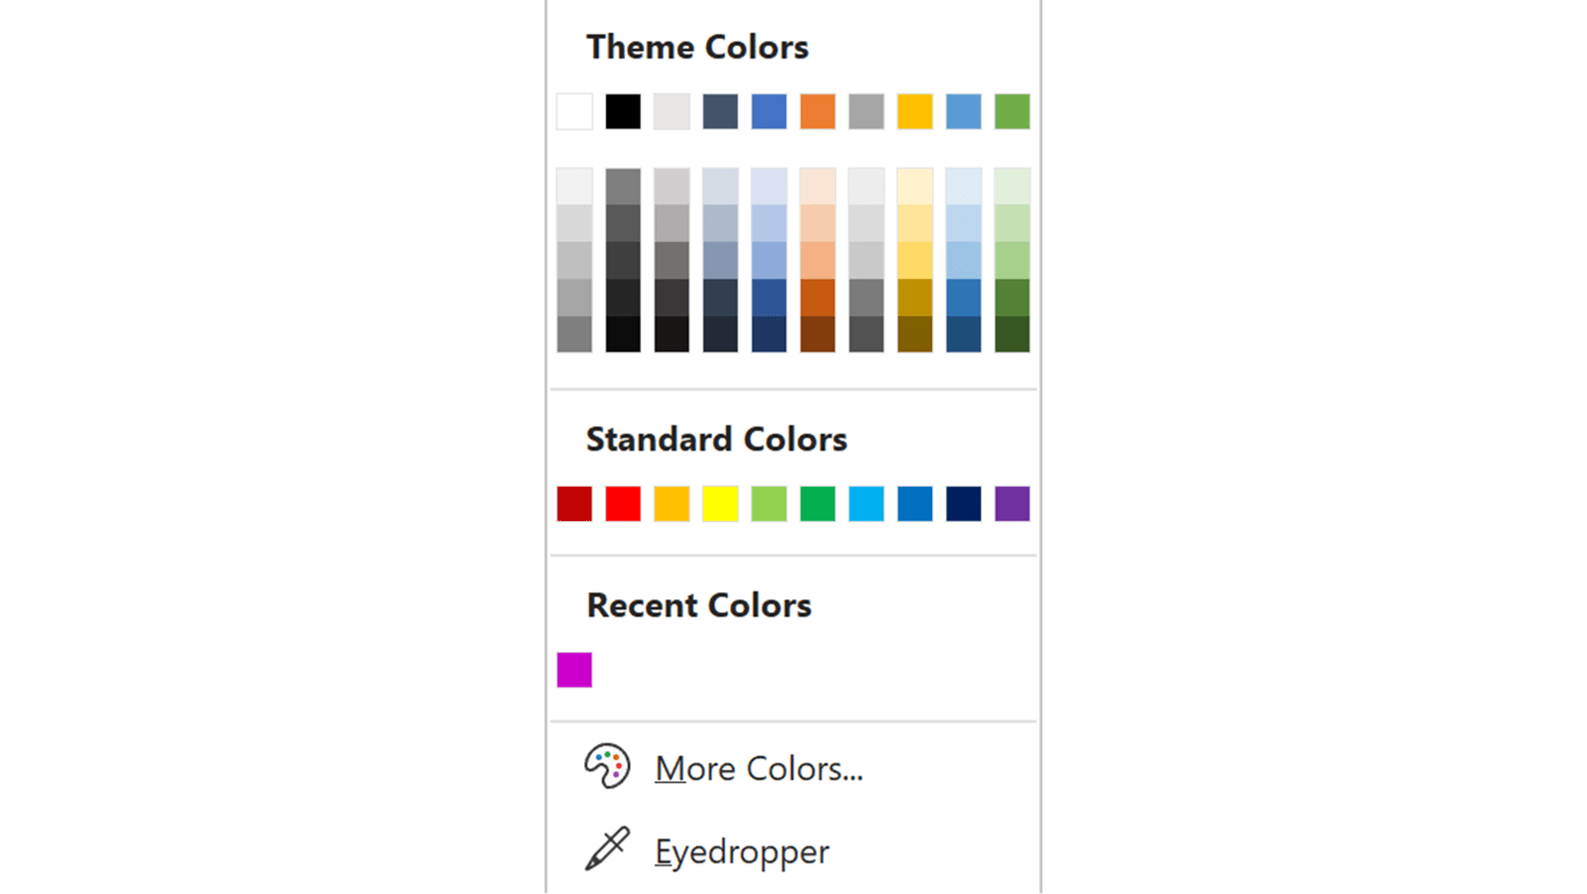
You can choose from over 16 million colors by clicking More Colors, and add your chosen color (or spot color) to a new section of the color picker UI called Recent Colors. You can save a maximum of ten spot colors here, and they’re saved on a first-in, first-out basis:
Adding spot colors is useful when developing a color palette if you don’t already have one. But PowerPoint doesn’t let you delete them, which is annoying.
The solution? Our free BrightSlide add-in. BrightSlide has over 50 smart tools, including the ability to delete Recent Colors from your file. Download it today, and change your life forever.
So that’s all great. But what if you want more than ten colors? And what if your digital brand guide defines tints and shades? What are you supposed to do? Do not fear! It’s Custom Colors to the rescue!
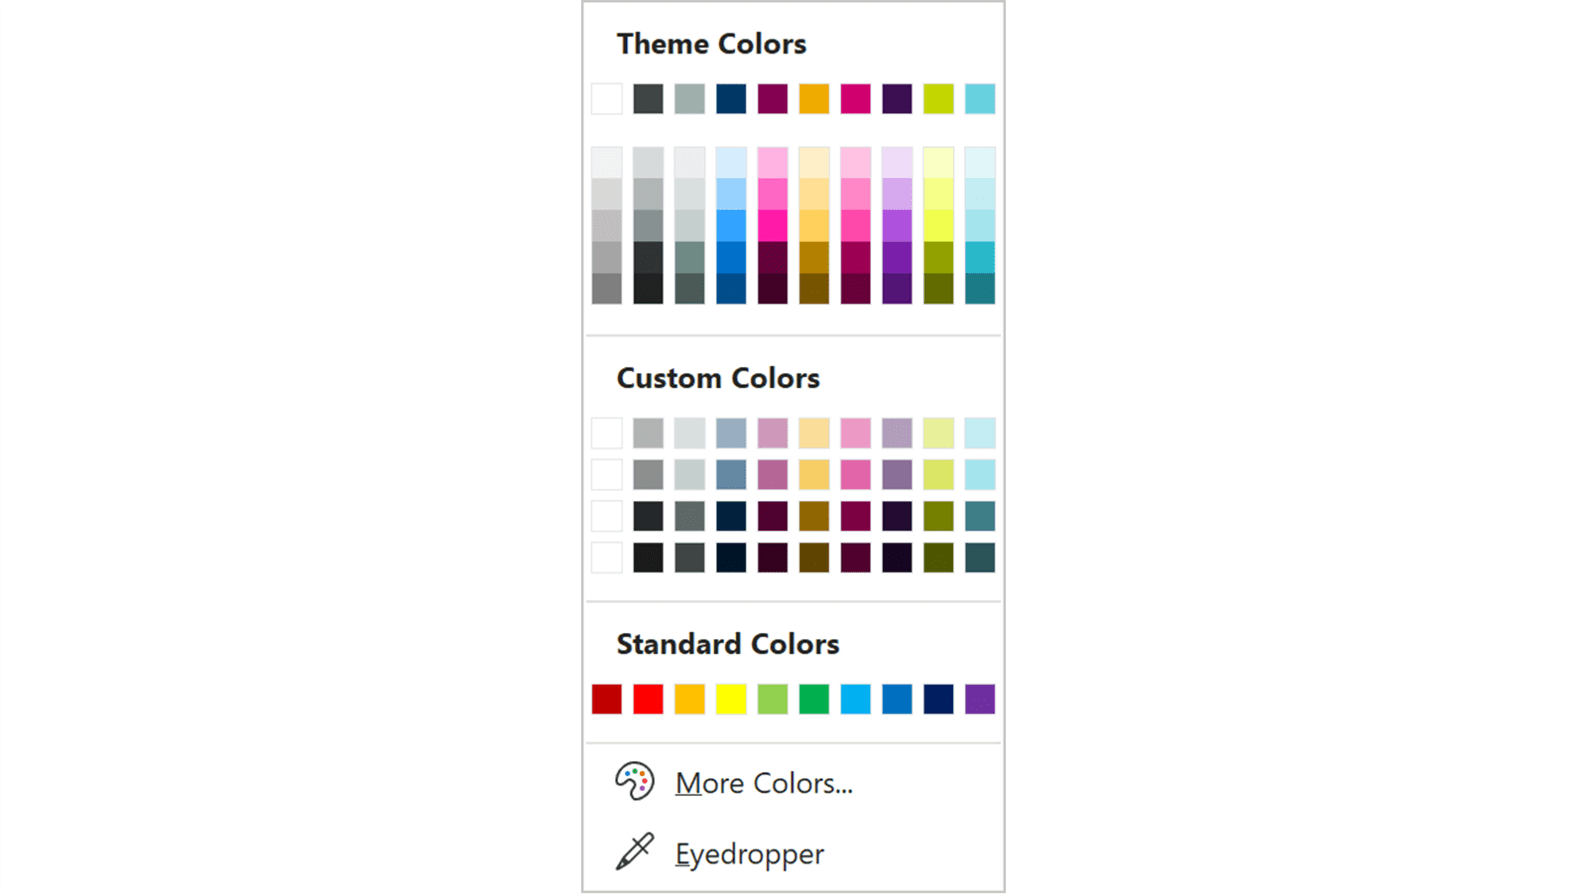
Here’s an example from a template we programmed for a client. It includes their ten primary theme colors (top row of ten) and 36 custom colors in the section underneath:
You’ll see that the 50 tints and shades auto-generated by Microsoft (which appear in the Theme Colors), are different from the 36 custom colors defined in the digital brand guide. Using one of the 50 tints or shades from the theme section would take the presentation’s content off-brand.
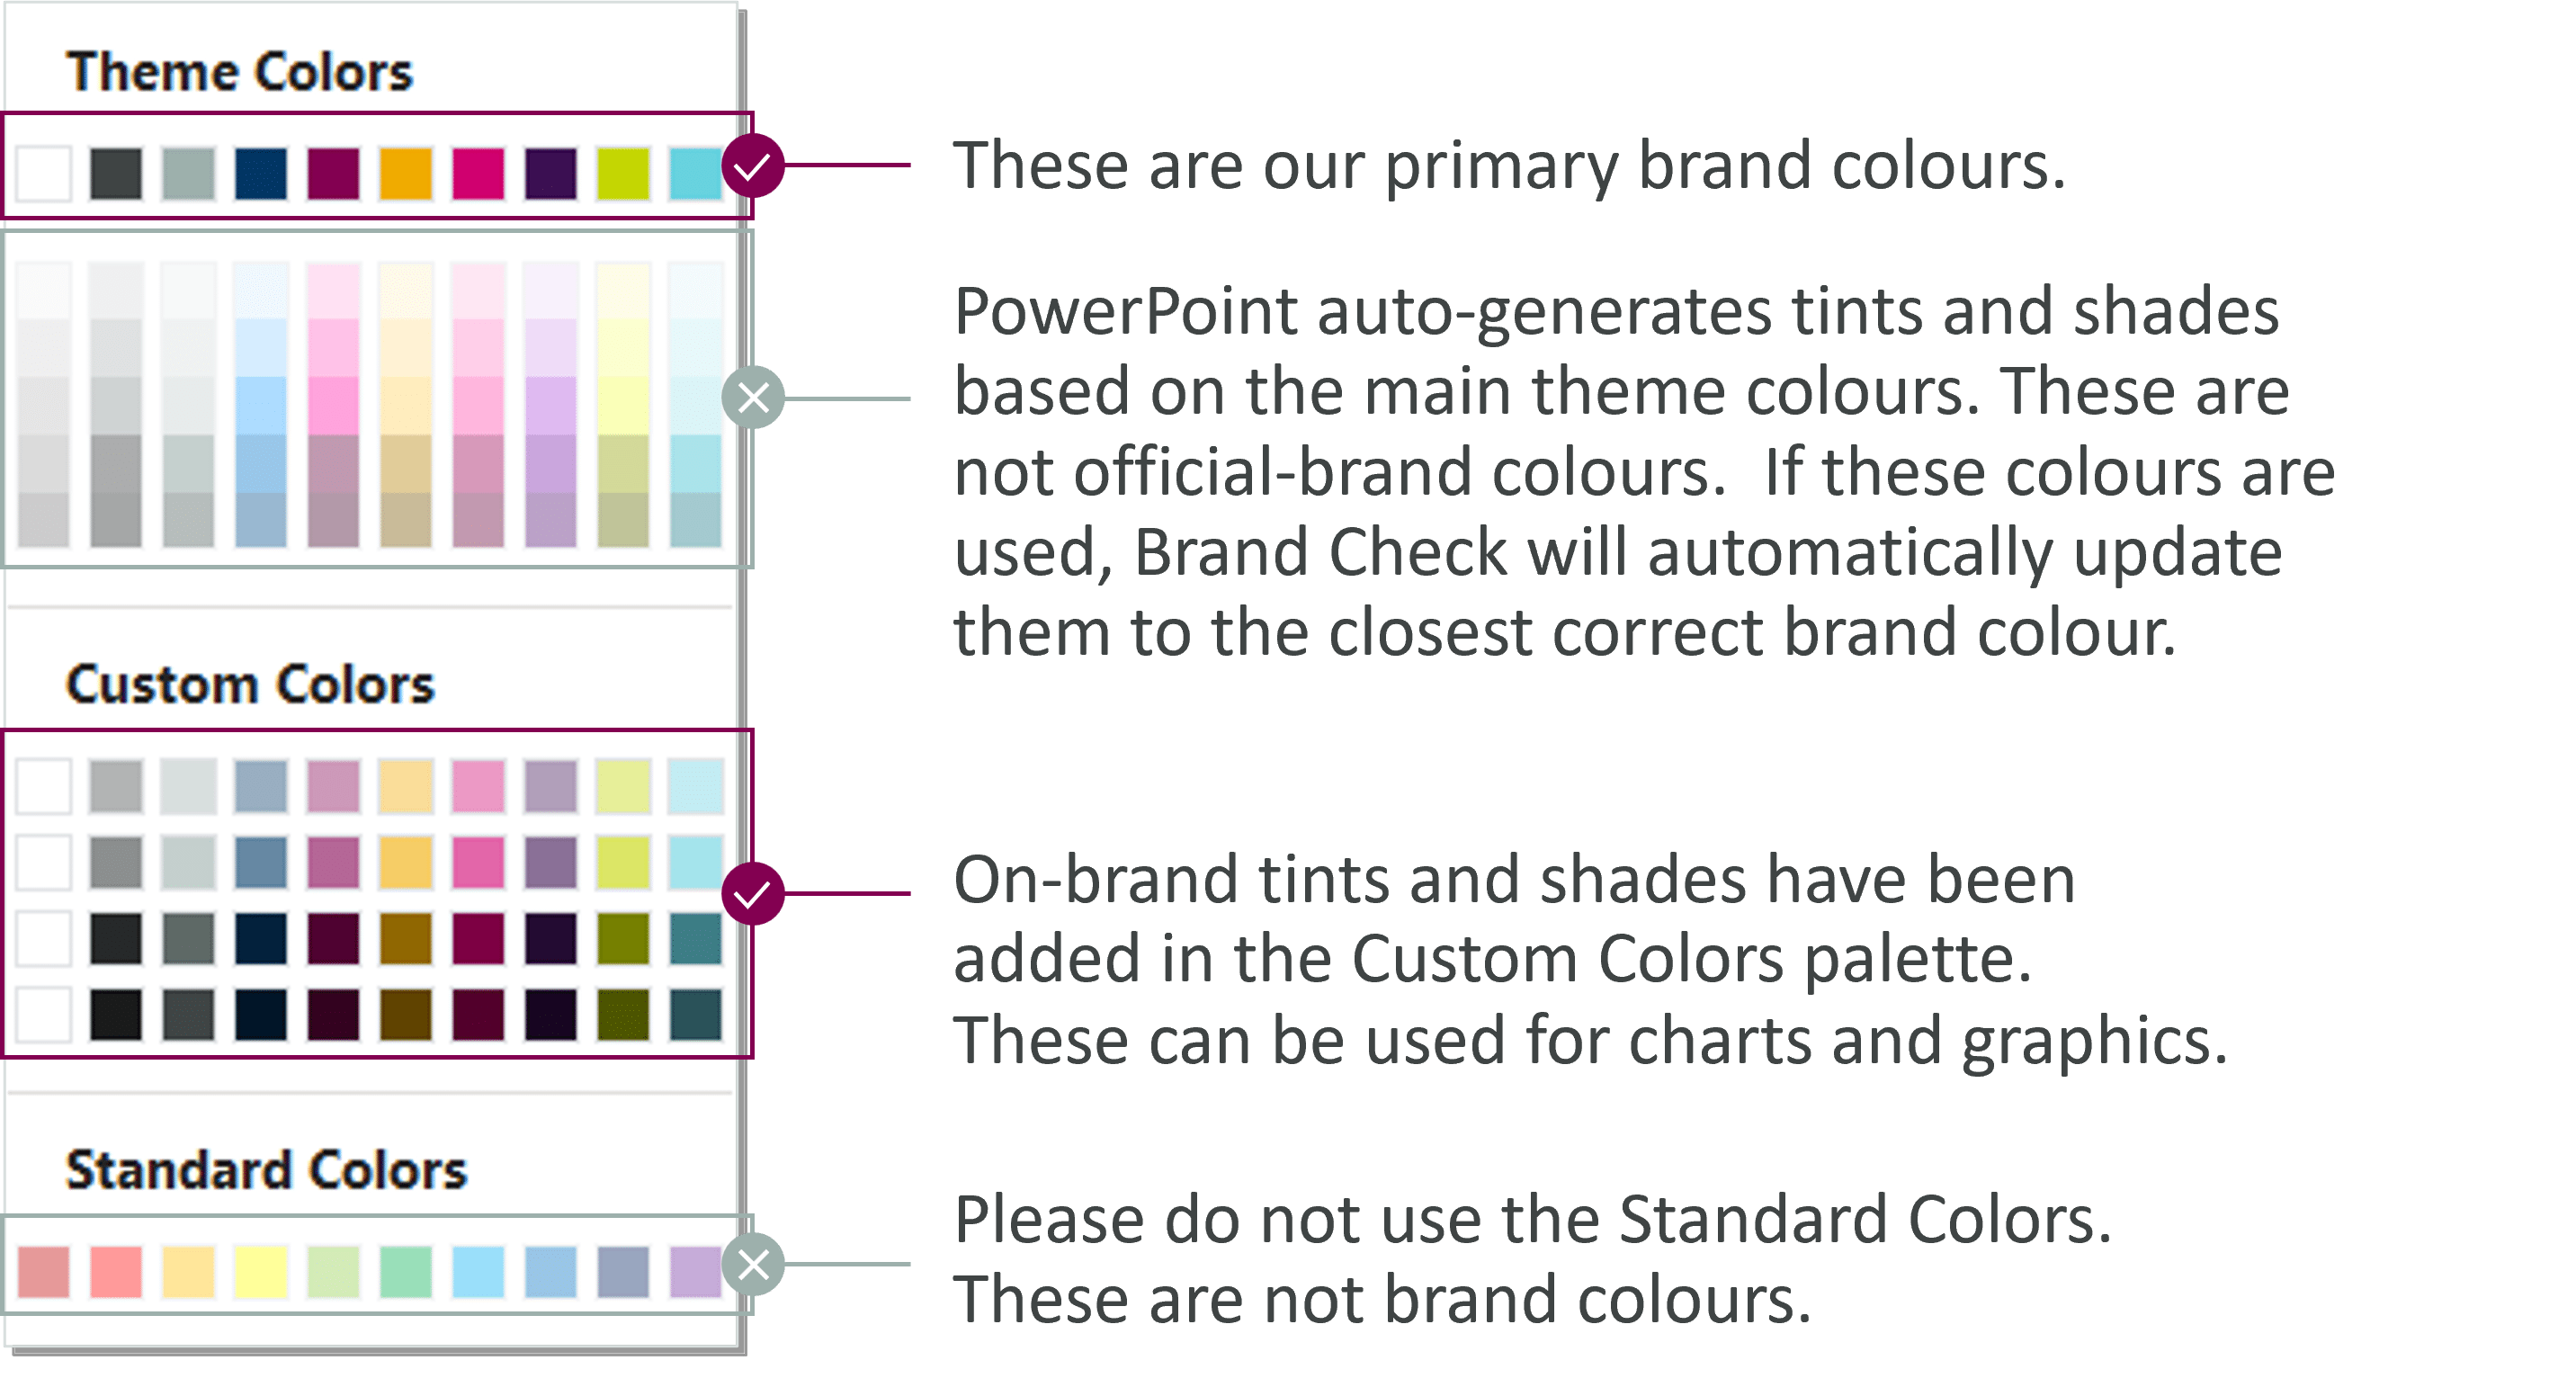
Given that these can’t be disabled (don’t forget to write that letter to Microsoft!), we created instructions to show users how to use their brand colors properly. This example is from a guide we can provide with our presentation creation service:
But how do we create these custom colors, I hear you ask. Let’s find out.
Creating custom colors in PowerPoint
You have two options:
You could become a geek, learn XML, and manually write barely readable code.
Or (if that sounds like a bit too much of a lifestyle change) you could simply download and install BrightSlide – our free, life-changing PowerPoint add-in that works on Windows and macOS (and has a beautifully designed interface!)
Once you’ve downloaded and installed BrightSlide, open your PowerPoint file. If you’re developing a template, this will typically be a potx file (or at least a pptx file, which you later save as a potx when the design phase is complete).
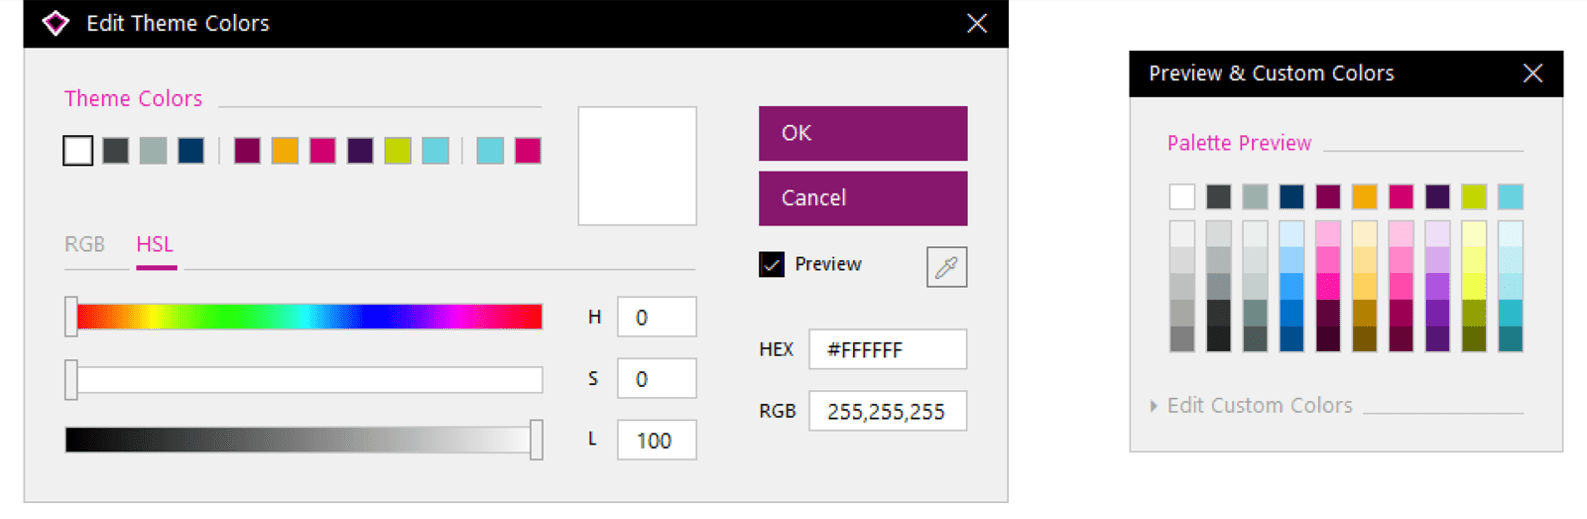
With your file open, go to the BrightSlide tab, then to the File & Master group, and click Theme Colors, followed by Edit Theme Colors:
You’ll see your existing theme colors in a pair of windows:
You can edit the ten theme colors in the window on the left. And you can set the RGB values for your custom colors in the window on the right.
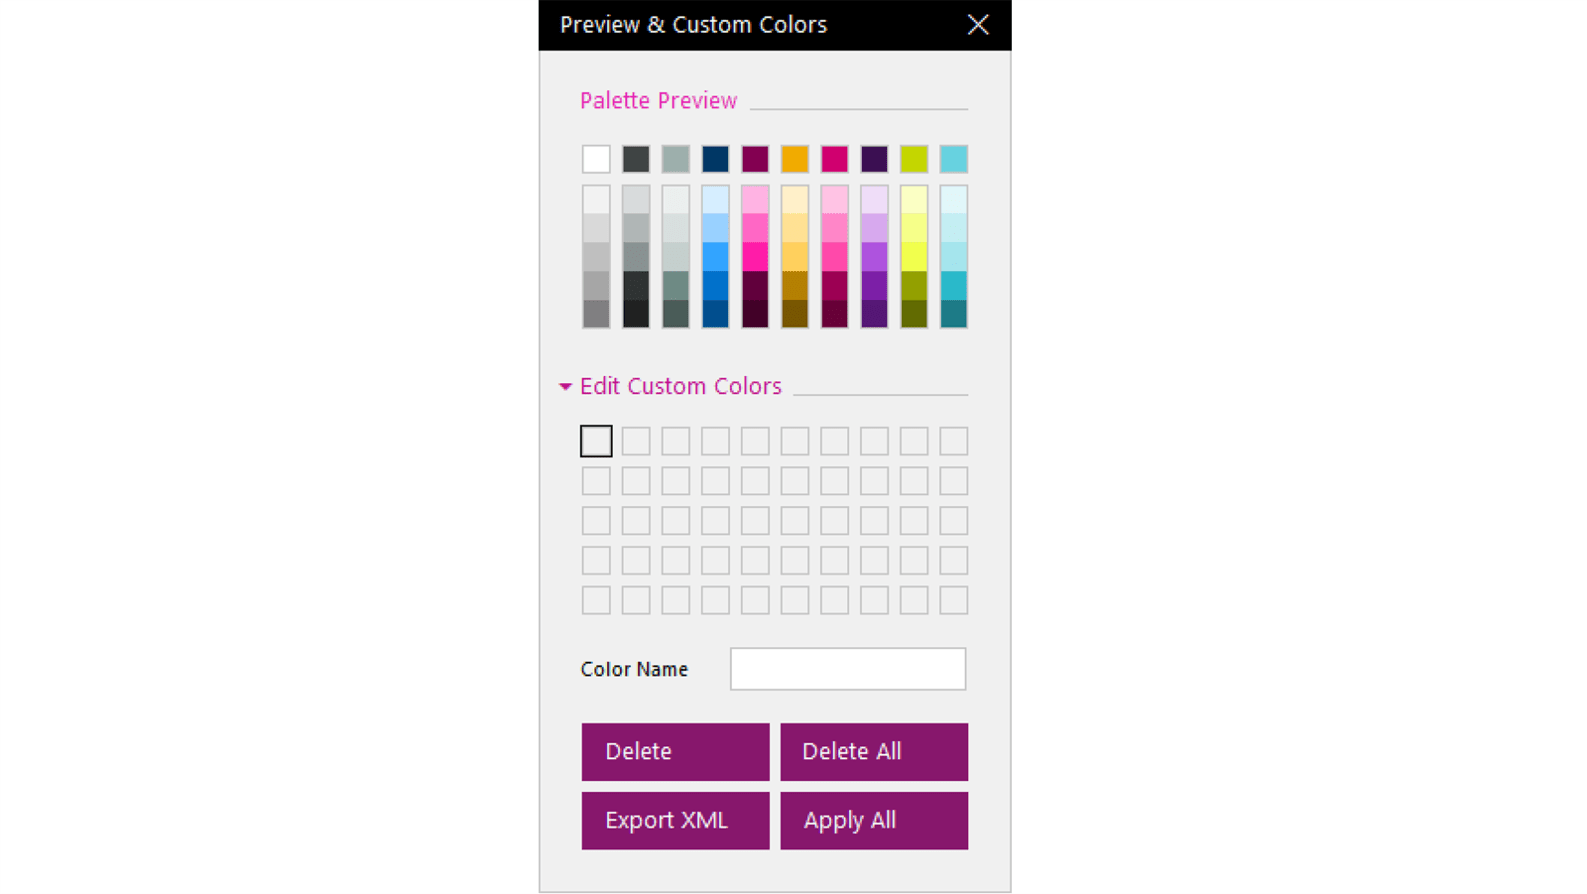
To start editing custom colors, click the grey Edit Custom Colors text in the right-hand window. This will reveal 50 available swatches. Note, if you have multiple masters in your file, you’ll see a warning, and you can choose to load any existing custom colors present in a single master file.
Before diving head first into a heap of custom color editing fun, it’s important to understand that Microsoft doesn’t allow you to define a blank/empty swatch, and that the definition runs from top-left to bottom-right. This means that if you want a blank swatch, it must be defined with a color of some sort – usually white and the name ‘blank’, or anything else you choose. You can define any number of custom colors between one and 50.
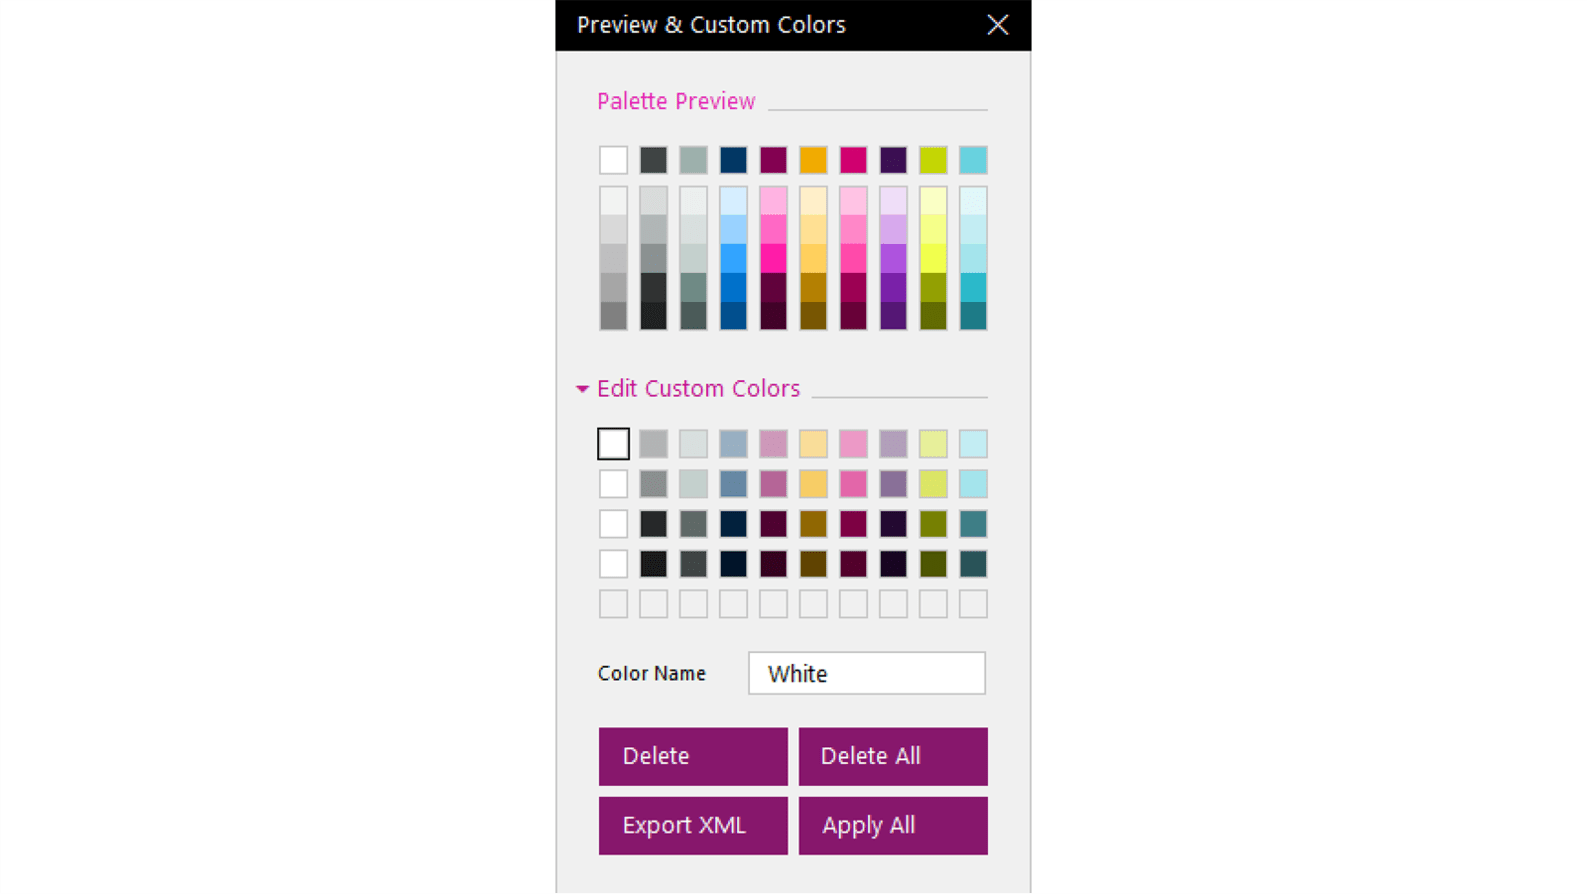
Repeat the steps below to define each color:
Click the custom color swatch in the right-hand window to select it and copy the color from the left-hand window.
Type the name of the color in the field below (the names appear in the PowerPoint color picker when you hover over the swatches).
In the left-hand window, use the color sliders (RGB or HSL), RGB, or HEX input methods to set the color value.
Top tip: BrightSlide currently doesn’t save your work as you go, so to avoid losing your custom colors, click Export XML, and copy the contents to a text editor, email, or Word document. You can then hold the shift key while clicking the same button to paste and load your work back into the editor.
If the 50 tints and shades that Microsoft generates are a good starting point for you, then you can copy them from the top to the bottom of the right-hand window. You do this by holding the shift key while clicking on the palette preview area at the top.
Here’s a completed example:
Once you’ve defined your custom color palette, you have two choices:
Use BrightSlide to Apply All
Manually hack the PowerPoint file.
Option 1 sounds easy, and it is. But it comes with a caveat: BrightSlide’s Apply All is currently a Windows-only feature, and if you’re working on a file with multiple masters, or masters with graphics on them, or the default style has been set, then things could get messed up. This is because BrightSlide uses the Apply Theme feature from Microsoft and it’s, well, a bit buggy to be honest! Only use this feature if you’re creating custom colors in a brand new template based on the Office default template right at the start of a project.
At BrightCarbon, we prefer to go for option 2. When we develop enterprise-quality templates for clients, we always opt to manually hack the PowerPoint file. This is because it guarantees that only the custom colors are changed.
So, don’t close the color editor just yet…
It’s time to hack PowerPoint for custom colors!
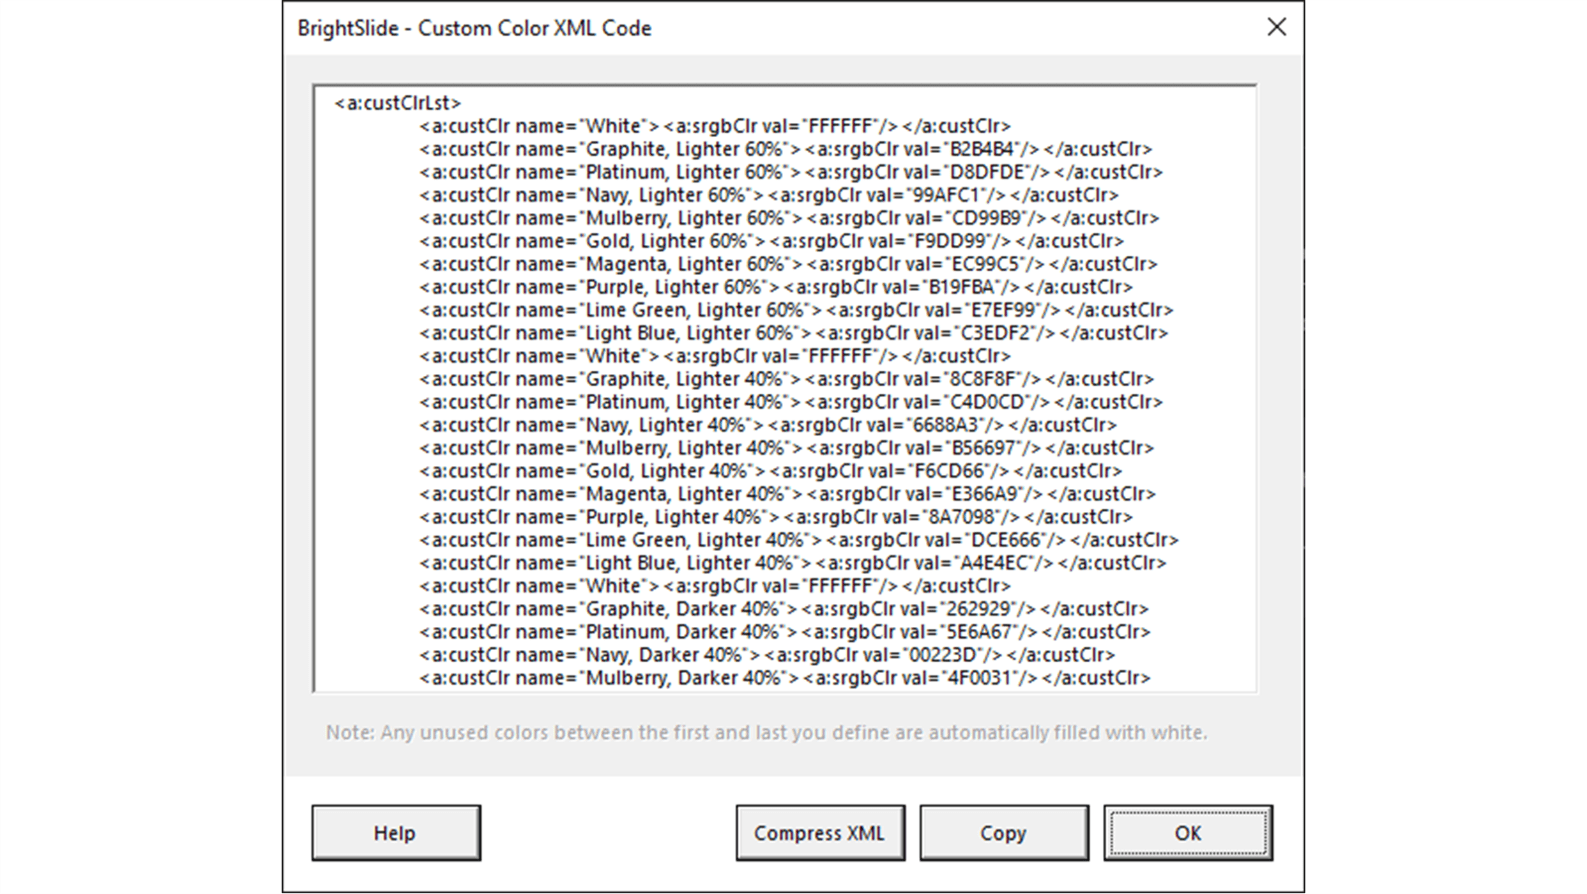
You’ve defined your custom colors and it’s time to inject them into your PowerPoint file like a well-deserved brand guide vaccine.
The first thing to do is take a copy of the XML representation of the colors you created above. Still in the BrightSlide Edit Theme Colors editor, click Export All to open the XML editor window:
Now, aren’t you glad you don’t have to learn XML?! You can click Compress XML to remove all tabs and carriage returns, but this isn’t necessary as PowerPoint cleans up XML each time it saves a file.
Click Copy to copy the XML to the clipboard. Paste it somewhere else as a backup before you close the Edit Theme Colors editor and the window above.
Now it’s time to do the unthinkable. You’re going to hack a PowerPoint file. Be careful: the CIA, MI5 and MiB are all watching!
Every PowerPoint file – and indeed every Office file, including Word and Excel – is nothing more than a Zip archive with a special application-specific extension. You can rename any Office file, changing just the extension to .zip, and see inside Pandora’s box on Windows or macOS.
But there’s an easier way if you’re using Windows. Skip this section for macOS.
If you download and install the free 7-Zip application for Windows, you can edit the contents of a potx/pptx file and all sorts of other Office files directly, without having to rename them. Once installed, you’ll see a new right-click 7-Zip menu item in Windows File Explorer.
To open your file in 7-Zip:
Close your PowerPoint file.
Create a backup copy – this is VERY IMPORTANT in case you make a mistake later.
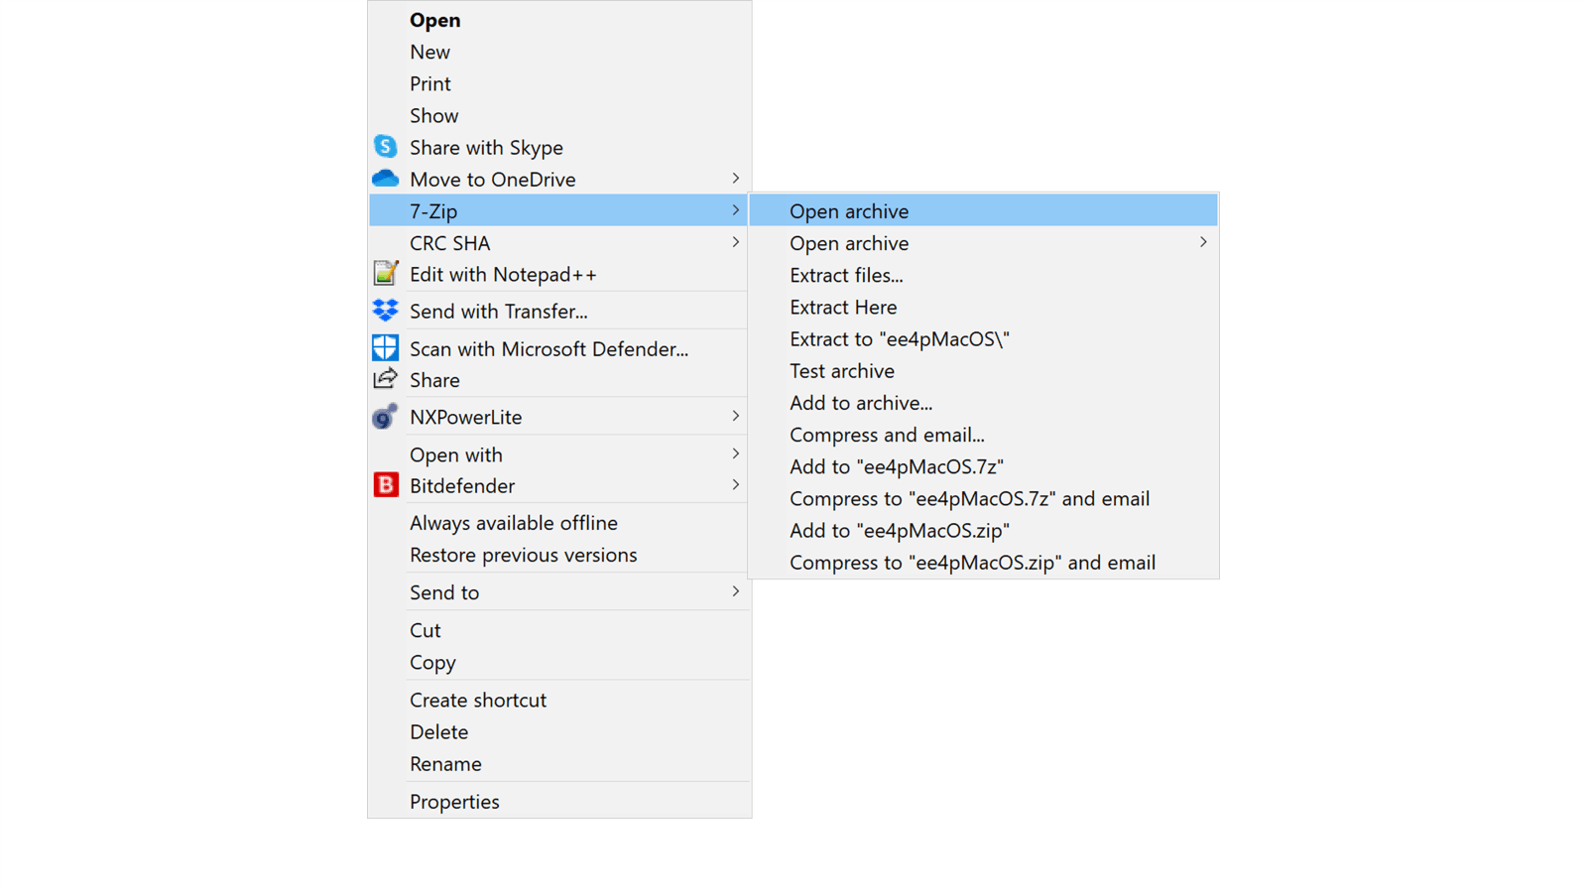
Find the file in Windows File Explorer, right click it and select 7-Zip > Open archive:
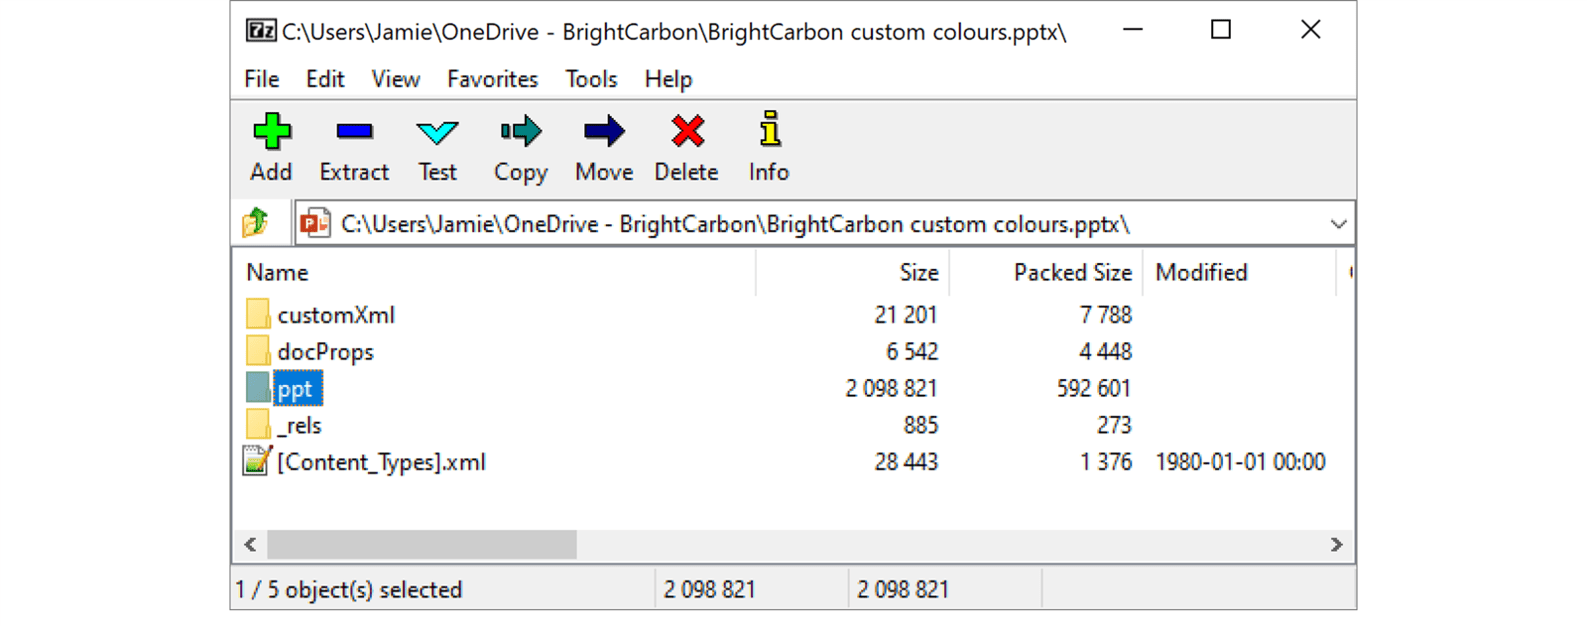
You can now see inside your PowerPoint file. It will look something like this:
Just like Windows File Explorer, you can navigate around the archive. Double-clickppt then theme to find all your theme files. You’ll find at least one theme file named theme1.xml, and possibly others, depending on how you’ve created your PowerPoint file. They are typically named as follows:
theme1.xml – theme for slide master 1
theme2.xml – theme for notes master (or the next slide master)
theme3.xml – theme for handout master (or the next slide master)
theme4.xml and upwards if you have multiple masters (possibly ending with the pair for the notes and handout masters)
Double-click on the theme file you want to inject your custom colors into. Again, there are multiple text editors available, and we like to use the free Notepad++ app on Windows as it makes the XML more readable, and highlights opening and closing tags within the XML. BBEdit for macOS is also exceedingly good.
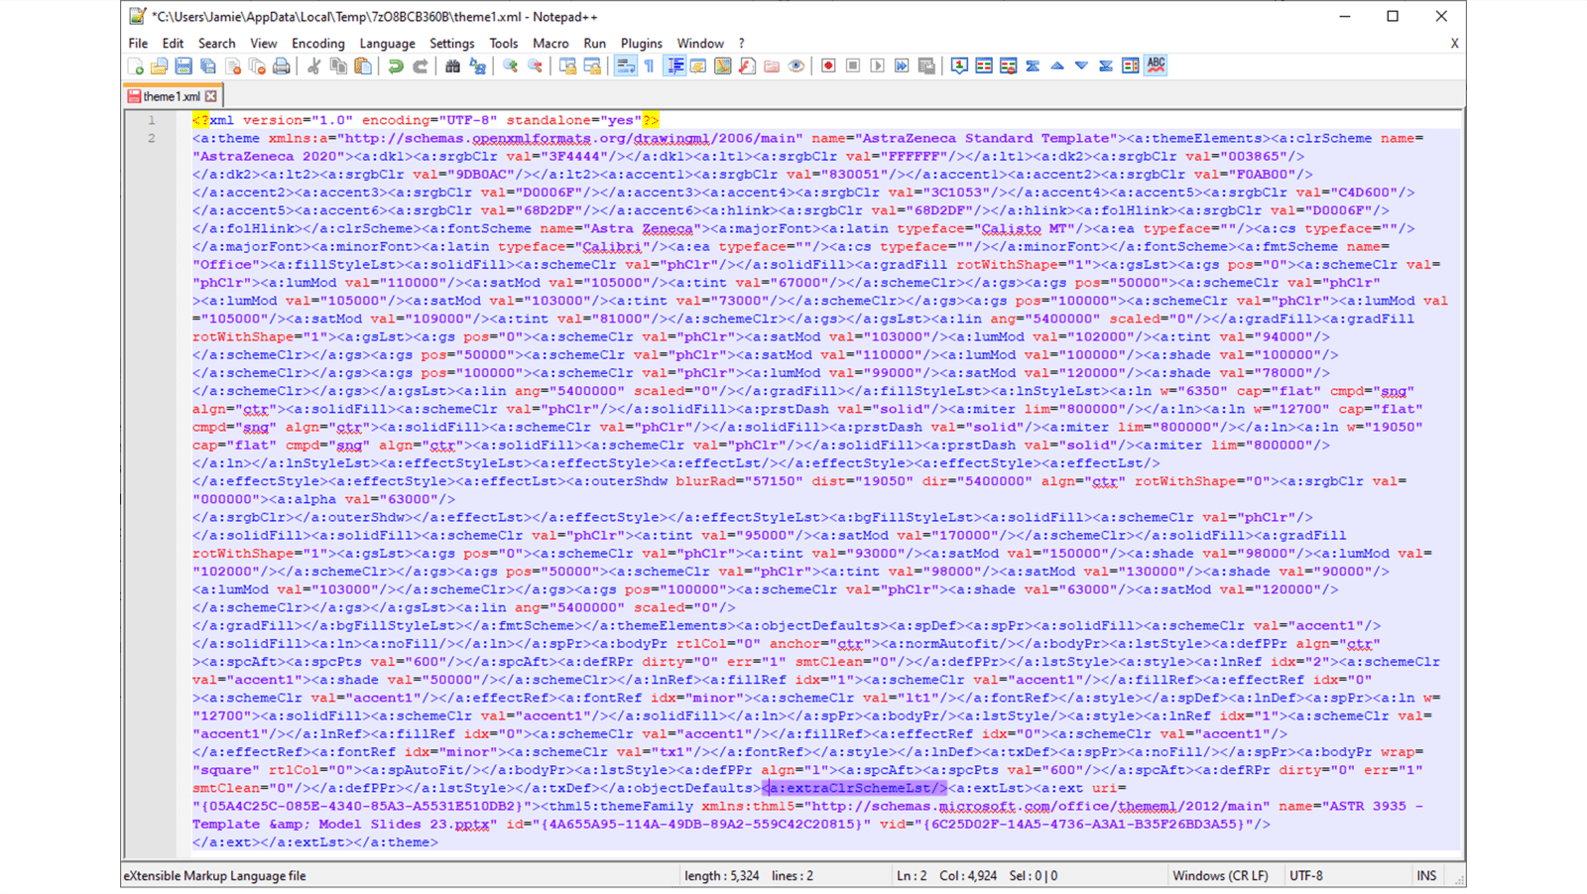
Here’s the XML for our slide master theme:
Pretty horrendous, huh? Don’t panic!
All you need to do is to scan from the bottom to find the tag <a:extraClrSchemeLst/>, highlighted above. That self-closed tag is followed by the opening <a:extLst> tag. Place your cursor in-between these two tags like so:
<a:extraClrSchemeLst/>|<a:extLst>
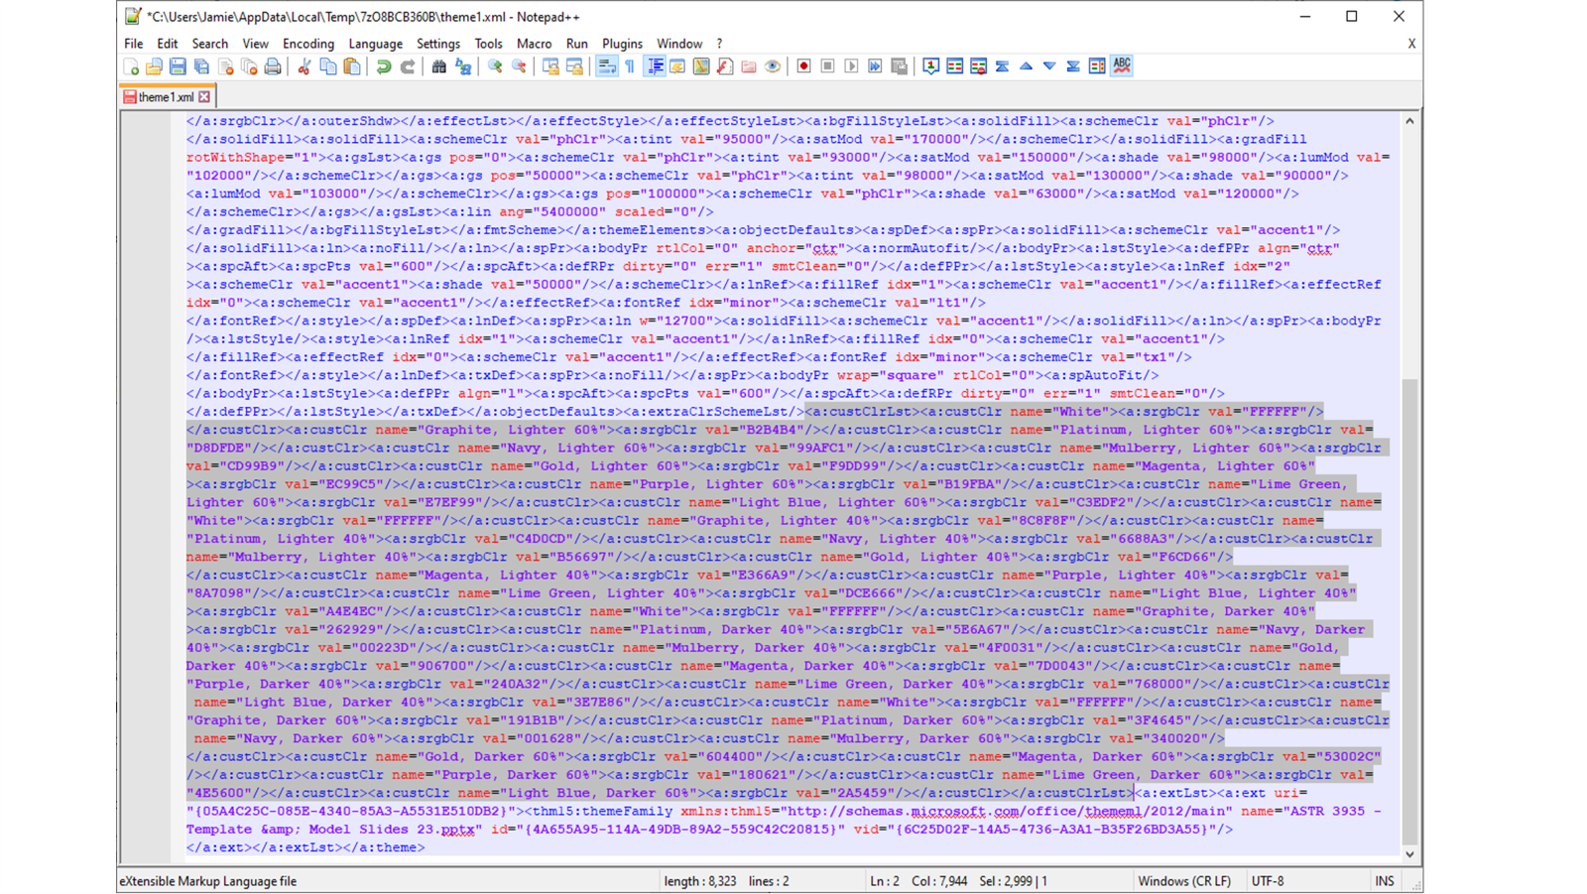
And then paste the XML you previously copied from the BrightSlide Theme Color Editor. You should now see something like this:
Save the XML file and then close your text editor. Return to the 7-Zip window and click OK to update the PowerPoint archive when prompted:
Repeat the XML hack steps for all theme files you want to inject your custom colors into.
Once you’ve finished, close 7-Zip and open your potx/pptx file again in PowerPoint to confirm that the custom colors appear in the PowerPoint color picker as expected. Don’t forget to check it for each slide master, your notes master and your handout master as the themes are different for each.
But I’m a macOS user
You have a couple of choices on a Mac. The easy way or the hard way!
The easy way
Install BBEdit from the App Store.
Use BBEdit to directly open your PowerPoint file (pptx, potx etc.).
Navigate the internal folder structure to find the theme you need to edit.
Edit the theme XML and save back to the PowerPoint file.
The hard way
If you can’t install BBEdit then things are a little tricky on macOS. If you use any of the popular archiving utilities to simply unzip and rezip your PowerPoint file, even if you don’t edit any of the XML your file will be corrupted. PowerPoint will try and fail to repair it. The reason is that these utilities add hidden .DS_Store files all over the place and Office apps don’t like them one bit!
The solution is to use the macOS Terminal app to run a command to zip up your modified archive. Here’s how:
Save your pptx file with a simple short name because you’ll have to type it later. Let’s use myfile.pptx and let’s save it in the Documents folder.
In Finder, rename myFile.pptx to myFile.zip
Unzip the file using your preferred unarchive utility
Edit the required theme.xml file as in the Windows section above and save it when done
Run the Terminal app
Type this command to change directory to your unzipped folder:cd /Users/$USER/Documents/myFile
Type the list directory contents command to check that you’re in the right folder. You should see at least [Content_Types].xml, _rels, docProps and pptls
Type this command to zip up the archive:zip -r myfile.pptx *
You should now be able to open the pptx file in PowerPoint.
You’ve now added custom colors to PowerPoint! You’re a certified PowerPoint hacker and will be known to your colleagues and clients as a magician.
How do you make sure that your graphs and charts have consistent branding across Excel, PowerPoint and Word? Learn how to create and use custom templates that support your brand identity across Microsoft Office.
We love PowerPoint at BrightCarbon. It’s such a versatile application which can be used for so much more than ‘just’ designing presentations. You can create videos, printed collateral, interactive eLearning, even animated GIFs and so much more. But did you know you can even create games? We’ve built one for you, using VBA, and it’s free to download and adapt.
If you're having trouble with your Notes Pages - slide, notes and number placeholders changing size or jumping around - this little VBA macro will fix it for you in a snap.
Hi Marcin. I guess that really depends on the topic and how you want to portray it. For example, if you were presenting a marine topic, you might expect to see blues and greens as opposed to reds, greens and yellows for a fire safety course. There’s a lot of design theory behind choosing an appropriate colour theme but if you want inspiration, you could try one of the many colour palette generators online. The Adobe one is a personal favourite: https://color.adobe.com/create/color-wheel
Hi Gustavo. When you click the Theme Colors / Edit Theme Colors button you should see two windows appear. The one one the left has the title “Edit Theme Colors” and the one on the right is titled “Preview & Custom Colors”. If you don’t see that, please send us a message via the Contact Us page.
@Jamie Garroch: I’m believe I’m getting the same issue. The “Preview & Custom Colors” window you say should appear on the right, simply is not there on MacOS.
I believe that on Mac OS you can use BBEdit all the way: no need for unzipping and Terminal commands. You can open your PowerPoint file directly in BBEdit and edit all of its XML contents…
I got stuck on point 7 (on the mac) and instead tried it with BBEdit, and yes that works. On mine, you aren’t able to open the .ppt file from the BBEdit app, but needed to drag the .ppt file you wish to update, to BBEdit to open, and after the steps, hit save. Then open the .ppt file as normal. Thank you both.
After many false starts, I completed this today on a Mac. I had a difficult time adding colors before I learned to highlight the box, generate the color without clicking any buttons, then rename the color. Since we had a lot of holes with the custom colors, I made them all white, not knowing that the white would be added later in the XML.
Clicking buttons within the edit theme windows caused a lot of crashing and lost work. However, it was worth it. Having the XML in a word doc will make adding the custom colors to new templates much easier.
Thank you for the tutorial – I really appreciate it!
Thank you for the feedback Rachael. I assume the crashing you mentioned is coming from the use of BrightSlide on macOS? If so, we’ll take a look at that. Yes, adding white chips to represent blank holes is the best solution as the Office UI doesn’t support “empty” slots in the colour picker interface.
Hi Jamie, in your fourth image you say “Brand Check will automatically update them to the closest correct brand colour”. What id “Brand Check”? Is this a service offered by BrightCarbon or something the BrightSlide add-in can do? How can you edit the tints and shades – in ooXML?
Good question David! That screen shot is from a client’s brand guide and I hadn’t noticed the reference to one of the features of our BrandIn product. It’s an enterprise add-in for PowerPoint that helps users create on-brand content. You can find out more about BrandIn here: https://brightcarbon.com/brandin
I followed the steps on Mac OS. After inserting the XML and saving it, Powerpoint can’t open the file anymore saying “PowerPoint can’t read ^0.” Does anyone have an idea what I am doing wrong?
Thanks for the feedback Jonathan. Firstly, that ^0 message is a Microsoft bug and we’ve reported it to them several times. For the actually cause, XML is super-picky when it comes to syntax, case sensitivity and the position you inject the XML code. Which tools did you use to edit the XML? If you have a sanitised non-confidential pptx file you can email it for my attention using the Contact link at the top of this page and I’ll take a look.
Thanks for the quick reply, Jamie! I used BBEdit to edit the XML and inserted the code at the position suggested in the article. I’m not an XML-expert though. I’ll happily send you a sanitised non-confidential pptx file. Thank you so much for the offer!
Never mind, it was indeed a syntax problem which I’ve fixed now. 🙂 However, would you happen to know why my custom colours are only shown in the desktop application and not the browser application? 🙂
Well, the instructions seem very comprehensive, the trouble is that none of the processes outlined here have worked for me, on Mac or PC. Most frustrating! None of them have resulted in any colours embedded into the file.
Mac ends in file that needs repair PC ends in file that needs repair
Hi Jon. If Office says the file needs repairing then “something” went wrong with the XML code. Either the injection of the custom colours snippet is in the wrong place or the case-sensitive syntax is not 100% correct. XML is very finicky about that. If you like, you could send your modified theme XML file (marked for my attention) to us via our Contact form and I could take a look. We’ll update the instructions too, if required.
My comments for Mac users: After many tries, this worked for me: After adding all my secondary colours, I ‘filled-in’ or ‘plugged’ any additional colour blocks with white. Then I copied the XML code to a word document. I removed all the spacing between the code, which seemed to generate on my clipboard / word doc. I downloaded BBedit, found my themes, found the exact spot in the code to insert the copied code from my clipboard by using the ‘Cmd + F’ on my keyboard and searching for Then I inserted the code, saved the BBedit file and opened my PP.
Let me know if any of this was unnecessary, but I managed to work it this way.
I see I inserted the actual code on my previous comment and it turned my copy into colour but lost the code – basically, the code from the description in the tutorial above.


What colour scheme would you recommend for secondary school education that would make it unique and modern but not overwhelming?
Hi Marcin. I guess that really depends on the topic and how you want to portray it. For example, if you were presenting a marine topic, you might expect to see blues and greens as opposed to reds, greens and yellows for a fire safety course. There’s a lot of design theory behind choosing an appropriate colour theme but if you want inspiration, you could try one of the many colour palette generators online. The Adobe one is a personal favourite: https://color.adobe.com/create/color-wheel
Hi there!!! Great article!
I’ve just installed the BrightSlide app, although, the Theme Color tab, don’t open the edit windown, just the preview.
I’m on a Mac.
Hi Gustavo. When you click the Theme Colors / Edit Theme Colors button you should see two windows appear. The one one the left has the title “Edit Theme Colors” and the one on the right is titled “Preview & Custom Colors”. If you don’t see that, please send us a message via the Contact Us page.
@Jamie Garroch: I’m believe I’m getting the same issue. The “Preview & Custom Colors” window you say should appear on the right, simply is not there on MacOS.
Thanks for this wonderfull tool !
Very nice job !
Thank you so much Sebastien. We’re glad you like it!
I believe that on Mac OS you can use BBEdit all the way: no need for unzipping and Terminal commands. You can open your PowerPoint file directly in BBEdit and edit all of its XML contents…
That’s an excellent observation Arnout. Thank you so much for contributing to the article which I’ve updated accordingly 🙂
I got stuck on point 7 (on the mac) and instead tried it with BBEdit, and yes that works.
On mine, you aren’t able to open the .ppt file from the BBEdit app, but needed to drag the .ppt file you wish to update, to BBEdit to open, and after the steps, hit save.
Then open the .ppt file as normal. Thank you both.
After many false starts, I completed this today on a Mac. I had a difficult time adding colors before I learned to highlight the box, generate the color without clicking any buttons, then rename the color. Since we had a lot of holes with the custom colors, I made them all white, not knowing that the white would be added later in the XML.
Clicking buttons within the edit theme windows caused a lot of crashing and lost work. However, it was worth it. Having the XML in a word doc will make adding the custom colors to new templates much easier.
Thank you for the tutorial – I really appreciate it!
Thank you for the feedback Rachael. I assume the crashing you mentioned is coming from the use of BrightSlide on macOS? If so, we’ll take a look at that. Yes, adding white chips to represent blank holes is the best solution as the Office UI doesn’t support “empty” slots in the colour picker interface.
Hi Jamie, in your fourth image you say “Brand Check will automatically update them to the closest correct brand colour”. What id “Brand Check”? Is this a service offered by BrightCarbon or something the BrightSlide add-in can do? How can you edit the tints and shades – in ooXML?
Good question David! That screen shot is from a client’s brand guide and I hadn’t noticed the reference to one of the features of our BrandIn product. It’s an enterprise add-in for PowerPoint that helps users create on-brand content. You can find out more about BrandIn here: https://brightcarbon.com/brandin
Hi.
How to do with the Highlighting color, want to add more custom color, any idea?
Hey, have a look at OOXML Tools to edit in a browser no 7zip, BBEDIT and Notepad needed.
https://chrome.google.com/webstore/detail/ooxml-tools/bjmmjfdegplhkefakjkccocjanekbapn?hl=en
I followed the steps on Mac OS. After inserting the XML and saving it, Powerpoint can’t open the file anymore saying “PowerPoint can’t read ^0.” Does anyone have an idea what I am doing wrong?
Thanks for the feedback Jonathan. Firstly, that ^0 message is a Microsoft bug and we’ve reported it to them several times. For the actually cause, XML is super-picky when it comes to syntax, case sensitivity and the position you inject the XML code. Which tools did you use to edit the XML? If you have a sanitised non-confidential pptx file you can email it for my attention using the Contact link at the top of this page and I’ll take a look.
Thanks for the quick reply, Jamie! I used BBEdit to edit the XML and inserted the code at the position suggested in the article. I’m not an XML-expert though. I’ll happily send you a sanitised non-confidential pptx file. Thank you so much for the offer!
Never mind, it was indeed a syntax problem which I’ve fixed now. 🙂 However, would you happen to know why my custom colours are only shown in the desktop application and not the browser application? 🙂
Well, the instructions seem very comprehensive, the trouble is that none of the processes outlined here have worked for me, on Mac or PC. Most frustrating! None of them have resulted in any colours embedded into the file.
Mac ends in file that needs repair
PC ends in file that needs repair
Terminal – I couldn’t get it to zip the file
Hi Jon. If Office says the file needs repairing then “something” went wrong with the XML code. Either the injection of the custom colours snippet is in the wrong place or the case-sensitive syntax is not 100% correct. XML is very finicky about that. If you like, you could send your modified theme XML file (marked for my attention) to us via our Contact form and I could take a look. We’ll update the instructions too, if required.
My comments for Mac users:
After many tries, this worked for me:
After adding all my secondary colours, I ‘filled-in’ or ‘plugged’ any additional colour blocks with white.
Then I copied the XML code to a word document.
I removed all the spacing between the code, which seemed to generate on my clipboard / word doc.
I downloaded BBedit, found my themes, found the exact spot in the code to insert the copied code from my clipboard by using the ‘Cmd + F’ on my keyboard and searching for
Then I inserted the code, saved the BBedit file and opened my PP.
Let me know if any of this was unnecessary, but I managed to work it this way.
I see I inserted the actual code on my previous comment and it turned my copy into colour but lost the code – basically, the code from the description in the tutorial above.
Hi there!
Excellent article!
I need to use this hack on Word for shading columns.
I managed to do with text colors, but the custom colors won’t show in the shading colors.
Any ideas?
This worked like a charm! I’m soooo happy with this feature. THANK YOU!