
30th Oct 2023
How to create PowerPoint templates that work
Without a proper PowerPoint template, presentations can be a bit of a mess. Here are the building blocks for developing a PowerPoint template that works!

What’s the weirdest thing people do in PowerPoint? Yes, the answer could be to make Christmas cards, or even worse, Valentine’s Day cards, but in general it’s printing the slides. At BrightCarbon we promote the use of PowerPoint as a presentation tool, where visual slides support a presenter and use graphics, diagrams, and animations to explain the key points. These types of slides often don’t print well because of layers and animations, and they certainly aren’t self-explanatory. But sometimes you do need to print PowerPoint slides, or print PowerPoint slides with notes, or even print multiple slides on one page. So, if do you need to do that, how do you do it?
The best, and possibly easiest, thing to do is not print your slides, but print the Notes Pages in PowerPoint. Notes Page is a special view that shows the slide and the speaker notes on the same page. This allows you to have a more visual slide to explain the point when presenting, and then a detailed set of notes for your audience to use as reference material.
The nice thing about using the Notes Page to print PowerPoint with notes is that there is a separate, dedicated view for it, so you don’t have to compromise on the design of your main slide, but it’s all contained in a single file.
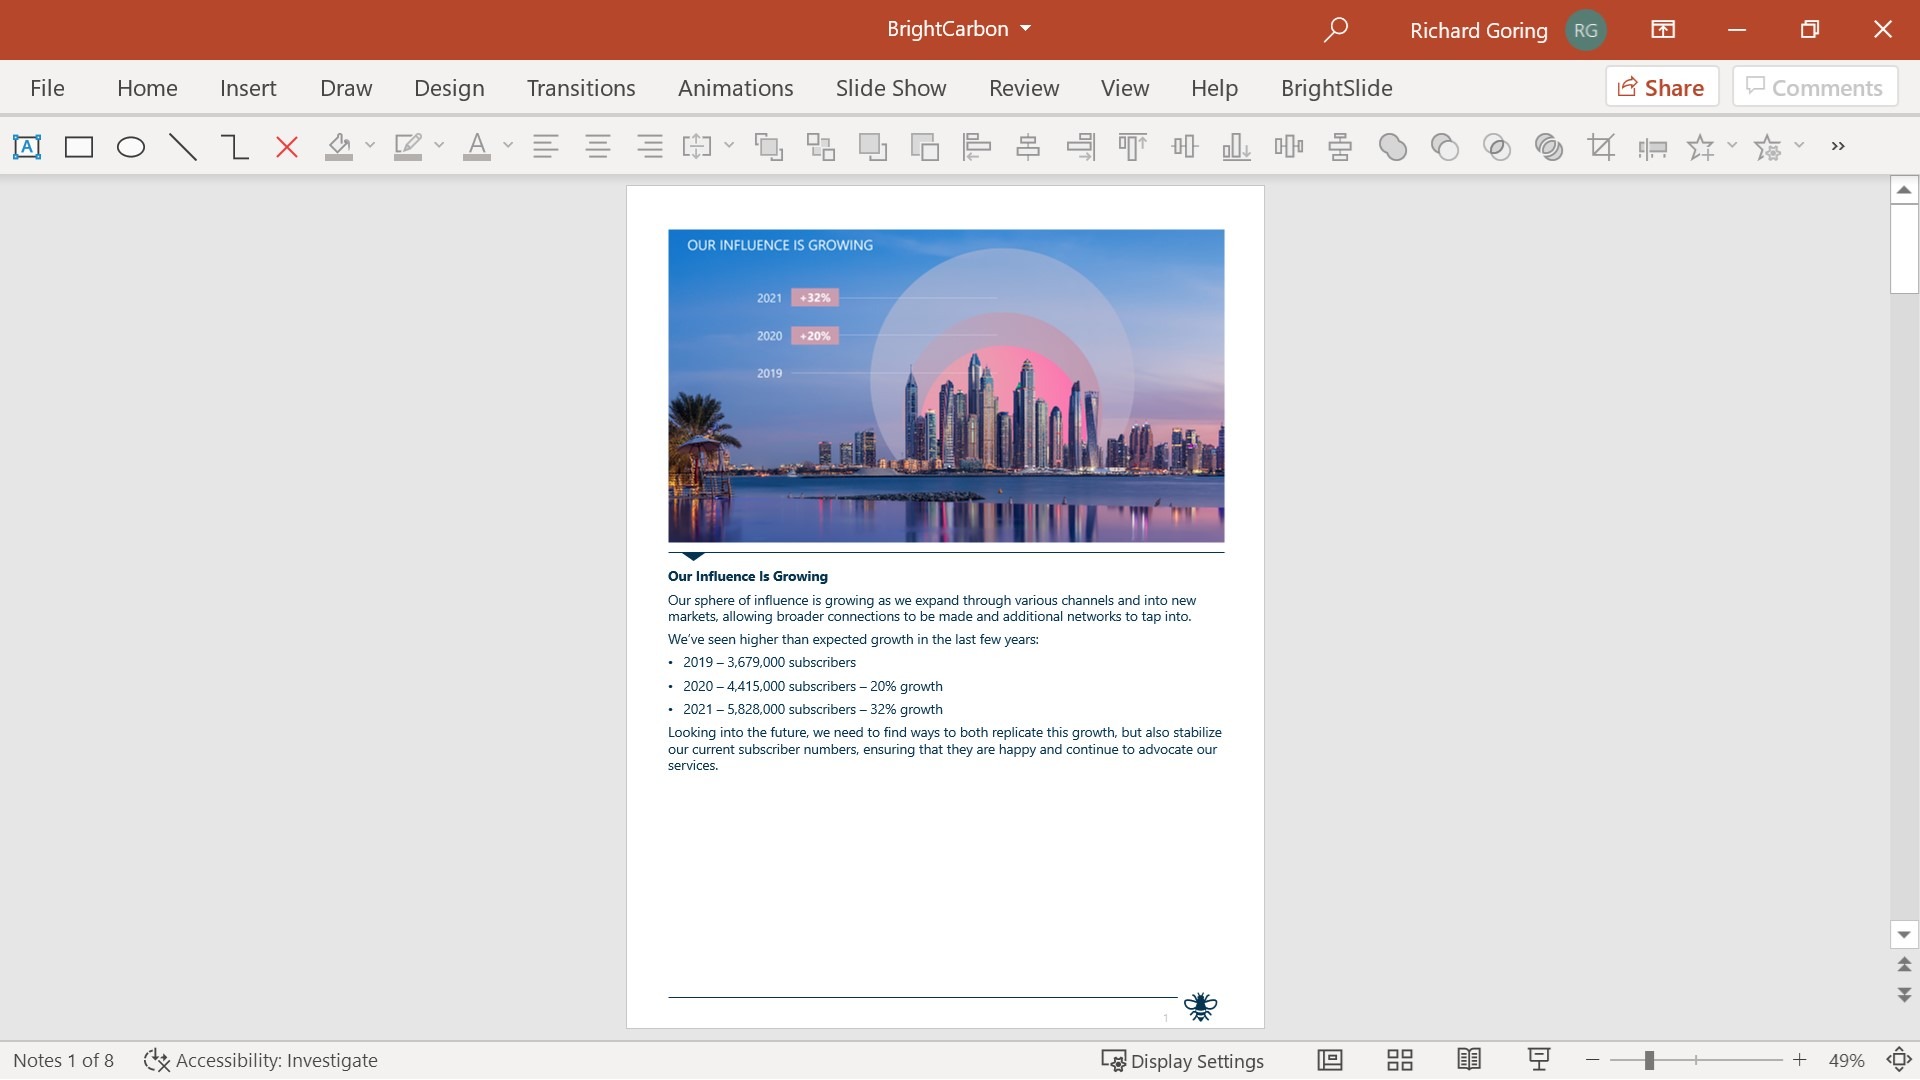
Go to the View tab on the ribbon, then select Notes Page on the left to see the standard layout with a slide at the top and speaker notes underneath.
You can simply print it as is, but of course there’s so much more that you can do to print PowerPoint with notes that look good and give off a sense of professionalism. Watch this video tutorial or scroll down for step-by-step instructions and even more detail.
How to create a PowerPoint notes master
How to add notes in PowerPoint
How to reset a PowerPoint notes page
Problems with PowerPoint notes pages
How to print notes in PowerPoint or save as PDF
Changing default print settings
Print PowerPoint notes in grayscale or black and white
How to export PowerPoint speaker notes to Word
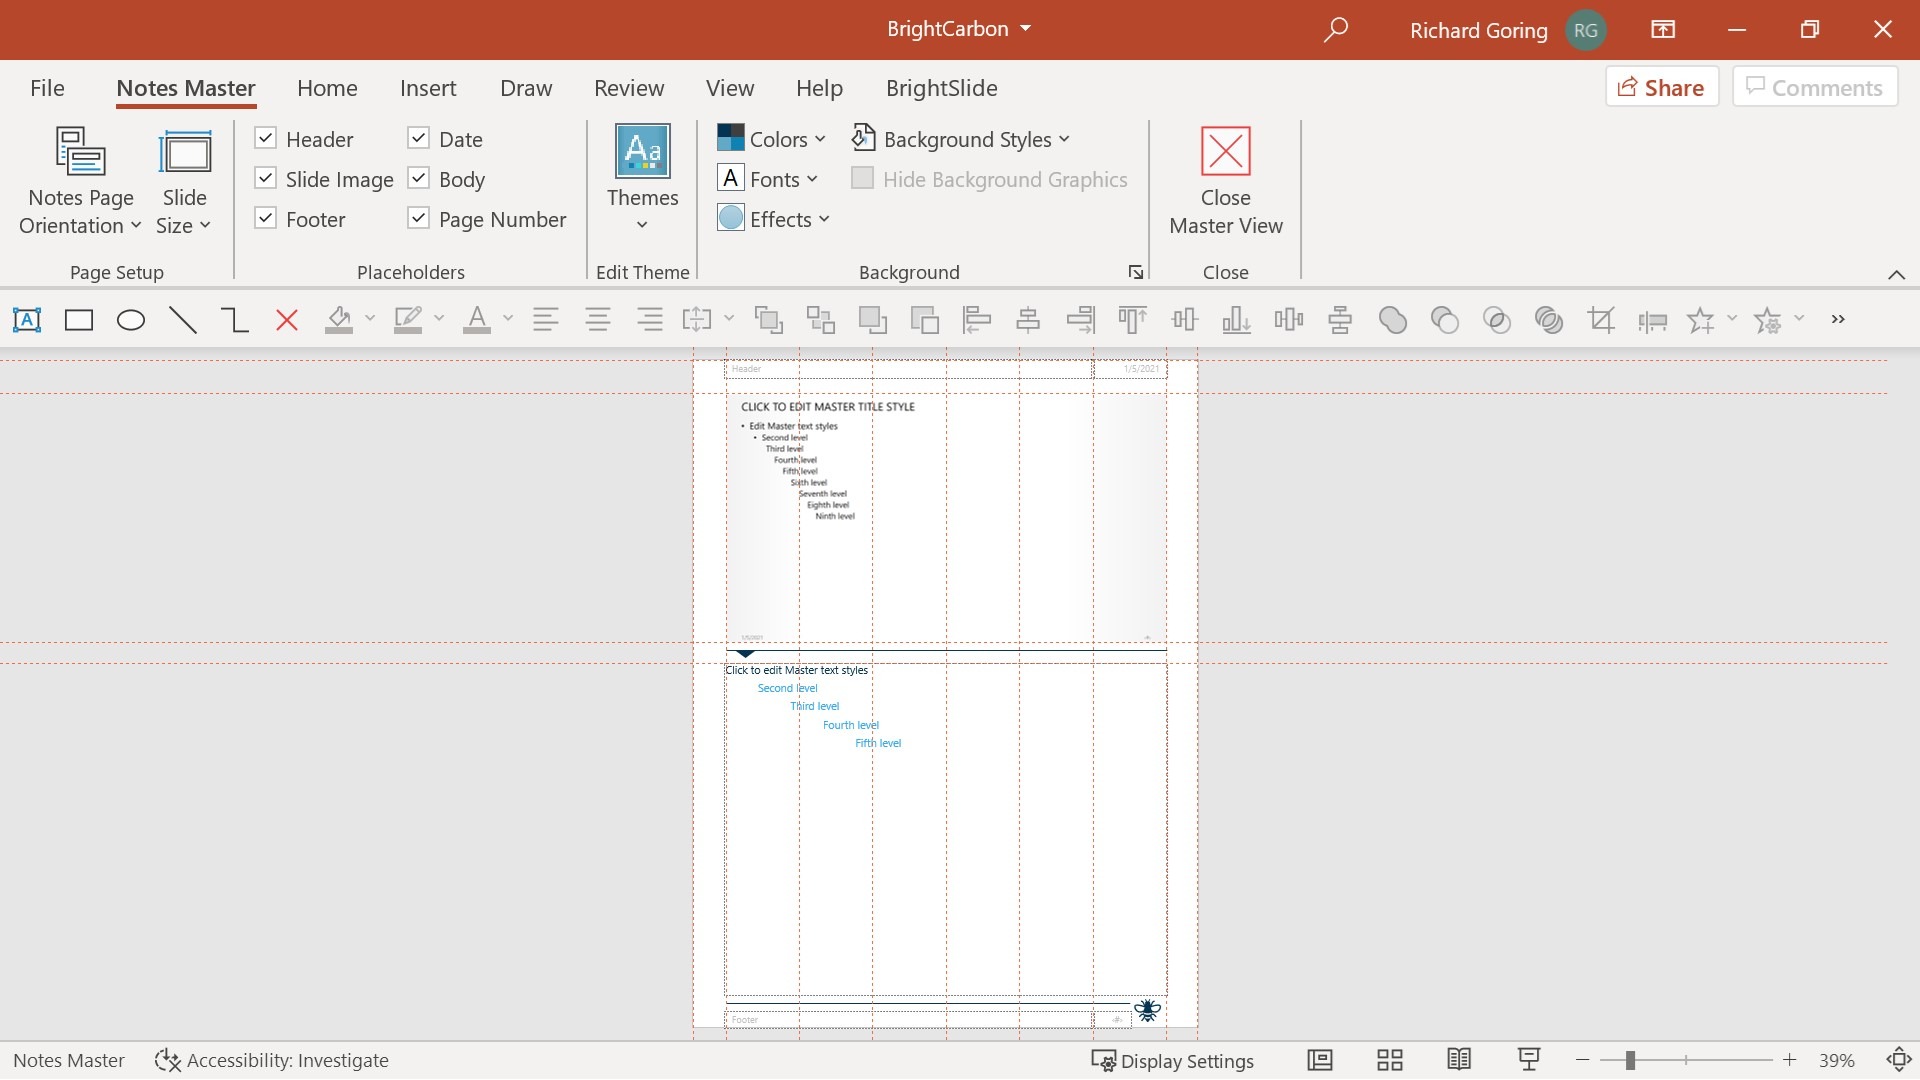
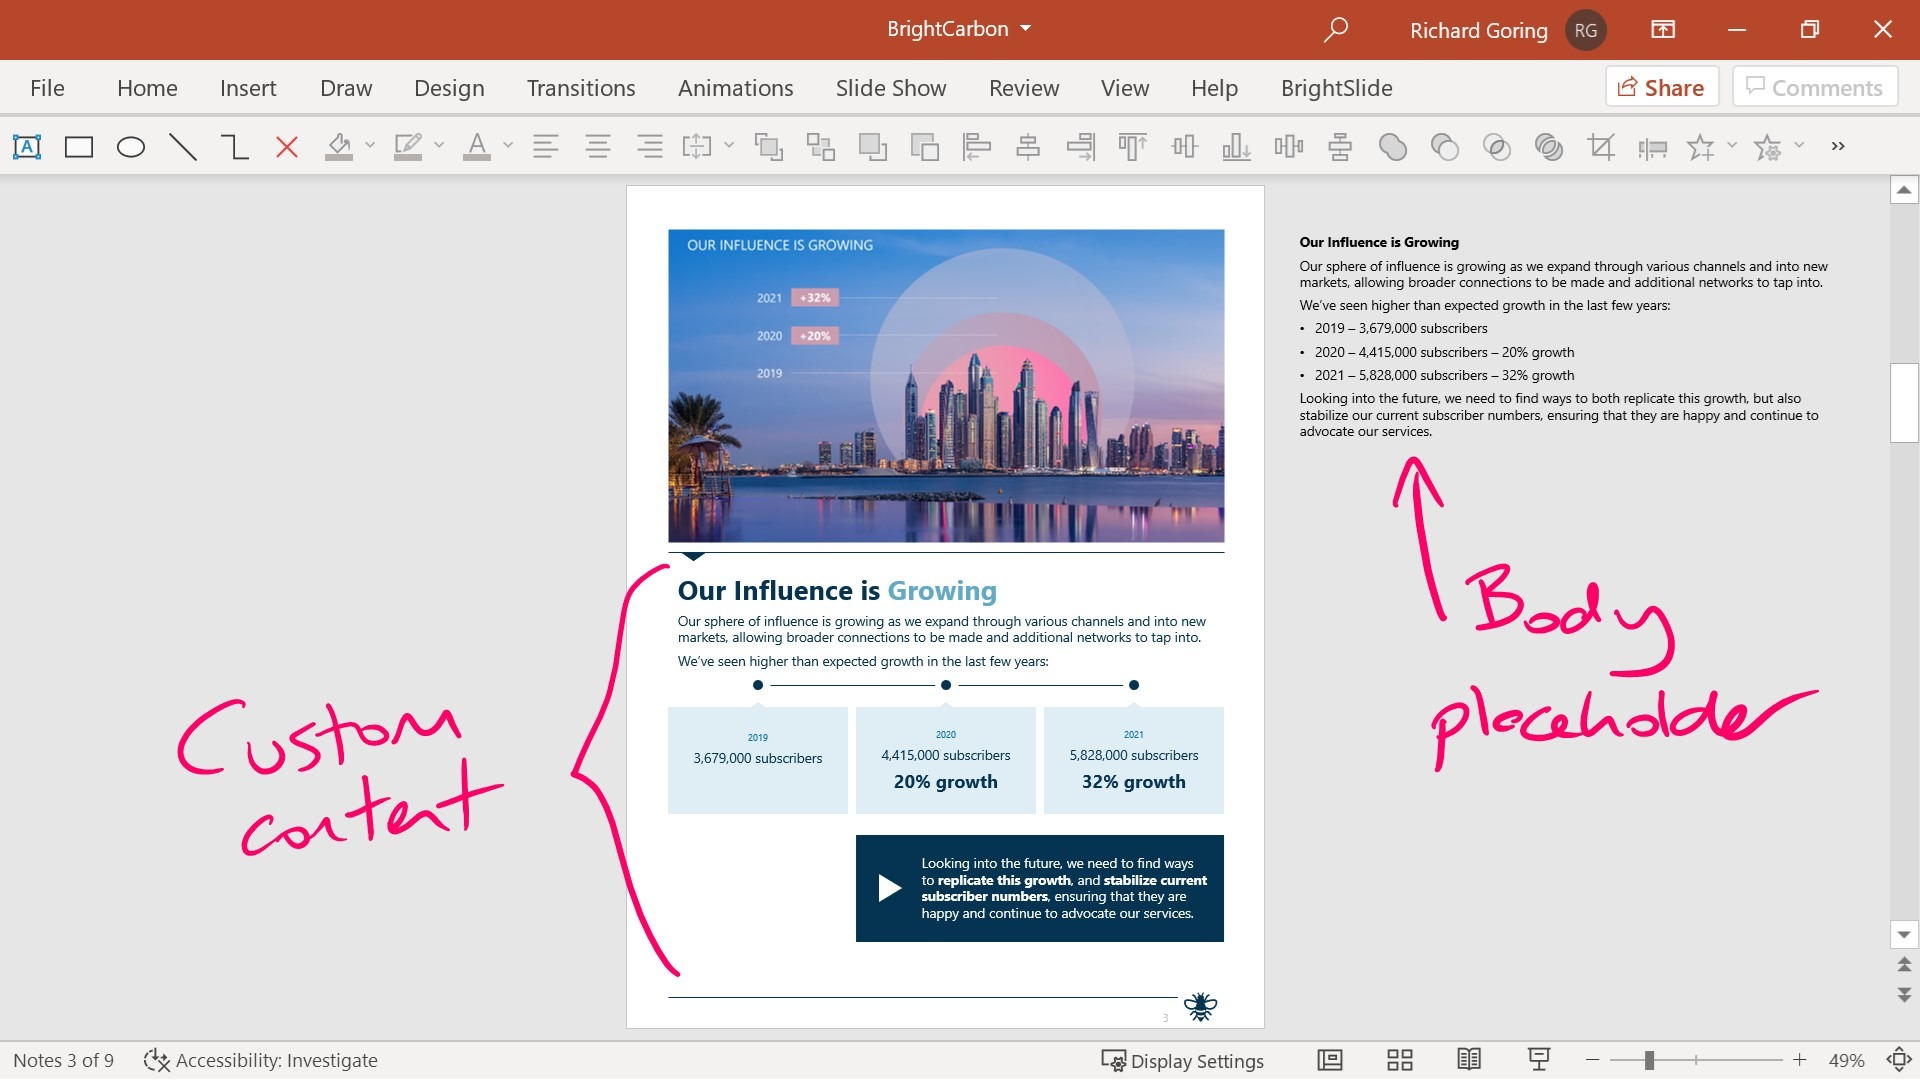
If you want to alter the layout of the PowerPoint Notes Page, you can do so in the Notes Master (to the right of the Notes Page button on the ribbon). Here you can update the formatting of all the Notes Pages in your deck which includes backgrounds, arrangement of the placeholder content elements (header, slide image, footer, date, body text, and page number), adding a grid using guides, and even adding custom elements, such as extra graphics, logos, and other non-placeholder content. You can even set a different brand style to your presentation with a new color and font theme. In fact, you’ll have to copy these over from your main presentation if you want to keep things consistent. You can also change the Notes Page orientation from portrait to landscape.
This means that, when you print notes in PowerPoint, you can create a completely custom and beautifully designed Notes Page to act as a dedicated handout, rather than the usual tedious affair of a slide thumbnail thrown on the slide with a load of notes haphazardly arranged underneath.
What you can’t do in the Notes Page view, which seems foolish, is change the page size. You may be tempted by the Slide Size button on the left of the Notes Master tab, but that changes the size of your presentation slides, so don’t use it! It will affect your whole presentation, mess up content and, if you’ve not removed the variants from your slide master (by saving as a .potx template file), then it will also alter the colors and fonts too. The paper size is set by your default printer settings. To change it, you have to change the print settings, which are in File > Print > Printer > Printer Properties. Remember to choose the printer from the drop-down menu too, as each printer in the list has different settings. I suspect the reason you have to navigate this path to Mordor to change the paper size is that no one expects you to do it, but at least now you know you can.
Occasionally things go wonky and the PowerPoint notes pages change size or are all different sizes. It’s an obscure bug, but can happen if you open the file in PowerPoint for the web. Fortunately, the excellent Steve Rindsberg has a quick solution to fix Notes Page size problems.
Back to the notes pages themselves, as well as changing the Notes Master, you can also go to the Notes Page in the View tab and add notes in PowerPoint by personalizing each individual page. This won’t impact your presented slides, but it allows you to create something perfect for printed handouts.
The standard layout for the PowerPoint Notes Page uses the Notes Master. You can alter any of the text in the main notes placeholder to add notes in PowerPoint, which will also transfer through to the speaker notes of your slides. You can alter the formatting of the notes so that they look better or are easier to read, but only basic formatting like bold, italics, and underline, plus bulleted and numbered lists will transfer to the slide speaker notes in PowerPoint. You can also alter the color, size, and font of text, and things like the margins, line spacing, and paragraph spacing, but this won’t transfer to the slide speaker notes. It’s worth noting that any changes in formatting you make to the slide speaker notes – like changing the color or font – will be reflected in the Notes Page, even though you can’t see these changes in the speaker notes view.
You can take it further by deviating from the standard PowerPoint notes template. For example, it may be that you have a key messages slide, or an agenda, contacts, or data slide, where there isn’t anything of value to be added with the speaker notes, and it’s better to see the slide as large as possible on the page when printed. Well, this is your opportunity. You can alter the size and position of any of the six placeholder element types. It’s easy to make the slide fill the page and remove the notes completely. You can also add additional custom elements onto each notes page. This might include additional information, data tables, highlights, ink annotations, or punchlines for key points. You’re essentially created a dedicated, custom notes page to print PowerPoint with notes, without affecting the presentation slides at all.
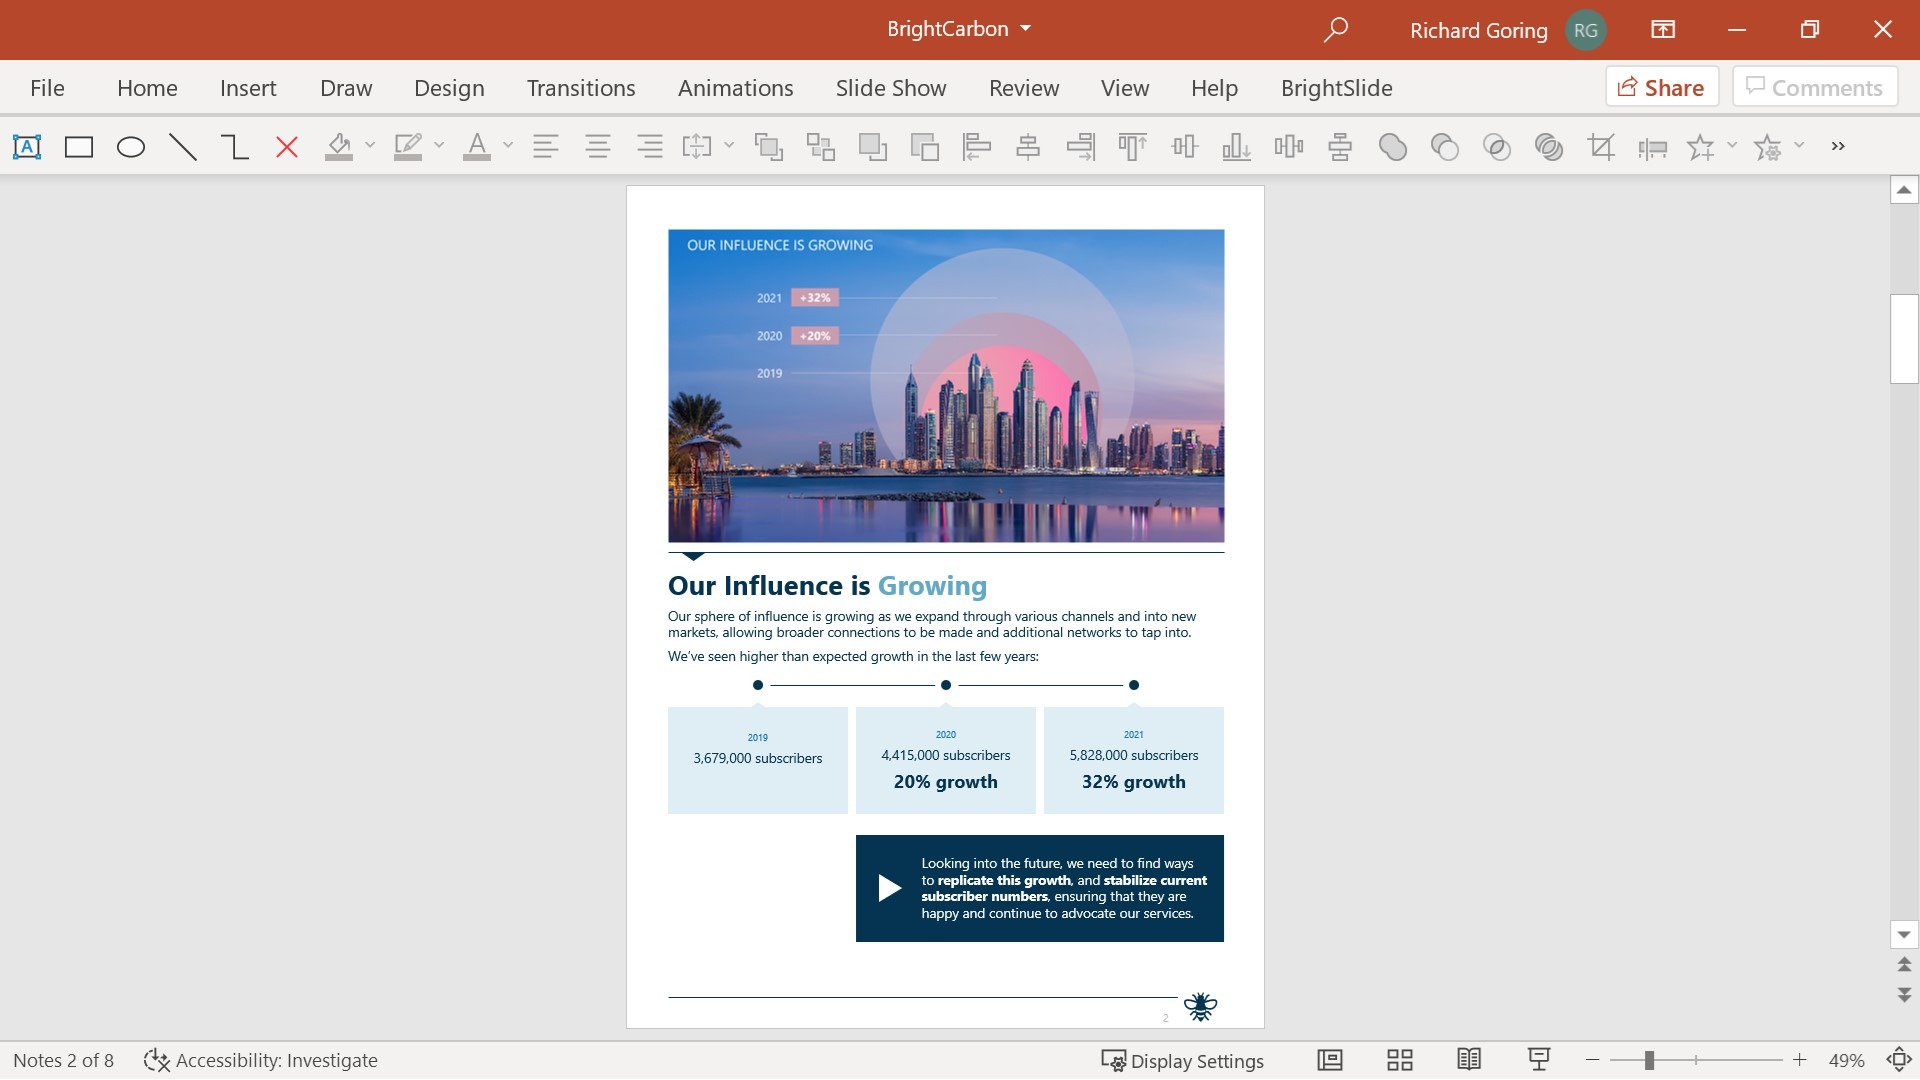
However, only content in the body placeholder of the notes page will appear in the speaker notes (and likewise anything in the speaker notes will appear in the notes page body placeholder). Custom formatted notes content like you can see in this example, with separate text boxes or visual representations of data, won’t appear in the speaker notes. One workaround is to put the body placeholder off the edge of the page. This means it won’t be seen when you print PowerPoint with notes or save handouts as a PDF, but all the content is still there in your speaker notes. With all this customization you’re essentially creating a second document, so be wary of the time requirement. On the upside, it’s all in one file and there are no version control issues.
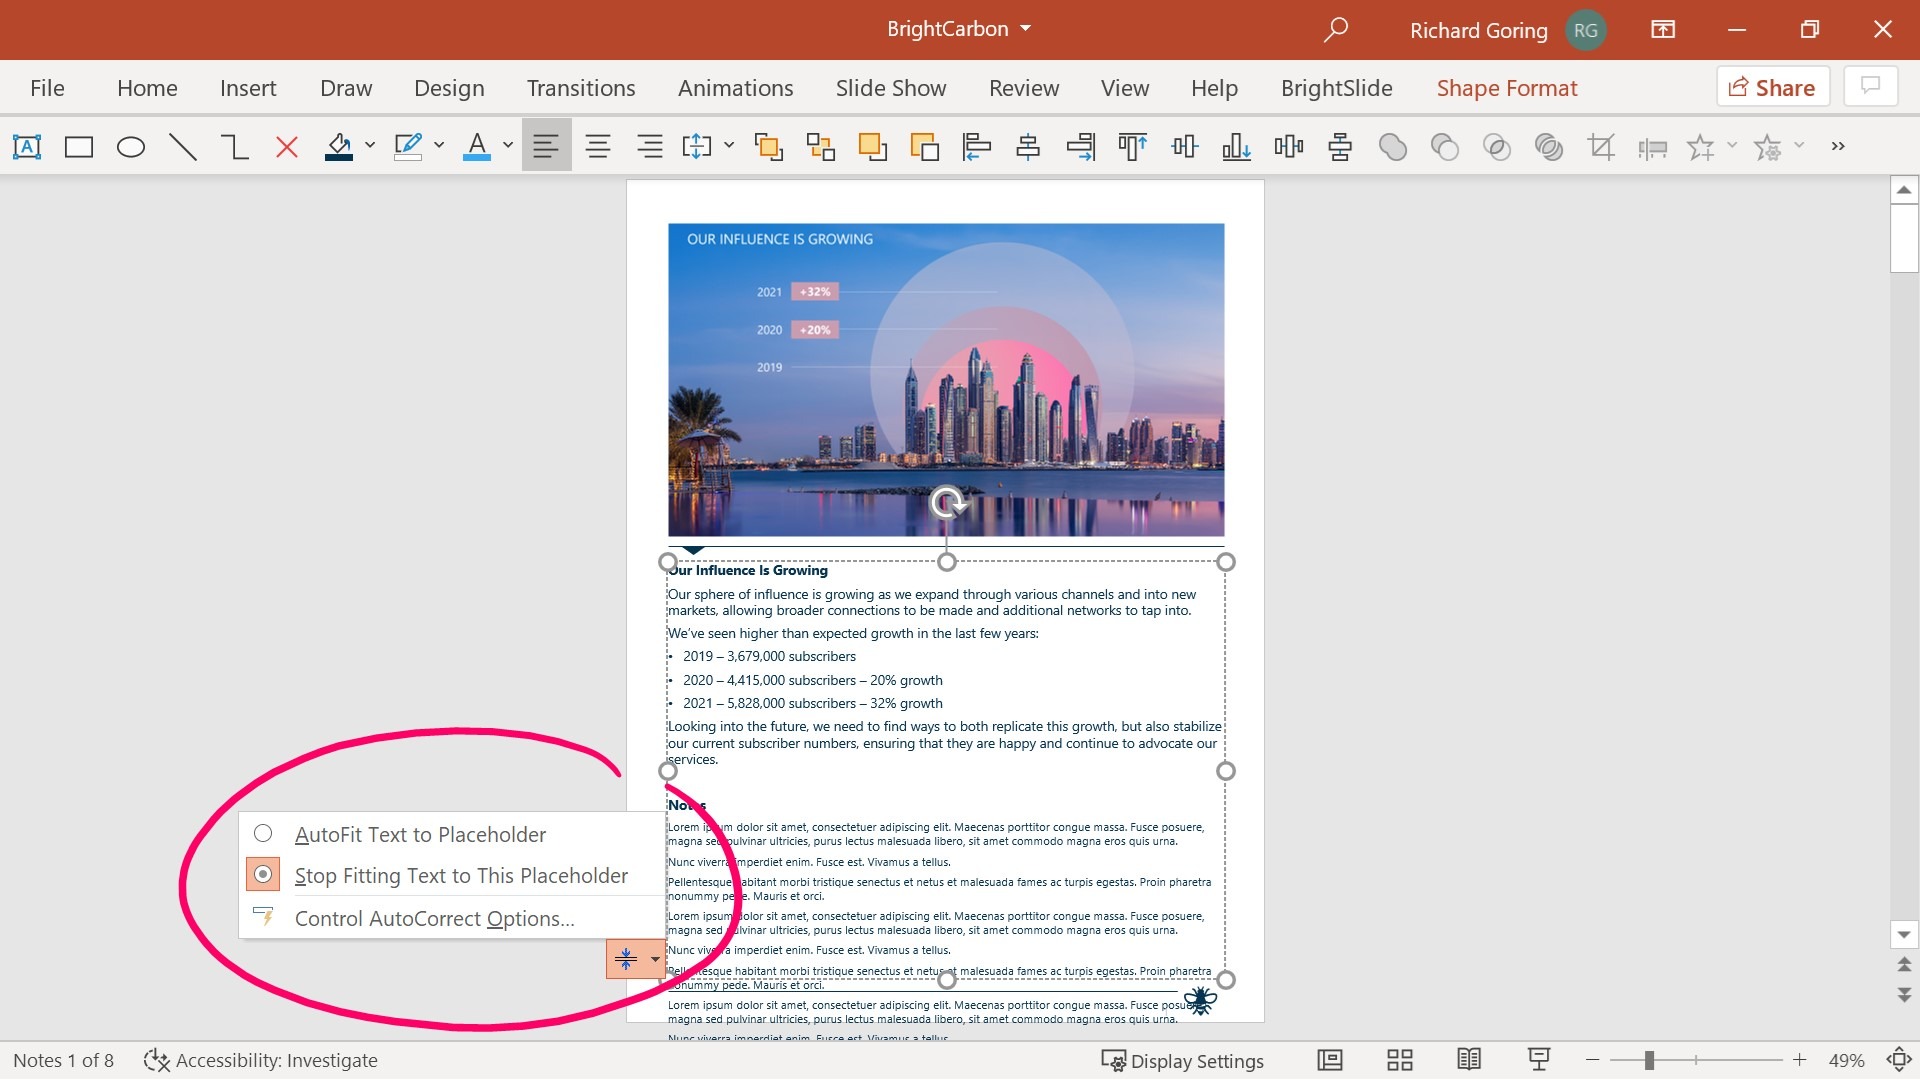
If you have a lot of notes for a single slide, you may be frustrated that they extend beyond the body text placeholder into your carefully selected margins or go off the edge of the page entirely. You can use the text formatting options to shrink text to the size of the text box (Right-click > Format Shape > Text Options > Text Box > Shrink text on overflow). On any individual text boxes where the text spills out beyond the placeholder, you’ll get a small AutoCorrect control appearing at the bottom left of the placeholder, allowing you to choose to AutoFit Text to Placeholder for that particular page. However, if you miss this, all is not lost, as PowerPoint, rather ingeniously, will recognize that you have text outside of the text placeholder, and when you print the notes pages, it will put that overflow text onto a second page, starting at the top with no slide thumbnail, but in line with your standard text box placeholder. Usefully (probably) it numbers both pages the same, so you won’t get additional page numbers from the extra overflow pages. That means you don’t have to force your audience to read tiny text just because you have a lot of it.
It’s also worth noting that you can’t change the presentation slide itself in the Notes Page view, and also that any changes you make to the slides will impact the thumbnail image of the slide that’s in the notes page. So you can’t have a layered slide for presenting and a flat slide for printed notes all on the same slide, unfortunately (unless you go to a lot of effort to create a flat summary version as a top layer that disappears instantly and so isn’t seen during the presentation).
If you alter a notes page and then decide you want to reset it to the original layout, you need to use the Reapply Master function. As far as I can tell, the only way to do this is on a blank area of the notes page right-click, choose Notes Layout, then Reapply Master from the pop-up menu. This will reset the notes page to the default in the notes master. That includes resetting the position of moved objects, restoring deleted elements, and removing any custom formatting from the text.
If you want to do this to every notes page in the deck, we’ve got a quick fix to reapply master to ALL PowerPoint notes pages.
There are a number of problems with PowerPoint notes pages that it’s worth knowing about.
Hyperlinks
You can’t add hyperlinks to objects in Notes Pages. However, if your text includes a URL, then the text itself will turn into hyperlink. If you really want to add hyperlinks to PowerPoint notes pages, you can create an object with a hyperlink in the Normal view (standard presentation editing) and then copy/paste that into the notes page, and the hyperlink will work. It seems bizarre, but there you are.
Page size
As noted above, it’s confusing that you can’t change the notes page size anywhere in the PowerPoint interface. In the Notes Master, there’s a group called Page Size where you can change the orientation of the page and the size of the slide, but it’s the size of the presentation slide, not the notes page. Doing this could ruin your actual presentation. To change the page size itself, you have to go to File > Print > Printer > Printer Properties > Mordor > Paper Quality > Mount Doom > Paper Sizes.
Print setup
If you do change your notes page size, then it’s per printer, not for the document. And so you end up changing the notes page for all subsequent presentations that you open. If you go on to choose another printer, or decide to print to PDF, then it changes the notes page size again. And of course, this will cause problems sharing the file with others, especially if they’re in a different country and use a different paper size (Letter in the US and A4 everywhere else, for example).
Placeholder scaling
When you change notes page size, the scaling of the placeholder elements is odd. It seems like it doesn’t like the slide image placeholder especially, which scales differently and ends up partially off the page, so ideally change the notes page size right at the start, before you do anything else.
No outline on slide image
All the slide images have a thin black line around them, which is OK, but doesn’t look great. However, applying ‘no outline’ to the slide image in the notes page makes the slide image disappear completely. If you want to remove the outline, you can apply an outline with 100% transparency, which means the line is invisible. No, I don’t understand it either.
Guides
Guides are a really useful way to ensure alignment, especially to a grid. But in the PowerPoint notes pages, the guides function is pretty much unusable. At least sensibly. If you create guides, their position is based on the size of the presentation slide, not the page. So if a slide is 13.3”x7.5”, then guide positions are measured using that boundary. You can’t have a guide that is more than 7.5” from the top of the page (but the standard portrait letter page is 10” tall, so guides cannot be dragged into the bottom quarter of the page). Also, the 0/0 centre point of the horizontal and vertical guides is somewhere near the right-hand edge of the page, about a third of the way from the top. If you’re OK with just using guides to create a grid of vertical bars, and happy to work out the odd position measurements, then you’re golden, but it feels somewhat incomplete, which is a shame.
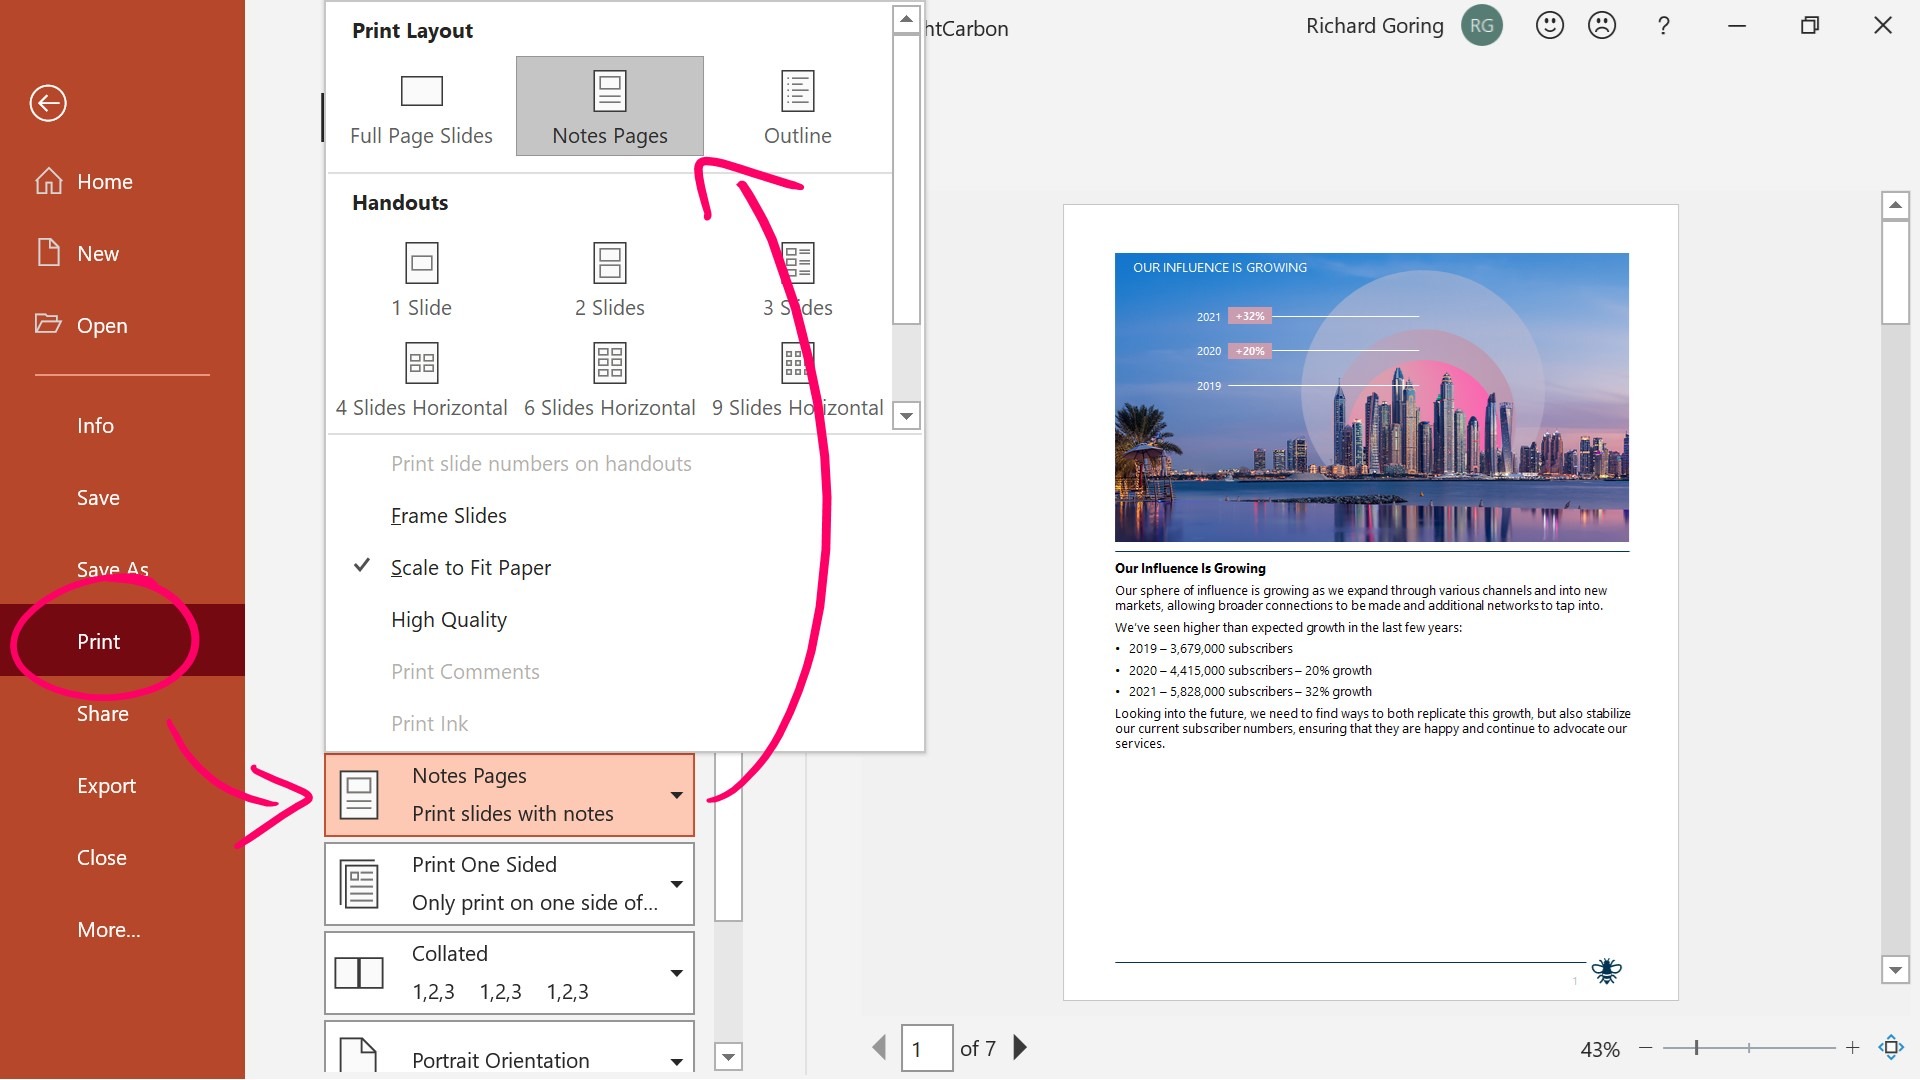
When you want to print notes in PowerPoint, go to the File tab in the top left of the ribbon (or use Ctrl + P), and then choose Print from the menu on the left-hand side. Here you have a number of options, but the key ones are under settings in the middle on the left, where you need to click the Print Layout drop-down (which says Full Page Slides by default) and select Notes Pages. This will print out the notes pages that you’ve formatted, or you can choose to just print PowerPoint Full Page Slides, or Handouts.
You can choose to print all the slides or notes pages, just the ones you’ve selected (in the normal view) or type specific slide or page numbers to print. In this same drop-down menu, you can also choose whether to print hidden slides. This can be useful if you have hidden detail slides that you don’t want to present, but you’d like to print notes in PowerPoint for all the slides in your deck.
There are also options for one- and two-sided printing (which will depend on your printer’s capabilities), and also collation options. You can also choose to print in color or using the grayscale or black and white settings. Find more details on that below.
Remember to choose your printer using the button at the top of the list. Clicking the drop-down menu will allow you to change printer. Be really careful when doing this, as the default paper size may change for the new printer, which will ruin the layout of the notes pages – scaling is often glitchy and if you’ve lined things up beautifully then you’ll be disappointed. You can also use this drop-down menu to print PowerPoint with notes as PDF using Microsoft Print to PDF. However, be warned, the PDF printer page size is slightly different from the standard printer one. More specifically, the margins for the page size are different. For physical printers, PowerPoint takes into account a half inch border around the page, knowing that printers generally won’t work edge to edge. But for PDF that’s not needed, so those margins are removed. You need to think carefully about what you want your notes to look like. If you want them to look like they do on-screen, then go into Settings > Print Layout, and select Scale to Fit Paper. Or if you want it to look like a printed page, with the default print margins (perhaps because you want to print it later), then deselect Scale to Fit Paper and you’ll get the full margins all around.
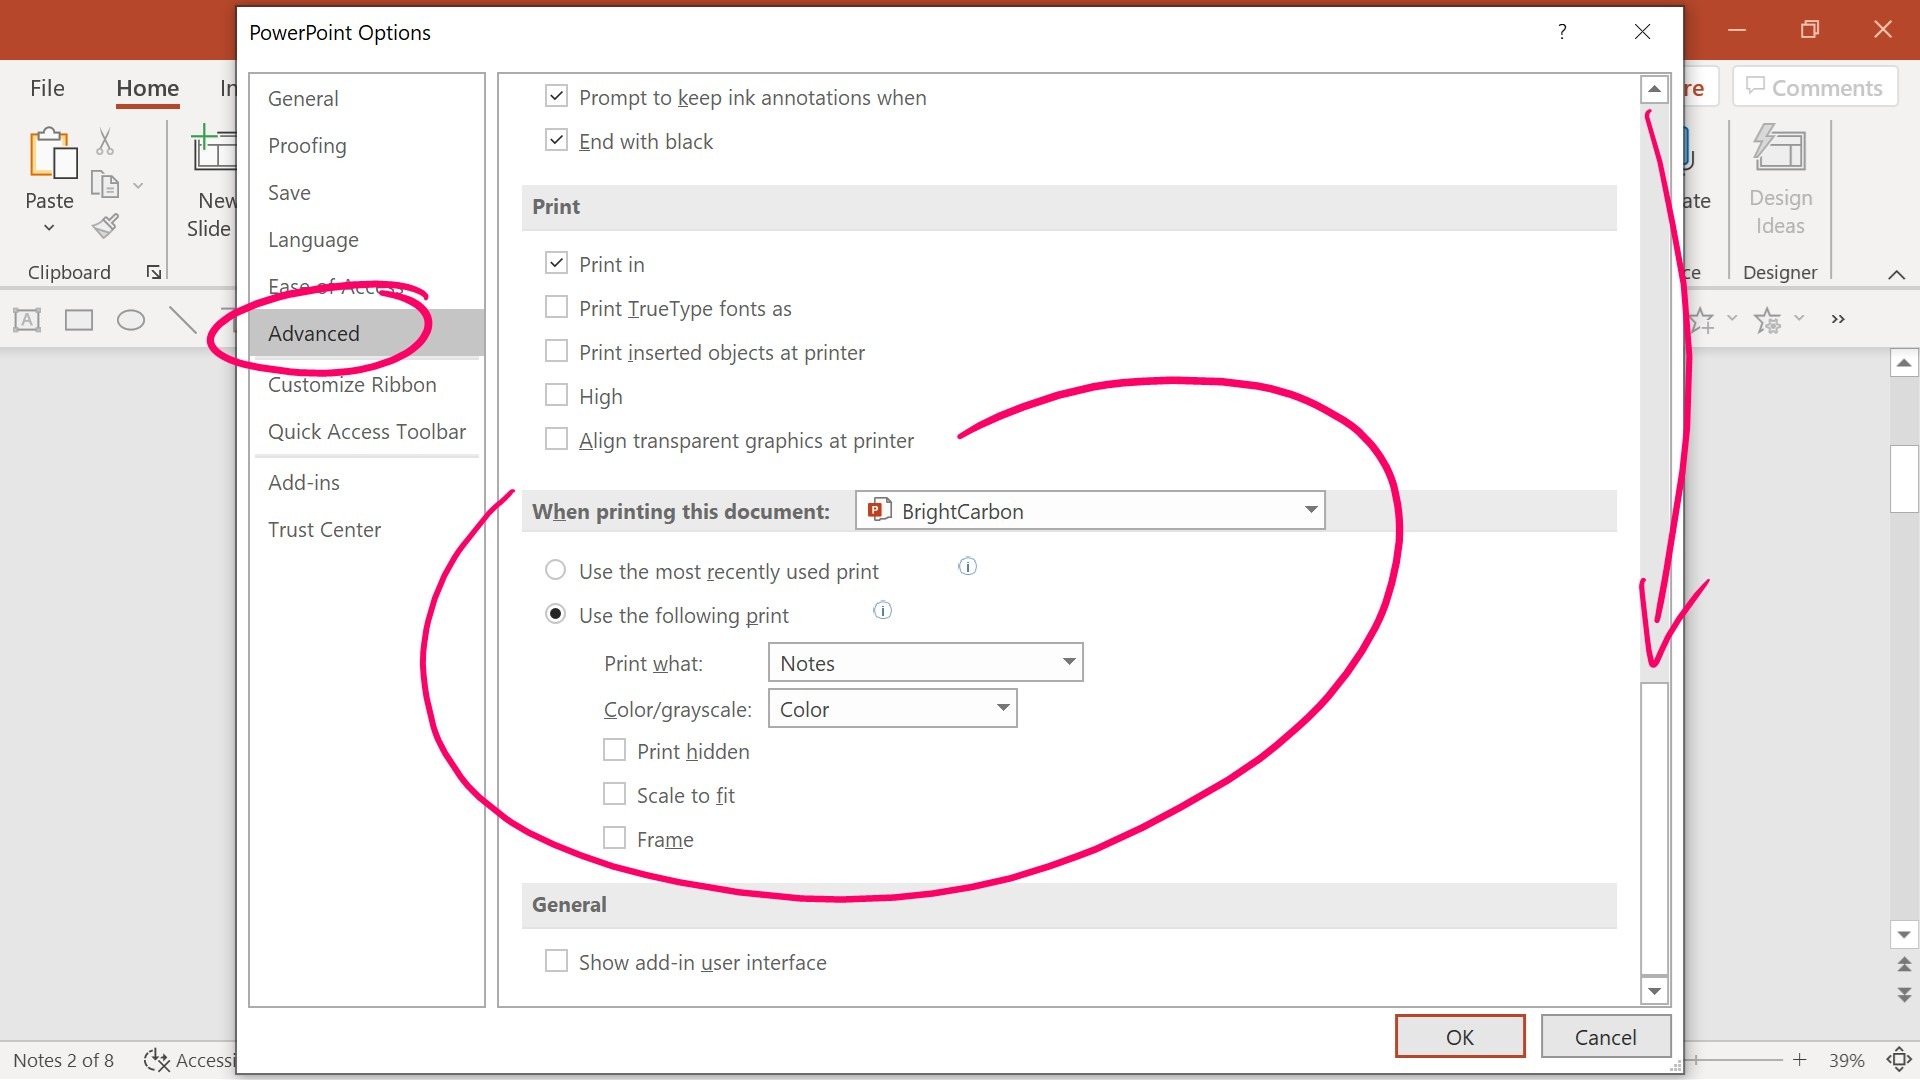
If altering all these print settings seems a bit tedious, and you regularly do the same thing each time, you can choose default print settings to suit you. Go to the File tab on the ribbon, choose Options on the bottom left then select Advanced from the pop-up window menu. Next, scroll all the way down (don’t worry, we’re almost there!), and you’ll find two sets of printing options. The standard ‘Print’ functions may not be useful, but below it, there’s ‘When printing this document’. The standard PowerPoint behavior is to use whatever settings you last used, so if you print lots of different types of documents then you have to constantly change things. Alternatively, these settings allow you to set the default printing settings for each presentation file you have open. So it might be that one particular presentation is only ever printed with notes in grayscale, while another is full slides in color.
It’s the same collection of settings as outlined in the printer options above, but you just set them for each document, which can cause slightly less frustration.
If you’re printing in color, you will hopefully see if the contrast ratios are correct clear, as the screen is showing what will be printed – although it’s always worth checking to see if there are any accessibility issues with it, for example is the color contrast high enough to be legible for people with common forms of color blindness. Our free BrightSlide add-in has a built-in color contrast checker for PowerPoint that can be really useful. However, if you’re printing in grayscale then it can be a bit more problematic, because you don’t know how the printer will interpret the colors you’ve chosen. Fortunately, PowerPoint gives you some neat tools to manage this and give you a grayscale specific print version of your slides that doesn’t impact your color presentation at all.
Go to the View tab on the ribbon and choose the Grayscale option. Now, you can see what the slide will look like when printed in grayscale. You also get a new tab on the ribbon called Grayscale. The commands on this ribbon allow you to change the grayscale formatting of any object on the slide without changing the color formatting when you’re presenting. So, if something doesn’t look right, you can make it darker or lighter, black or white, or even choose not to show the object. This is great if you want to make sure you get the best print from a black and white printer.
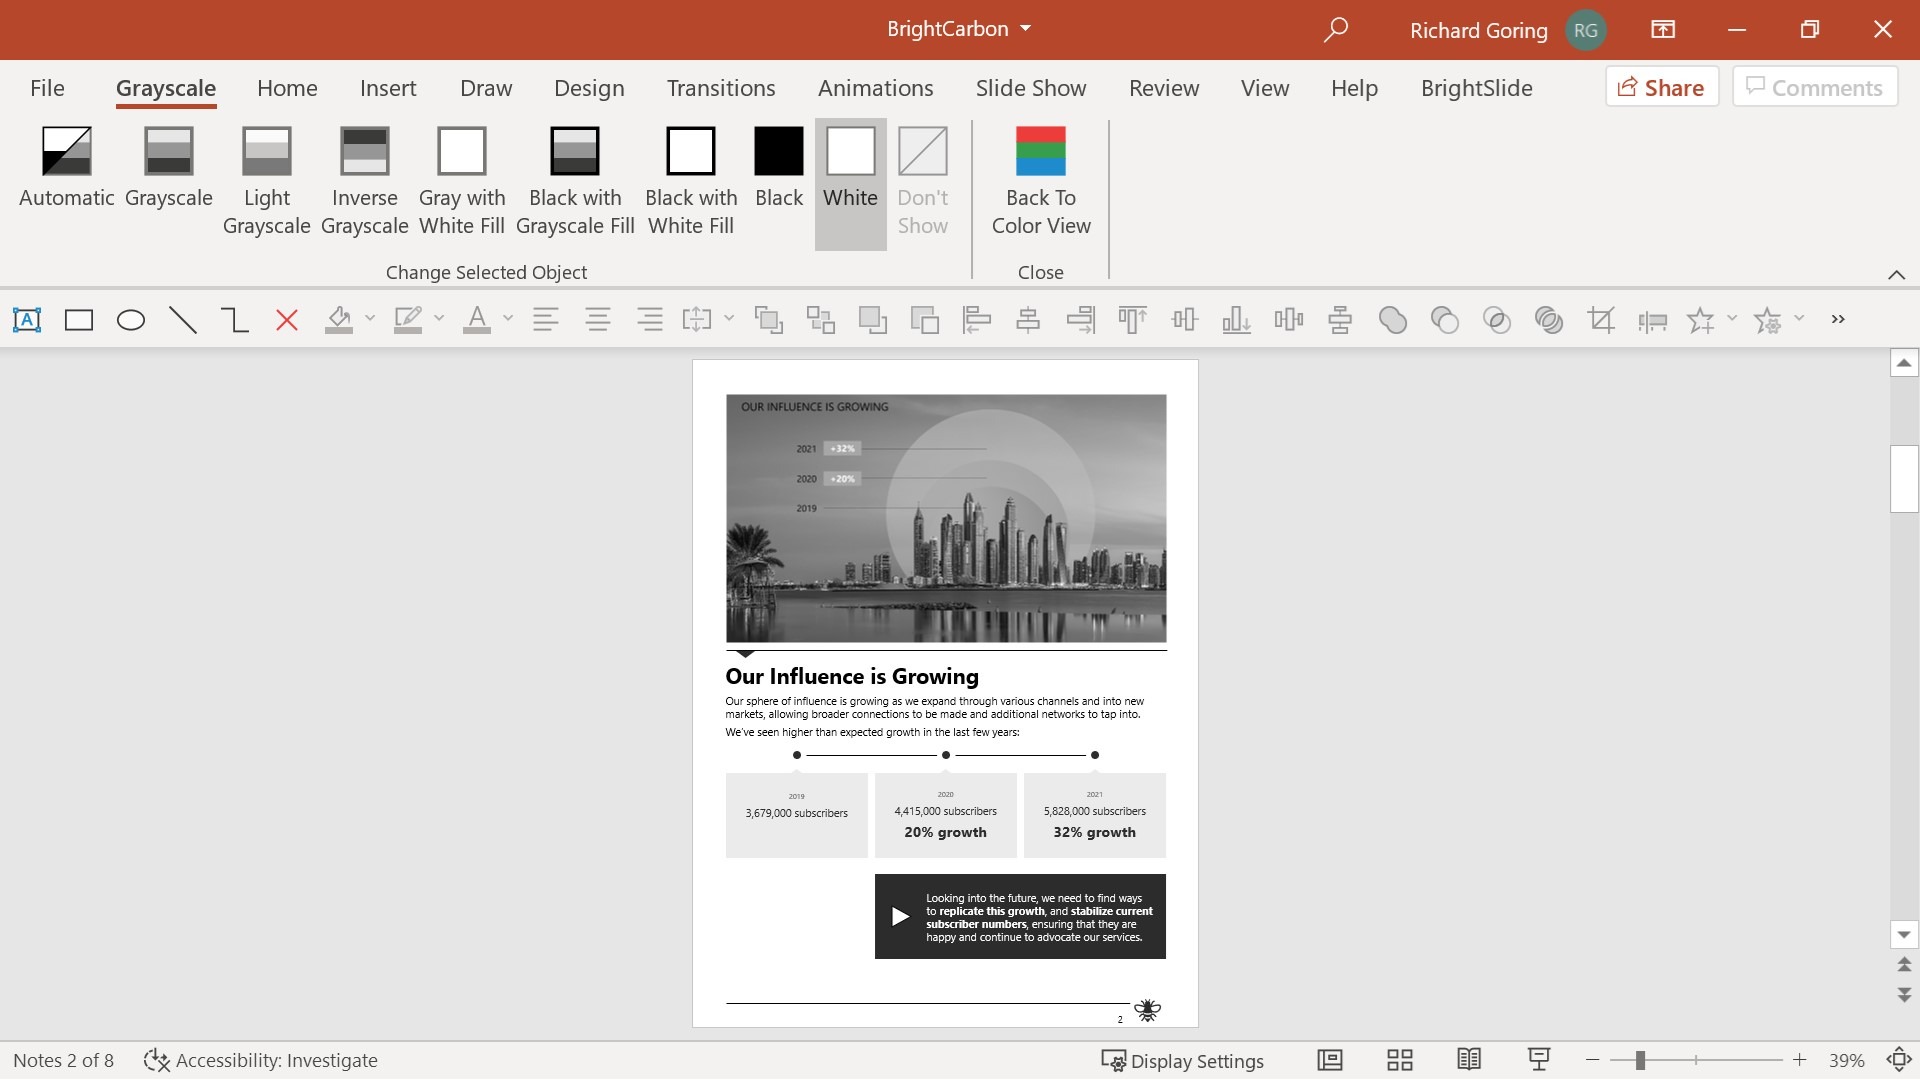
It’s worth noting that there are a couple of quirks. If you have text in a shape, or a textbox with a fill color, then these settings only apply to the fill color of the object, not the text. However, if you have a plain textbox with no fill color, then the settings apply to the text itself. Also, there is a ‘Don’t Show’ option, which is great to remove ink-heavy content like images or big blocks of color, especially in the background. Irritatingly, if there is text typed into the object, then choosing Don’t Show will hide the object, but not the text. This feels odd, given that the ‘White’ option essentially does the same thing if you’re using a white background (makes the object fill or a picture appear white, so it’s invisible when printed on paper). And when printing in grayscale or black and white, any slide background fill is automatically removed. However, graphics on the slide master aren’t, so just be aware that you may not get quite the result you want, depending on how the slide master was built.
To hide all graphics from the background and the slide master, right-click on the slide and choose Format Background from the pop-up menu. In the window that appears on the right, there’s a check box to Hide background graphics. This is a setting for each slide individually AND it affects your presentation slides, so be careful about using it, or reset when you’re done printing.
And all of this is also available in the Black and White settings, which can be helpful for even more frugal use of ink, or to create an ultra-high-contrast version, essentially giving you two custom versions of your presentation that can be used for printing, but don’t impact the actual presentation slides.
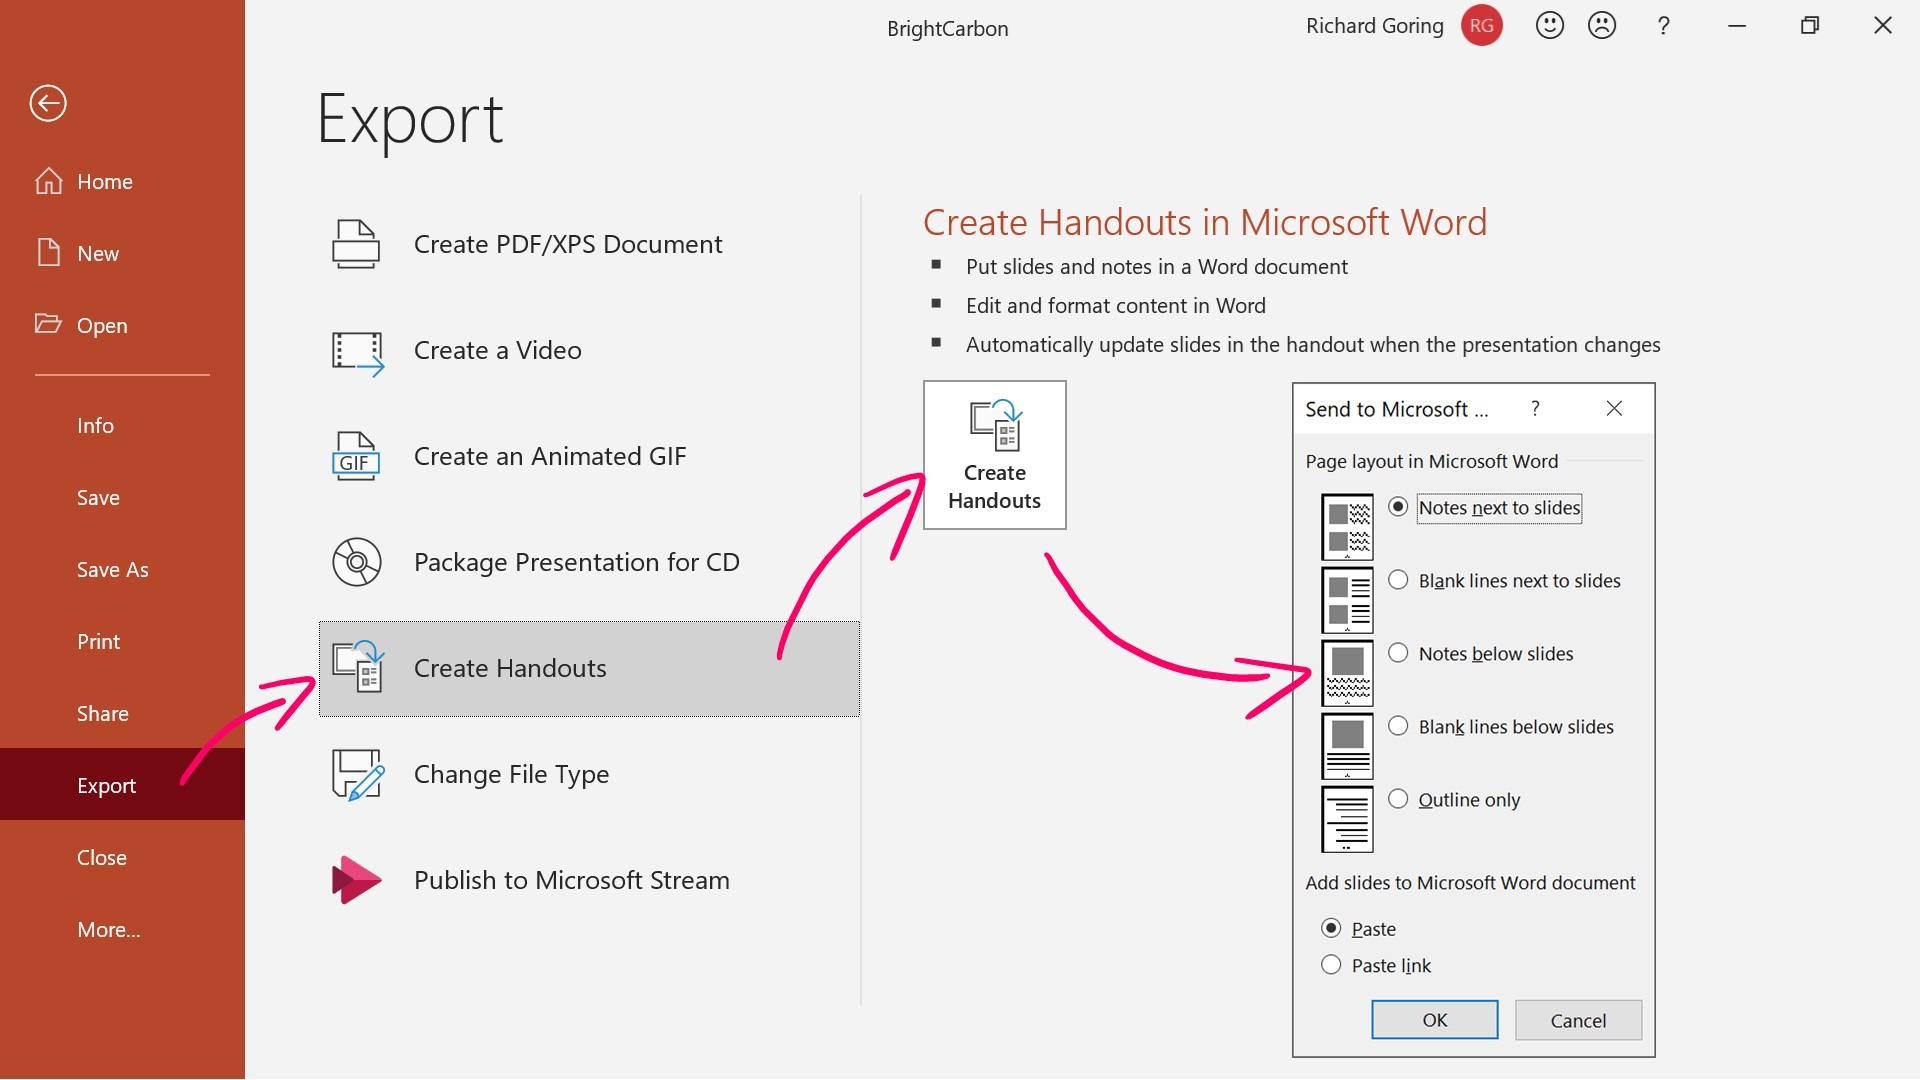
Of course, it could be that all you want is to export your speaker notes to Word and print those, rather than print PowerPoint slides with notes. You can do this in PowerPoint by:
This will produce a Word document with a thumbnail of each slide with speaker notes underneath. The nice thing about this is that if you change the slides, then they will change in the Word document. But the speaker notes don’t, which may or may not be helpful. The big issue is that it’s Word, and dealing with images in Word can often be tricky if you want to format things precisely. So think about whether you’ll want to format this document further.
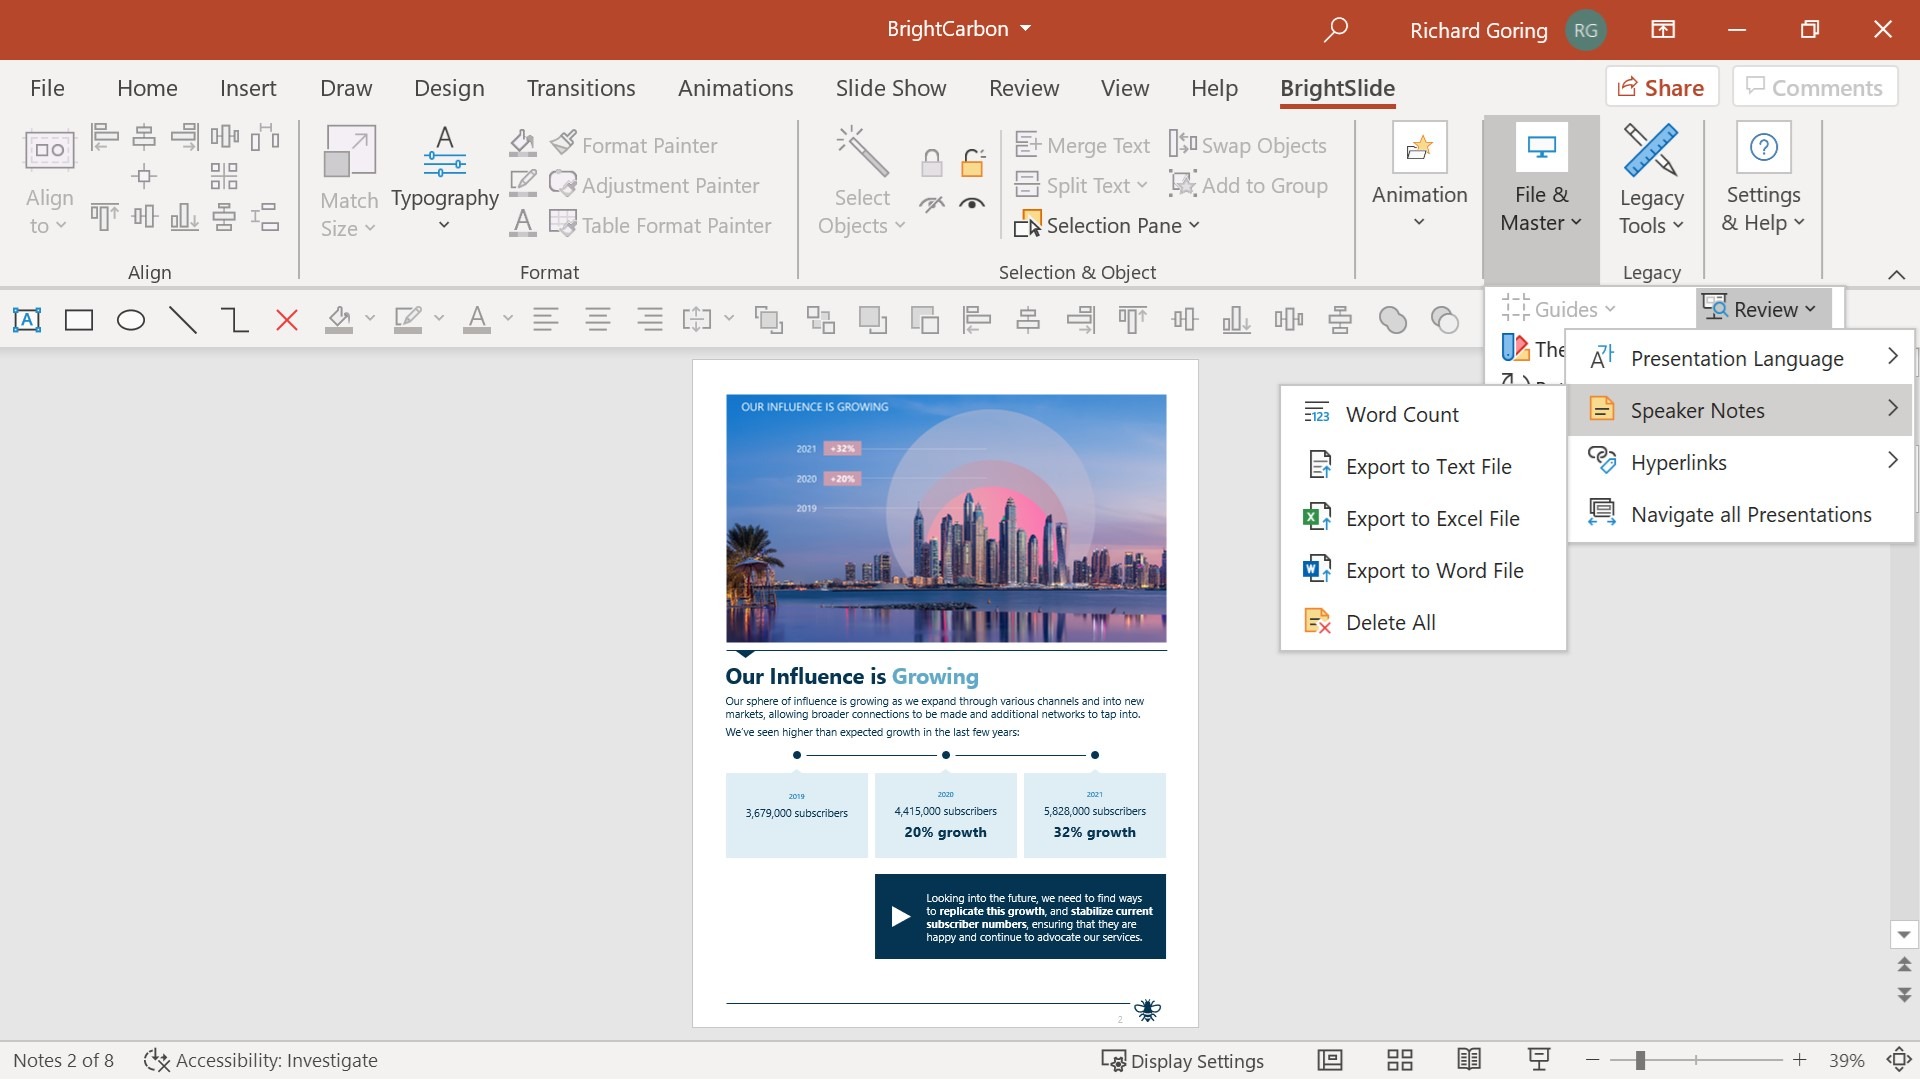
If you want to export speaker notes to other programs, our free BrightSlide add-in for PowerPoint allows you to do exactly that. On the BrightSlide tab in the ribbon, go to Review on the right-hand side, then Speaker Notes, and Export to Text File, Export to Excel File, and even Export to Word File. You’ll get an automatically generated Text, Excel, or Word document with the speaker notes of every slide. In Word you’ll get the title from each slide added with Heading 1 formatting, allowing you to easily navigate through it all. BrightSlide will also give you a total word count for the notes or allow you to delete all speaker notes from PowerPoint.
And there you have it, plenty of options showing you how to print PowerPoint with notes. But just because you can doesn’t necessarily mean you should print notes in PowerPoint for every presentation. Consider what will be most helpful to your audience, and perhaps consider more dedicated and specific handouts for them instead. You can go even further, as demonstrated by Nolan Haims, who has done some lovely print work using PowerPoint. For example, this report on non-profit funding in the age of Covid that he created for the Center for Effective Philanthropy, and a funding report in spreads that you can see in his portfolio.
Leave a commentWithout a proper PowerPoint template, presentations can be a bit of a mess. Here are the building blocks for developing a PowerPoint template that works!
By applying some key principles of presentation design, you can make your PowerPoint design really standout and deliver both a more ‘popping’, but also more effective presentation.
Most presentations are a cascade of text-heavy Death-by-PowerPoint slides. Online learners suffer the torture of brochures converted to click-through-eLearning. Most people now recognize that using visuals is the way to go. But how do you make visual presentations and eLearning that work? We think there are six steps you need to follow.
Join the BrightCarbon mailing list for monthly invites and resources
Tell me more!No one was looking at their electronics; all eyes were on the podium. We raised the bar on what a great presentation is supposed to look like.
Curtis Waycaster Smith & Nephew


Good morning,
Would you please orient me o how to design and create colored pages in power point with writing in it.
i want to insert them in my facebook page.
Thanks in advance
Youness,
Hi Youness. Probably the best way is to change the background colour of your slide and then add a text box over the top. Go to the ‘Design’ tab on the ribbon, then ‘Format Background’ on the right-hand side. That will give you he ability to apply a solid fill colour of your choice. And you then put any content you like on top of that colour.