If you come from a print media background you’ll be familiar with the importance of image resolution and how it affects quality. If you come from a web design environment you might be more familiar with pixels. But when it comes to PowerPoint, there’s an odd mix of measurements from the physical and digital worlds even though the majority of what is produced is shown on either a monitor or a projector. So what do presentation professionals need to know about picture size and resolution?
Pictures are made of dots
OK, so this might not be the most exciting news headline but we need to start from the beginning. A raster or bitmap picture (contrary to a vector image) is made up of thousands of tiny dots or pixels. Each of these dots is a single colour and the number of dots affects the file size of the picture. The image below shows how pixels are used to form an image. The first shows the image at a normal scale:
But when we zoom in you can clearly see each individual pixel that makes up the picture:
When you resize pictures in PowerPoint beyond their original 100% size, extra pixels have to be ‘invented’ by PowerPoint through a process of interpolation. This can cause pictures to appear blurry and degrade the quality of your slide show when displayed on a monitor or projector. In addition to the size of the picture in pixels, some image editors set a DPI (Dots Per Inch) parameter. This is usually only applicable for printed media and defines how many pixels (dots) are crammed into each inch. But PowerPoint does take DPI into account as you’ll see later.
So there are two aspects of a picture you need to be aware of:
Size: the number of pixels horizontally by the number of pixels vertically. This affects file size.
Resolution: the density of pixels per inch. This does not affect file size.
Points vs. Pixels
To add to the complexity of picture size and resolution, PowerPoint measures picture sizes in points under the hood and then converts them into your preferred measurement system, inches or centimetres, before displaying them in the user interface:
Points may mean prizes in game shows but in PowerPoint, points are not equivalent to prizes nor pixels. A point is actually 0.75 of a pixel on a 96 DPI monitor which comes from 96 DPI / 72 PPI (dots or pixels per inch versus points per inch). The 96 number comes from the resolution of your monitor (more on that later) and 72 comes from the world of typography where a point is a physical unit of distance. A point (pt) is equal to 1/12 Pica, and 1 Pica = 1/6 inch. Hence 1 pt = 1/72 inch, meaning 1 inch contains 72 points. Phew!
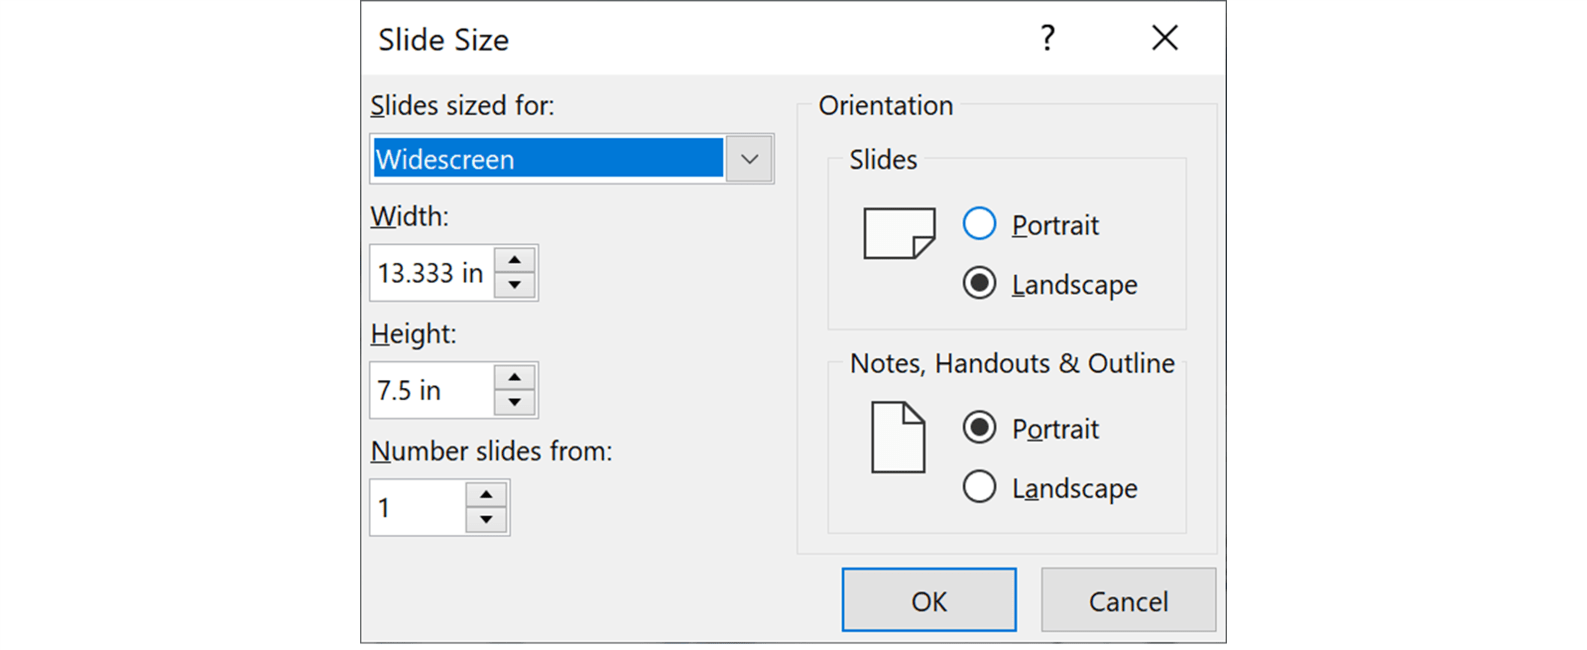
Let’s see this in practice when examining a standard 16:9 widescreen slide in PowerPoint. If you click the Design tab followed by Slide Size and choose Custom Slide Size, you’ll see the size of your slide in either inches or centimetres:
Inches are actually easier to deal with here because you’re going to see conversions using DPI or Dots Per Inch. In the above example the slide has a size of 13.333 x 7.5 inches. Now, because there are 72 points per inch (don’t get this confused with dots per inch!) this translates to 960 (13.333 x 72) by 540 (7.5 x 72) points. This is what’s used to scale your picture as it’s inserted into your slide. That then translates to 1280 (960 / 0.75) by 720 (540 / 0.75) dots or pixels and that is what is used to project your picture during a slide show.
A little known secret is that regardless of the measurement system set on your computer, you can actually enter dimensions for your slide setup and/or objects on your slide by typing in a number followed by px for pixels or pt for points. As soon as you hit return, the number is converted to your default units of measurement. So entering 1in, 2.54cm, 72pt or 96px all yield the same result. Go ahead and try it!
Now, let’s take a look at what happens when you insert pictures into your slides at various sizes and resolutions.
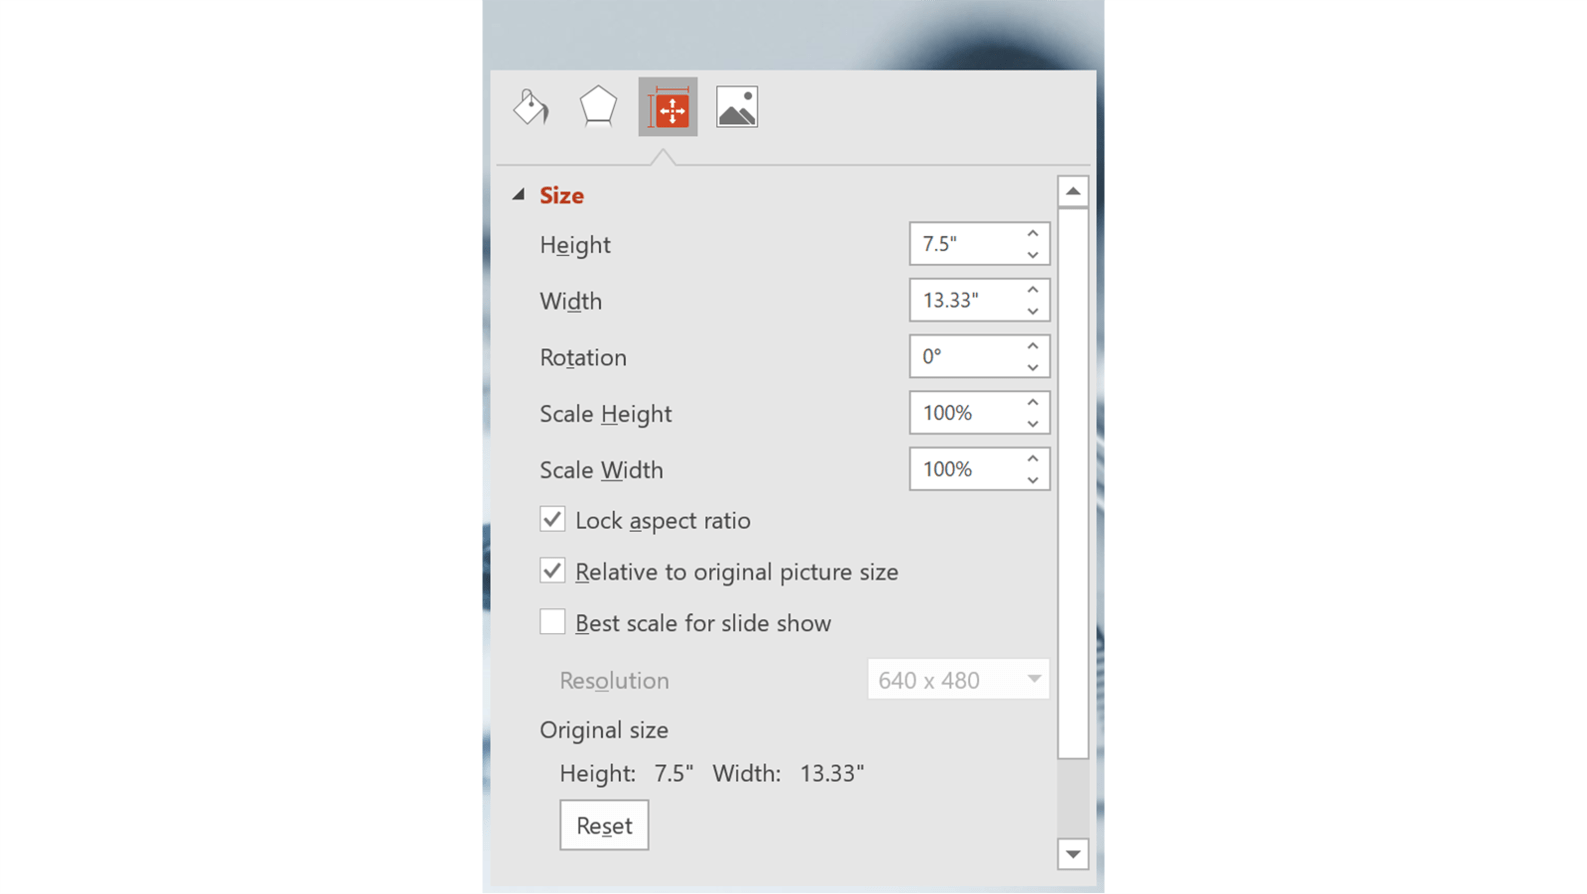
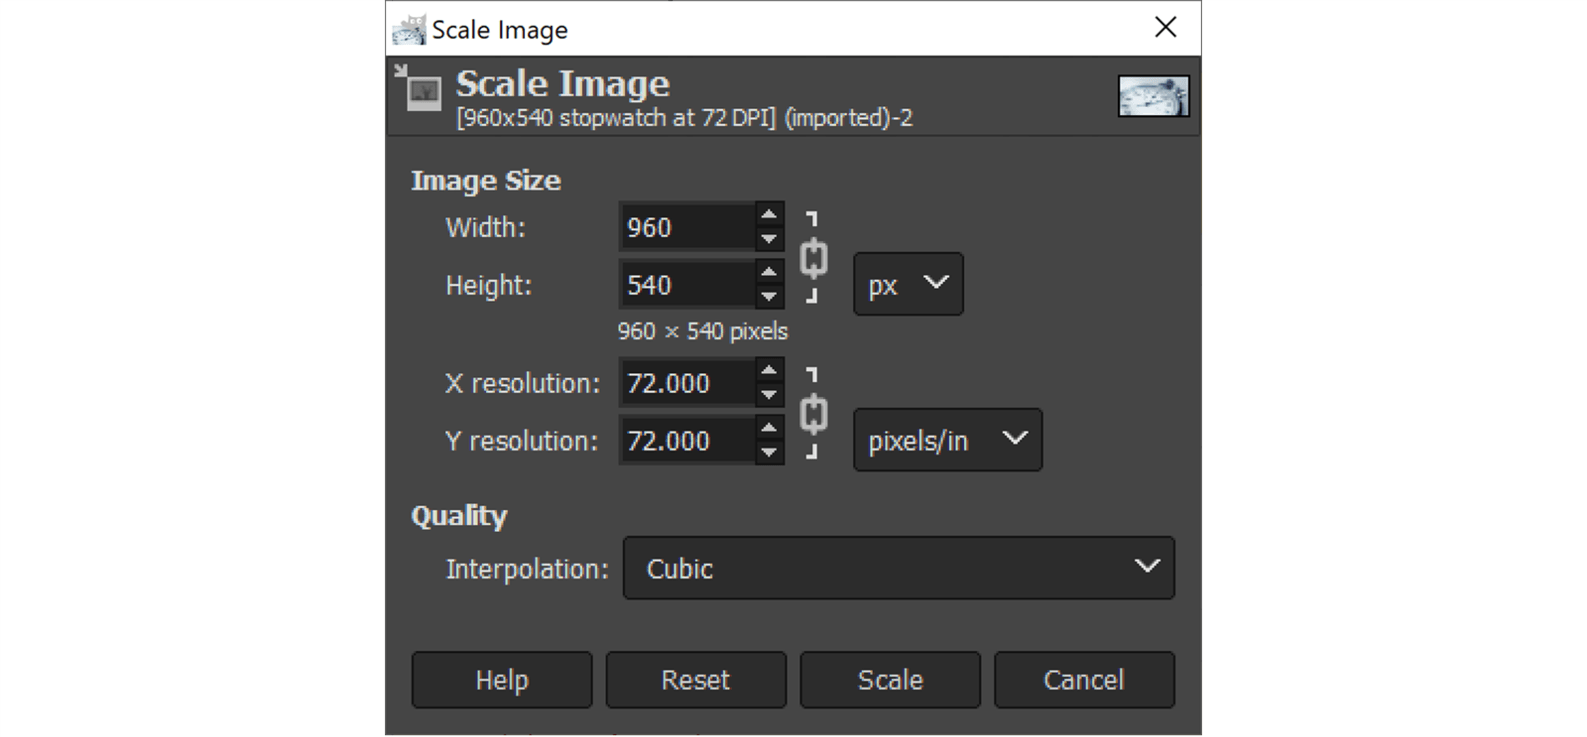
Below are the settings for the stopwatch picture which we’ve scaled to 960 x 540 pixels at 72 DPI. Most decent image editor apps will allow you to set both the size and resolution and in this example we used the free GIMP (GNU Image Manipulation Program) app which is available for both Windows and Mac.
When it’s inserted into the slide it occupies the full slide size and PowerPoint has kept it scaled at 100%. This is because we have the same number of pixels in the picture as there are points for the slide and the image is set to 72DPI:
You’ll get the same result if you rescale the source picture in your preferred image editor to 1280 x 720 pixels, but at 96DPI. This is because PowerPoint scales it by the ratio of 72/96 or 0.75.
Making this picture larger than the slide or projecting it at anything bigger than HD720p can cause it to become blurry.
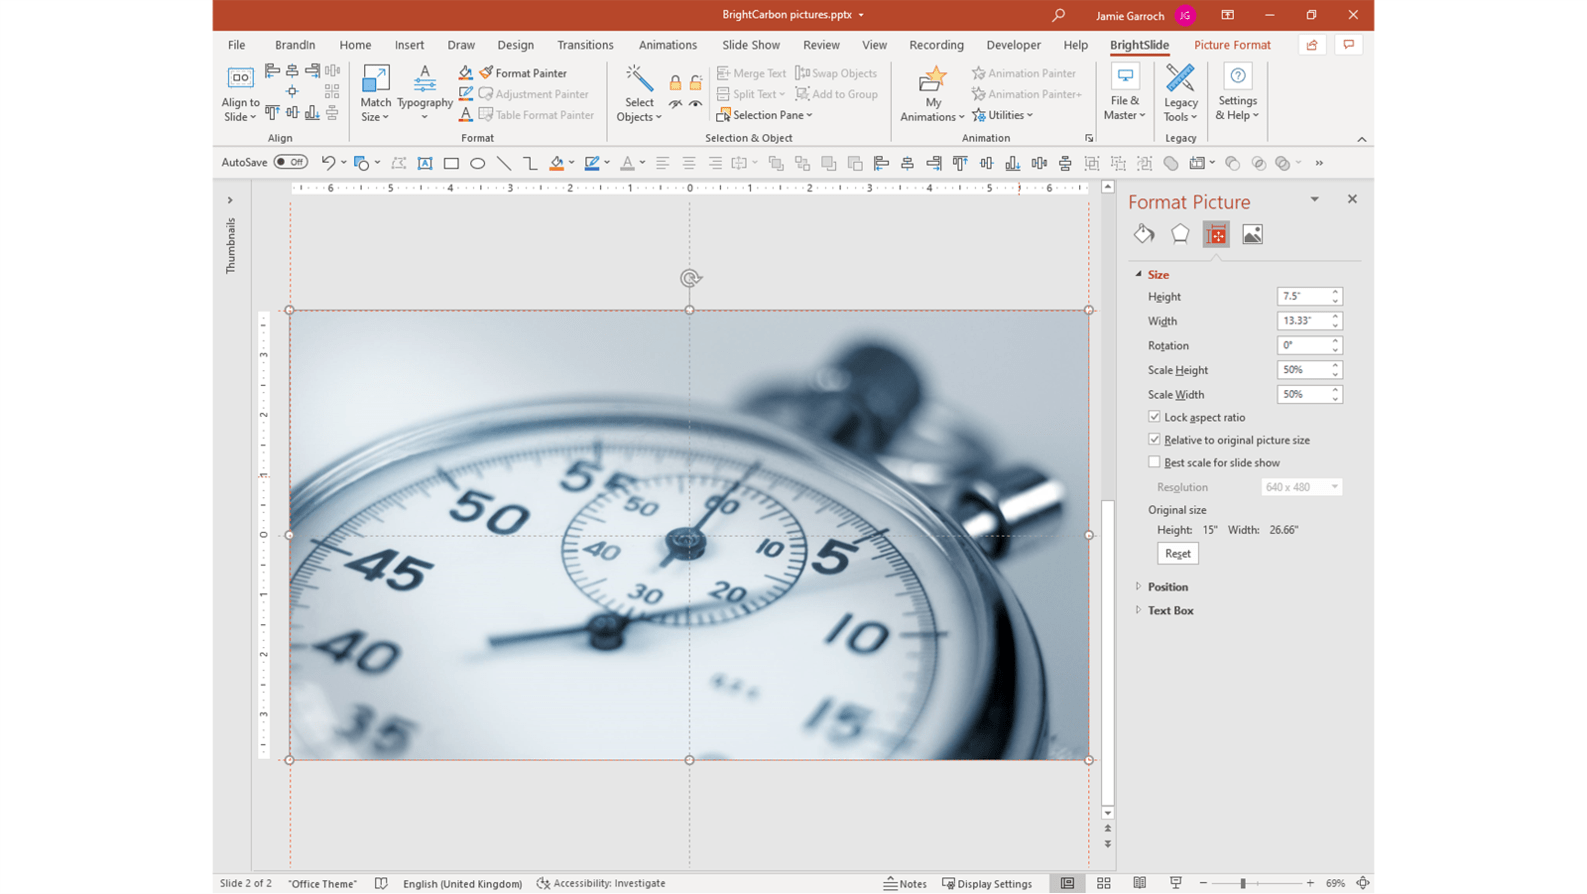
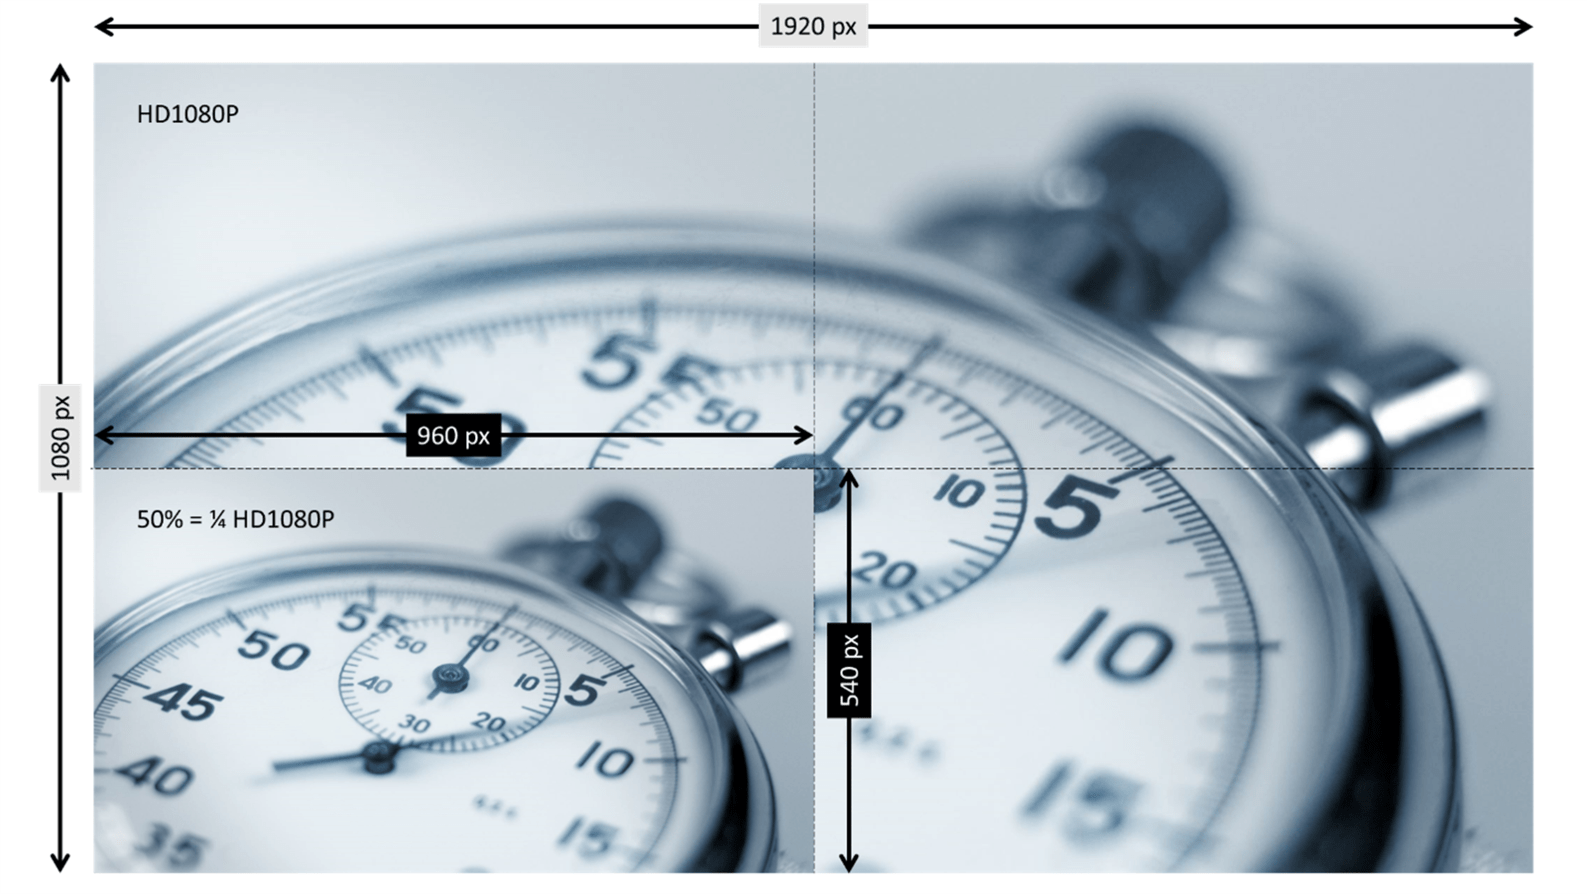
If you now insert the same picture scaled to HD1080P (1920 x 1080 pixels) at 72DPI you’ll see that it’s automatically scaled down in PowerPoint to 50% of its original size or ¼ the size of HD1080P so that it fits on the slide:
In this case, even though the picture has been scaled to the slide size all of the pixel data is still there for use when projecting. That means you can display or project this slide at a maximum size of HD1080P without any degradation of the picture.
If you were to project at a higher size such as 4k or 8k HD, there’s a chance that the projected image will not be pin-point sharp. This depends on the image interpolation algorithms in use by the combination of PowerPoint, your graphics card and the projector. If you insert the same picture at HD1080p size but with the DPI set to 144, it’ll get inserted at 100% scale and fit the slide exactly.
When looking at file size, it’s clear to see that it’s the number of pixels in the file that makes the difference and that the DPI setting does not impact file size at all. This is the relevant information in Windows Explorer for our test pictures:
So what have you learned?
That the DPI setting within a picture file is used to scale the picture as it’s inserted onto the slide but it has no impact on the projected quality nor the size of the picture file.
That these two images are treated as the same size when inserted but the second one can be projected at a larger size as it contains more pixel data irrespective of its DPI setting.
960 x 540 pixels at 72 DPI
1280 x 720 pixels at 96 DPI
The second picture will have a larger file size as it contains more pixel data.
Monitor Scaling
Now you know how DPI has an impact on pictures in PowerPoint, you might be asking yourself how does the Windows scaling affect all of this? When you change the scale factor in Windows Settings what is essentially happening is that the display DPI is being changed. You might have one HD1080p monitor set to 100% scale and another set to 200%. The corresponding monitor DPI values for these are:
100% = 96DPI
200% = 192DPI
This means that there are twice as many dots/pixels in use on the second monitor. The impact on PowerPoint is therefore that you need twice as many pixels in the image to display it optimally, irrespective of the DPI setting in the picture file. That means taking your HD1080p picture and sourcing a 4k version of it, which is 3840 x 2160 pixels.
Other PowerPoint Considerations
If you dig around in PowerPoint you’ll find a couple of other features that affect picture quality. The first is in the ribbon and the second is in the backstage.
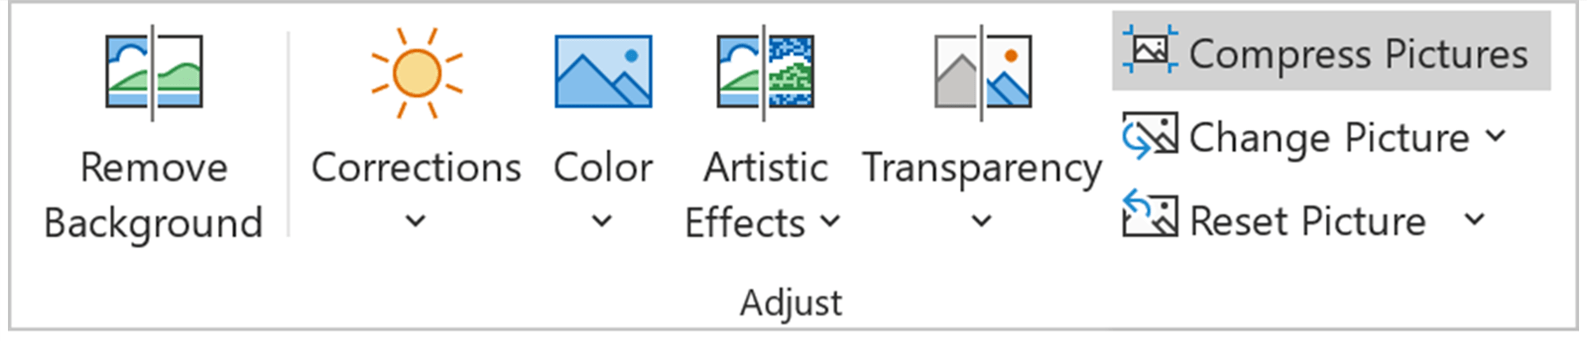
Compress Pictures is found in the ribbon when you have a picture selected and you click the Format Picture tab:
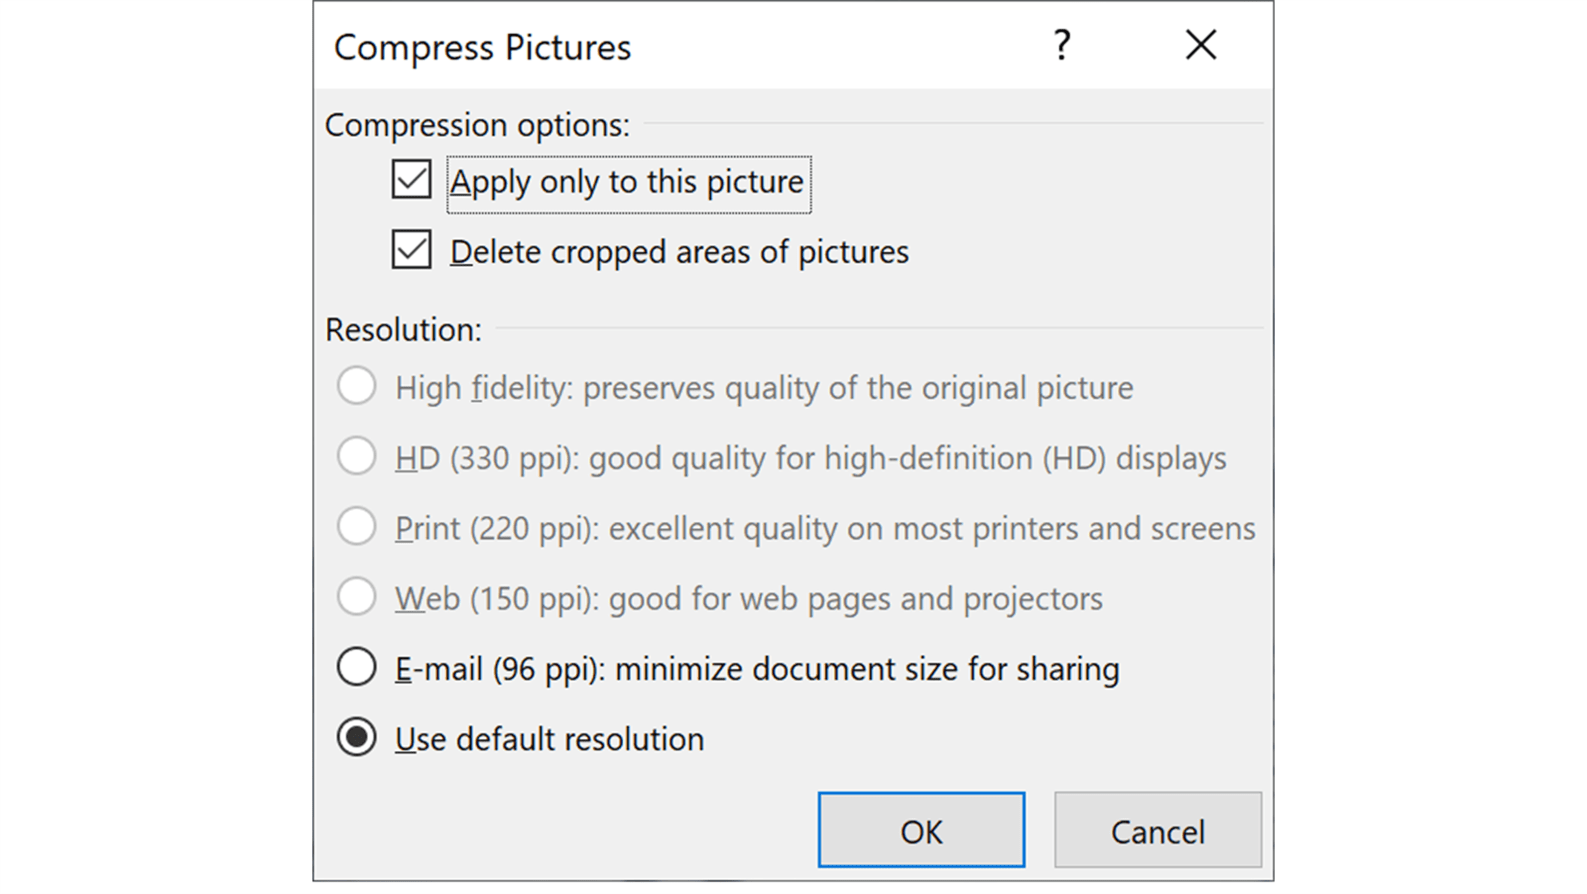
This open a window that allows you to compress the currently selected picture or all pictures in your presentation:
You can click the ? icon in this window for lots more detail from Microsoft on what each of these settings does but basically, the Resolution section scales the image down to the set ppi (ppi here means dpi not points per pixel!). It doesn’t scale beyond the current DPI setting of the image because this implies creating new pixel data, which is why you’ll see some options greyed out.
You might think that PowerPoint is just changing the DPI setting in the image but it’s not. It also changes the size of the image in pixels. To test this we took the original stopwatch picture sized to 2048 x 1203 at 330DPI. Using the compress pictures tool, the picture was set to the Web (150 ppi) setting. We then used the free BrightSlide Export Media Files to observe the result in Windows Explorer:
As you can see, the resolution was indeed changed from 300 to 150 but the pixel count changed too, by an ratio of 1:2.2 (330/150). PowerPoint did this so that the picture on the slide remained the same physical in/cm size.
This is obviously a destructive process as pixels are deleted from the picture so use it with care. Also destructive is the option to delete cropped areas which deletes all the picture data outside of your cropping mask.
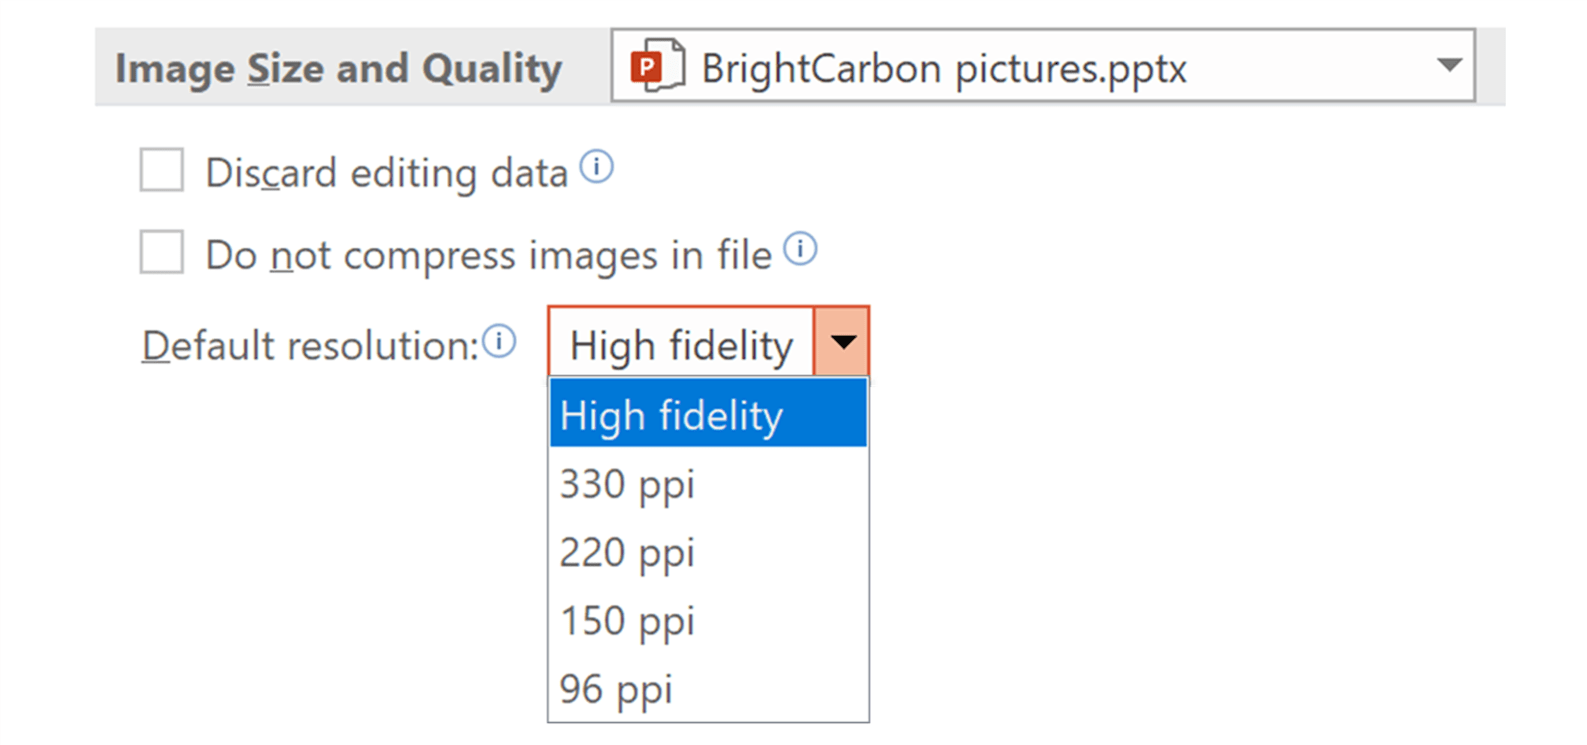
The other place you’ll see DPI is in the backstage when you click File / Options / Advanced, which corresponds to the Use default resolution option in the widow above. How convenient!
Maximum Size
While you’re learning all about slide and picture sizes, let’s complete the picture (sorry!) by covering the topic of maximum slide size. You might want to know this if you’re printing your creation onto a large format printer or displaying it on a monster projector. Currently, the maximum size for a PowerPoint slide is as follows:
56 x 56 in | 142.24 x 142.24 cm | 4032 x 4032 points | 5376 x 5376 pixels
Conclusion & Recommendation
Pictures in PowerPoint can be tricky to get to grips with. Choosing the right size has an impact on both the file size of your presentation and the maximum monitor/projection size you can use without degrading quality. In general, if you’re projecting at a maximum size of HD1080p, make sure you’re using pictures that are created at 1920 x 1080 pixels in size. Set the DPI to 144 if you want them to be inserted into your slide at 100% scale but remember that the DPI setting doesn’t itself impact file size or the quality of your image or how it’s projected during your slide show. Only pixels do that.
How do you make sure that your graphs and charts have consistent branding across Excel, PowerPoint and Word? Learn how to create and use custom templates that support your brand identity across Microsoft Office.
Tints and shades auto-generated by Microsoft from Theme Colors often take your content off-brand. How can you get the custom colors you want in PowerPoint? Read on to find out!
I have a related question to help complete my understanding. Suppose you have a screen resolution of 1920 x 1080 pixels with PowerPoint slides sized set to match. What happens if you insert a picture with larger Pixel Dimensions eg 3840x 2160 pixels and then ‘Scale’ the picture to fit in the slide? Is the image ‘resampled’ down by removing pixels or is the image scaled down by shrinking existing pixels (which i imagine doesn’t make sense as presumably you can’t shrink pixels below the native pixel size for the screen) ? Similarly, if you inserted a smaller picture of eg 480 x 270 pixels and then ‘Scale’ up to fill the slide, are pixels added or are the existing pixels ‘stretched/made larger ?
Hi Campbell. Great question! It depends on what is set for the file in File / Options / Advanced / Image Size and Quality. Take a look at the mouse hover tips for the options “Do not compress images in a file” and “Default resolution” for the answers to your questions.
Thanks for taking the time to reply to my question. The mouse hover ‘tips’ help explain what happens when the file is saved but I still have the same question when changing the size of the image on screen up/down before it is saved. I.e do you know if the images are ‘re-sampled’ by adding/deleting pixels or are existing pixels somehow stretched/shrunk. I hope that makes sense and thanks again for your help.
I do not understand why Microsoft can’t make this app use pixels for the default dimensions. PPT is used for on-screen presentations at least 95% of the time, and yet they continue to use inches. Also, there is no easy way to see if an image (especially one used as a background image in a shape) is 100%.
Thank you so much for conducting our advanced PowerPoint training workshop. We will definitely use BrightCarbon in the future – we really think that we would be hard pressed to find anywhere better!


Thanks Jamie. A helpful article
I have a related question to help complete my understanding.
Suppose you have a screen resolution of 1920 x 1080 pixels with PowerPoint slides sized set to match. What happens if you insert a picture with larger Pixel Dimensions eg 3840x 2160 pixels and then ‘Scale’ the picture to fit in the slide? Is the image ‘resampled’ down by removing pixels or is the image scaled down by shrinking existing pixels (which i imagine doesn’t make sense as presumably you can’t shrink pixels below the native pixel size for the screen) ?
Similarly, if you inserted a smaller picture of eg 480 x 270 pixels and then ‘Scale’ up to fill the slide,
are pixels added or are the existing pixels ‘stretched/made larger ?
Hope that makes sense and thanks for your help,
Cam
Hi Campbell. Great question! It depends on what is set for the file in File / Options / Advanced / Image Size and Quality. Take a look at the mouse hover tips for the options “Do not compress images in a file” and “Default resolution” for the answers to your questions.
Hi Jamie,
Thanks for taking the time to reply to my question.
The mouse hover ‘tips’ help explain what happens when the file is saved but I still have the same question when changing the size of the image on screen up/down before it is saved. I.e do you know if the images are ‘re-sampled’ by adding/deleting pixels or are existing pixels somehow stretched/shrunk. I hope that makes sense and thanks again for your help.
Campbell
Useful. I did not realize ppt respects a units suffix in setting sizes in the Format pane.
I do not understand why Microsoft can’t make this app use pixels for the default dimensions. PPT is used for on-screen presentations at least 95% of the time, and yet they continue to use inches. Also, there is no easy way to see if an image (especially one used as a background image in a shape) is 100%.
For the type of picture you have, use JPG, not PNG.
PNG is great for screenshots, but not “natural” images.