

 Last week I shared the importance controlling the design conversation by having several styles you feel comfortable in. I let you all vote on which one to release.
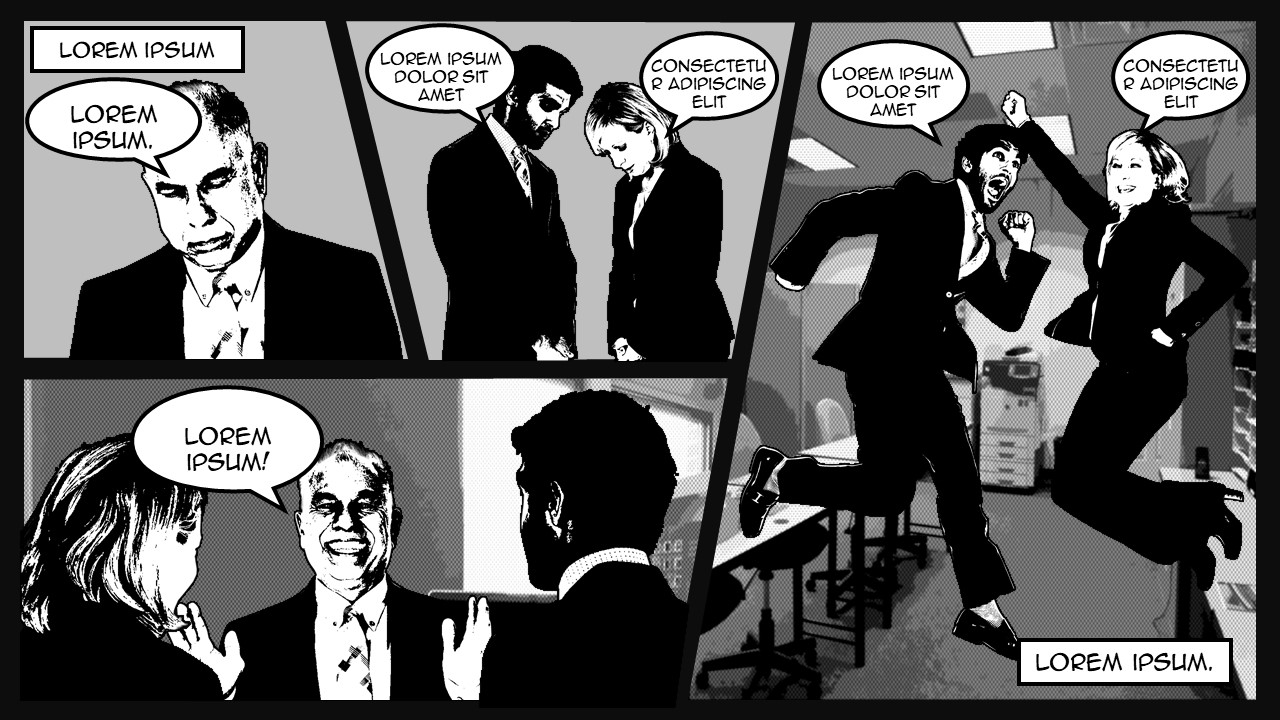
As promised, here is the step-by-step tutorial on how to create the graphic novel style.
Download the source files for quick editing, as well as the PDF version of the tutorials below.

This tutorial is broken into 2 main sections (with separate videos)
Let’s get started!
1. Apply the Graphic Novel Effect to a Person
1A. Style your first character
- Insert the image into your PowerPoint file.
- Right-click the image.
- From the dropdown menu, select Format Picture.
- In the Format Picture panel, click on the Picture icon.
- Open the Picture Color dialog.
- Click the Recolor icon.
- Choose Black and White: 50%.
- In the Format Picture panel, click on the Effects icon.
- Open the GLOW dialog.
- Set Color to black.
- Set Size to 3 points.
- Leave Transparency on 0%.
- Duplicate the style to another character
- Insert the new image into your PowerPoint file.
- Click on the styled image.
- On the Home ribbon, click Format Painter.
- Click on the new image. It will automatically be styled to match.
1B: Duplicate the style to multiple characters
- Insert all new images into your PowerPoint file and get them ready.
- Click on the styled image.
- On the Home ribbon, double-click Format Painter.
- Click on each of the new images. They will automatically be styled to match.
Hint: To close the Format Painter tool, click the ESC (Escape) key on your keyboard.
2. Design the Graphic Novel Panels on Your Slide
2A. Create the panels
- Right-click on your empty slide.
- On the dropdown menu, click Format Background.
- On the Fill Dialog, select Solid Fill.
- Click on the Fill Color icon.
- Select the color you want. For this example, we’ll choose Black.
- On the Insert ribbon, click Shapes.
- Click Rectangle.
- Create and resize the shape.
- Right-click on each shape, on the dropdown menu, click Edit Points.
- Edit the points until you’re done!
2B. Change the background color of the panels
- Right-click on a panel.
- On the dropdown menu, click Format Shape.
- On the Fill & Line dialog, select Solid Fill.
- On the Fill Color icon, select any color that you want as background for each panel. For this example, we’ll choose Gray. (4)
- On the Line dialog, select No Line.
- If you want to do the process on the other panels, click on the styled panel.
- On the Home ribbon, double-click Format Painter.
- Click on the other panels. They will automatically be styled to match.
2C. Put background images on panels
- Select the panel onto which you want to put a background image.
- Right-click on the panel.
- On the dropdown menu, click Format Shape.
- On the Fill dialog, select Picture or texture fill.
- Click the File dialog box.
- Select the image you want as background.
- Adjust the offset properties to your desired position and background size.
- Repeat the process on the other panels.
- Adjust the background image until you’re done!
2D. Insert the characters on each panel
- Copy the treated characters. Click Ctrl+C on Windows or Cmd+C on Mac.
- Paste the character on the panel. Click Ctrl+V on Windows or Cmd+V on Mac.
- Right-click on the character.
- On the dropdown menu, click Crop.
- Crop the character depending on the shape of the panel.
- Repeat the process, fitting each character in its panel.
- Place and adjust all the characters until you’re done!
2E. Add speech bubbles
- On the Insert ribbon, click Shapes.
- On the Call Out section, select the speech bubble you like. In this example, we’ll choose Speech Bubble: Oval.
- On the Format Shape, select Solid Fill.
- On the Fill Color icon, click White.
- On the Line dialog, select Solid Line.
- Click the Outline Color icon, click Black.
- Adjust the Width according to your preference.
- On the Compound Type, click Simple.
- Copy and paste the speech bubbles to the other panels.
- Adjust the tailof the speech bubble to point toward its character
- Click on each speech bubble and type in the dialogue. On the Home ribbon, choose the Font type, size and color that you want.
- Once the speech bubbles are filled, you’re done!

