Questions in CenarioVR® can serve many different purposes. They can help you assess learner performance or guide learners through a specific narrative or branching path. Creating questions in CenarioVR is relatively simple and can be done in just a few clicks.
In this article, I’m going to walk you through how to create a hidden question interaction. This entails creating a question that is only visible to the learner in the scenario when they click a hotspot. I’ll also be adding feedback to this question through the use of an info card.
Here are the basic concepts we will break down in more detail below:
- Creating a question
- Creating an info card
- Creating a Hotspot
- Adding actions
For the purpose of this tutorial, I’m going to assume you’ve already uploaded at least one scene to create a scenario.
Creating a Question
Let’s start by creating a question.
- Select the Blue “Add Object” icon in the top right corner
- Select “Add Question”
- In the Question Properties:
- Name the Question
- Update the Question Text and Choice options
- You can add more choices if necessary
- Be sure to select the correct choice toggle for the correct answer
- Toggle off the Visibility toggle at the top of the properties window. This will hide the question on scene load
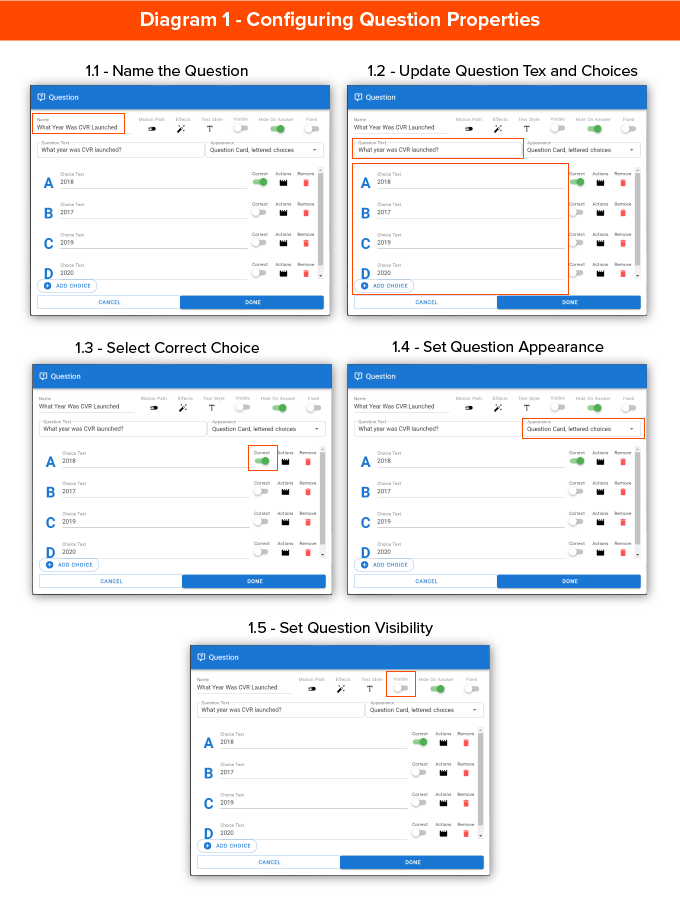
4. Select Done on the properties window
5. Position this wherever you would like it in the scene
Creating an Info Card
Next, we’ll create an info card. This will serve as text feedback to our learners. We’ll actually end up creating two of these feedback info cards, one for correct and one for incorrect feedback, but the process for creating each will be identical.
- Select the Blue “Add Object” icon in the top right corner
- Select “Add Info Card”
- In the Info Card Properties window:
- Name the Info Card “Correct Feedback”
- Update the Info Card text as appropriate
- Toggle off the visibility toggle
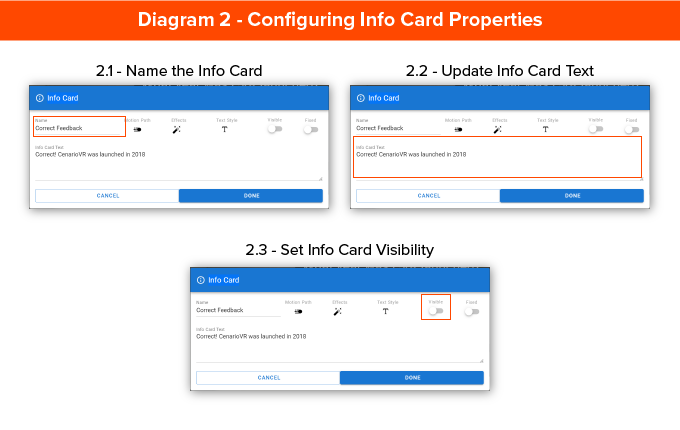
4. Select Done
5. Position appropriately in the scene
6. Repeat this process to create an Info Card name “Incorrect Feedback”
Creating a Hotspot
Hotspots are selectable objects within an immersive environment that learners can interact with. They are highly versatile. For our purposes today we will be using a hotspot to pop up our hidden question. This process is pretty similar to creating a question and creating the info card.
- Select the Blue “Add Object” icon in the top right corner
- Select “Add Hotspot”
- In the Hotspot Properties window:
- Name the Hotspot
- Select your image resource
- Select Media Library
- Select Actions
- Select the Question Icon
- Select the blue Add Hotspot icon that appears with the Question Icon
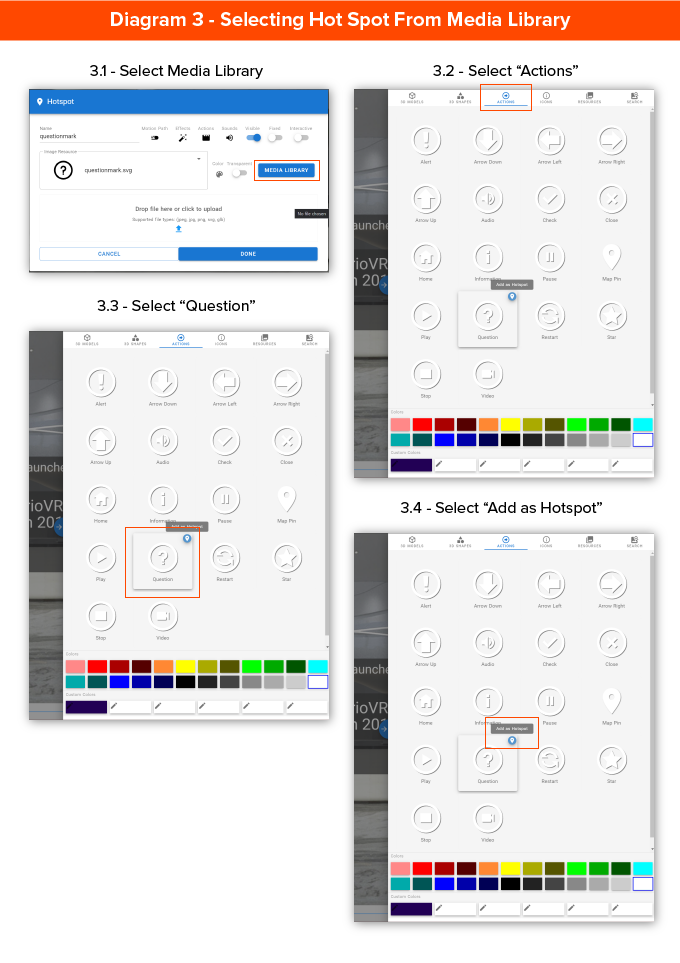
From here, don’t select Done quite yet, this will give us a good starting point for our next phase.
Adding Actions
Actions are what drive interactivity to occur within a scenario. Actions allow you to navigate between different scenes, play or pause media, or show different objects. All actions happen in response to triggers. Typically this will be the learner interacting with a hotspot, but could also be a timed event or by selecting an answer on a question.
Let’s add some actions to this hotspot that will cause our question to appear when the learner selects it.
- Select the Add Action icon in the Hotspot properties.
- It looks like a clapper you might see on a movie set.
- Under “On Select” select “Choose an Action”
- Select “Show” from the second row of Actions
- In the “Object” dropdown select your Question
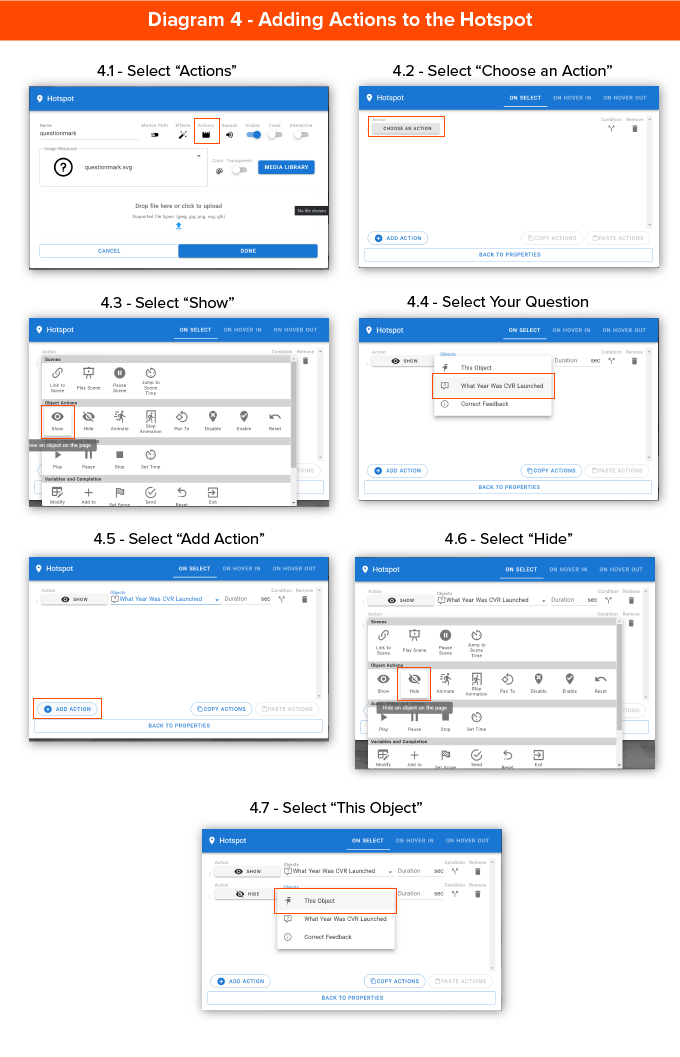
Now we’ll add an additional action to hide this hotspot when it’s selected so that it doesn’t obstruct our learner’s ability to interact with the question.
- Select the Add Action
- Under “On Select” select “Choose an Action”
- Select “Hide” from the second row of Actions
- In the “Object” dropdown select “This Object”
- Select “Back to Properties”
- Select Done
- Position your Hotspot in the appropriate location in the scene
Now test that your Hotspot functions correctly. Toggle the Edit/Preview toggle to Preview mode.
Select your hotspot. Assuming you did everything correctly you should now see your question and your hotspot will disappear.
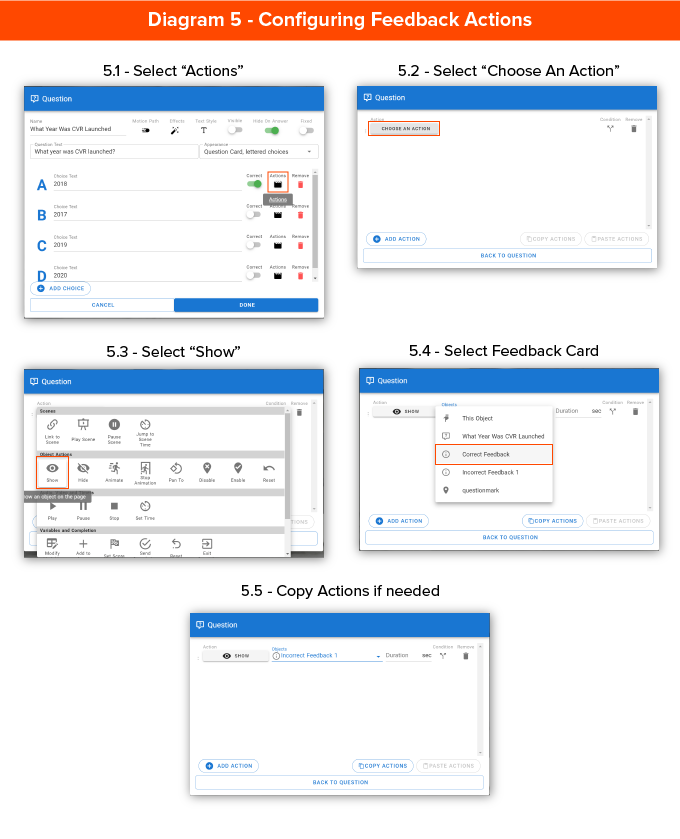
But now we need to make our feedback appear when the learner selects a particular answer.
Let’s navigate back to Edit mode and do that now.
- Select your Question in the Scene list and select the edit icon.
- It’s blue and looks like a little pencil in a circle.
- Select the Add Action button next to your correct answer
- Select “Choose an Action”
- Select “Show” from the second row of Actions
- In the “Object” dropdown select your Correct Feedback info card
- Select “Back to Question”
Repeat this process on your first incorrect answer. The only difference here is that you will select your Incorrect Feedback info card instead of the Correct Feedback info card.
If you have multiple incorrect answers, before selecting “Back to Question” this time select Copy Actions.
Now select “Back to Question.”
Select the Add Action button next to your next incorrect answer. Now select Paste Actions. This pastes the Action you created earlier. You can repeat this process for however many incorrect answers you choose to include.
Now preview your work as we did before.
And there you have it! This is a very basic way to implement questions in a CenarioVR scenario.
In other blog posts, I’ll go into more applications of questions like creating branching. If you have any questions feel free to reach out to us here at ELB Learning.