A sudden cut on eLearning budget can generate a panic storm for the project lead. It bars access to choices — tools, resources, the types of content that can be created, and the work that can be outsourced to speed up the process. And hence, the actual time available for completing it.
If you are in such a pinch, then know this: IT IS POSSIBLE to create quality eLearning courses on a shoe-string budget. It’s a matter of prioritizing your efforts, focusing the core learning objectives and deliverables, planning ahead, using toolkits, and reusing content.
Here is a five-step process for delivering quality eLearning courses on a shoe-string budget.
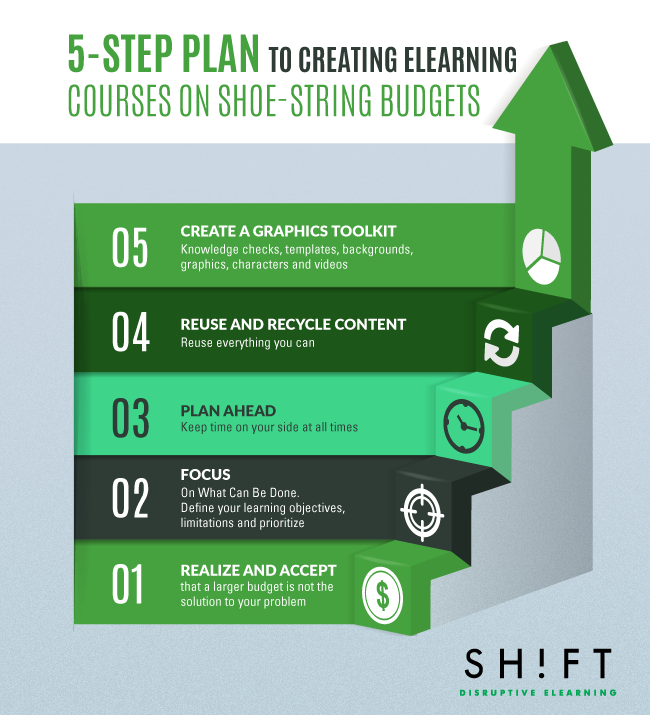
Step 1: Realize and Accept that a Larger Budget is NOT the Solution to your Problem
Don’t bank your success on a larger budget.
It’s not available, and it is unlikely that your efforts will get you more. So, rethink your strategy and separate success from big budget, because at the end of the day it’s the content that matters.
Learners care more about how useful and engaging your content is and the practical benefits they can receive— in the shortest time possible. They are investing their time to become better, not to enjoy/marvel at the great animations and media.
Realize that big budgets simply offer a greater cushioning for errors. With a smaller budget, you simply have to be more careful.
This means spending more time planning out the course content and how to allocate resources and time.
Step 2: Stick to the Essentials
When your budget is limited, designing with purpose is the key.
This stage involves deciding what information would be most relevant to the course. This is best achieved through a content audit. By sorting content into a spreadsheet, you can easily determine what content to delete, what to update, and what to reorganize.
Then, you'll need to follow three main steps:
- Define your learning objectives, realizing the needs and expectations of the target learner.
- Determine your limitations. Accept them, realizing that there is no way to overcome them except finding alternatives. When you do this, you are sure to create a solution that is more innovative than the one you would have come with a bigger budget.
- Prioritize. Cut the content to the bare minimum. Remove whatever is unnecessary, placing concerns about fancy designs, animations, and graphics on the backburner. Get this straight: Fancy graphics and animations aren’t the only ways to create learner engagement. If you’re in confusion, simply list content that you think you can add, and refine it by asking yourself “Should I add this?” Simpler is better; so avoid cluttering the content with simulations, animations, and scenarios together. Decorative graphics or interactivity can hurt, instead of aid the learning process.
Recommended Reads:
Step 3: Plan Ahead
Keep time on your side at all times. Here're some guidelines you can follow:
- Storyboard: Don't begin an eLearning course without a clear path in mind; like any other effort, planning is key. Understand the time requirements and constraints for different tasks. Do this by mapping out your content with a storyboard.
- Prioritize visuals by separating them between the “must haves” and “nice to haves”. Ruthlessly cut down the “nice to haves” (such as filler content), brainstorming solutions for the “must haves” before passing them into production.
- Allocate resources wisely: Avoid producing content in a linear order. Organize it into themes. It is easier to communicate the themes/idea, and allows the designers to create graphics /templates and hence speed their creation process.
- Rapid prototyping: Put in just five minutes of your time to draw a quick sketch, and you can save hours of trial-and-error, hundreds of dollars worth of extra effort, and countless anxious moments towards the end stages of development.
Step 4: Reuse and Recycle Content
Starting from a blank canvas is exciting, but it doesn't always fit the budget of the project. In such cases, you need to reuse everything you can.
Your task is to deliver effective training, and given that the intellectual property being used belongs to the organization itself, you should take full advantage of it.
Here's what you can do:
- Locate and use existing stores of content, media, and learning assets to reduce time and costs of creating content from scratch.
- Find old lessons that are boring and turn them into something modern and engaging. Convert your old modules into better ones, avoiding deep customizations, making modest changes only where necessary.
- Reuse eLearning templates every time you can.
- Learn from the success/failure of previous courses. If certain interactive elements were successful in previous courses, reuse them. If they fail, assess them in terms of the content and the design. Often you will find that you can use the template to increase consistency and efficiency for your design.
Get inspired to recycle and reuse:
Step 5: Create a Graphics Toolkit
Some design elements, like logos and icons, tend to repeat from project to project out of necessity. Rather than go search through old project files each time, increase your effectiveness and productivity with a graphics toolkit. That way, you can get to them easily for future projects.
Map the features that will be commonly used, such as:
- Knowledge checks
- Templates (title pages, videos, audio, images, and more)
- Backgrounds
- Graphics (Icons, logos, backgrounds, charts, etc.)
- Characters
- Videos
Tutorial: How To Build Your Graphic Design Toolbox
Find plenty of useful resources to get your eLearning courses done without having to start everything from scratch here.
In Conclusion — Realize, Re-asses, and Re-Align Your Budget
It is possible to create compelling eLearning courses on a shoe-string budget. By effectively planning your content, prioritizing the “must haves” according to your core learning objectives and following the 5-steps mentioned you are sure to deliver results on the shoe-string.

Source: Bozarth, Jane. E-learning on a Shoestring: Help for the Chronically Underfunded Trainer