How to Add LearnDash Course Materials to a Searchable WordPress Resource Library
If you’re using LearnDash to add courses and lessons to your WordPress site, then you know that organizing and displaying learning resources is essential. Most courses need extra resources to boost students’ learning, such as course handbook or other downloadable materials.
It’s easy enough to manually list a few links within a course or lesson. However, this becomes unmanageable if you need to display larger numbers of resources. Students might need a quicker way to find specific items.
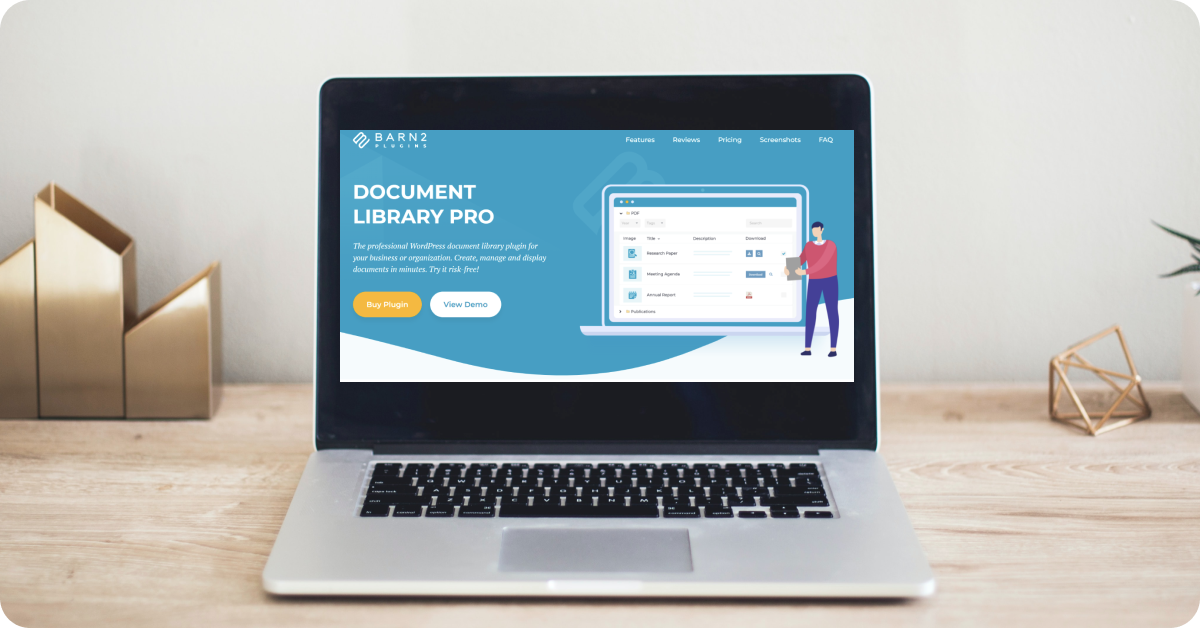
Thankfully, there is a solution with the Document Library Pro plugin. This tool allows you to create a searchable database of learning resources that can be easily accessed by your students from within a LearnDash course or lesson.
Combining the plugin with LearnDash helps you to:
- Enhance the user experience by providing a centralized location for all course resources.
- Increase the ability to search and filter materials, making it easier for students to find what they need.
- Add resource version control to your existing tracking and reporting capabilities, allowing instructors to know which learning materials were available when.
We’ll show you how to use the Document Library Pro plugin to add LearnDash course materials to a searchable database within a course or lesson.
Best WordPress Plugin for Adding LearnDash Course Materials
As well as adding LearnDash course materials library to your site, Document Library Pro allows you to:
- Display LearnDash course materials anywhere on your site. Use the default plugin shortcodes to display your resources on the main course page, the ‘Materials’ tab, the course sidebar, or even within individual lessons.
- Display the resources in a table or grid. The table layout is recommended for large numbers of resources, while the grid view is ideal for smaller collections of materials.
- Offer advanced search, filtering, and sorting features. Your students can now use an optional search box to locate specific learning materials faster. They also get powerful sorting and filtering functionality.
- File downloads and third-party website links. You can embed all sorts of downloadable files including PDFs, audio, and video files. Students can also follow links to third-party websites for further learning.
To add these powerful features to your LearnDash courses, follow the steps below.
Step 1: Install and Activate Document Library Pro
To enable search in your LearnDash course materials library, you need to install and activate the plugin. Get your copy of Document Library Pro to receive a downloadable ZIP file link and license key in your email.
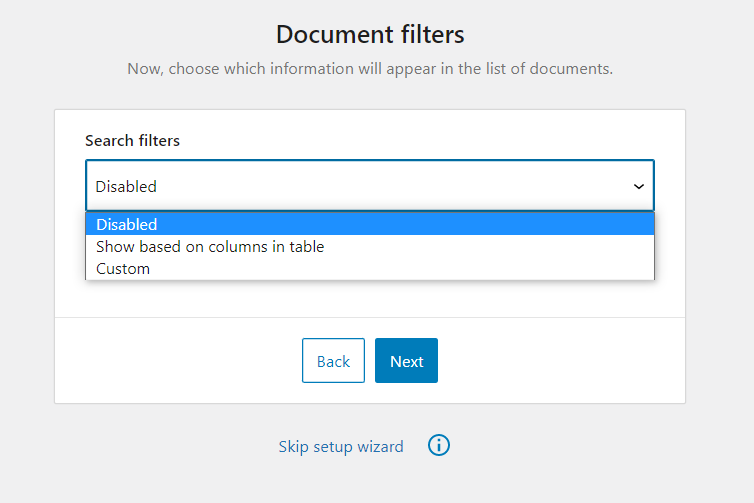
In your WordPress admin dashboard, go to Plugins > Add New > Upload Plugin. Select the plugin ZIP file and click Install Now followed by Activate Plugin. Follow the setup wizard’s instructions and enter your license key and default settings for your course materials.
Pay attention to the Columns and Document filters options. The Columns option controls what information to display about each course material or resource. For example, you might want to show its title, a brief excerpt, the categories, and a link to download (or to view on a third party site, depending on the type of course material).
You can also enable searching and filtering if you want your site users to search LearnDash course materials. This allows you to go beyond listing a few course materials in a specific site location.
You can also begin tweaking more features:
- Customize the style of download links.
- Enable instant previews, so that people can access course materials without having to download them.
- Add advanced sorting and filtering options.
- Control the elements above and below the table or grid.
- Customize mobile visibility and responsive options.
Step 2: Add LearnDash Course Materials to Your Site
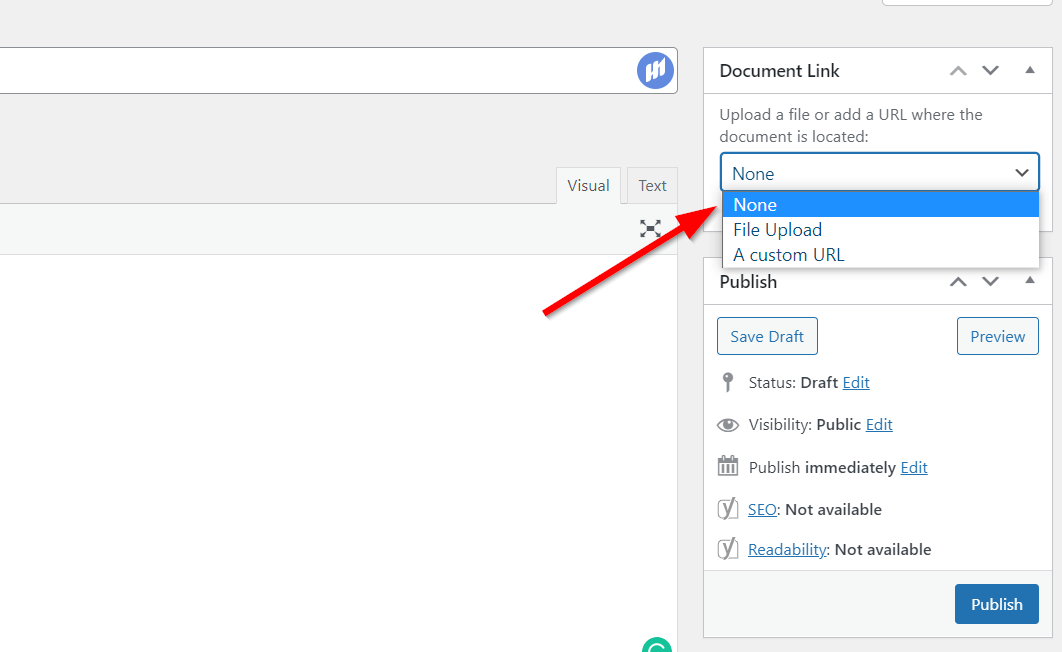
You can add LearnDash course materials to WordPress in bulk, or one by one. To add course materials to LearnDash individually, go to Documents > Add New. This works like adding a new WordPress post.
Add the course material’s title and description. In the Document Link tab, you can either upload a file directly to the WordPress Media Library or add a third-party URL link.
To add LearnDash course materials in bulk, navigate to Documents > Import. Here you can either drag and drop multiple document files into the upload area or do a bulk CSV file upload.
Once you’ve added LearnDash course materials to your site, let’s display them in the appropriate courses and lessons.
Step 3: Add LearnDash Course Materials Using a Shortcode
With Document Library Pro, you use a shortcode to list your newly added LearnDash course materials. The plugin offers over 50 shortcode options. You also get to decide what they should look like.
The basic plugin shortcode for listing LearnDash course materials is [doc_library]. This will list all the course materials on your site, with the settings that you selected in the setup wizard.
If you have more than one course, or if you want to list different course materials in other lessons, then you need to tell the shortcode which materials to display. To add LearnDash course materials this way, you can use shortcodes like:
- [doc_library doc_category=”wordpress”] – This will list only course materials in the “WordPress” category.
- [doc_library doc_tag=”woocommerce,bogo”] – This displays all the resources tagged “woocommerce” and “bogo”.
Once you’ve planned out your shortcodes, you can start adding them to your courses. Let’s walk you through some of the most popular options.
Adding a Searchable Resource Library to the Main LearnDash Course Page
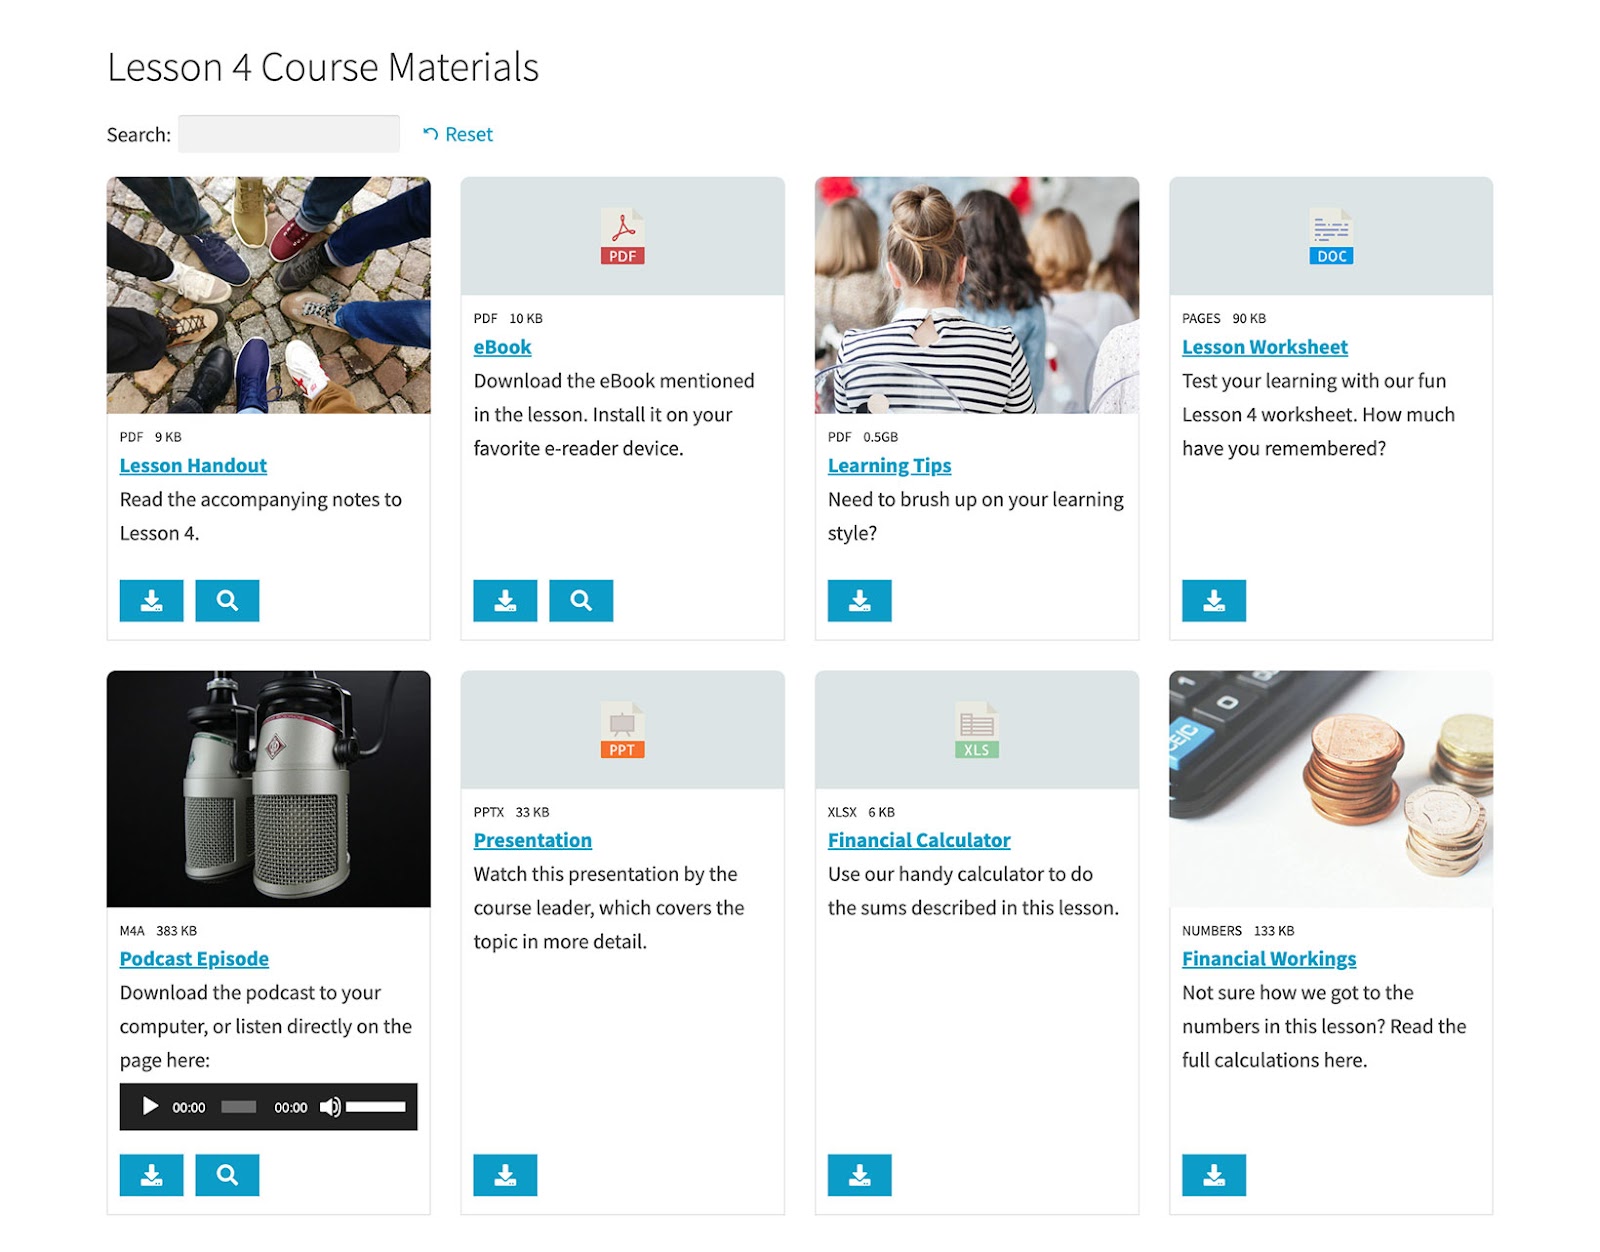
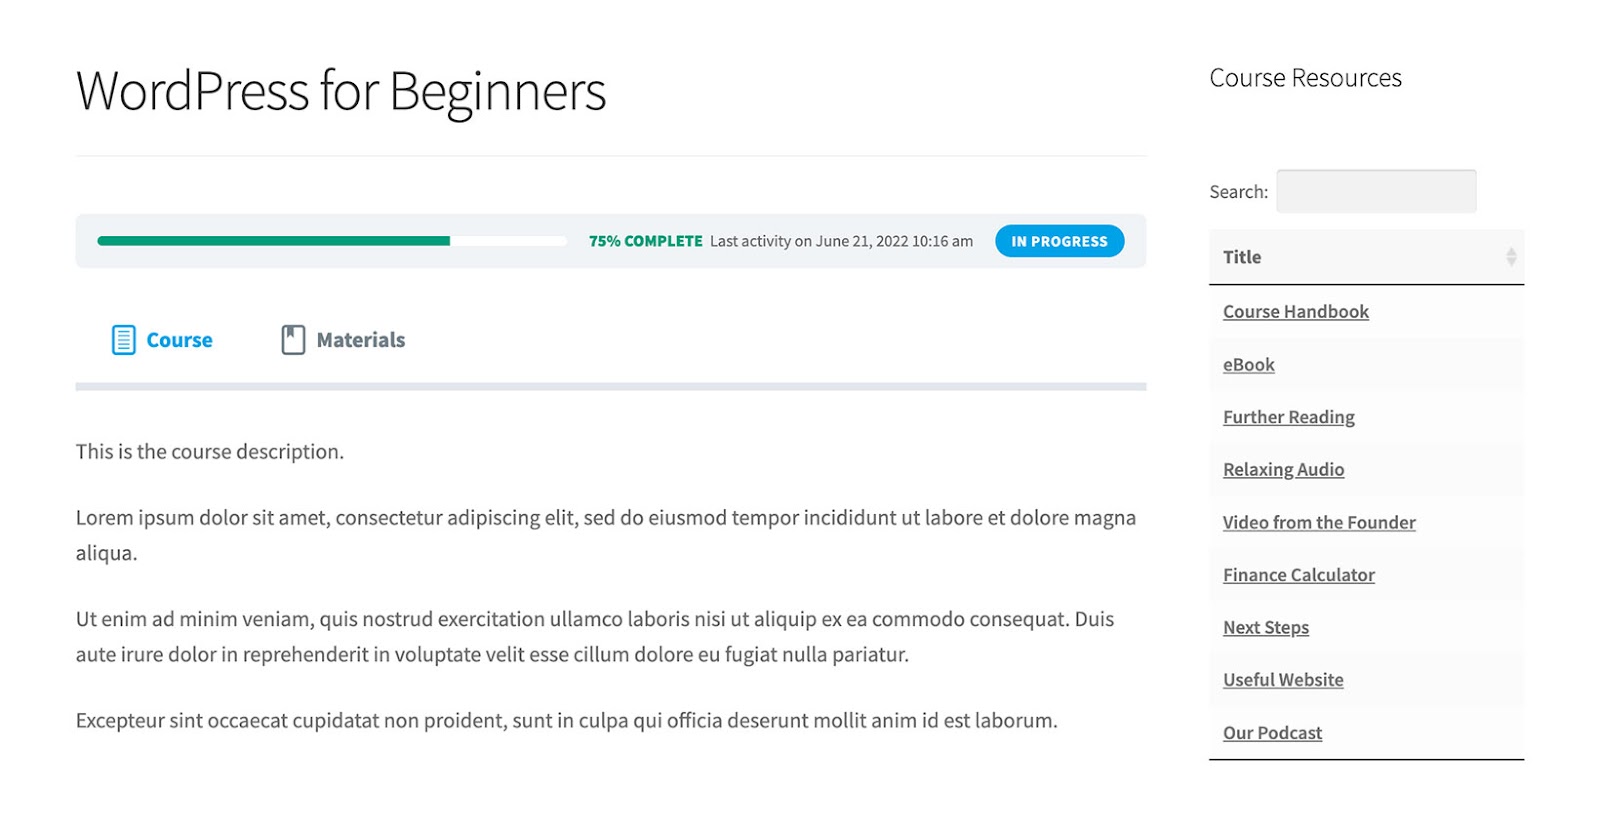
Since you’re adding additional materials to individual courses, it makes sense to display them directly on the course’s homepage. This creates a central resource library for the entier LearnDash course. The most popular position for this would be below the course overview section.
To do this, go to LearnDash LMS > Courses and hover over the course you want to add materials to. Then click Edit. On the ‘Edit Course’ screen, scroll down to the main description and add a shortcode block.
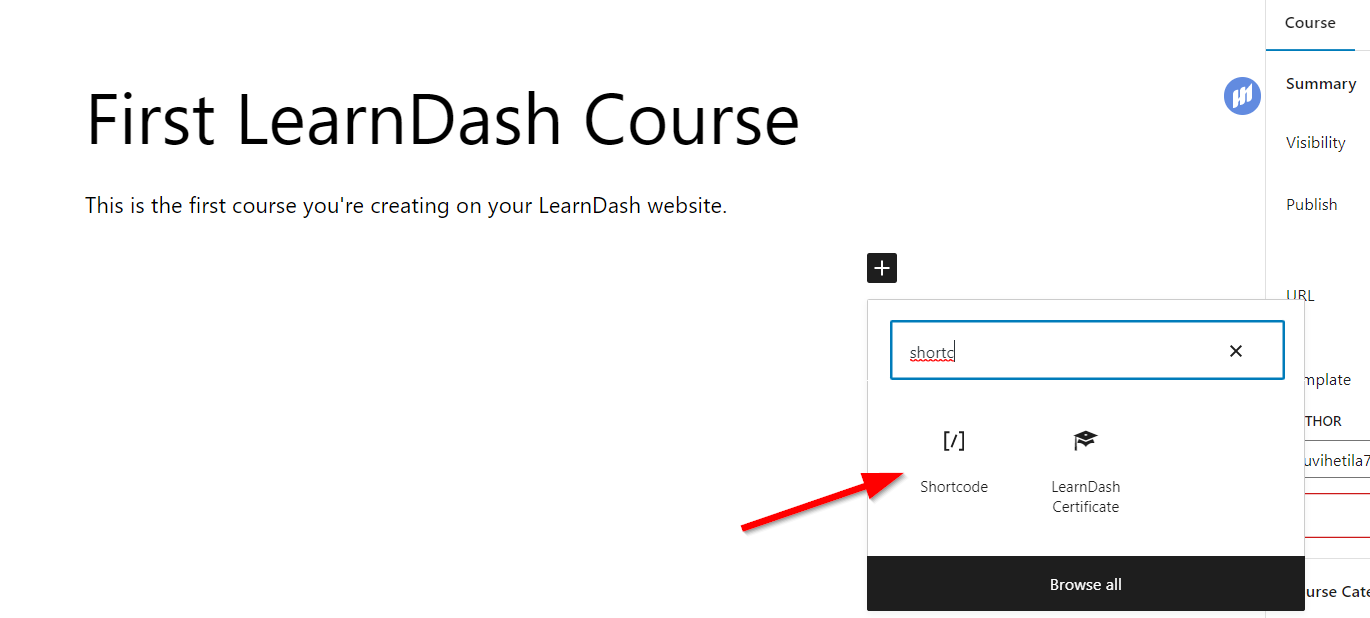
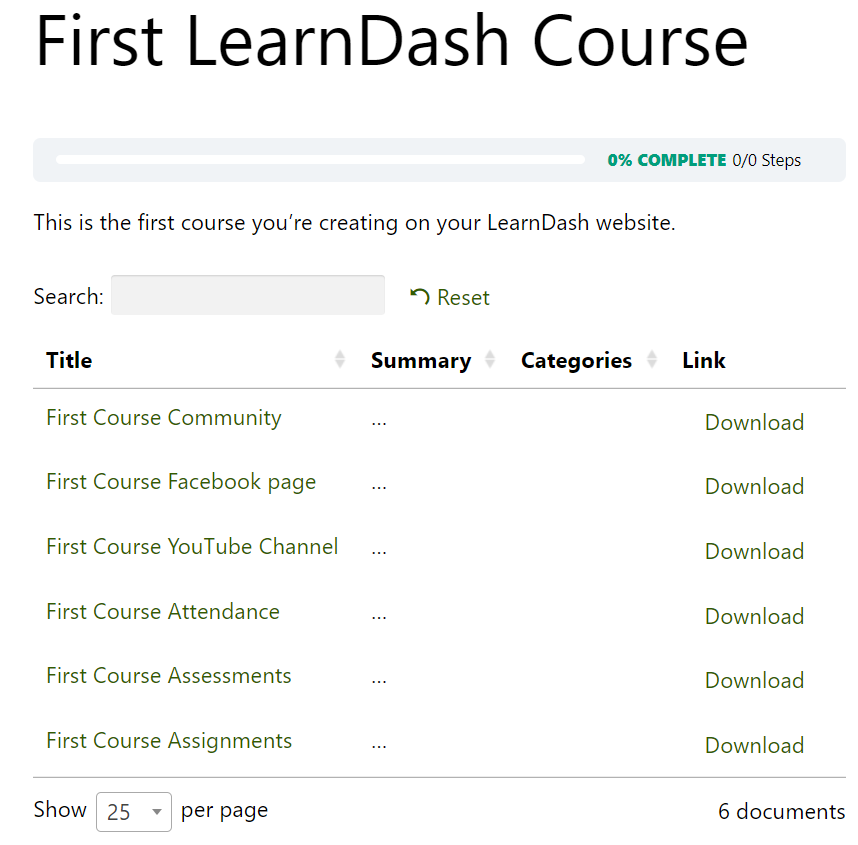
Then paste the Document Library Pro shortcode where you want to display the course resource library. Click Preview to check out the results in a new tab. Your first LearnDash course materials library should look something like this:
Add LearnDash Course Materials to the Materials Tab
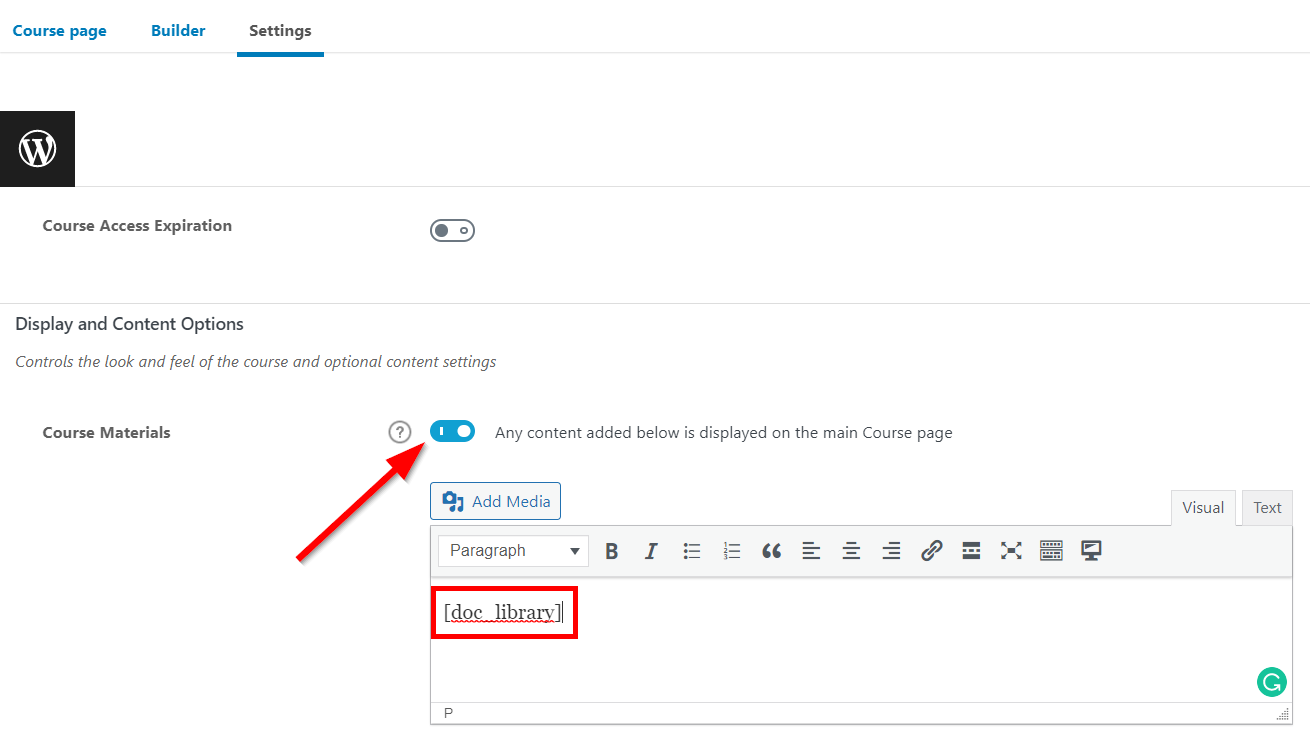
Another option is to display your LearnDash course materials library in the ‘Course Materials’ tab. The LearnDash ‘Course Materials’ tab could be an ideal location to display all the materials for a particular course.
To add the materials here, navigate to the Settings tab of the ‘Edit Course’ page. Scroll down to the Display and Content Options section. Toggle on Course Materials and enter the Document Library Pro shortcode.
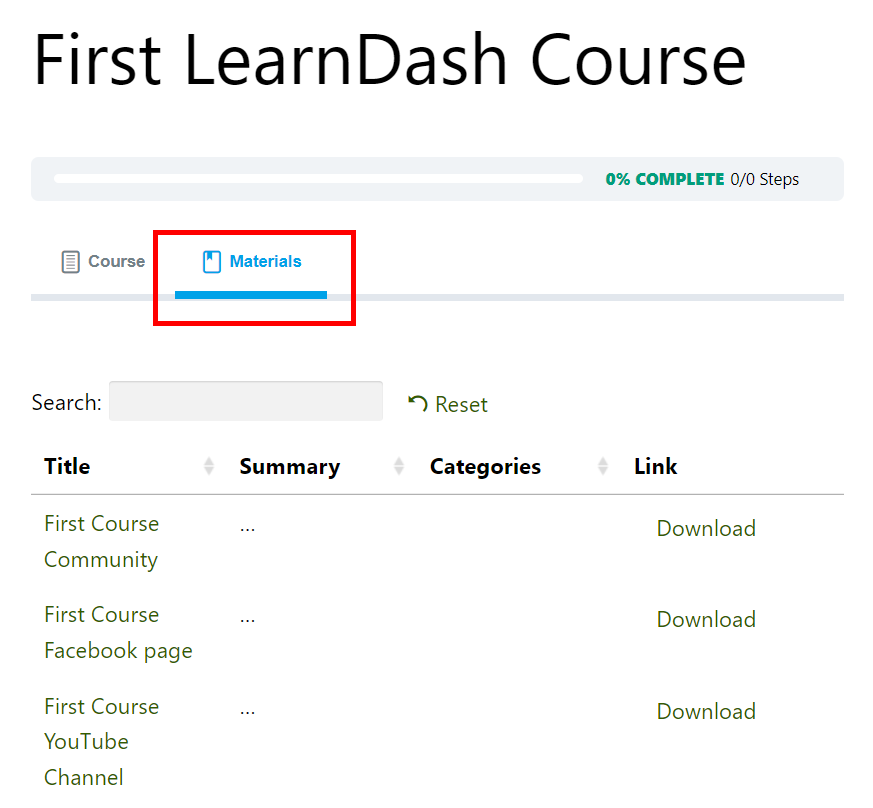
Now, the course materials tab will have a resource library that looks like this.
Add LearnDash Course Materials to the Course Sidebar
Alternatively, you can make your LearnDash course materials even more accessible by displaying them in the course sidebar. The good thing about adding LearnDash course materials to the course sidebar is that they will be visible on all the course and lesson pages.
To do this, simply go to Appearance > Widgets and add a shortcode block to the sidebar widget. If you want to apply the sidebar display to only specific course pages, you can use a free plugin like Widget Options. It allows you to choose which courses and lessons to display the widgets on.
Add LearnDash Course Materials to Individual Lessons
There are also common use cases for adding course materials to individual Learndash lessons. This can be useful if each lesson has unique additional resources like audio tracks and lesson notes. You can easily showcase these materials at the end of any lesson or even include a ‘Further Resources’ lesson at the end of the course.
You can do this by going to LearnDash > Lessons. Create a new lesson or edit an existing one. Then add a Document Library Pro shortcode block at the bottom of the content.


Extra Customization Options for Your LearnDash Course Materials Library
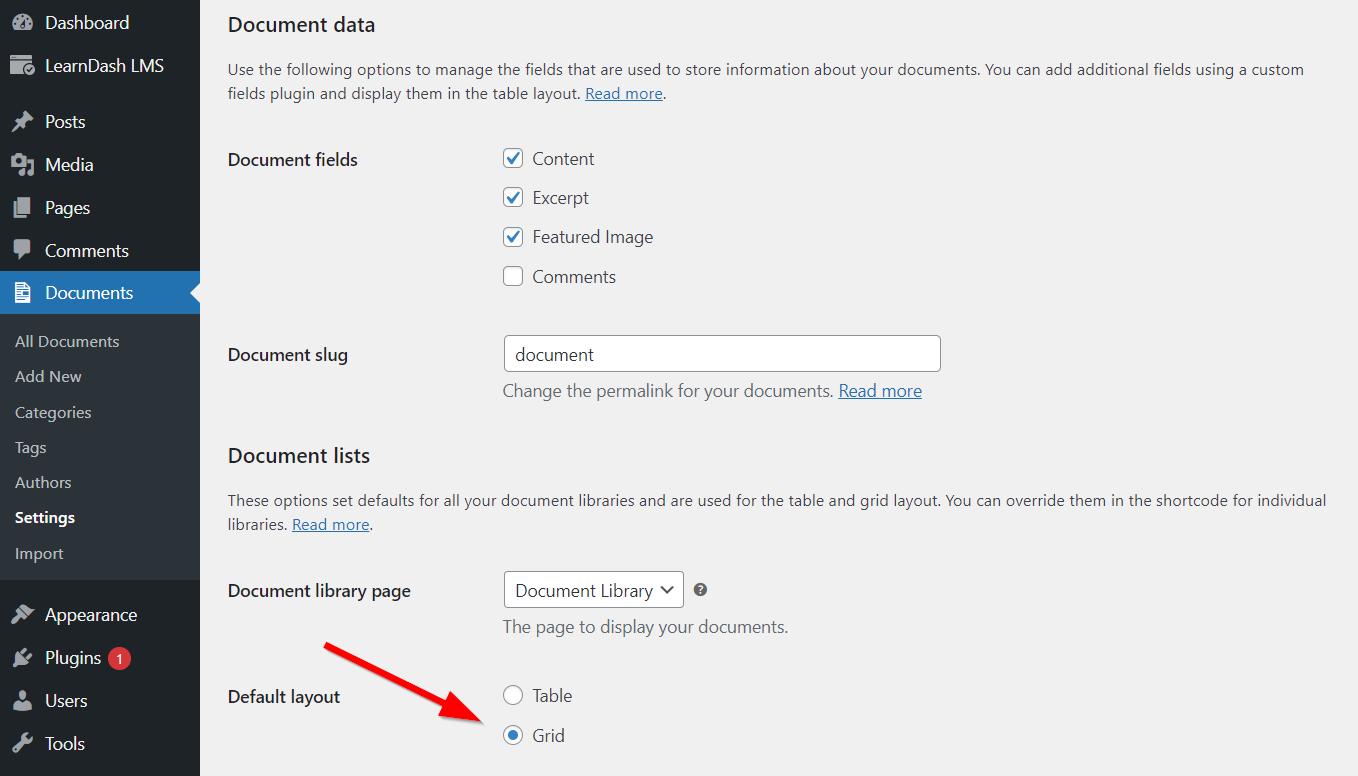
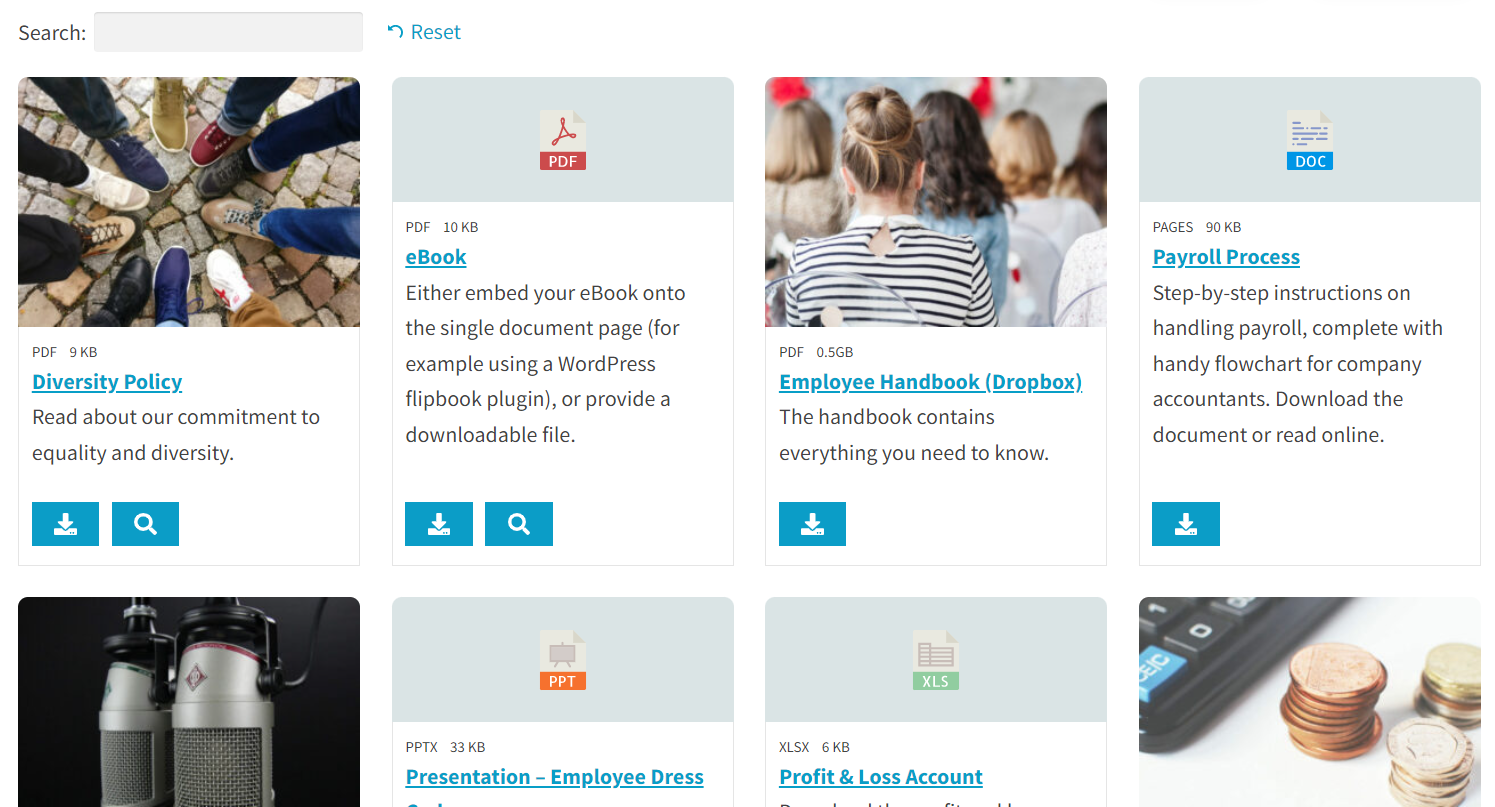
Document Library Pro allows you to customize your library’s look and feel in different ways. For example, you can choose to display your course materials in a grid rather than a table. All you need to do is navigate to Document > Settings and scroll down to the Default layout section and check Grid.
Here’s what the results should look like:
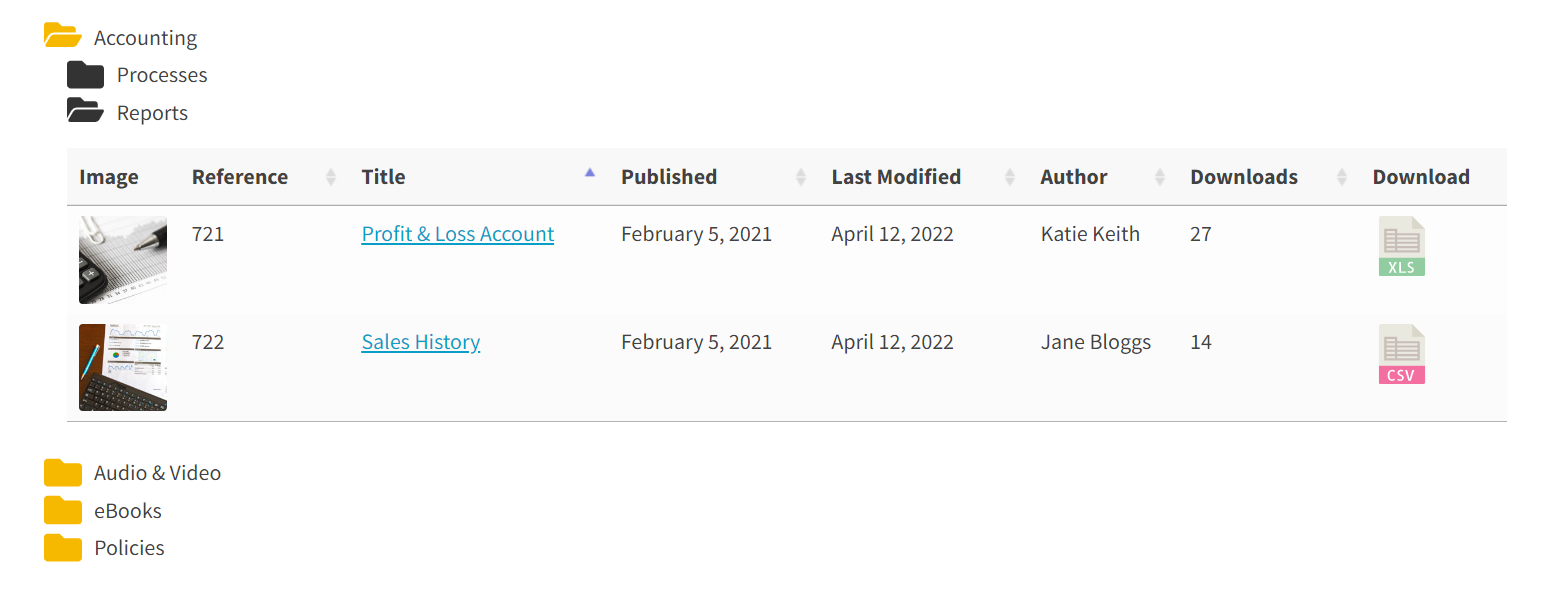
Similarly, you can enable folder view on the same page by checking Display the document library in folders. This is a perfect way to create a well-organized hierarchical structure for eLearning sites with multiple course materials categories.
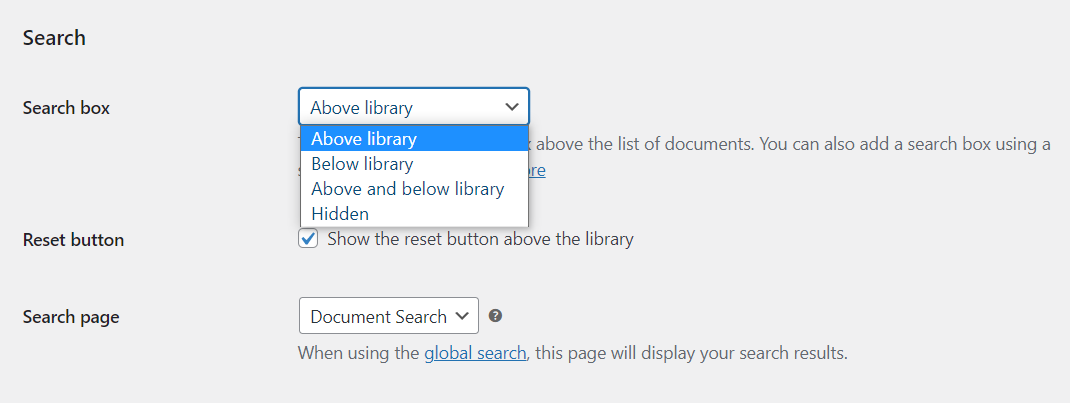
Another important feature is the search function. You can include the search box above or below the course materials list, or both. Alternatively, you can even hide the feature completely and display it somewhere else using a shortcode or widget.
Improve Your LearnDash Site With a Searchable Course Materials Library
Adding a searchable course materials library to your LearnDash site has many benefits. With the ability to search and filter materials, students can easily find what they need, improving their engagement with the course.
Document Library Pro allows you to add course materials to the main LearnDash course page, the “Materials” tab, the course sidebar, and individual lessons. It also gives you control over the look and feel of your course materials library.
Whether you need to add resources one at a time or in bulk, Document Library Pro plugin offers all the control you need. Add this useful plugin to your LearnDash site and see how it improves your courses.

Rachel Kolman
@LearnDashLMS