
30th Oct 2023
How to create PowerPoint templates that work
Without a proper PowerPoint template, presentations can be a bit of a mess. Here are the building blocks for developing a PowerPoint template that works!

Video is a great way to engage your audience in a more engaging, dynamic, or emotive way than can be achieved with standard PowerPoint alone. Or it can save you a lot of time. There are a couple of options available if you want to embed video in PowerPoint.
Read on for step-by-step instructions and more!
The most reliable way to embed video in PowerPoint is to go the Insert tab on the ribbon, and then Video on the right-hand side. Here you can choose Video on My PC and navigate to the appropriate file on your computer. Once selected, click Insert and you’ll insert video into PowerPoint. The video will appear on your slide just like a standard shape. Using the white grab handles, you can resize the video and move it anywhere you like on the slide. If you embed video into PowerPoint slides that have other elements on them, then try to make the video line up with everything else and fit neatly into a set working area. Don’t just leave it floating. If you have a blank PowerPoint slide, make the video fill the entire screen, so it’s easier for your audience to see what’s going on.
If you want to keep the slide count down, you can insert video into PowerPoint as a layer on a slide. One option, which also works well if you need to share your presentation with others, is to select the video, go to the Playback tab on the ribbon and look at the Video Options section in the middle. There is a check box to Play Full Screen, which means that you can make the video fairly small on the slide, but it will play full screen when in slide show mode. It can be tiny or even off the slide entirely, but it will still play full screen with no loss of quality and it will appear in front of all other content, so this is a pretty useful function.
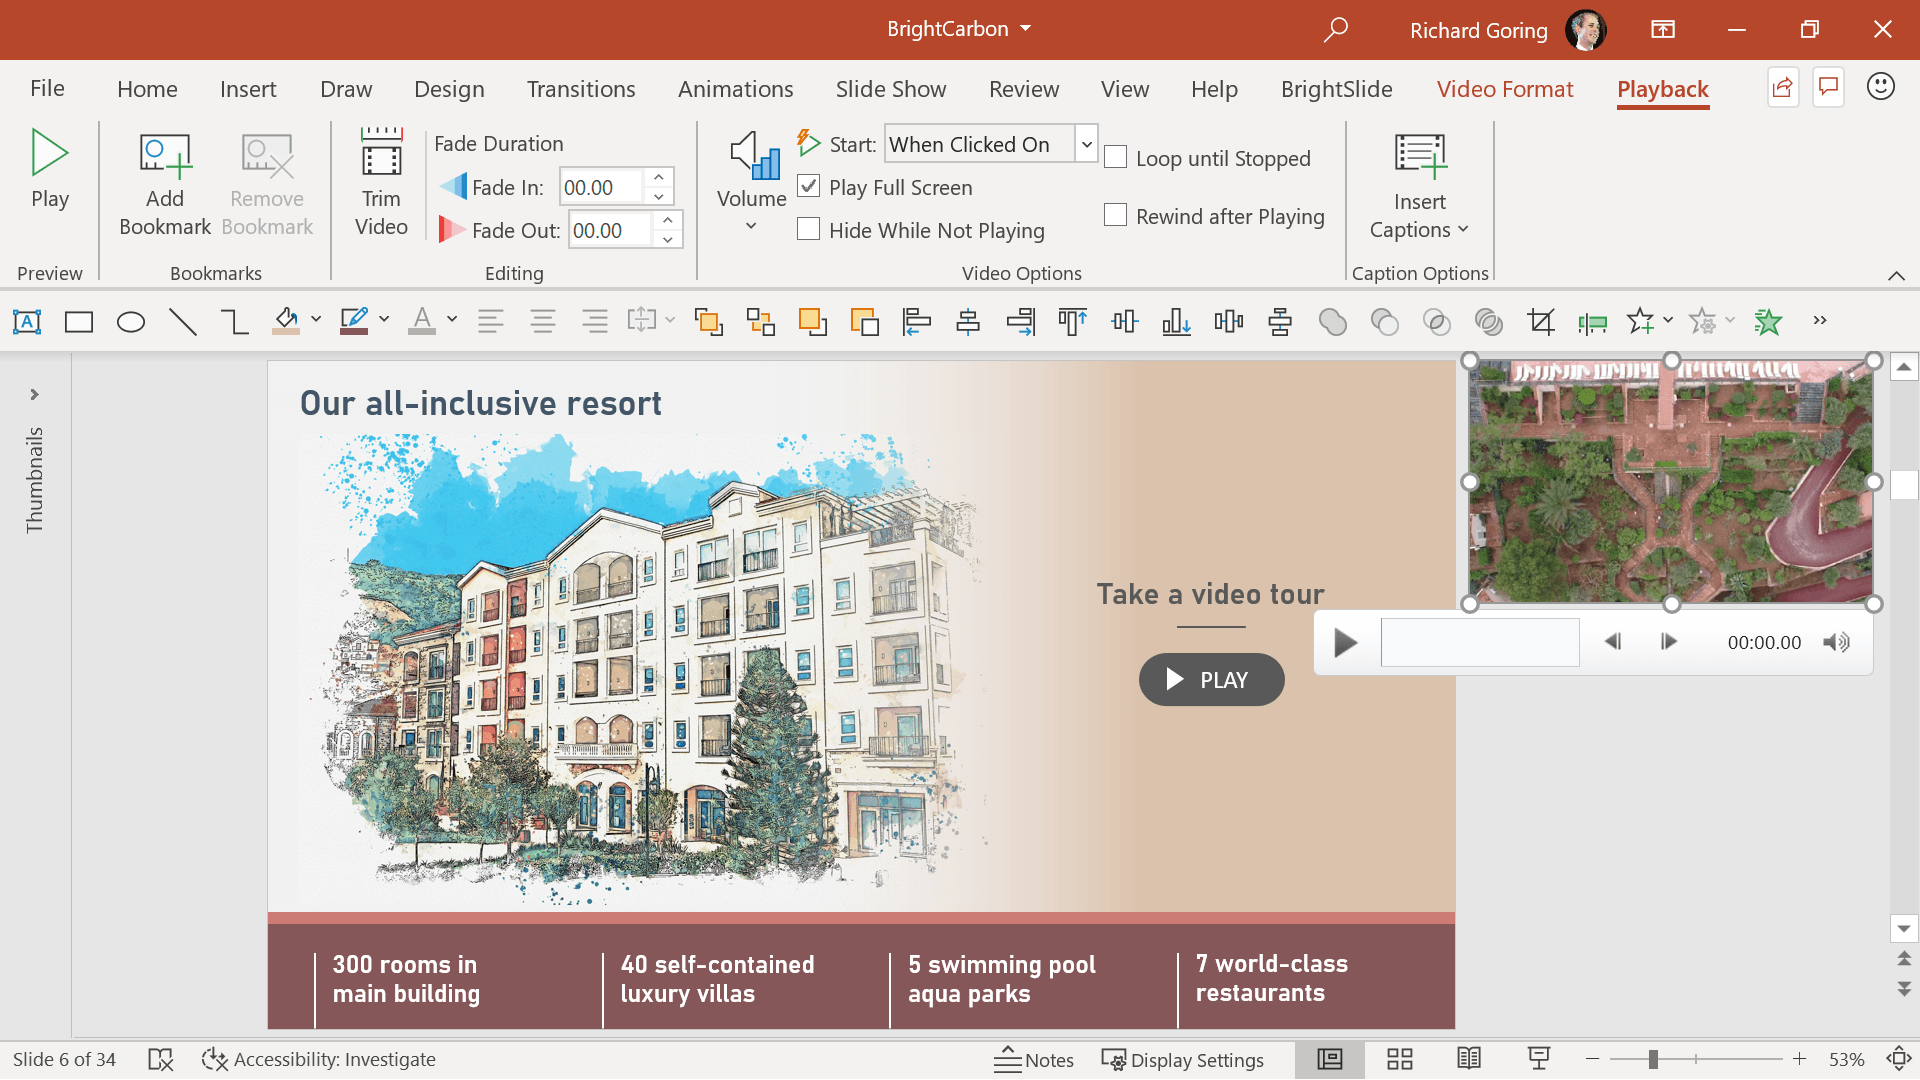
Next, still on the Playback tab in the Video Options section in the middle, use the drop-down menu to choose when the video Starts. There are three options here and they can be misleading. In Click Sequence and Automatically both mean that the video starts to play when the Play animation is next in the animation order. If you have nothing else animating on the slide, then it’s easy. But if there are other objects animating, then In Click means you have to click for the video to play and other objects may animate first. Automatically means it will start immediately after the last animation you added. With either of these options, you’re best going to the Animation tab on the ribbon, and choosing Animation Pane from the right-hand side. Here you’ll see a list of all the animations on the slide – the blue play icon shows you when the video will play. A number with a mouse icon shows you need to click. No number and a clock icon shows the video will play after the previous animation. You can change when either of these things happen by dragging the animation up or down the animation list, or using the arrows on the top right-hand corner of the Animation Pane. You can also use other animations on the video, such as an entrance animation to bring it on to the slide at a particular point, and an exit animation to remove it once it’s finished playing.

And that’s it. Now you know how to embed a video in PowerPoint. But, you can do so much more than that, and I know that you want to!
Video layout, cropping, formatting, and design in PowerPoint
How to crop a video in PowerPoint
How to custom crop a video in PowerPoint
How to create video text in PowerPoint
How to edit or trim a video in PowerPoint
How to play video in PowerPoint
Hide video controls in PowerPoint
How to add video bookmarks in PowerPoint
How to extract a video from PowerPoint
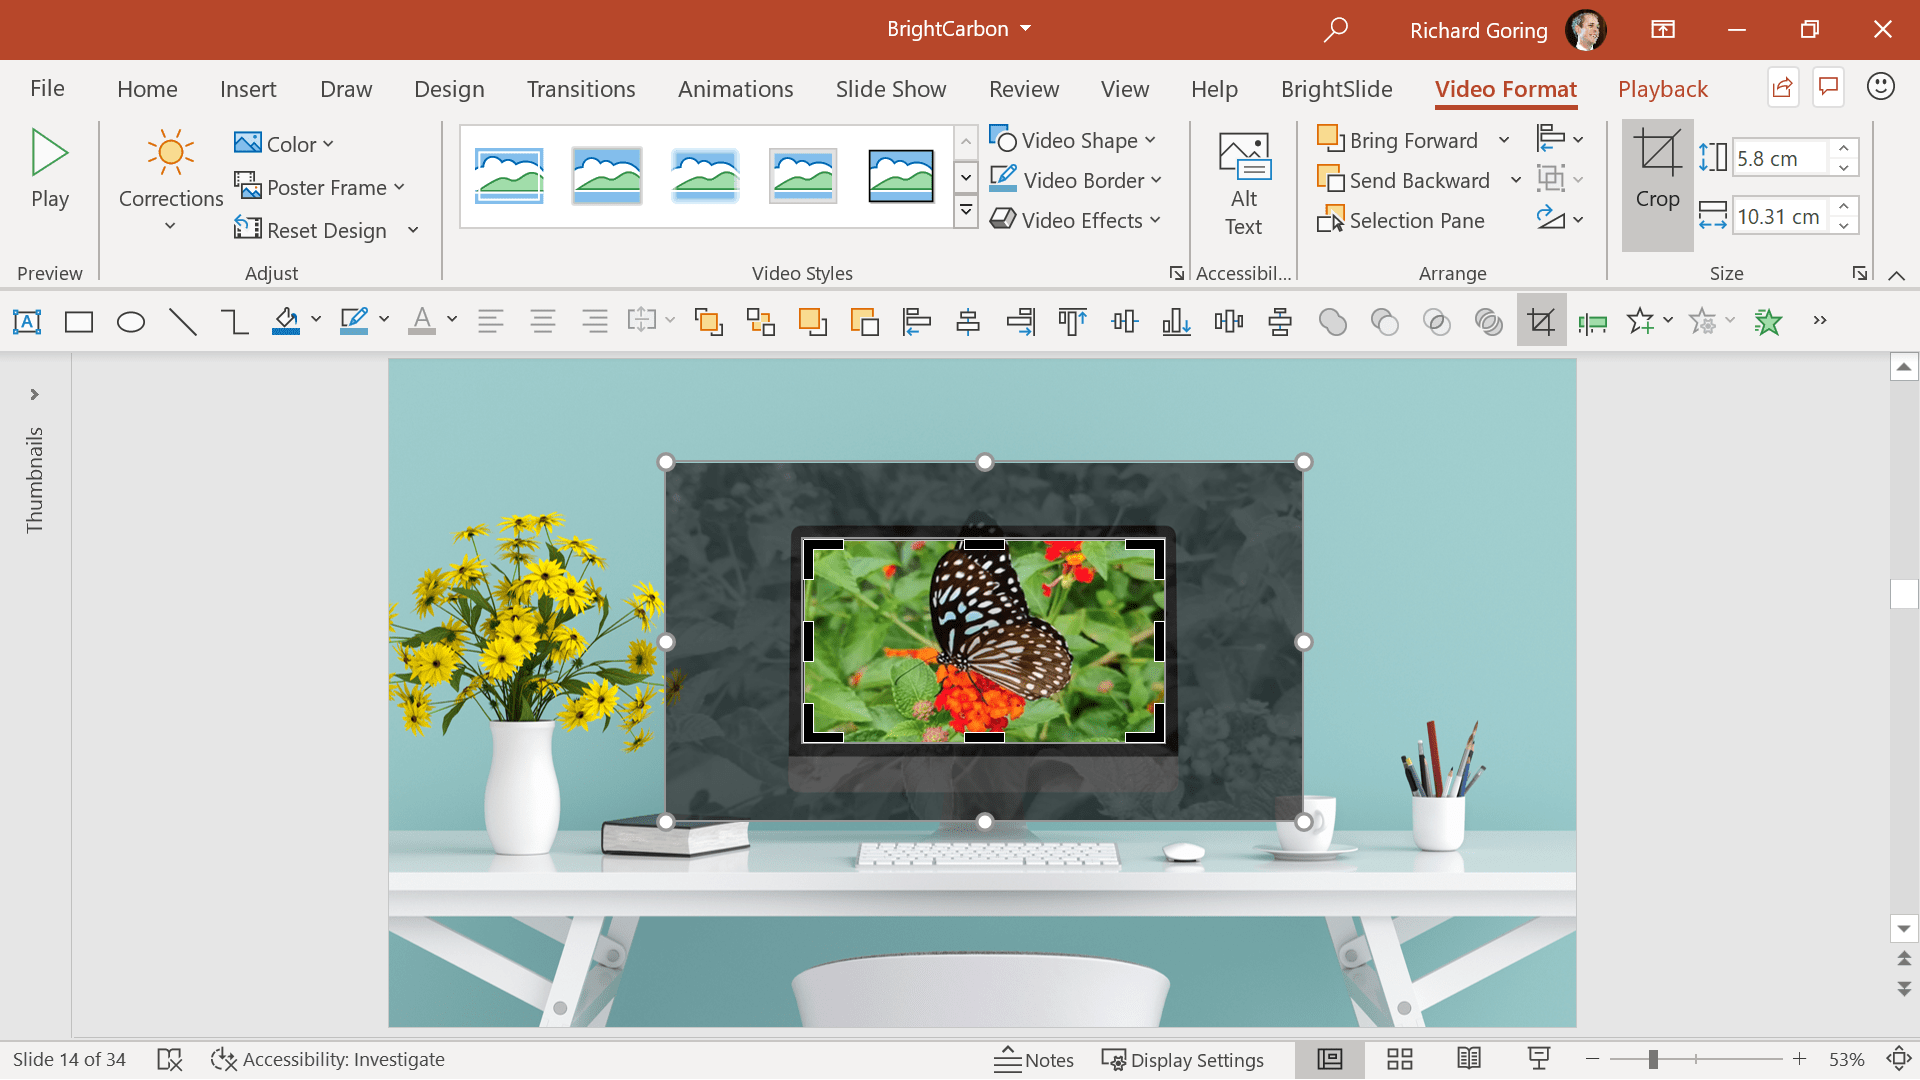
When you embed a video in PowerPoint, simply playing it is just the tip of the iceberg in terms of what you can accomplish. When you click on a video in PowerPoint two new tabs appear on the ribbon. The Video Format tab gives you options to change the video style. Things like corrections to change the brightness and contrast aren’t great, nor are the color wash options, although you may find a use for the greyscale. What may be useful is changing the poster frame, using the button on the left, which alters the still image you see before the video starts playing. You can use any image you have saved on your computer (which could be a still from later in the video), or something PowerPoint has found online, or even an icon – which I wouldn’t recommend as it looks odd jumping from a totally different image or icon to the video.
The Video Effects button in the middle of the ribbon gives you a whole load of video style options, most of which are terrible, and you shouldn’t go near, but it may be useful to apply them in some instances. You have all the same formatting options as with images. So, a shadow may help the video to stand out, or perhaps a small amount of 3D rotation is helpful to fit the video onto an image with a TV or screen at an angle, to create a more natural scene. Just remember that you probably want people to view the video easily, so minimize what effects you apply, and make the video as large as possible (ideally full screen).
![]()
![]()
You can also crop a video, using the Crop button on the right-hand side of the ribbon. This can be useful to remove things you don’t want, like the black tramlines created if a widescreen video has been saved in the old 4:3 aspect ratio, or you could crop to zoom in on an area of the video.
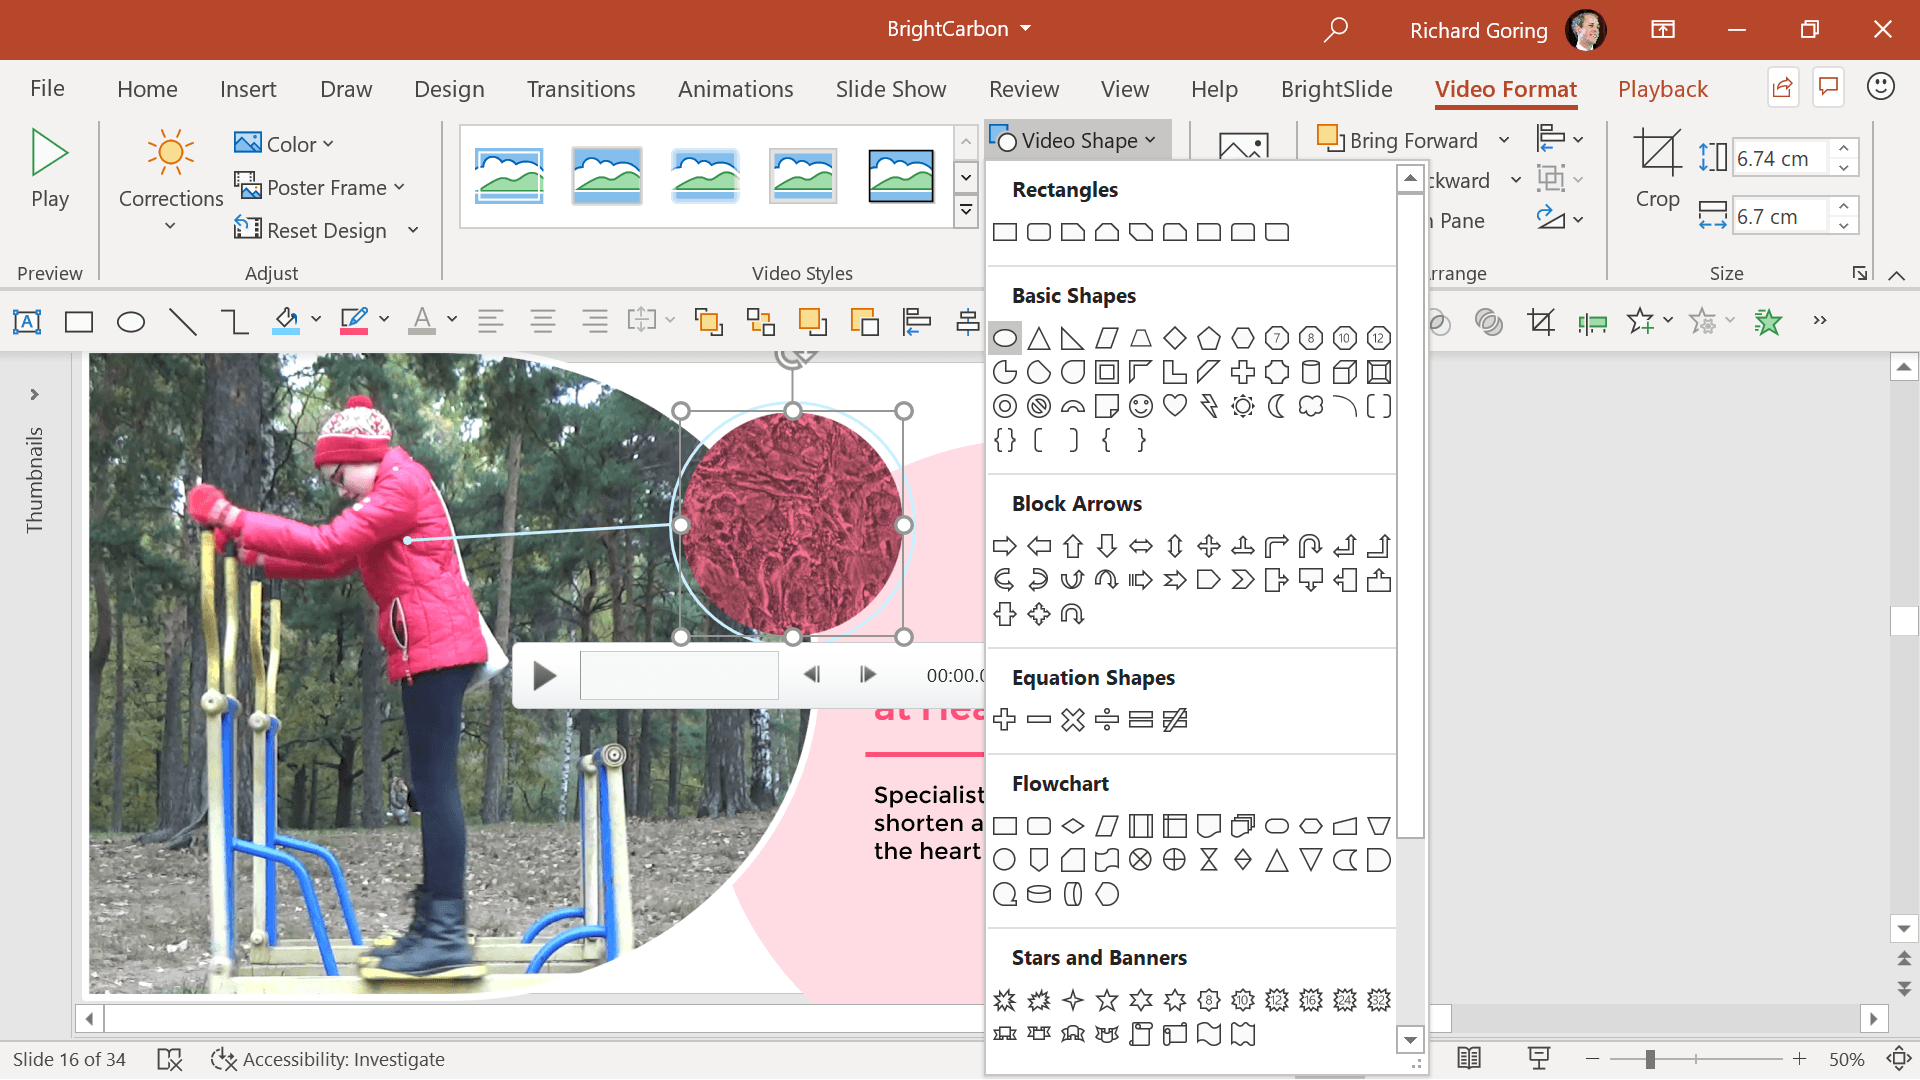
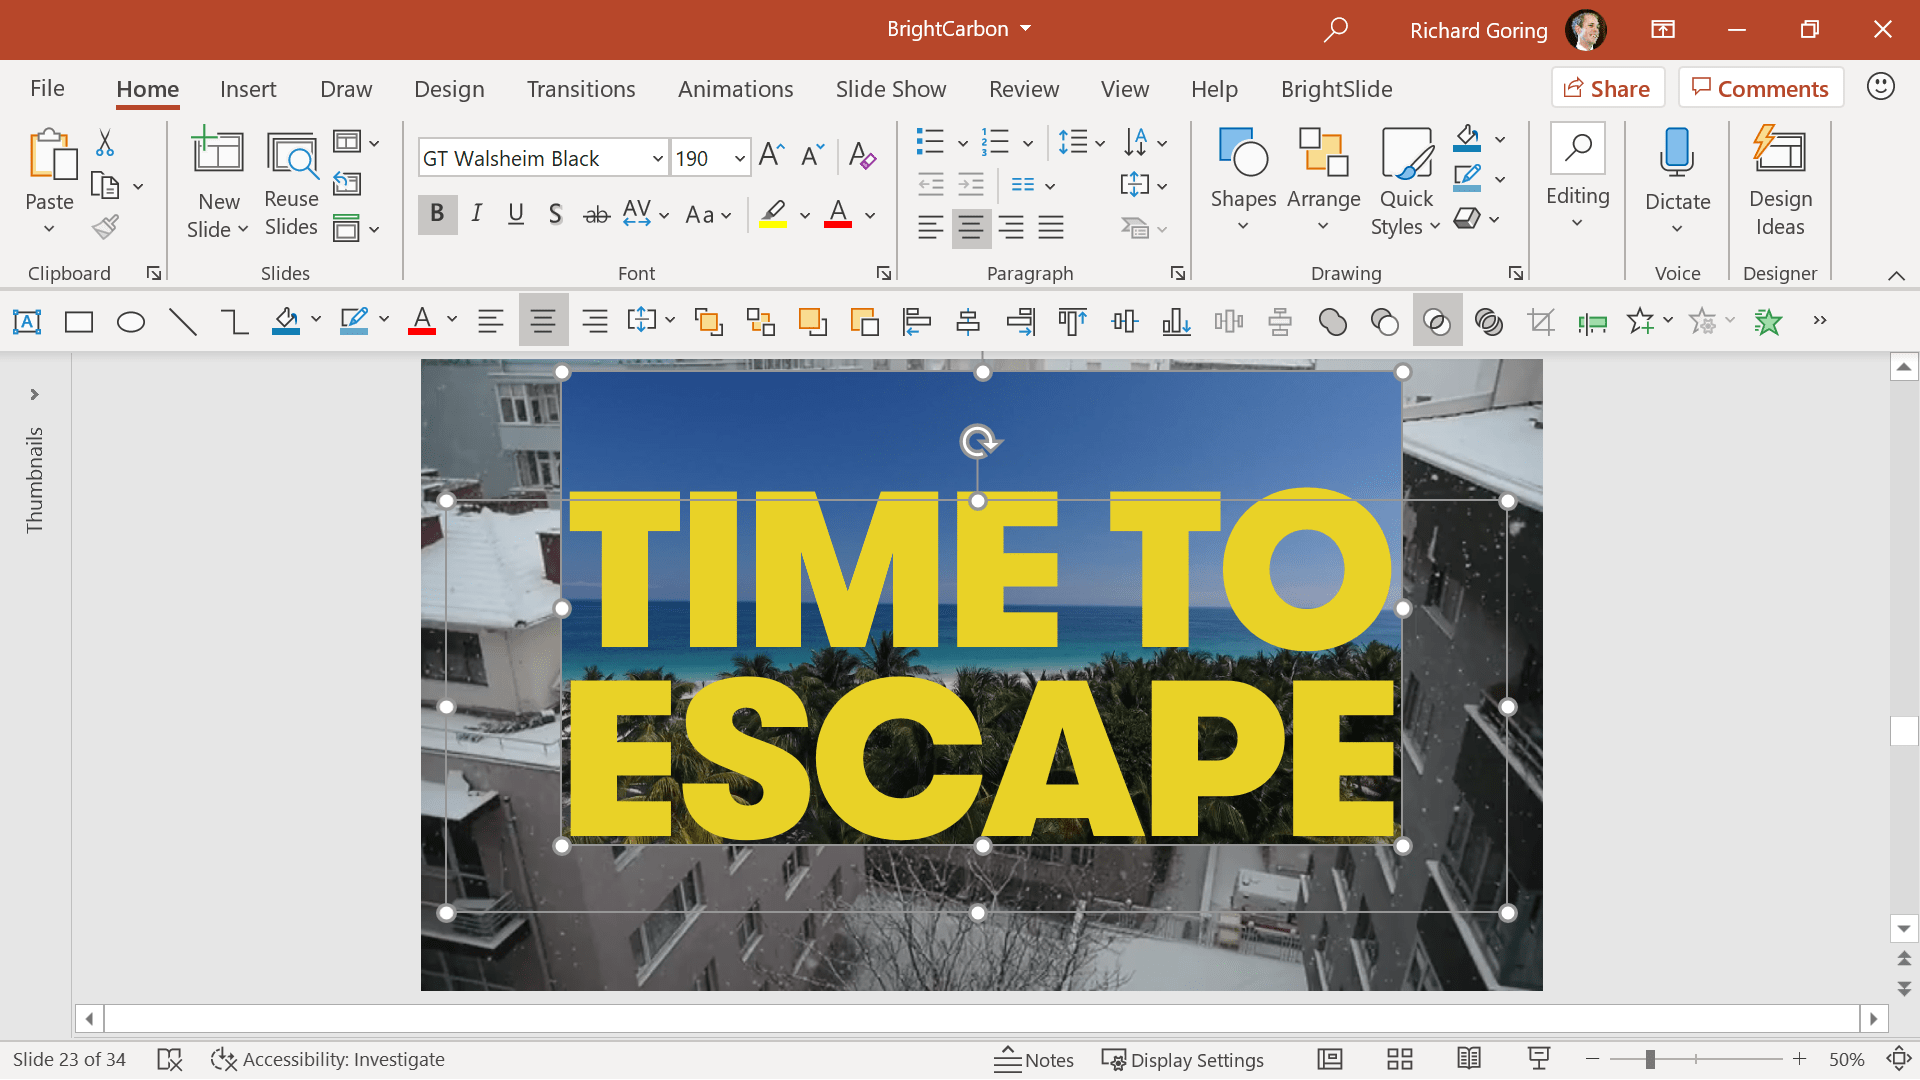
You can also crop the video to any of the standard shapes in PowerPoint using the Video Shape button in the middle of the ribbon. Mostly this is going to look terrible, so be cautious of doing it. But you there are some instances where it could look great. Imagine a circle crop showing a ‘lens’ into something like a machine revealing more details or giving the impression of a clinical imaging system looking inside the body. This would look especially good if you add an internal shadow using the Video Effects option on the ribbon. Unfortunately, unlike with picture cropping, there’s no option to choose the aspect ratio, so use a circle shape to line up and get it right, rather than guessing by eye.
What if you don’t want a standard shape? Perhaps your branding uses a certain angle throughout, and you’d like to create a block to the side for a title, quote, or call-out? You can’t use Edit Points to alter the video frame, but you can use the Merge Shape tools, if they’re on your Quick Access Toolbar. The Merge Shape tools are on the Shape Format tab on the ribbon, but that doesn’t appear if you have a video selected. Add them to your QAT, and as long as you have a standard shape selected with the video, you can subtract any shape, or combination of shapes from the video.
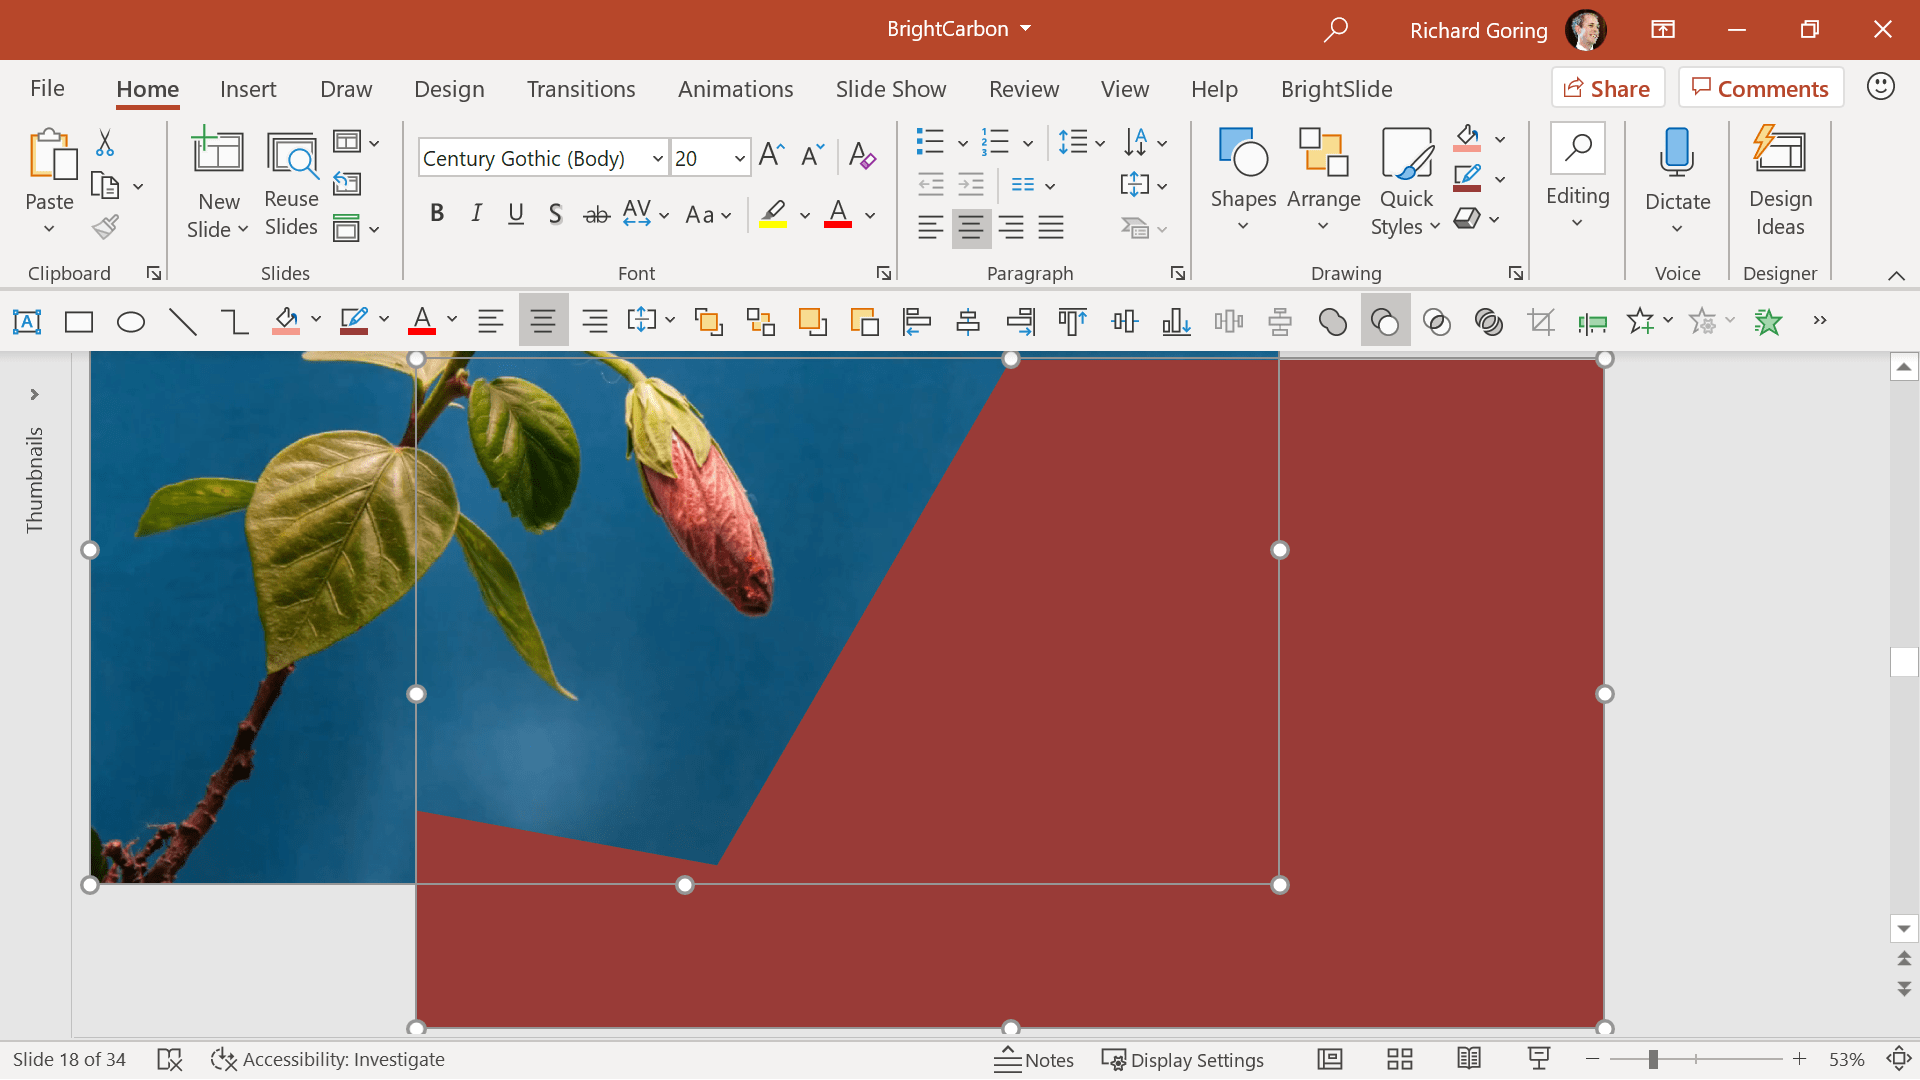
Or you can use the Intersect option to draw a freeform shape and use Edit Points to get something very precise, and then use that as the custom crop frame.
Another use for Intersect would be to ‘fill’ text with a video. Type your text then set the font and size. Position the text over the video, select the video and shift click to select the text, then choose Intersect to get a video shaped like your text. It’s important to select the video first when doing this, otherwise, you’ll just keep the text, and not the video text. You can then put the video text over the top of another video if you’re super keen, and can create some rather neat double video effects – all using PowerPoint.
You can take things even further, because, why wouldn’t you, and use Fragment. This will give you lots of videos, that you get independent control over, which can produce an interesting staggered play effect.
You can start to do some really interesting things, so try it out.
I’ve talked about cropping video to a specific size, but in PowerPoint you can also trim your video to remove unwanted footage. It’s not sophisticated, but it is quick. With a video selected, go to the Playback tab on the ribbon and the Editing tools on the left. Here you can choose Trim Video, which allows you to start and finish at any point. Sadly, you can’t create multiple sections, which would be oh so useful, but if you’re desperate to do this in PowerPoint, you can trim the video to the first section you want, then copy/paste the video and trim the second video to the second section you want. A bit of playing with the animation using a disappear on the first video and an appear and play animation on the second video would then give the effect of two sections of video playing seamlessly as one. But I agree, it’s a pain.
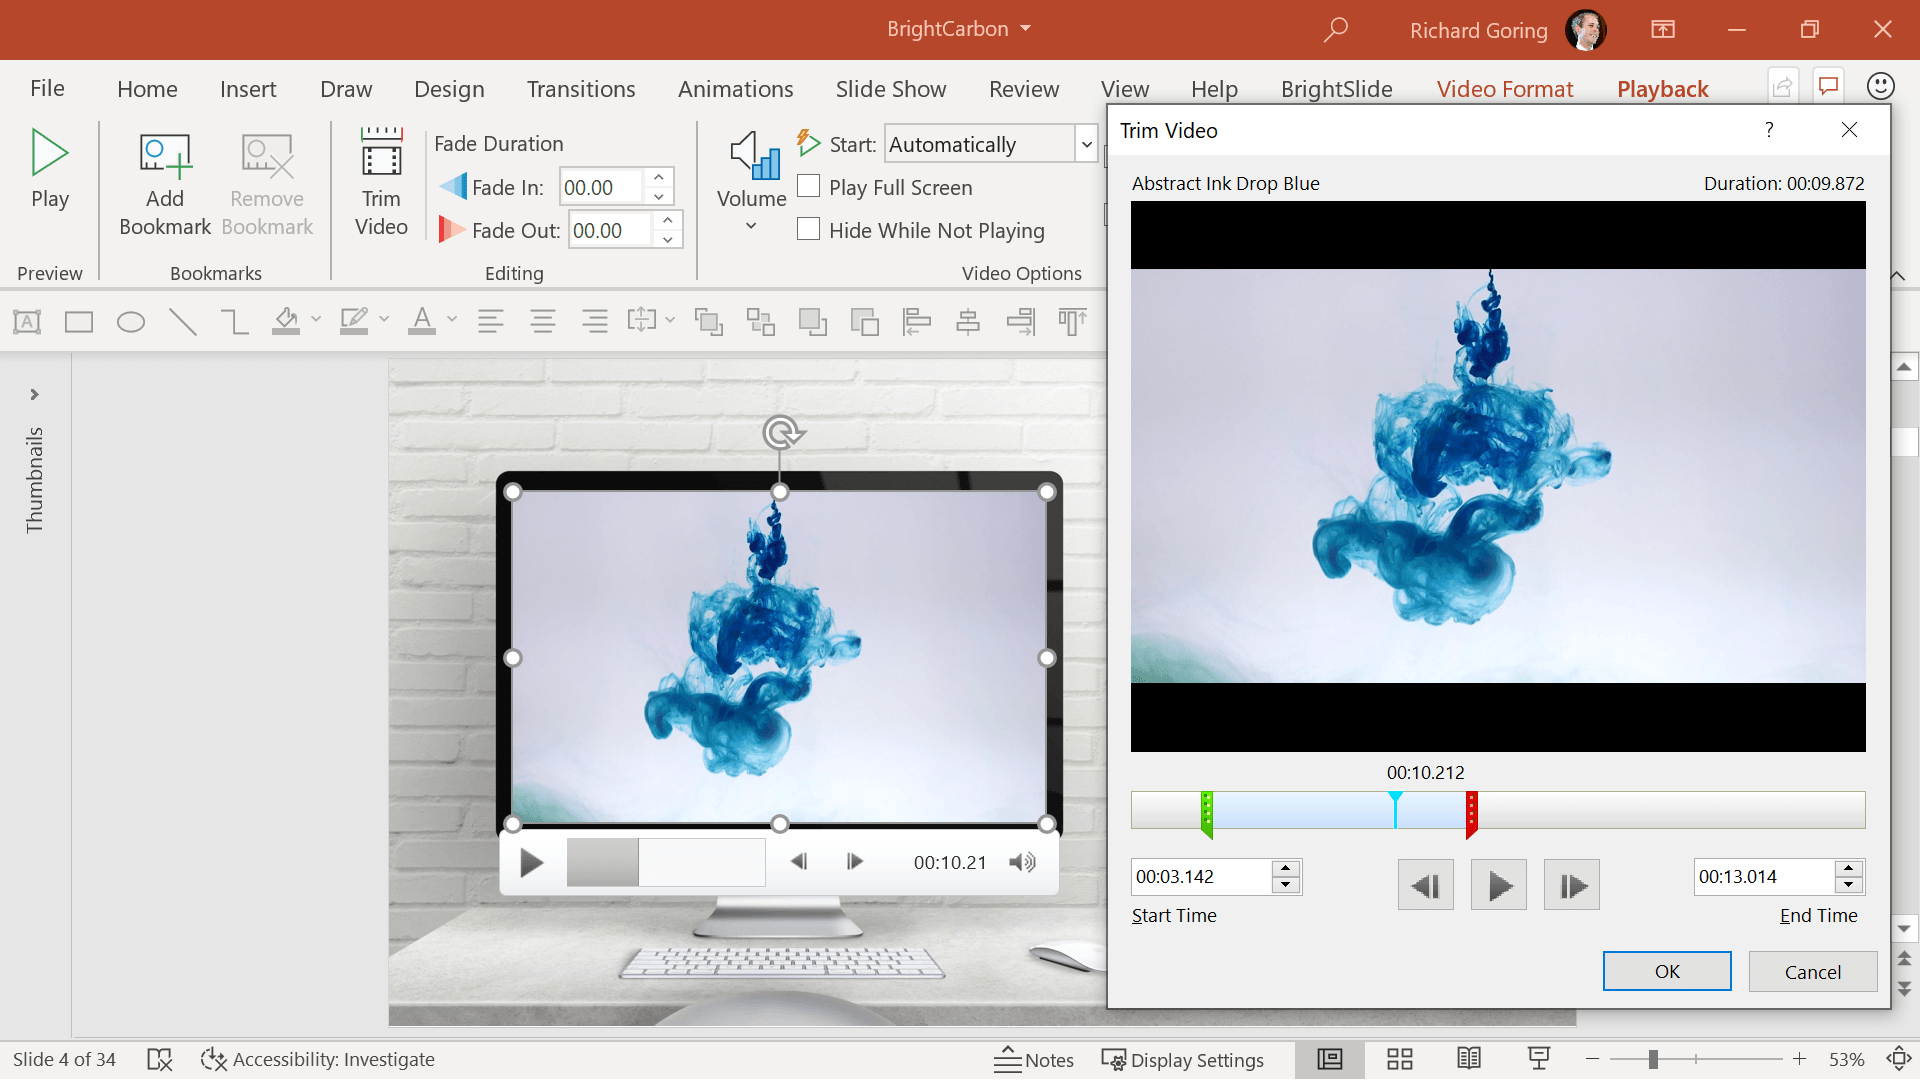
To avoid a trimmed video being too harsh, back on the Playback tab on the ribbon, you can also use the Fade In and Fade Out buttons to fade the video content in from black and out to black. Note that this is not the same as the video object fading into the slide from nothing. You’ll have a black video window that will reveal the video content. This works nicely for videos that are full screen, but for anything else, I’d use the regular PowerPoint entrance and exit animations on the video, as mentioned below.
Playing a video in PowerPoint is easy. There are several methods but using the PowerPoint animations options mentioned earlier in the introduction is probably best. This is also the best way to get PowerPoint to autoplay a video without you having to do anything.
If you’re looking for other options for how to play video in PowerPoint, you can move your mouse cursor over the video to bring up the player controls and click play at any point to play the video (in either edit or slide show modes), or you can just click on any part of the video and it will start to play, and then click again and it will pause.
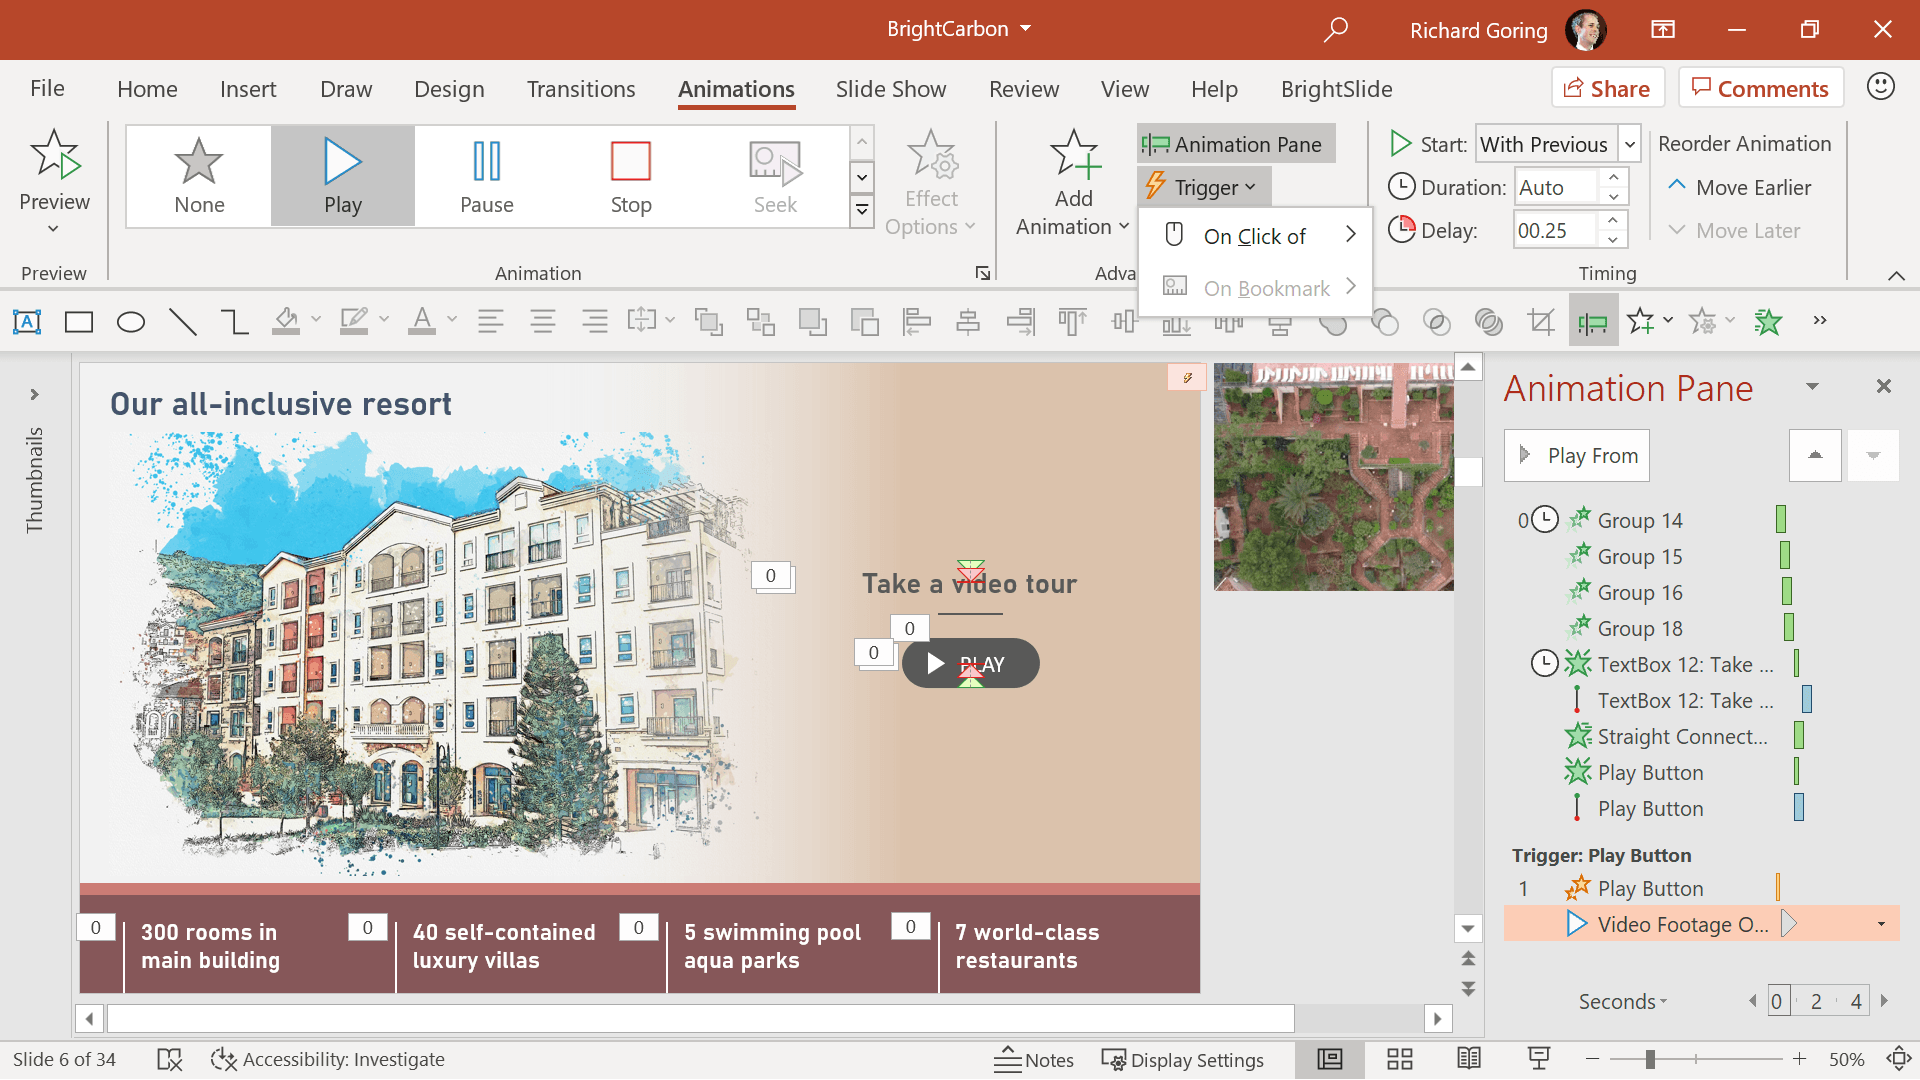
These things are actually controlled by a trigger animation, where clicking an object on the slide triggers the play animation to start. Anything can be a trigger for an animation to start, so it doesn’t need to be the video. You could have a nicely designed play button, for example, that you click to play the video. To create the trigger, select the Play animation in the Animation Pane, go to the Animation tab on the ribbon and choose Trigger on the right-hand side, then On Click of, and choose the object you want to be the trigger – for example the nice play button you’ve created.
And of course, that play button could trigger not only a play animation, but an entrance animation too, so the video appears on the slide and then starts to play. It doesn’t need to be on the screen to start with. You can also remove a video from the slide once it’s finished with an exit animation. This could be automatically after the video has finished playing, or again using a trigger animation and an object on the slide to ‘close’ the video or remove it.
And if you’re super keen, you don’t even need to click, but could instead use a mouse over Action to set the video playing. Select the video that you’d like to mouse over to play, go to the Insert tab on the ribbon and choose Action on the right. In the pop-up menu choose the Mouse Over tab, select Object action in the middle and then Play in the drop-down menu. Now, whenever you move your mouse over the video, it will play immediately.
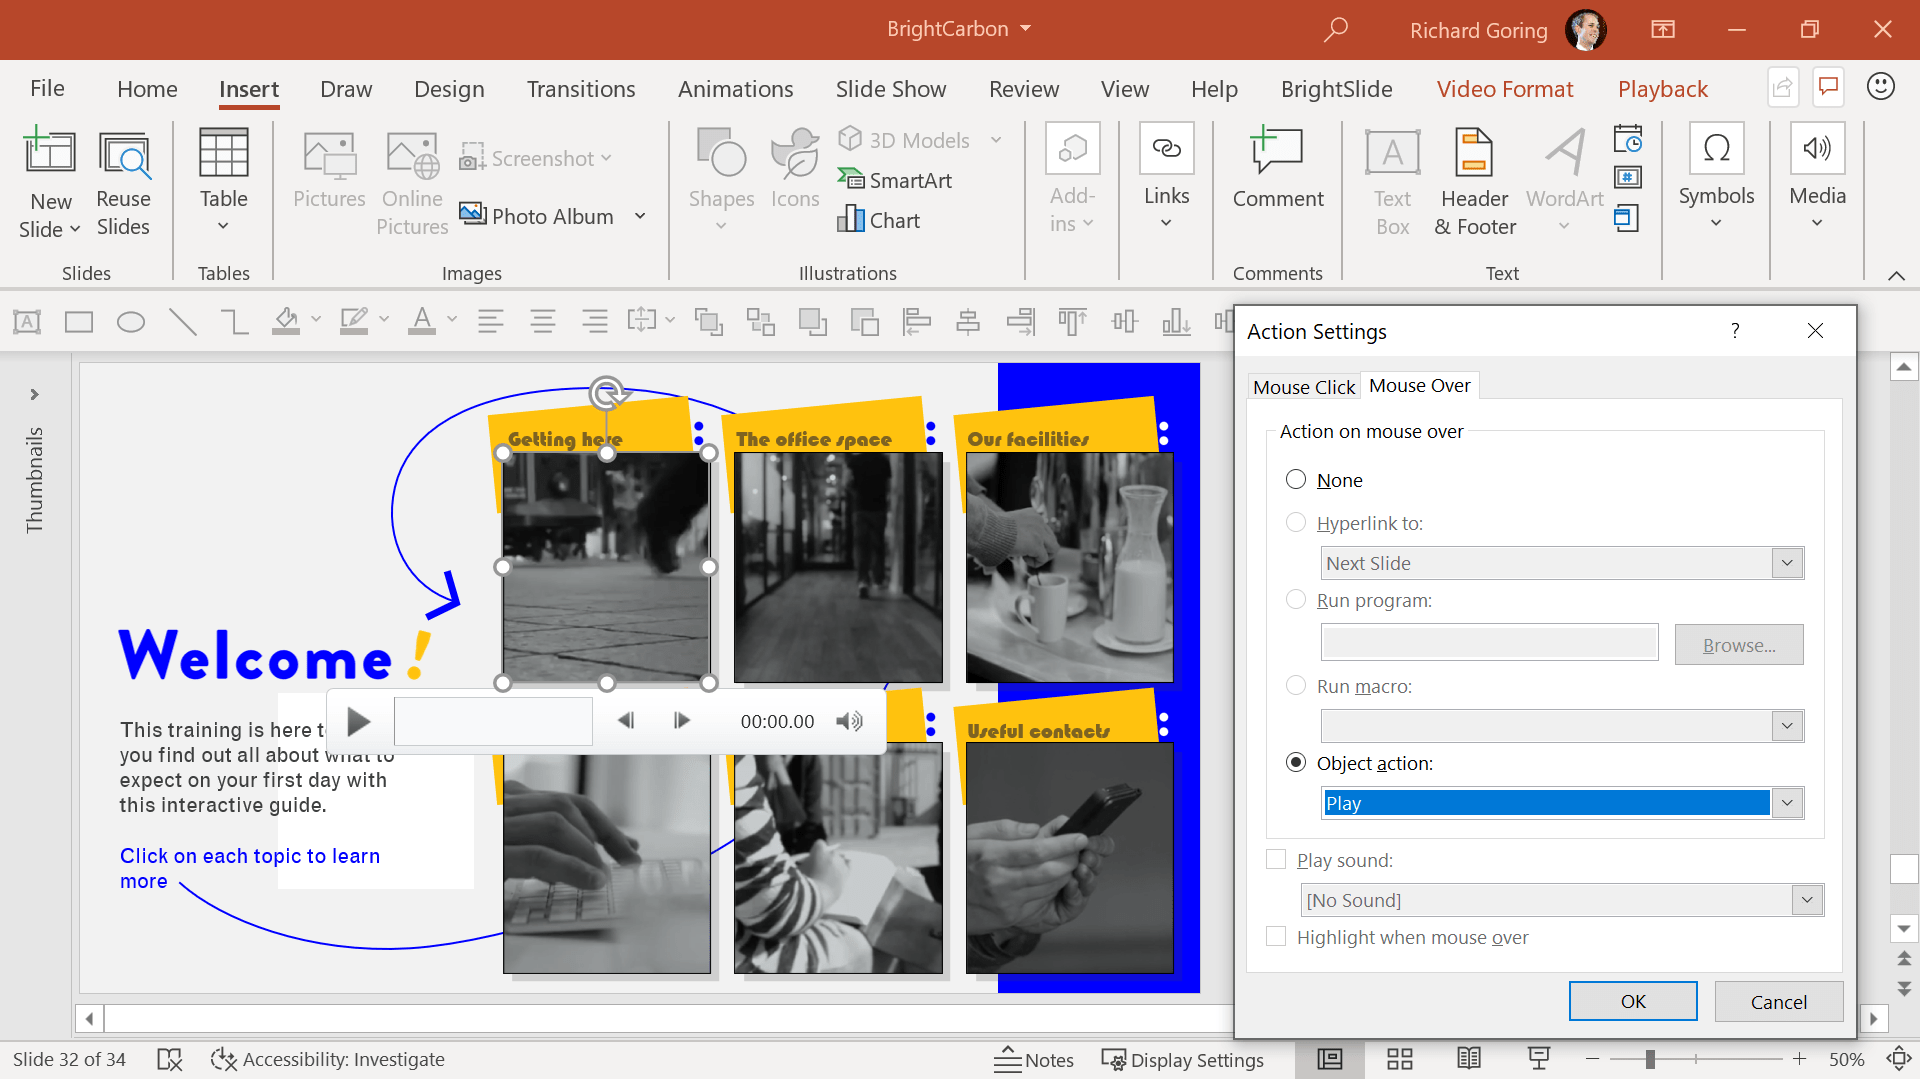
If you’re eagle-eyed, you’ll notice that in the Mouse Click tab in the Action Settings window, the Object action Play setting is toggled on, which is why the video actually plays when you click on it in slide show mode (but it still pauses because of the trigger animation). If you don’t want the video to play when you click on it, you can change this setting to None and then rely totally on the player controls or animations in the Animation Pane.
This might be useful to do if you have other active content on the slide, such as triggers or hyperlinks for other content. You don’t want someone accidentally clicking the video and it plays, when really you wanted to click on a link. Another option, which may be quicker, is simply to place a transparent, no fill box over the video, so you can’t accidentally click it. That box can act as a hyperlink, or you could create other shapes, or indeed other transparent, no fill boxes in specific areas that have hyperlinks or triggers to various elements. Doing this also means that the player controls don’t appear when you move your mouse over the video, which generally looks poor and can be quite irritating.
If you embed a video in PowerPoint but don’t want the player controls visible, you can hide them by going to the Slide Show tab on the ribbon and unchecking the Show Media Controls box in the middle. This means you’ll have to either ensure the Action setting is preserved, or that you’re using a play animation (either in the click sequence) or on a trigger to make the video play. You also won’t be able to skip around the video, unless you use video bookmarks.
PowerPoint allows you to add bookmarks to videos that help you to navigate to specific points quickly and easily. To add a bookmark, select the video and use the video scrub bar to select the point in the video that you’d like the bookmark. Once selected, go to the Playback tab on the ribbon, and then Add Bookmark on the left-hand side. You’ll now see a small circle in the scrub bar, which is the bookmark. You can add as many bookmarks as you like, and remove them using the Remove Bookmark button on the Playback tab.
You can now use those bookmarks to jump to a specific point in the video using the video scrub bar and clicking on them. Or, use the keyboard shortcuts Alt + Home to go back to the previous bookmark and Alt + End to go to the next bookmark. It’s also worth noting that the start and end of the video count as a bookmark with these shortcuts, you can go back to the start or straight to the end.
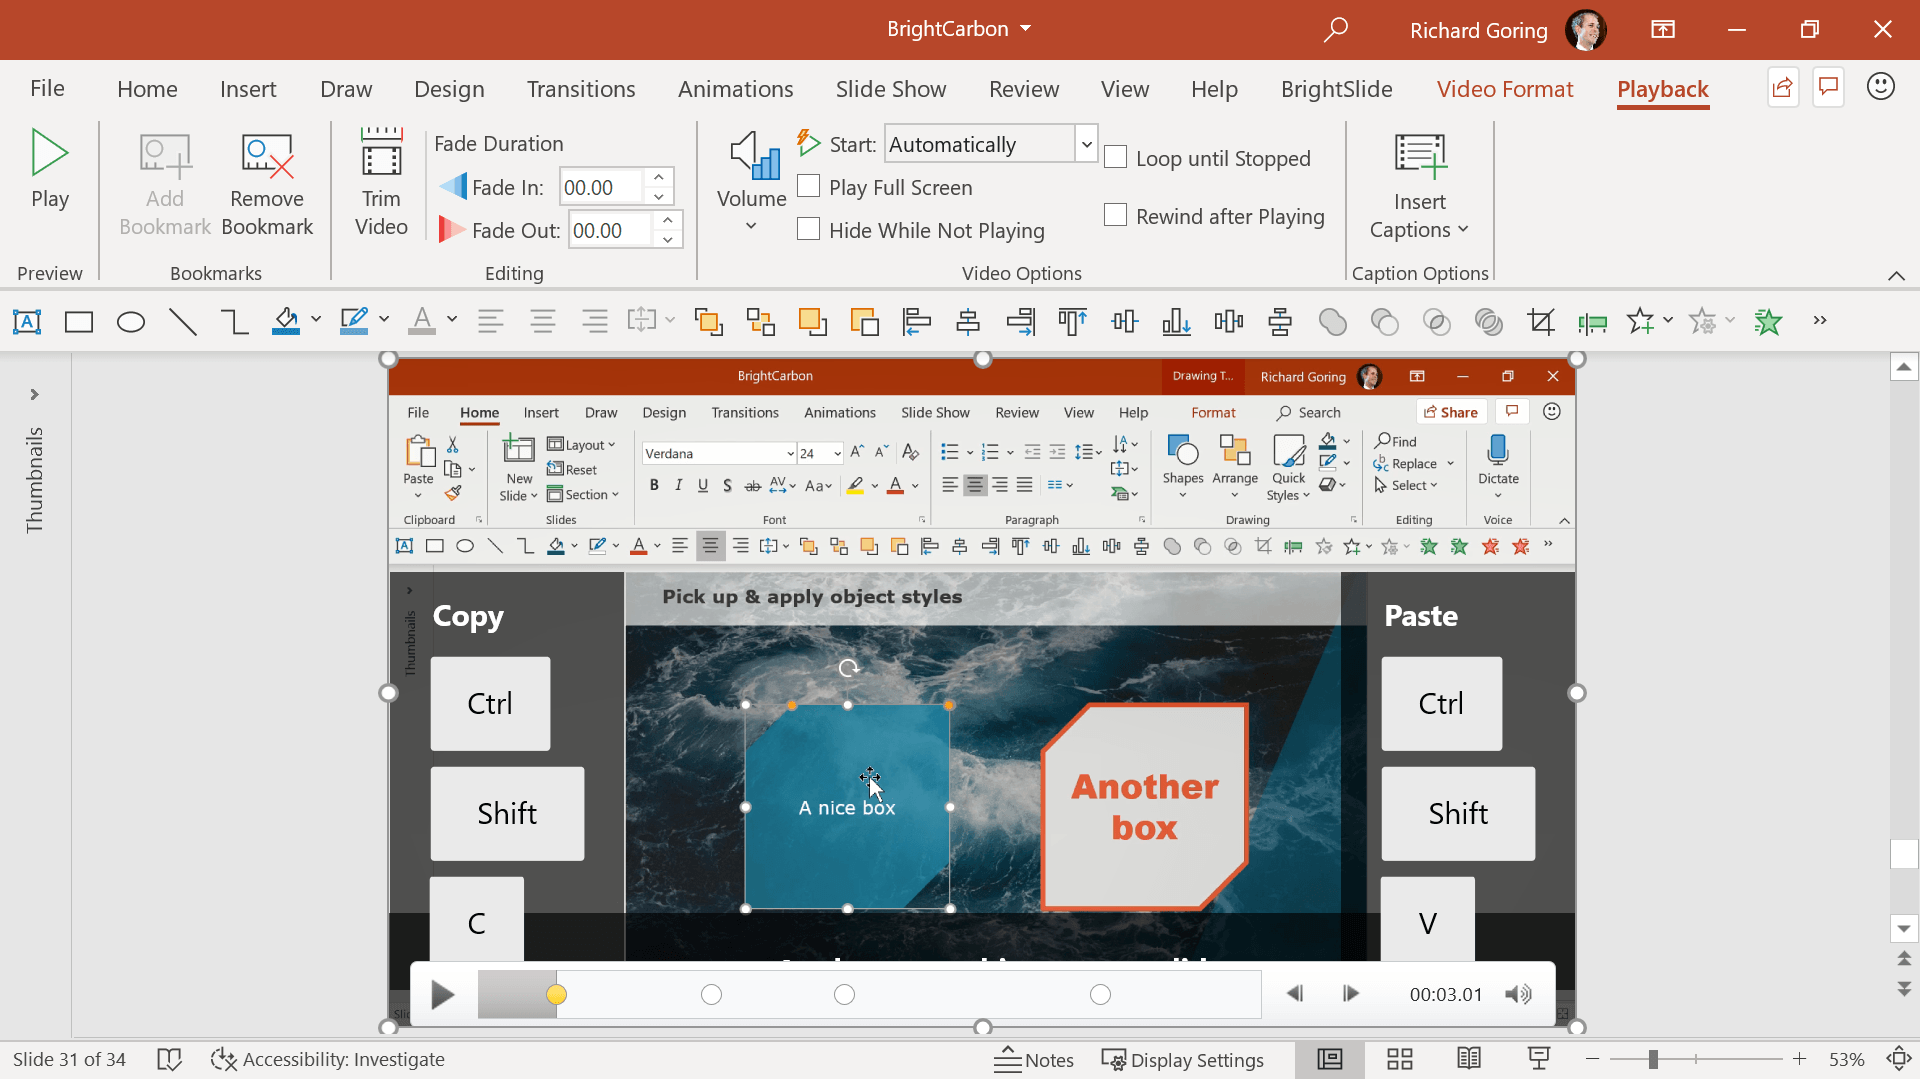
But what’s really neat is that you can use the bookmarks as a trigger for any other animation, so that when the video reaches a bookmark, an animation is triggered. One good use case for this is annotations on a video, so that a PowerPoint shape, text box, or any combination of elements appears over the video, or anywhere else on the slide when the video hits the right point. And then fades out later on at another point in the video. Say you’ve got a video tutorial on using PowerPoint and want to show the keyboard shortcuts you mention. You can create pictures or shapes of the keys, group them, and add an entrance animation using the Add Animation button on the Animation tab in the ribbon. Then click the Trigger button and choose On Bookmark, where you can choose the appropriate bookmark in the video. Using this technique, you can have elements come in, change, or disappear, all timed to the video. And if you jump around the video, then the objects will animate at the same point in the video every time.
It’s worth noting that the order you add the animations can be important. For example, if you have an object with both an entrance and an exit effect, each triggered by different bookmarks, it’s the order of the animations, top to bottom, in the Animation Pane that matters. So, if you add the trigger to the exit animation first, it will appear first in the list, even if it’s on Bookmark 2. Then adding an entrance animation to the same object, it will appear second in the list, even if it’s on Bookmark 1. That means PowerPoint sees the first animation in the list as being an exit animation, so the object will appear on the slide from the start. When you get to Bookmark 1 in the video, it will trigger the entrance animation, so the object will flash off the slide and then come back in. It’s a pain, as it means editing animations triggered by video bookmarks is awkward, but as long as you plan things out beforehand, you should be fine. Just animate and trigger objects in the order you want them to appear.
When you embed a video in PowerPoint, you can save that video from PowerPoint by right-clicking on it and choosing Save As Media to extract video from PowerPoint as a separate video file, saved somewhere on your computer. If you want to extract all the video files in a PowerPoint deck you can do this with the free BrightSlide add-in using the Export function in the File & Master section, and choose Export Media Files.
![]()
![]()
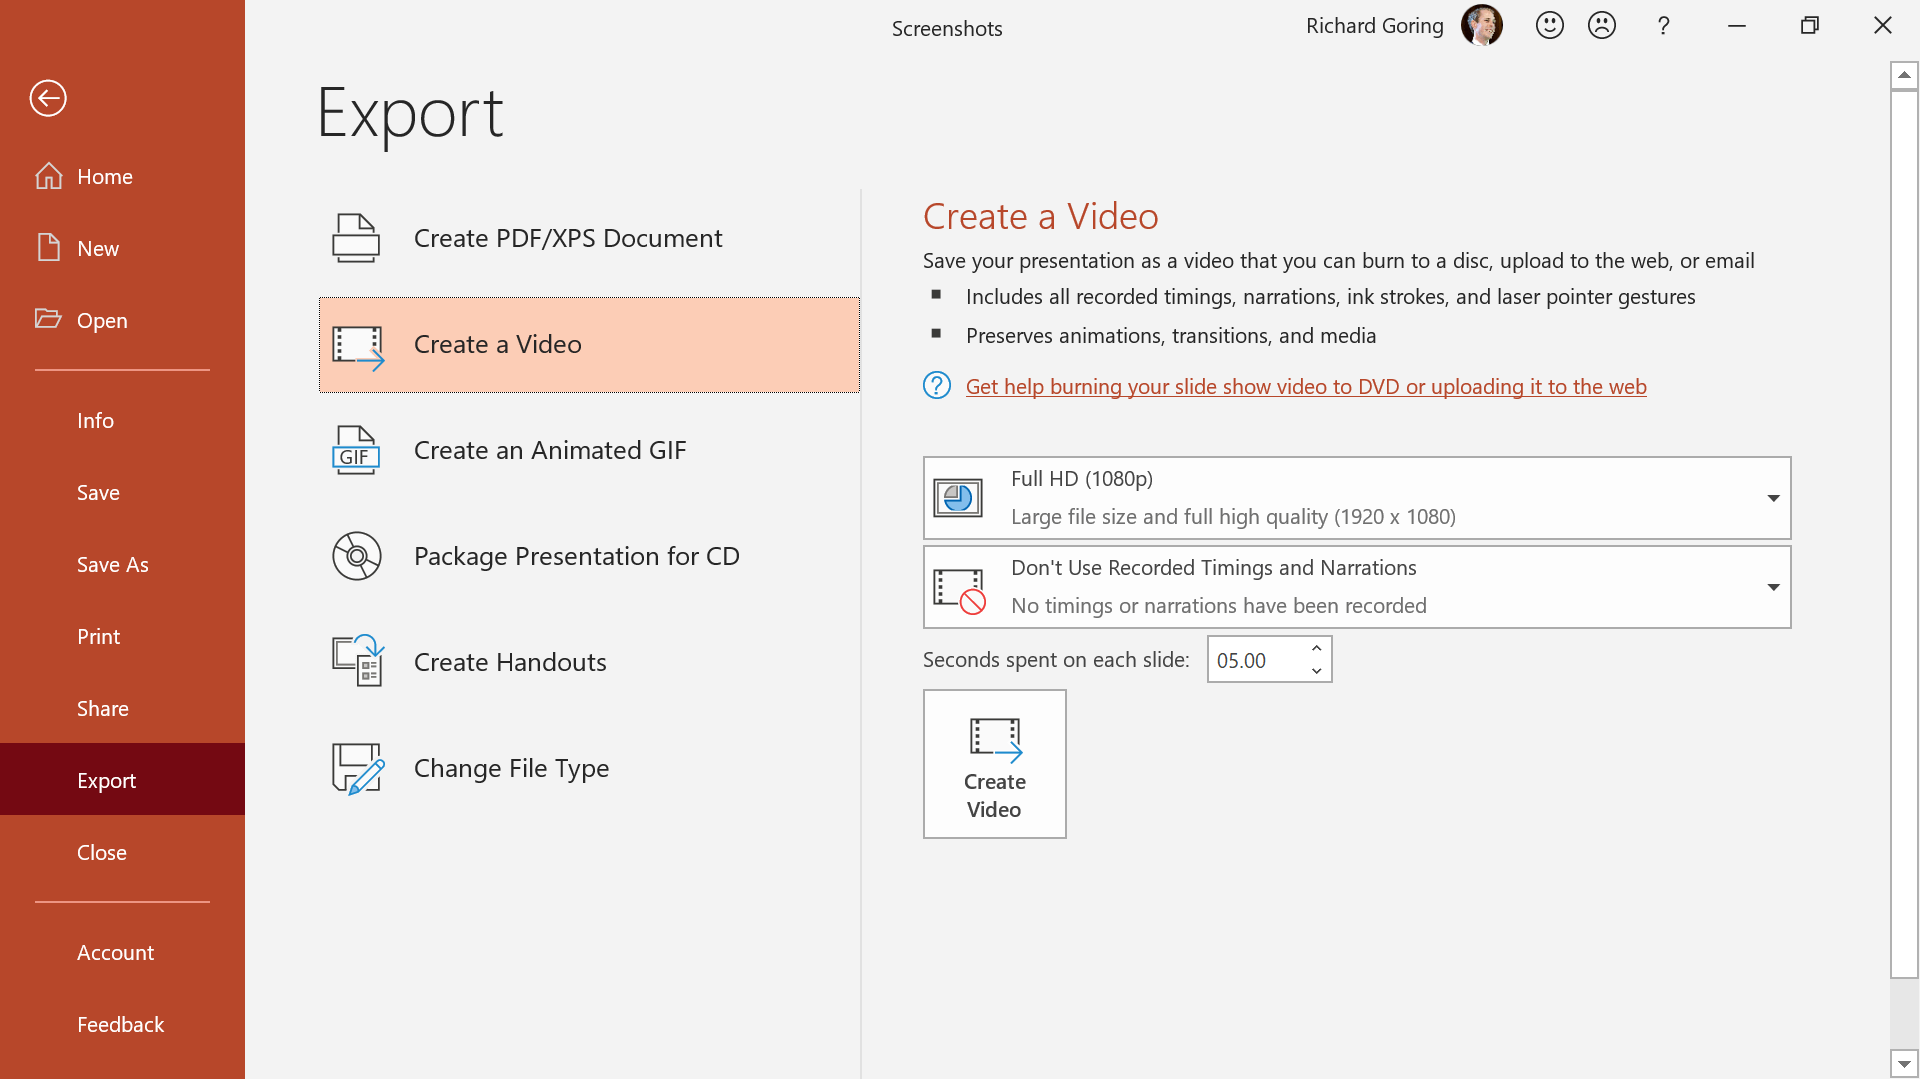
Sadly, when you extract video from PowerPoint any formatting, cropping, or trimming you’ve applied won’t be saved (although you can save the trimming by compressing media which you can find out about here). You’re simply extracting the base video that you embedded in PowerPoint originally, but that may be precisely what you want. If not, one way to get hold of the edited video is to save the slide (or whole PowerPoint file) as a video. Go to the File tab on the ribbon and choose Export half-way down the left-hand menu. Then choose Create a Video on the menu, choose your resolution, and whether you want to use any narration you’ve added to the deck. The entire presentation will then be saved as an MP4 video file. If you only want one slide exported as a video – the slide with your edited video on it – then hide all the other slides in the deck. Then PowerPoint will export one slide to video. You can then un-hide the slides again. To hide a slide in PowerPoint, select the slide (or slides) in the thumbnails on the left, right click and choose Hide Slide from the pop-up menu. This acts as a toggle switch, so if a slide is already hidden, you can unhide the slide by doing the same thing.
And with all of these techniques, you’re now ready to start to create some really engaging interactive video content. My colleague Mikila has some neat suggestions on how to effectively use interactive videos in eLearning which may inspire you further.
Leave a commentWithout a proper PowerPoint template, presentations can be a bit of a mess. Here are the building blocks for developing a PowerPoint template that works!
By applying some key principles of presentation design, you can make your PowerPoint design really standout and deliver both a more ‘popping’, but also more effective presentation.
Most presentations are a cascade of text-heavy Death-by-PowerPoint slides. Online learners suffer the torture of brochures converted to click-through-eLearning. Most people now recognize that using visuals is the way to go. But how do you make visual presentations and eLearning that work? We think there are six steps you need to follow.
Join the BrightCarbon mailing list for monthly invites and resources
Tell me more!Thank you so much for conducting our advanced PowerPoint training workshop. We will definitely use BrightCarbon in the future – we really think that we would be hard pressed to find anywhere better!
Emma Pring Iona Capital


thank you for this informations
I have a challenge for you, Sir. How to embed a video which has transparent background (.mov) on power point.
That’s really great. It’s always fun to pick up new PowerPoint tricks – and I’ve been using this software since PPT 97
I always learn so much from BrightCarbon#s masterclass – great & awesome!