You spend hours, if not days, or even months creating your presentation content and then get asked for a copy. It’s your baby (and your intellectual property) so why should you just give it away? Well, you don’t need to, not without protecting it first. Let me guide you through some of the steps you can take to keep your content secure including restricting UI, locking objects and password protecting your PowerPoint files.
Why do it at all?
For most of us making our way in the presentation world, we interact with honest folk. People asking for your content are usually doing so because they have a genuine interest in what you’re presenting. But every once in a while, you come across someone who thinks that everything should be free; they don’t value your intellectual property, and might even upload it to a file sharing site or resell it! Copyright is a complex business, so instead of attempting to explain it to people who might be sharing your content – either maliciously or unknowingly – you can instead put hurdles in their way to limit the possibility of it happening.
There are lots of options. Some won’t be suitable for the type of slides you create, and others might need a little explaining to the consumers of your presentations. But, there’s nearly always one that will work for you.
Whenever you’re trying to secure something, whether it’s access to your car, email, bank account or a PowerPoint file, there are sometimes ways to circumvent the security mechanism. I’ll point out any backdoors for each option and a summary comparison of them all at the end so you can make the choice that’s right for you.
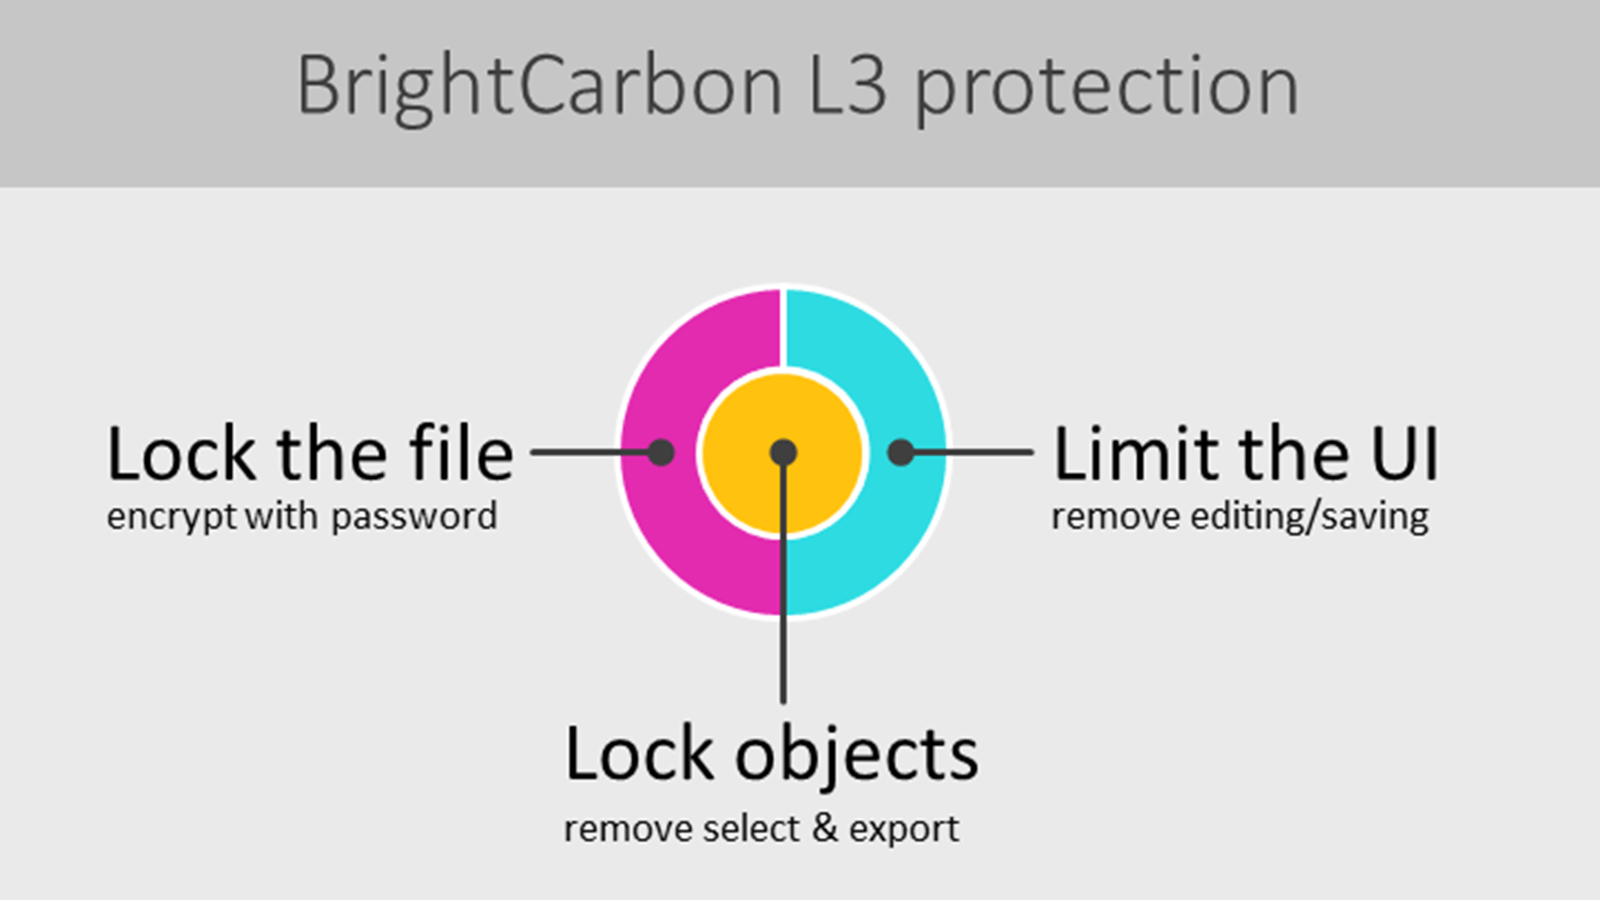
To prevent somebody ripping off your prized presentation or eLearning deck, we recommend a three-pronged approach. Using a combination of these different techniques, you can create an impenetrable fortress around your content.
This article explains exactly how and why to use this approach, and explores other file protection options.
Making your file read-only
Your first option is to provide your PowerPoint file to the nice people admiring your latest creative genius as a read-only file. This will allow them to open the PowerPoint file without a password, view the contents and run it as a slide show. It prevents them from editing or extracting the content. The options to make your content secure include:
Using the newer Protect Presentation feature
Converting the file to a PDF
Saving with the older Password to Modify feature
Converting to HTML5
Let’s take a look at each in turn.
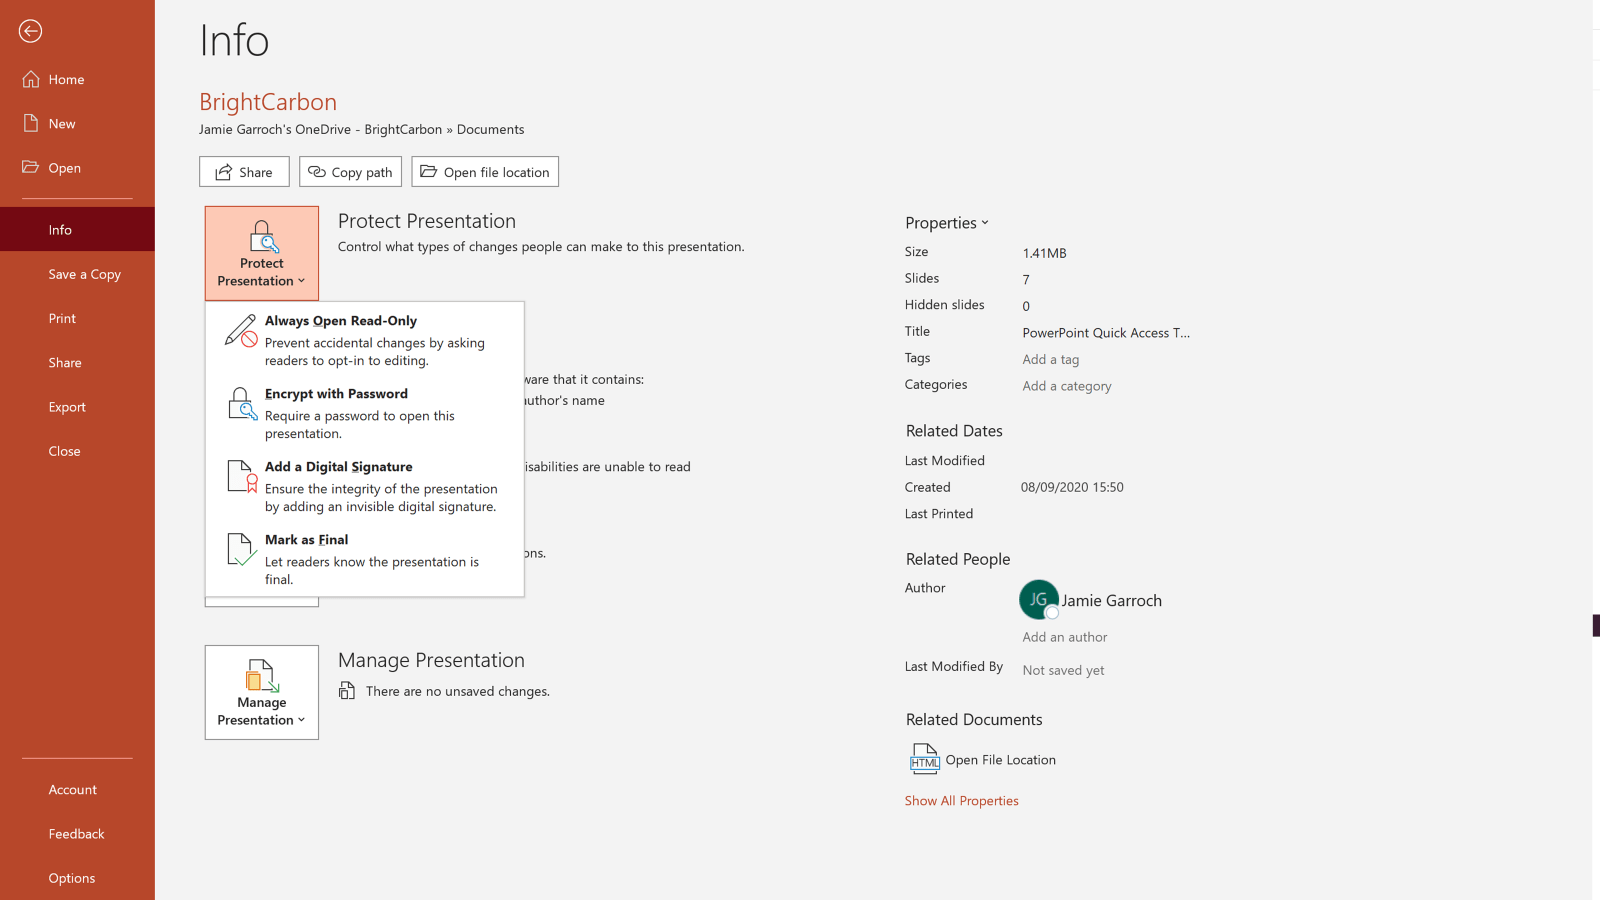
Protect Presentation
When you click the File button in the ribbon followed by the Info tab, you can view four ways to protect your file:
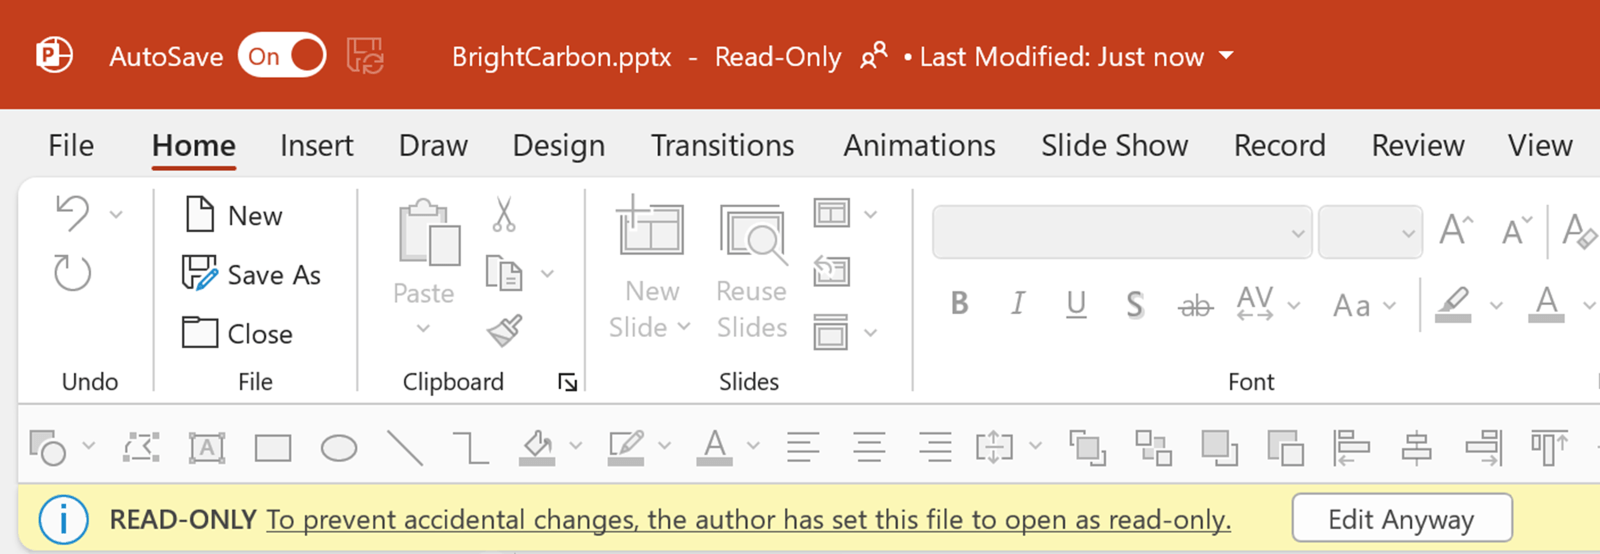
The first choice, Always Open Read Only, is a very low hurdle for your users to jump over. When set, the following message bar is shown each time the file is opened:
It’s not going to deter anyone who wants to steal your content, but it is a good way to make people think before making changes.
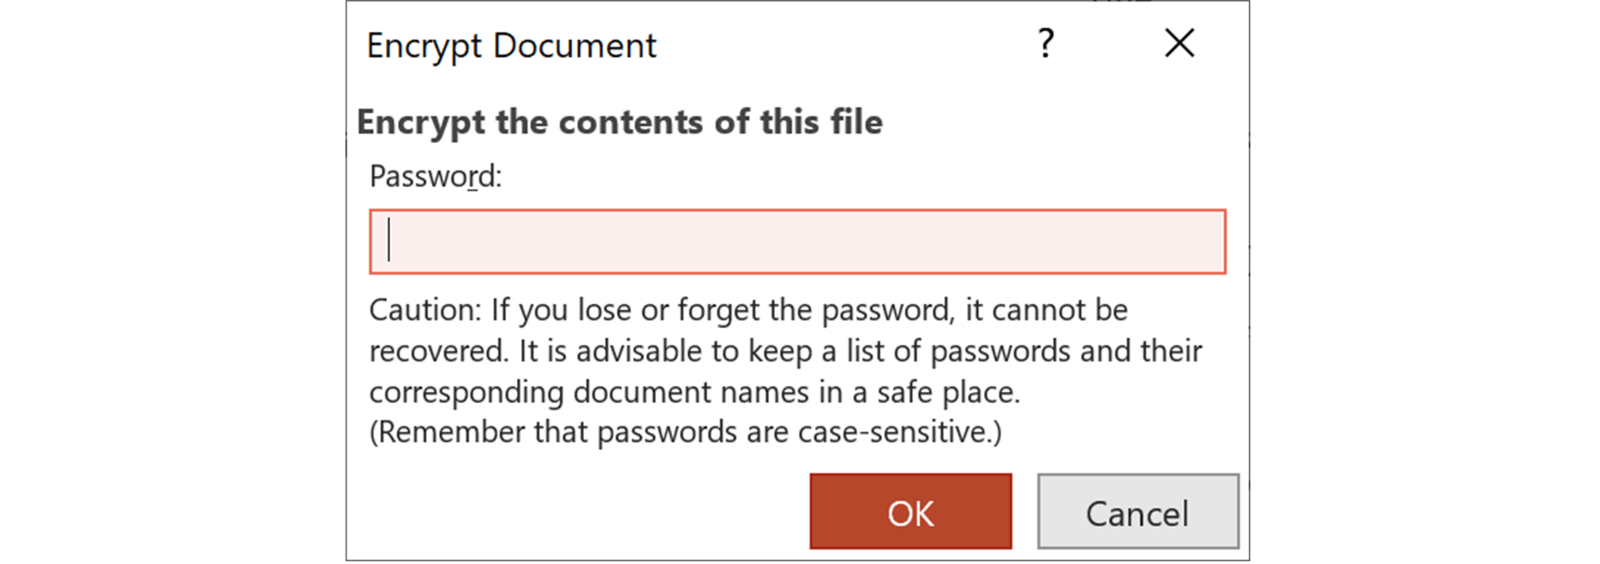
Option two, Encrypt with Password, allows your to password protect your PowerPoint file. It’s useful to prevent unauthorised access to your content. Choose this option and you’re prompted to enter a password in a dangerous-looking dialog box:
Now when the PowerPoint file is opened you must enter a password to fully access it. This is similar to the read-only password discussed later in this post but uses strong encryption on the contents of the file so that even the unzip hack, also discussed later, can’t be used to gain access to the content. The biggest drawback of the feature is that it’s only a read/open protection mechanism. There is no equivalent edit/copy/write mechanism, meaning that once the user is in the file, they can make any changes they like.
The third and fourth choices don’t help you protect your file as such. Option three, Add a Digital Signature, provides your users with a guarantee that the content you sent has arrived unaltered. Certificates installed on your system can be used to sign the file. And on opening the file, the signature status is also displayed in the message bar:
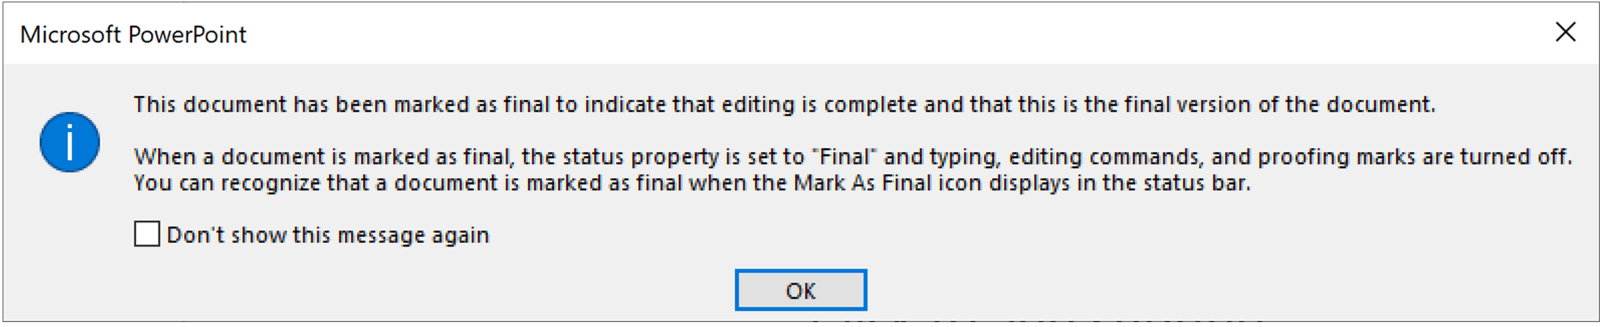
Finally, the last of these four options, Mark as Final, does just that. It saves the presentation with a marker:
Again, neither of these methods add any real protection to your content.
Converting to PDF
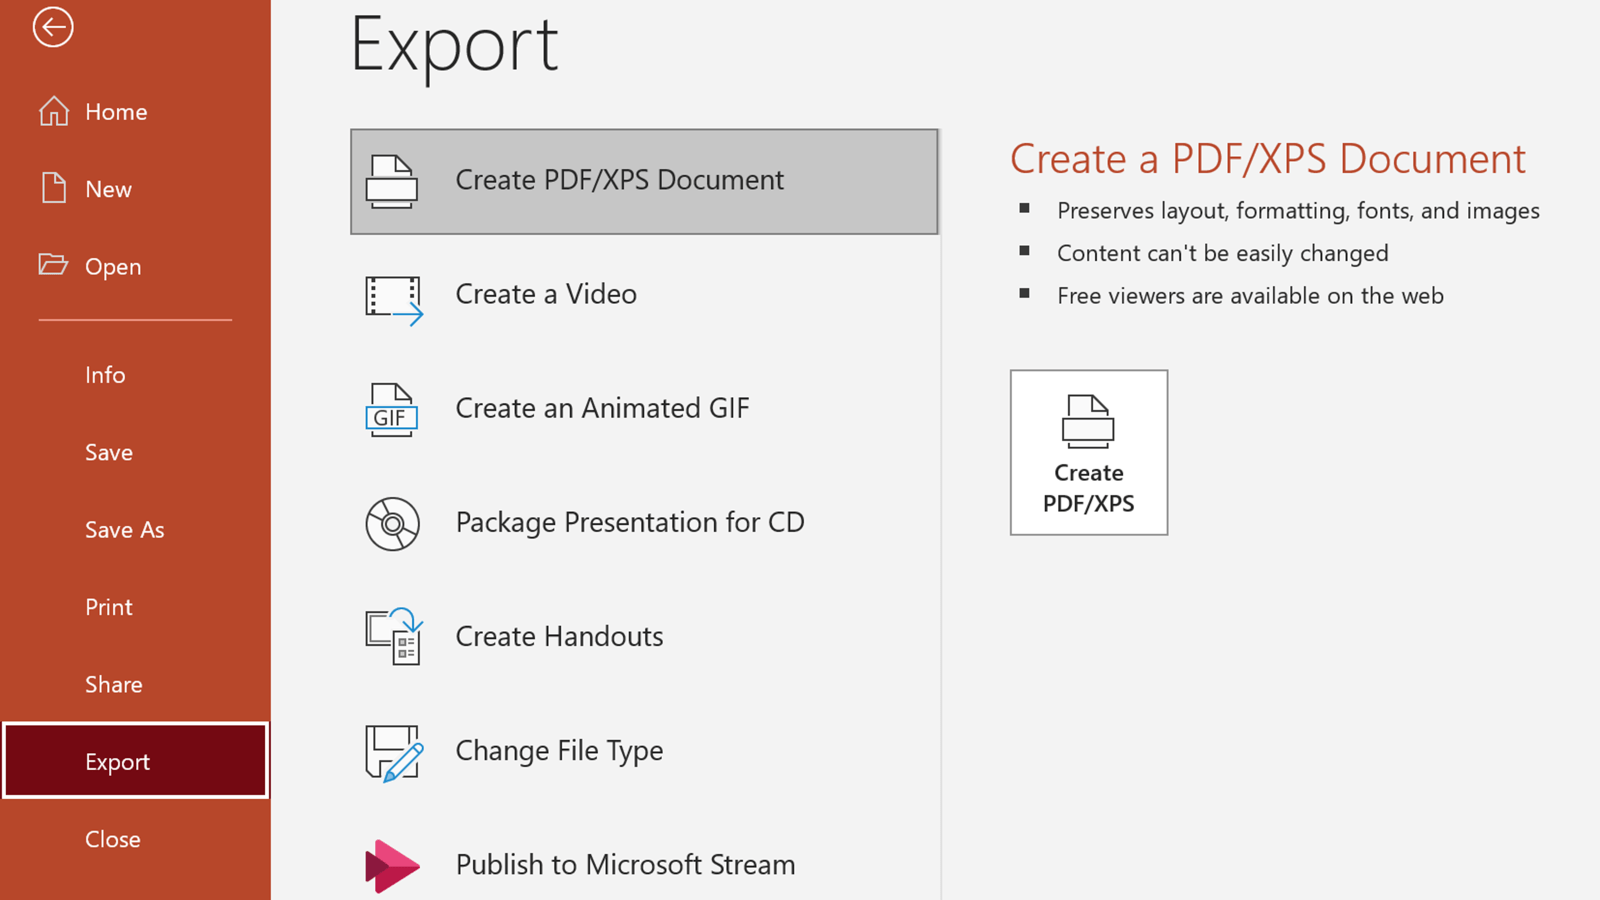
In the distant dawn of time, you used to have to buy a PDF conversion application. That’s long behind you now as the Office suite of apps have PDF conversion built-in. Click the File button in the ribbon to open the backstage view and then click the Export tab and select the first option.
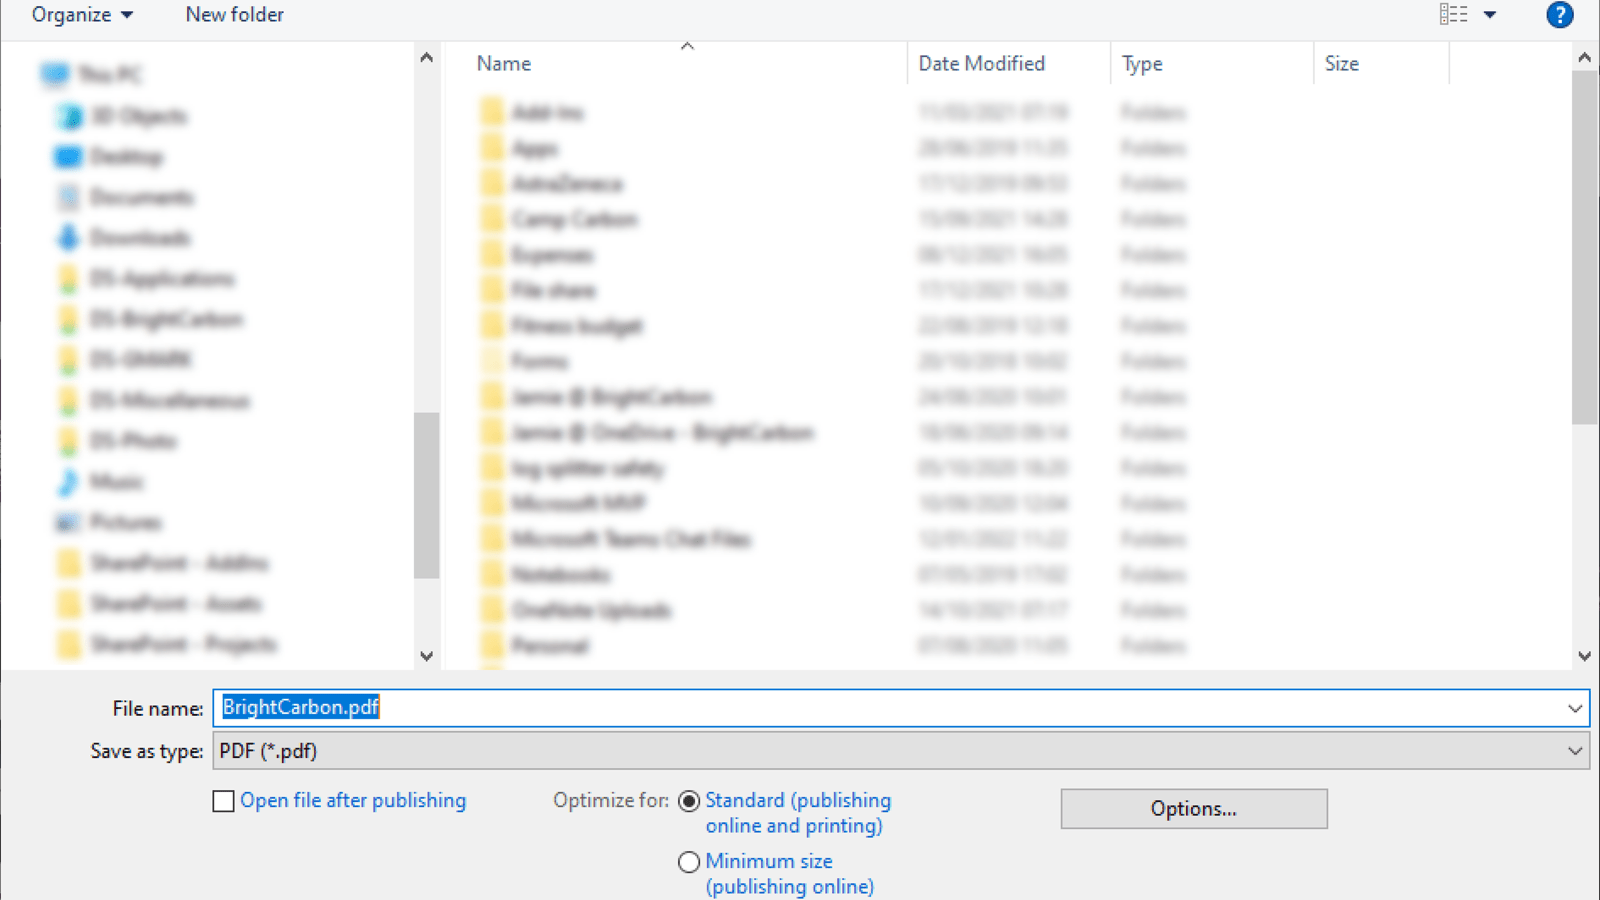
When you click the Create PDF/XPS button, a window will open where you can choose the location to save your PDF:
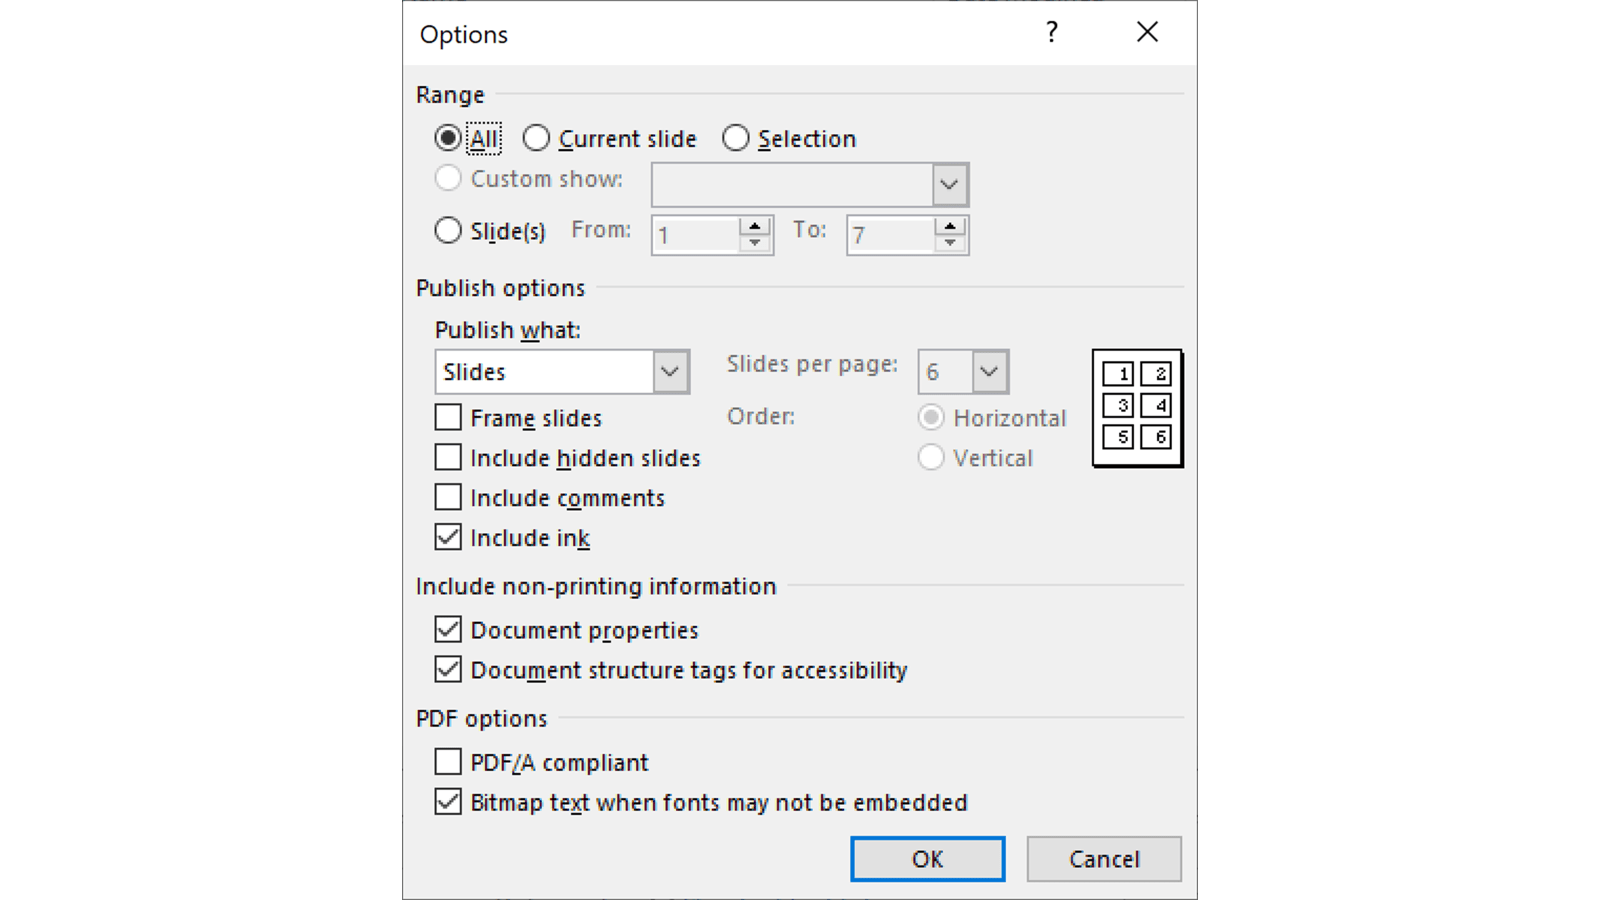
You can also click the Options… button to configure various aspects of the conversion:
So, are there any disadvantages of distributing your content this way? Yes. Lots! This method is only really of any use if you’re distributing a static document created using PowerPoint. Many presentations include slide transitions, build animations and multimedia content (click the links to find out how!). All of this is lost during the conversion to PDF. However, if you’re just converting a report for example, then this method could work for you.
How to password protect PowerPoint files
You can add two types of passwords to protect PowerPoint files; one prevents reading and the other prevents modifying or writing to the file. For the majority of cases, you’ll probably want to use the second one.
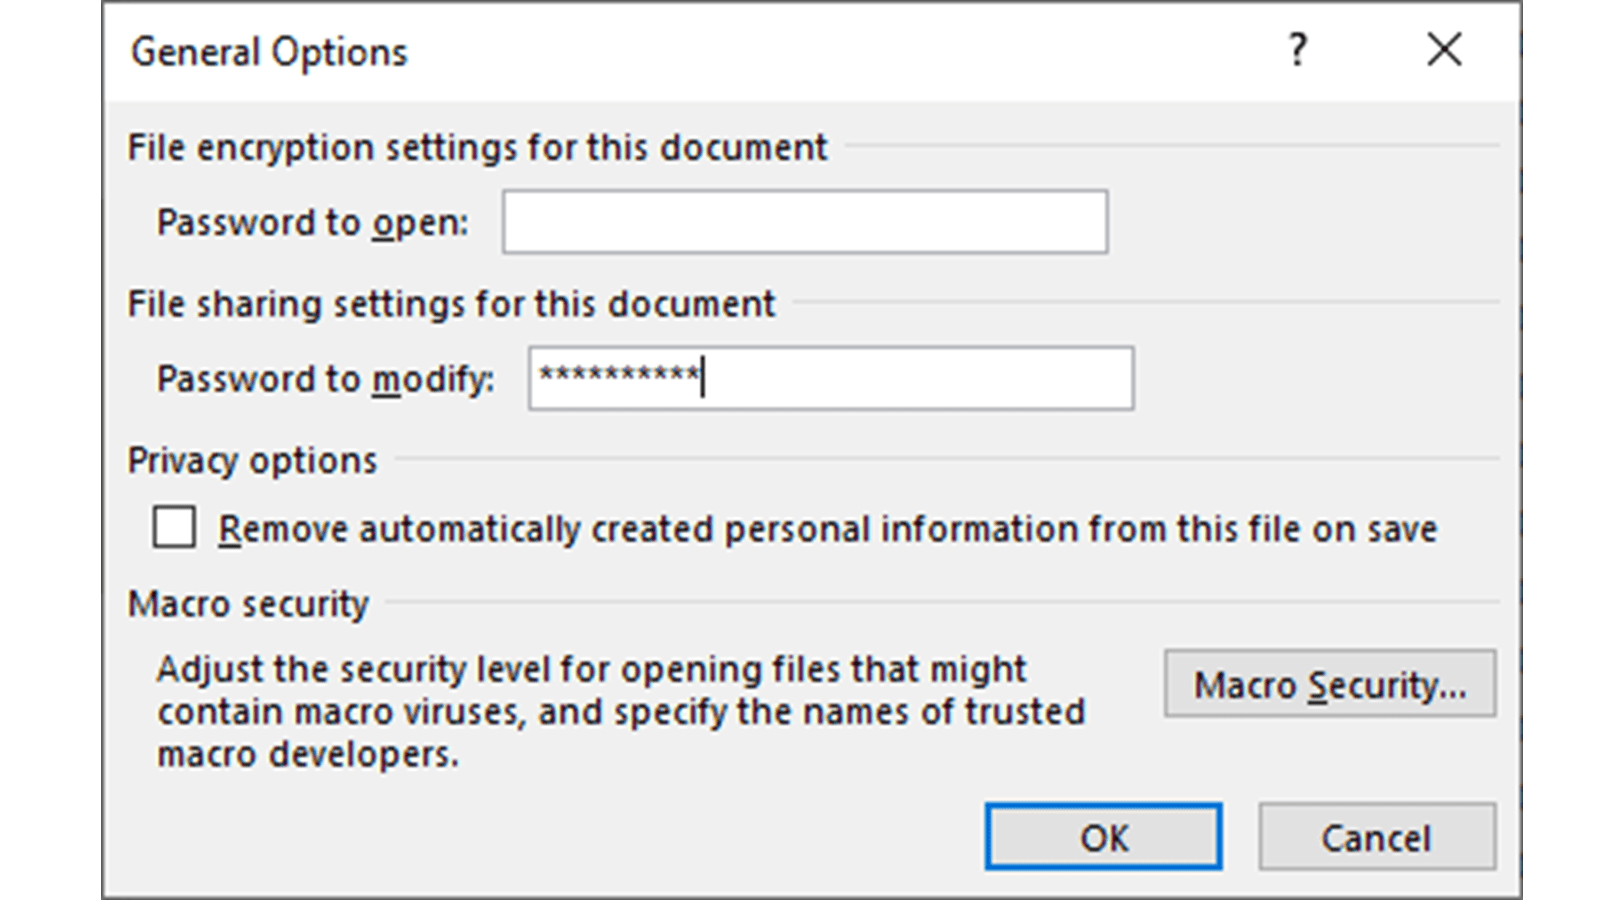
Simply hit Shift+Ctrl+S on your Windows keyboard or click File then Save As and then Browse and you’ll see a File Explorer window open on Windows or Finder for macOS. From here, click the Tools dropdown where you’ll find the militarily named General Options.
In the window that opens, enter your Password to modify:
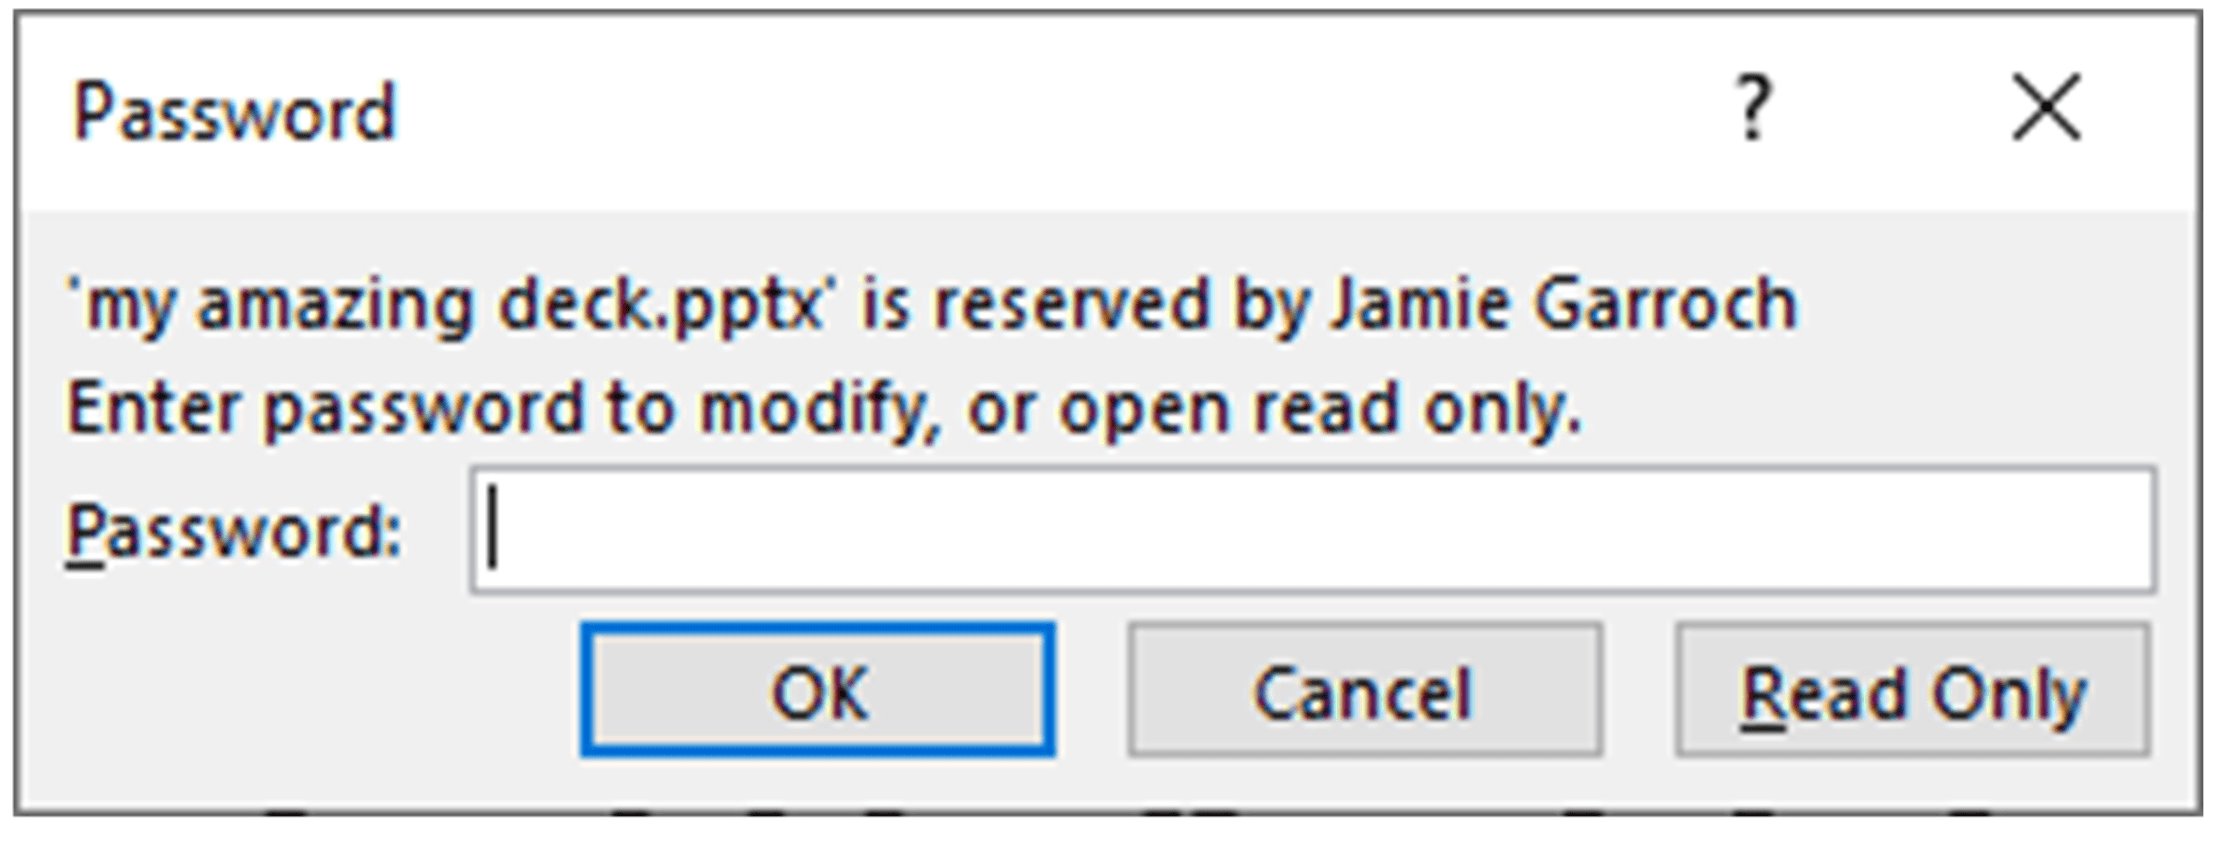
When you click OK you’ll be prompted to re-enter it. And this next bit is really important. Make a note of your password. If you forget it, there’s no way to get back into your file to edit it. Period. Now when a recipient of your PowerPoint file opens it, the first thing they will see is this message:
This is a terrible bit of user interface design because it looks like you need a password to access the PowerPoint file, when in reality, you can click the Read Only button. This is the only real disadvantage of this method of password protecting PowerPoint files because you now need to educate your users. Once the file is opened, all the features are available apart from the ability to edit or copy the content or save it as a new file without a password.
Converting to HTML5
If you’re an eLearning creator, you’ll probably be familiar with iSpring. They are one of the top providers of LMS creation software and content hosting solutions. The iSpring Converter add-in for PowerPoint is a super-easy set of tools enabling you to convert your presentation to HTML5 which can then be hosted on a web platform of your choice. You can read our in-depth review of the iSpring Suite here.
The advantages of delivering your content this way include:
maintaining transitions animations and interactivity
preventing embedded content from being extracted
no backdoors for users to edit or copy your content
Disadvantages are hard to find but if pushed, you might consider the following:
it needs to be hosted somewhere online
a decent Internet connection is required to play your content
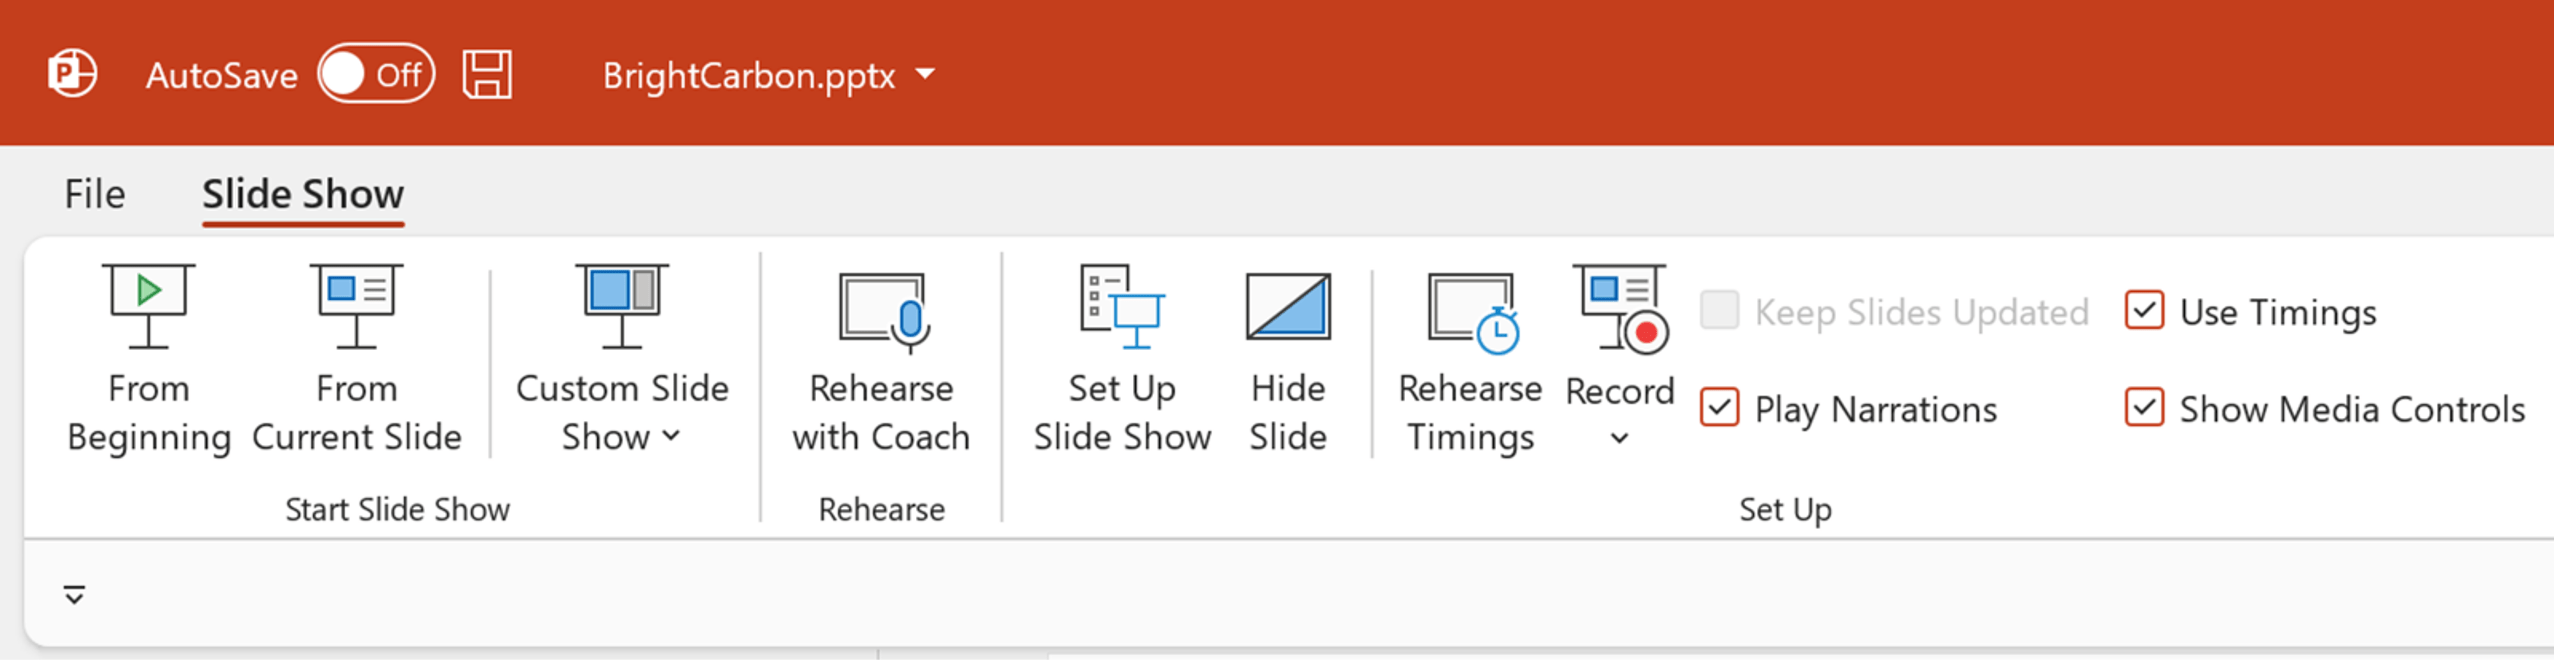
Saving as a slide show
A really simple hurdle you can create to thwart any thieves is to save your PowerPoint pptx file as a slide show in the pptx format. Your content remains exactly as designed, but this format simply instructs PowerPoint to run it as a slide show when a user double-clicks the file in File Explorer or Finder. When the slide show ends, the file is closed so the user never sees the PowerPoint user interface and hence can’t edit it. But, there is a major backdoor left wide open when using this technique. If you open the file from within PowerPoint, then it’s fully available to be modified, edited and even saved in other PowerPoint formats such as a pptx presentation file.
It’s possible to combine this method with the modify password above to provide additional security for your content.
Hosting in the cloud
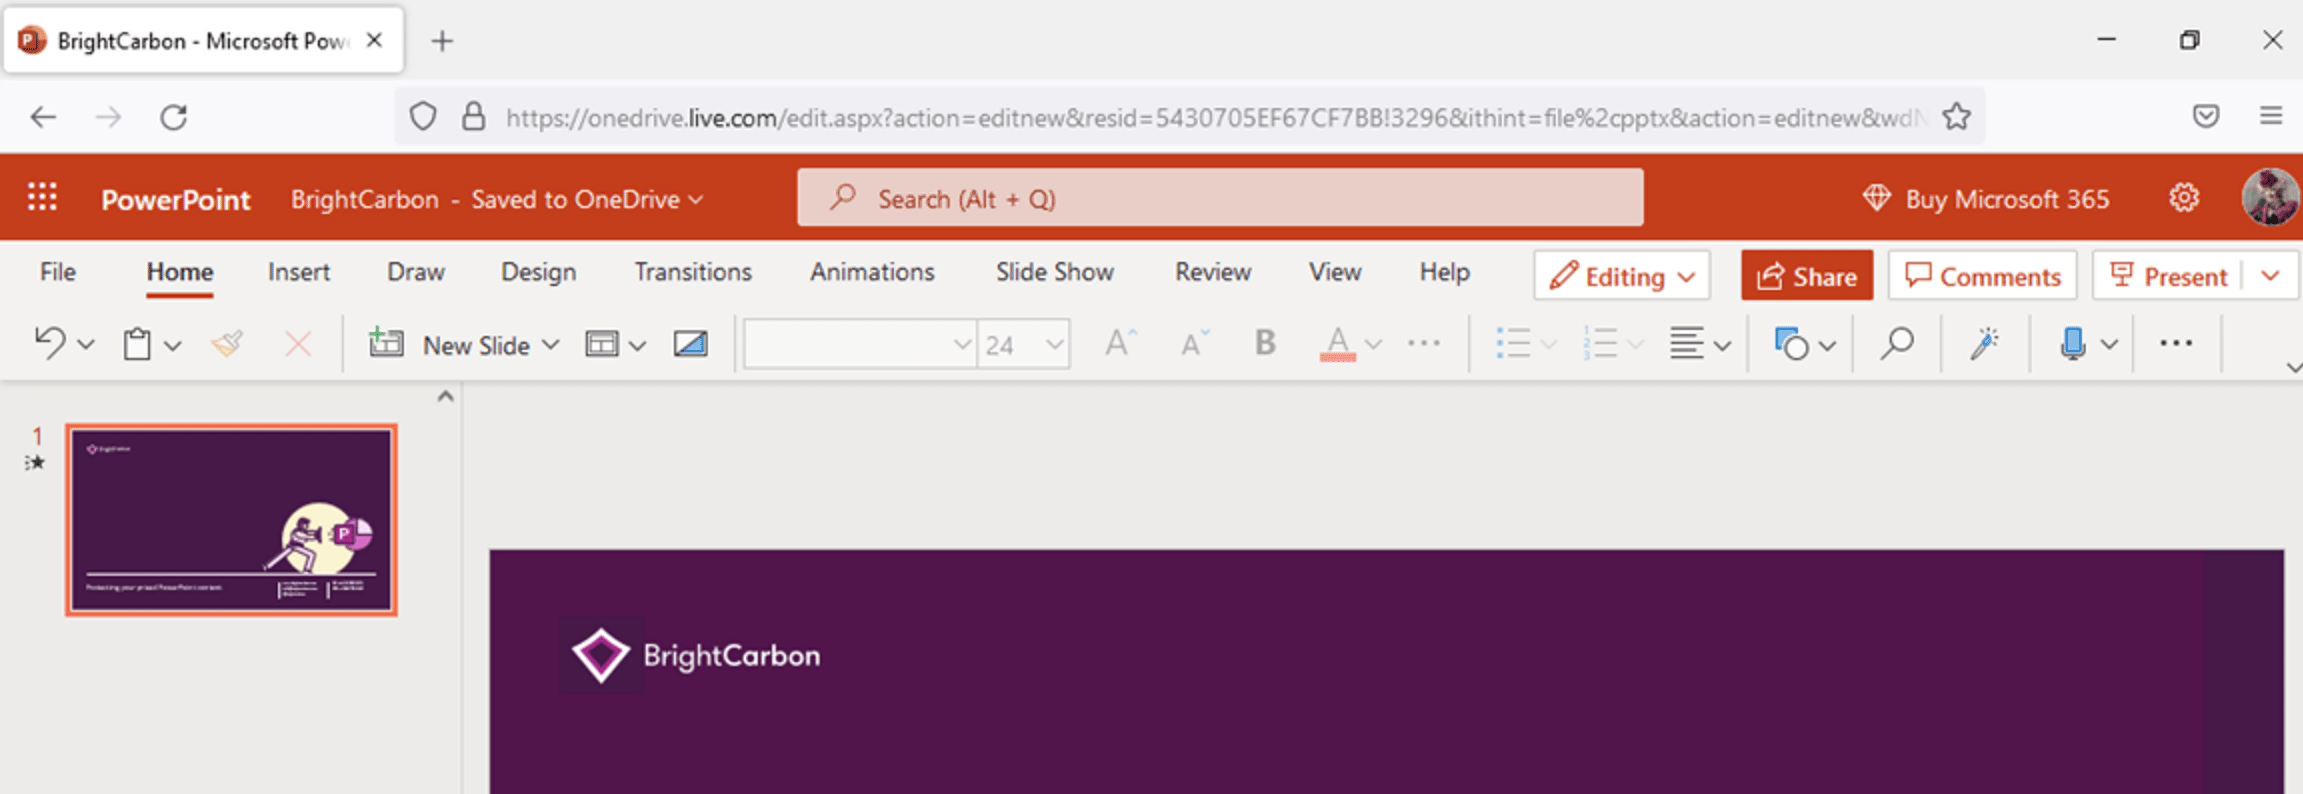
As Microsoft continues to move Office users to their Microsoft 365 subscription model, you have access to either personal or enterprise storage via the OneDrive integration. Once you save a presentation to OneDrive, it can then be opened by PowerPoint Online in a web browser:
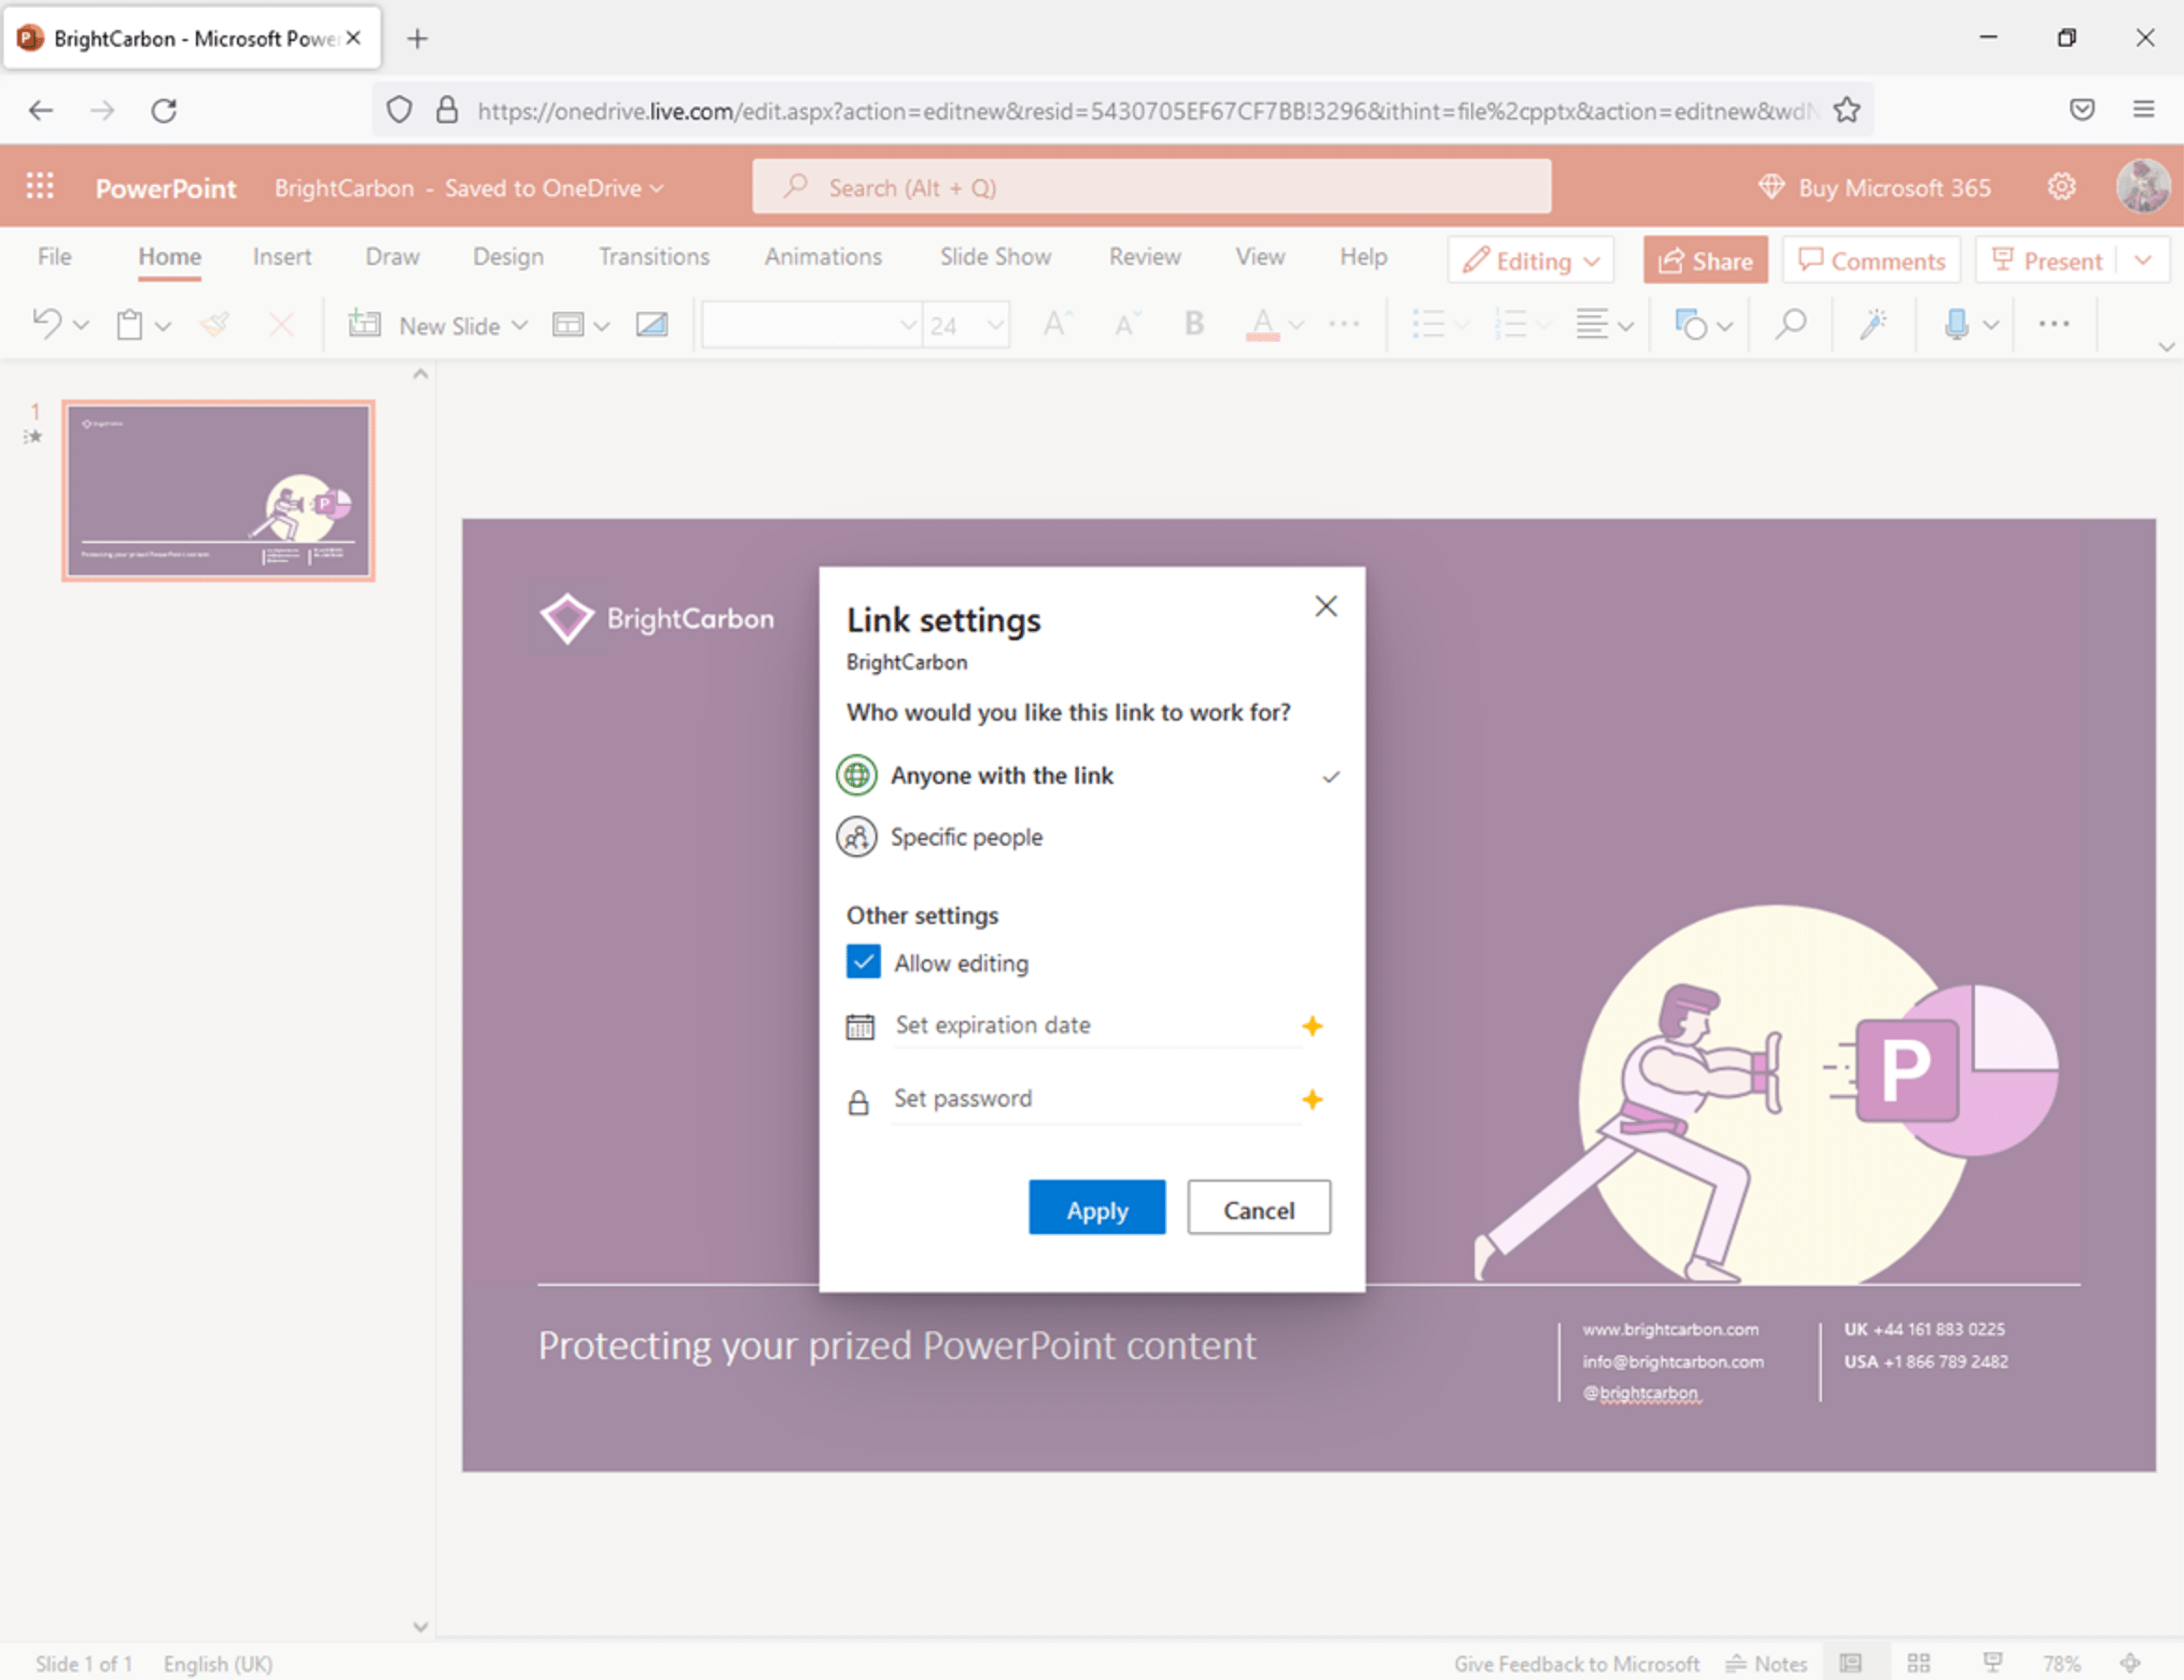
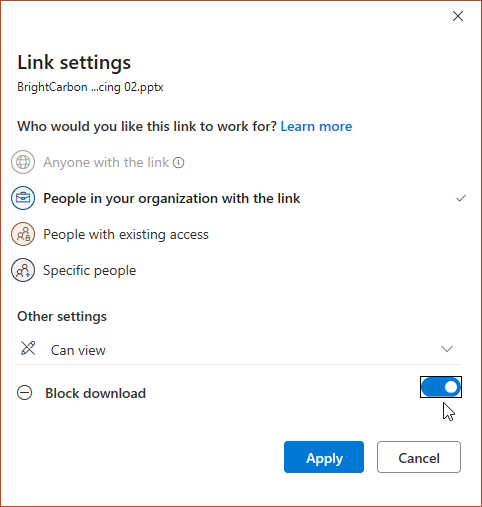
Since it’s hosted in the cloud, it can be shared with your content consumers by clicking the Share button at the top right of the browser window. This opens the link creation window. You can choose to share the file with anyone who has the link or click the ‘Anyone with the link’ text to access additional protection features:
Now you can deselect Allow editing and even set a password and expiration date, assuming you have a premium subscription. You can then copy the link and provide it to your users.
Are there any pitfalls for this method? Oh yes – and it’s a huge gaping hole! When you provide that link and someone clicks on it, the file opens as below:
Can you see the Download button at the top? Uh oh. What was Microsoft thinking? You choose to share something as a read only file on the web and your audience can just download it as a pptx file, with the ability to edit the file!
You can now share a file, set the permissions to view only and then block the ability to download:
ARM and Sensitivity
If you work for a large organisation with a competent IT team then it might be that you can use other Microsoft technologies such as ARM (Azure Rights Management, formerly IRM or Information Rights Management) or the relatively new Sensitivity Labels feature. Both use advanced encryption to provide varying levels of access to your file. These solutions are complex to implement, so talk to your IT team to see if you can use them.
Hacking the XML
And so to my favourite part! Hacking PowerPoint files to add custom protection hurdles. These solutions require no knowledge of coding and don’t require any VBA (Visual Basic for Applications). All you need is 7-Zip for Windows or BBEdit for macOS and a decent text editor such as Notepad++ for Windows or BBEdit again for macOS.
In this tutorial you’re going to see the Windows tools, but the process is similar on a Mac.
There are two things we can do to improve protection:
Add custom UI XML code to the pptx file to remove access to various features in the ribbon and backstage. Microsoft calls this “extensibility”, the ability to extend (or reduce) the features in the UI.
Add custom XML to the slides to prevent users from being able to select objects we don’t want them to access, for example, a licensed photograph or video. What they can’t select, they can’t edit, copy or extract. Subject to the ZIP hack!
The ZIP hack: Every modern Office file is essentially a ZIP archive. All you have to do to see inside is add the .zip extension to the file and hey presto, you can see everything inside it. You can even see inside the file without renaming it if you use 7-Zip for Windows or BBEdit for macOS. The only time this isn’t available is if you’ve used one of the encryption methods above to protect your presentation.
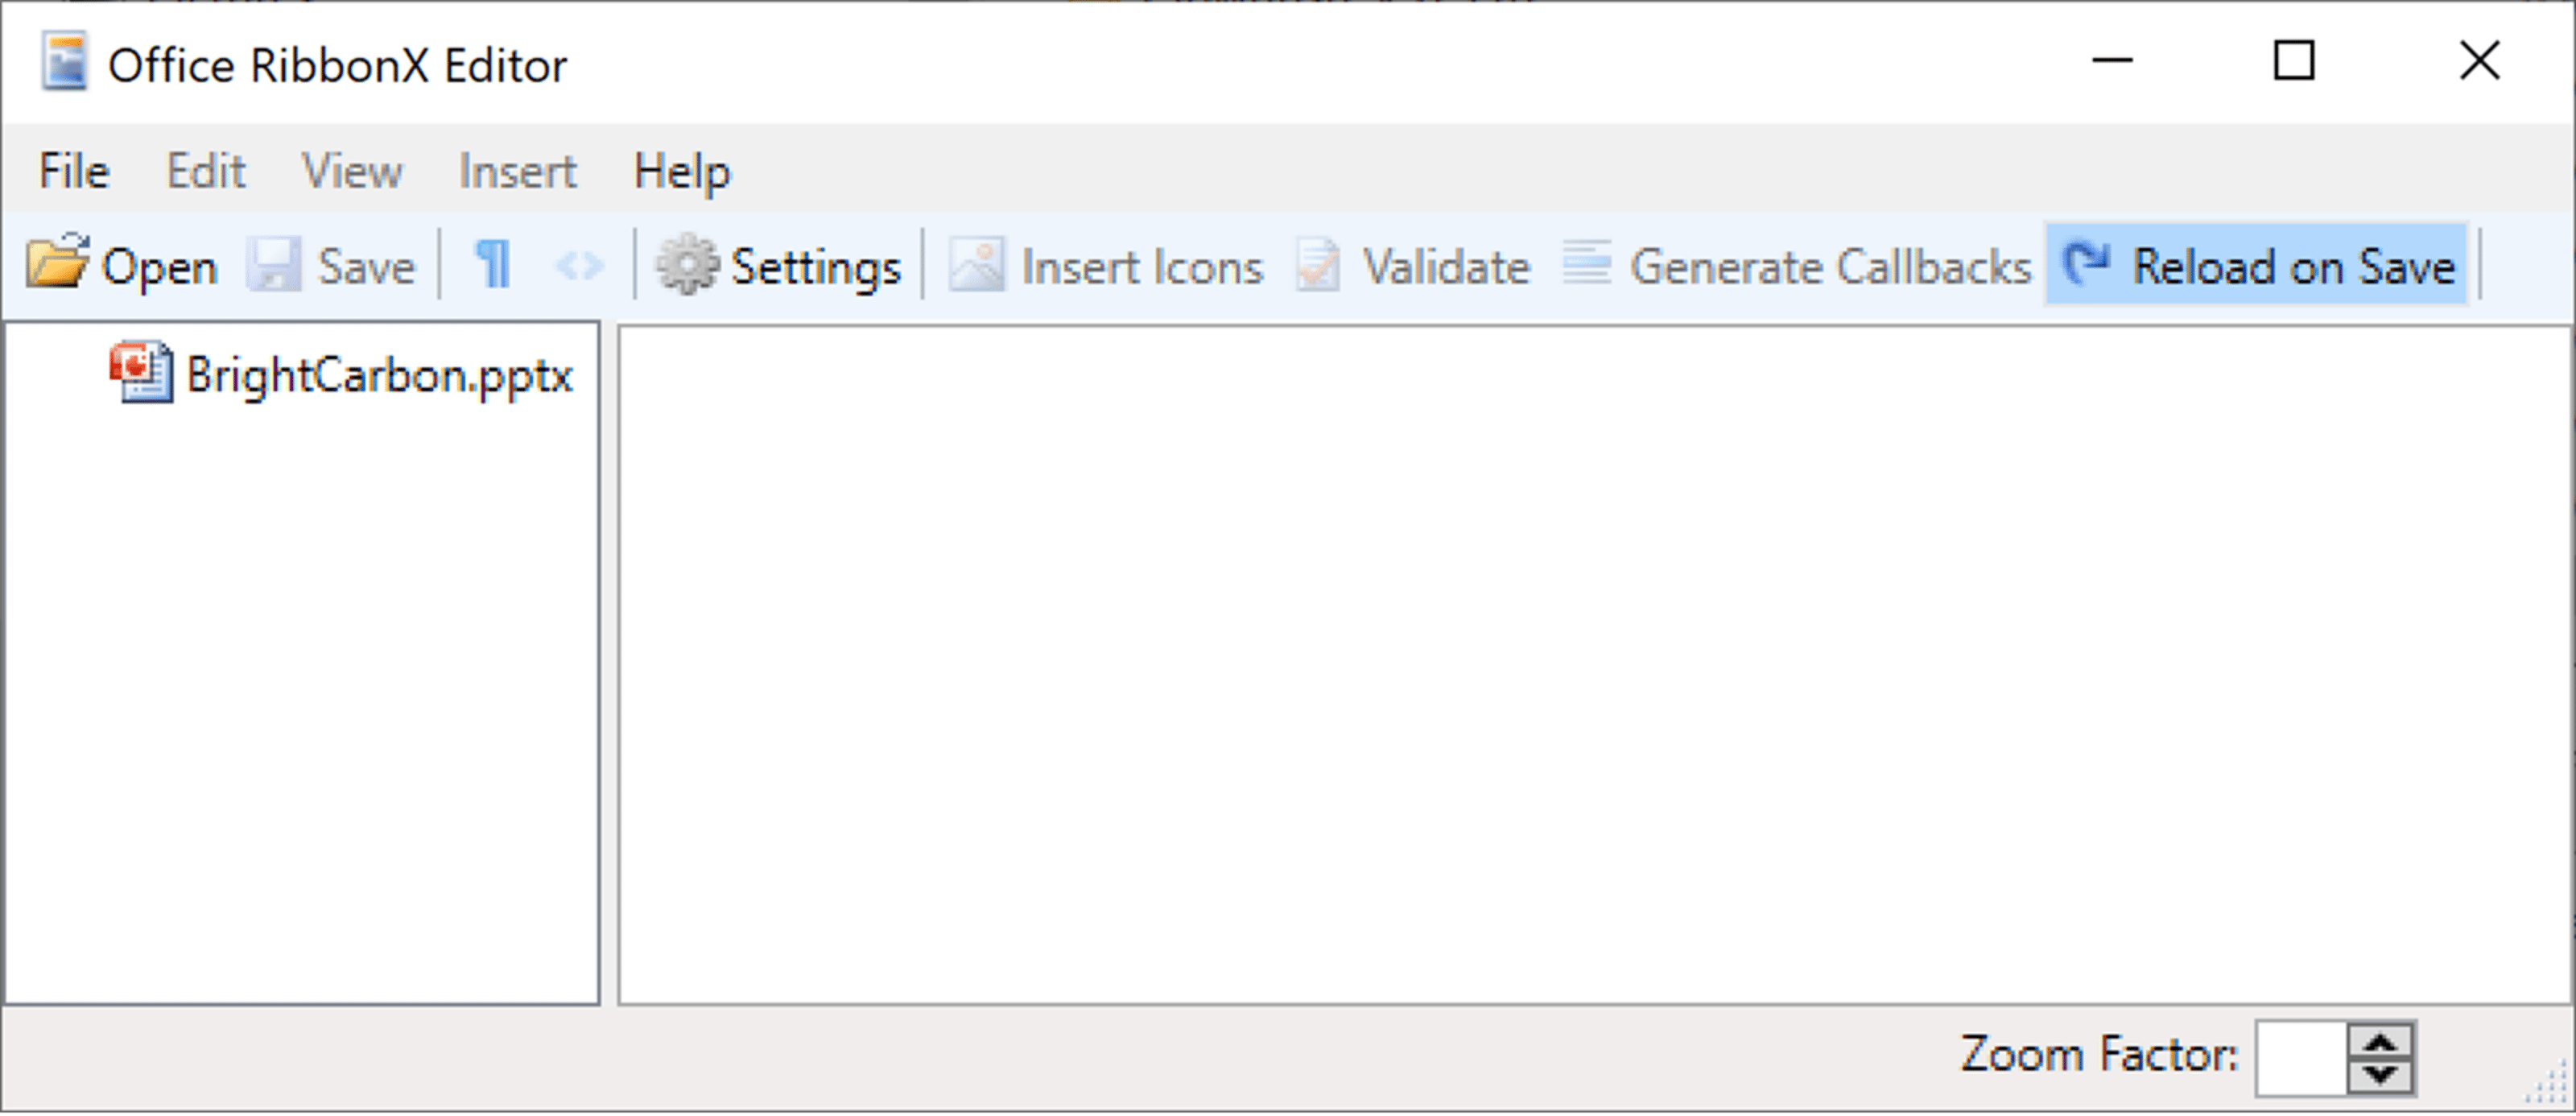
Now – back to our hack! Firstly, let’s add some custom user interface XML. You can download the free Office RibbonX Editor or do this manually in the ZIP archive, which is a bit more involved. Here’s the editor with our pptx file opened:
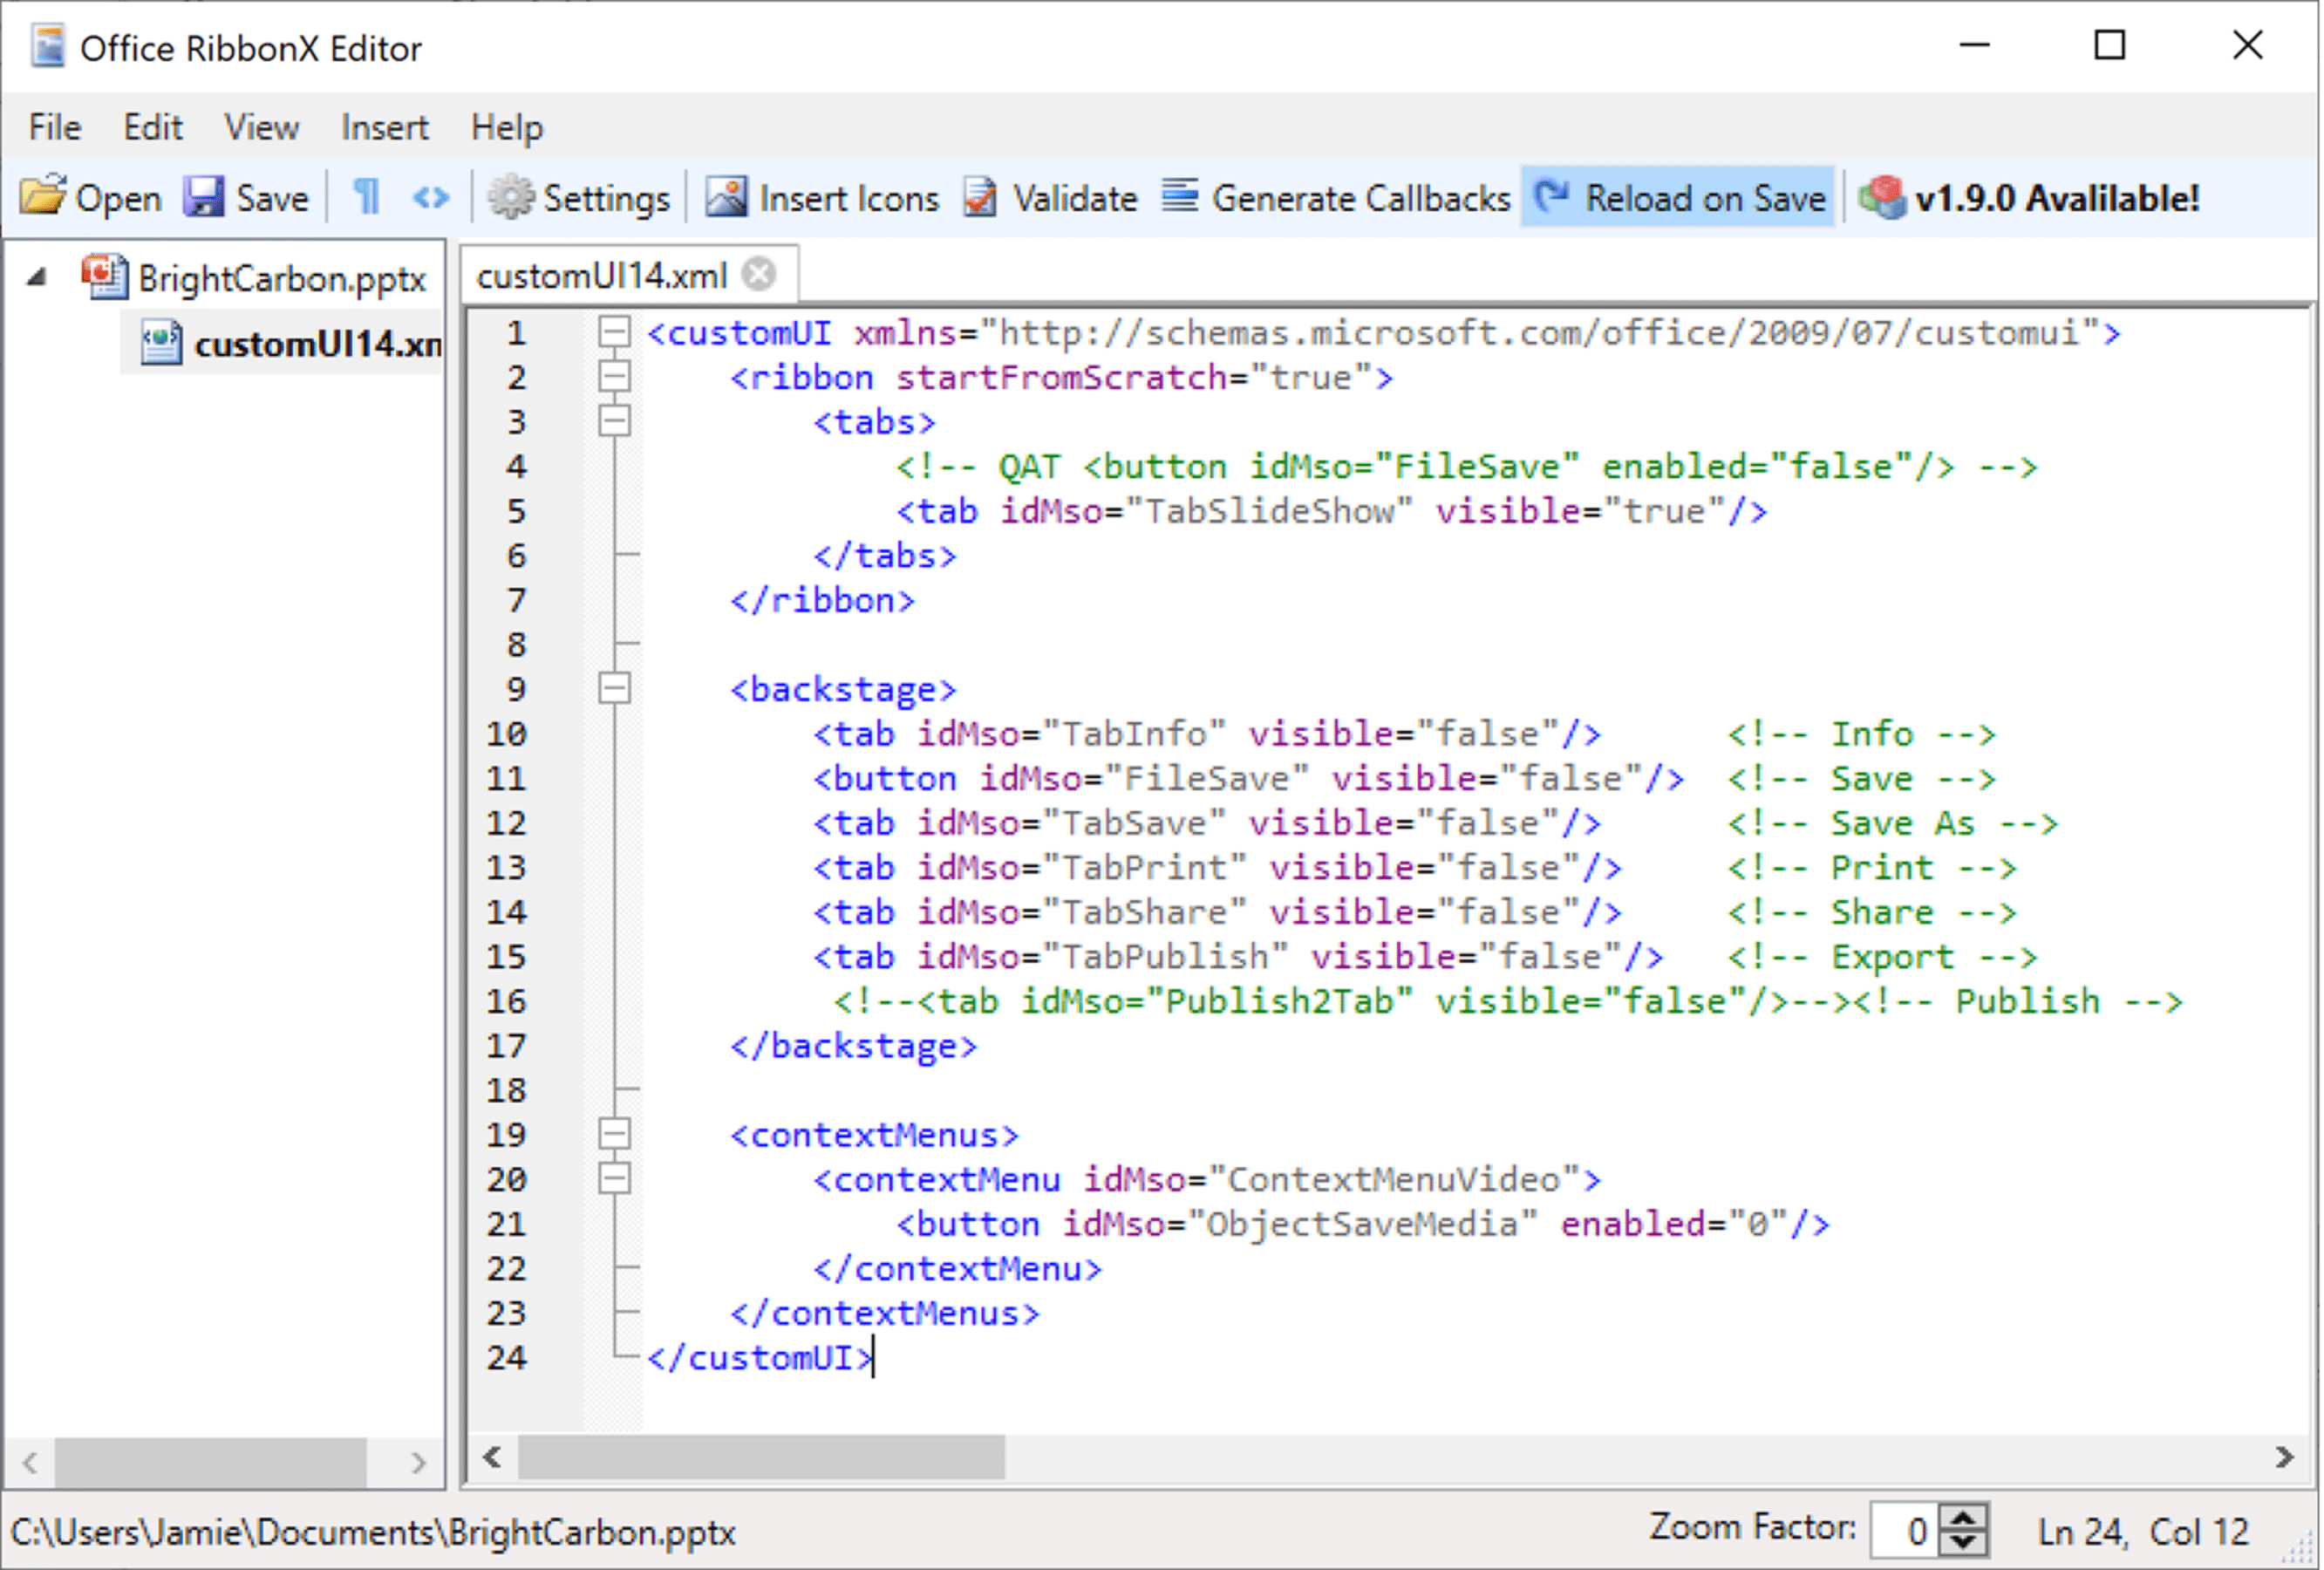
The first step is to select the file on the left and then click Insert / Office 2010+ Custom UI Part. Double-click the customUI14.xml file and then copy and paste the following XML into the right-hand pane:
This XML clears the ribbon, enabled the Slide Show tab, disabled several tabs in the backstage view and disabled the Save as Media… button in the content menu when you right click on a video in PowerPoint.
Save and close the file. Now when you open it, the ribbon is heavily restricted:
If you try to right-click on a video, the Save Media As button should now be disabled, and the backstage view after clicking on File should also be limited:
There’s one issue with that mechanism of protecting content in your file. It can be copied to another file, where the custom UI XML is not present, and then exported from there. To prevent this, you can add a lock to each object you want to protect so it can’t be selected. That way, the context menu is never available, and hence the object can’t be copied or exported. Here’s how:
Open your presentation in PowerPoint and go to the slide containing the content you want to protect.
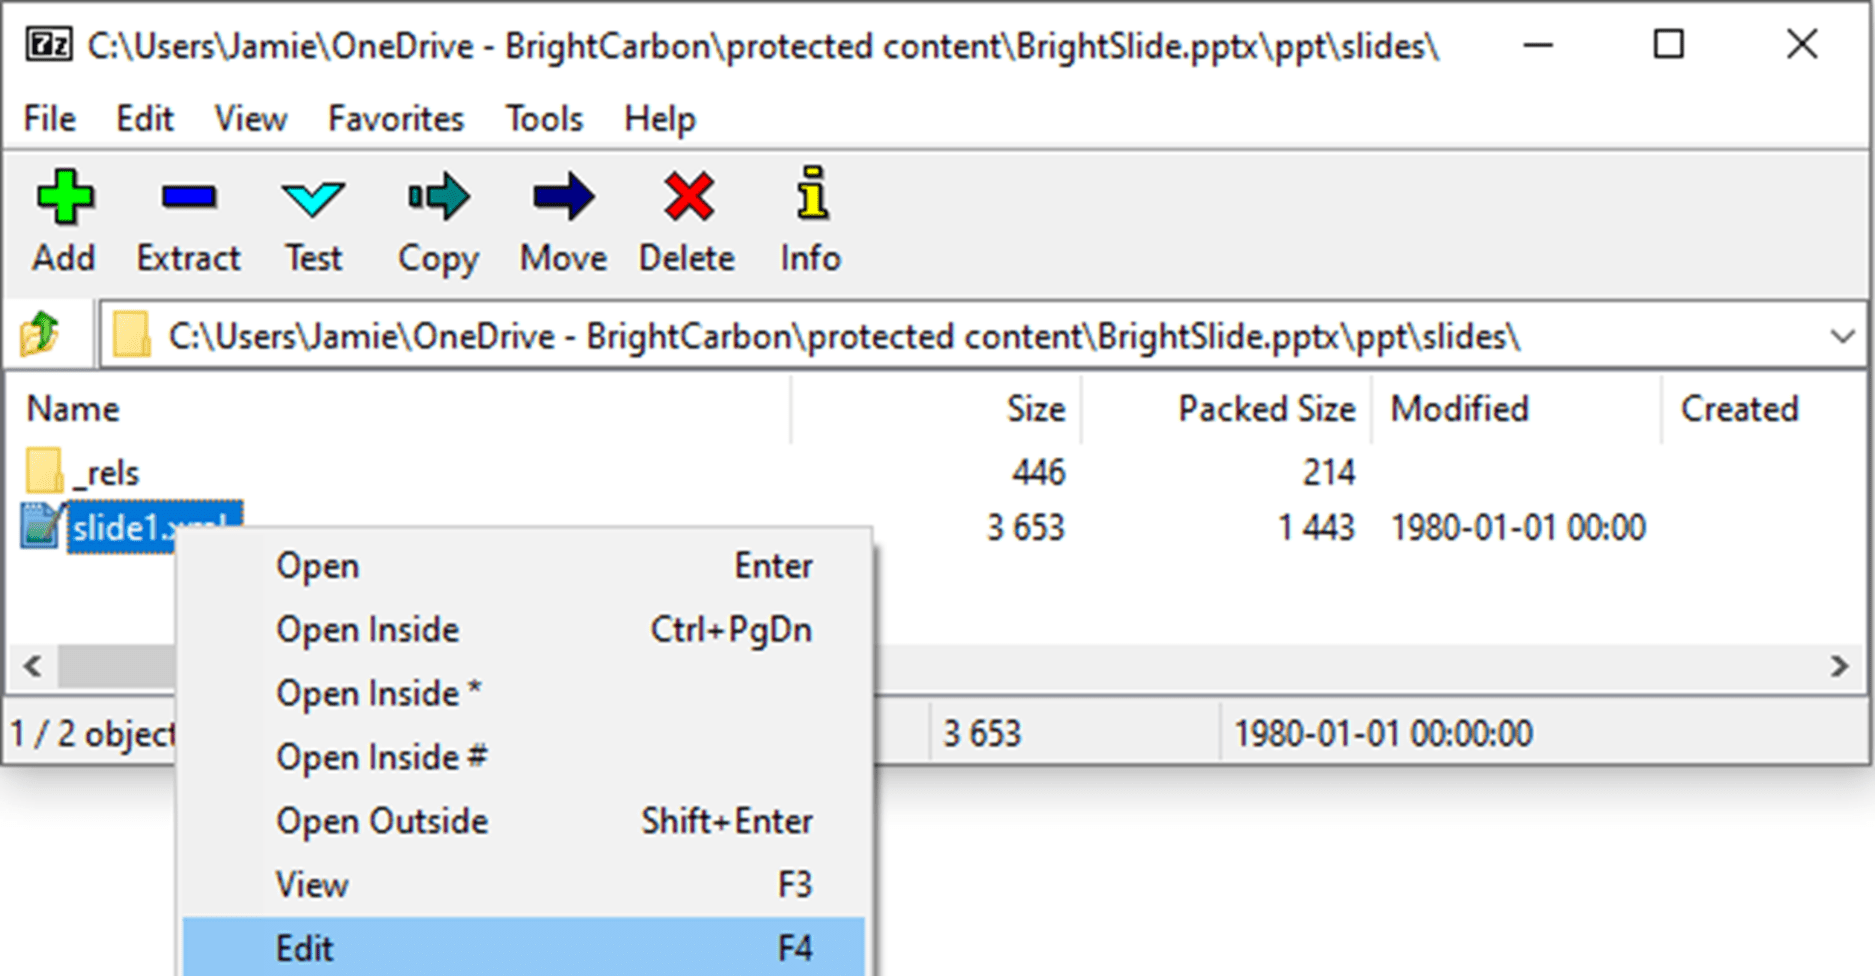
Open the Selection Pane(Alt+F10) and make a note of the object name, for example “my precious picture”.
Close the presentation.
With 7-Zip or BBEdit installed, open the PowerPoint file.
With the file open, navigate to ppt/slides and open the xml file corresponding to your slide for editing:
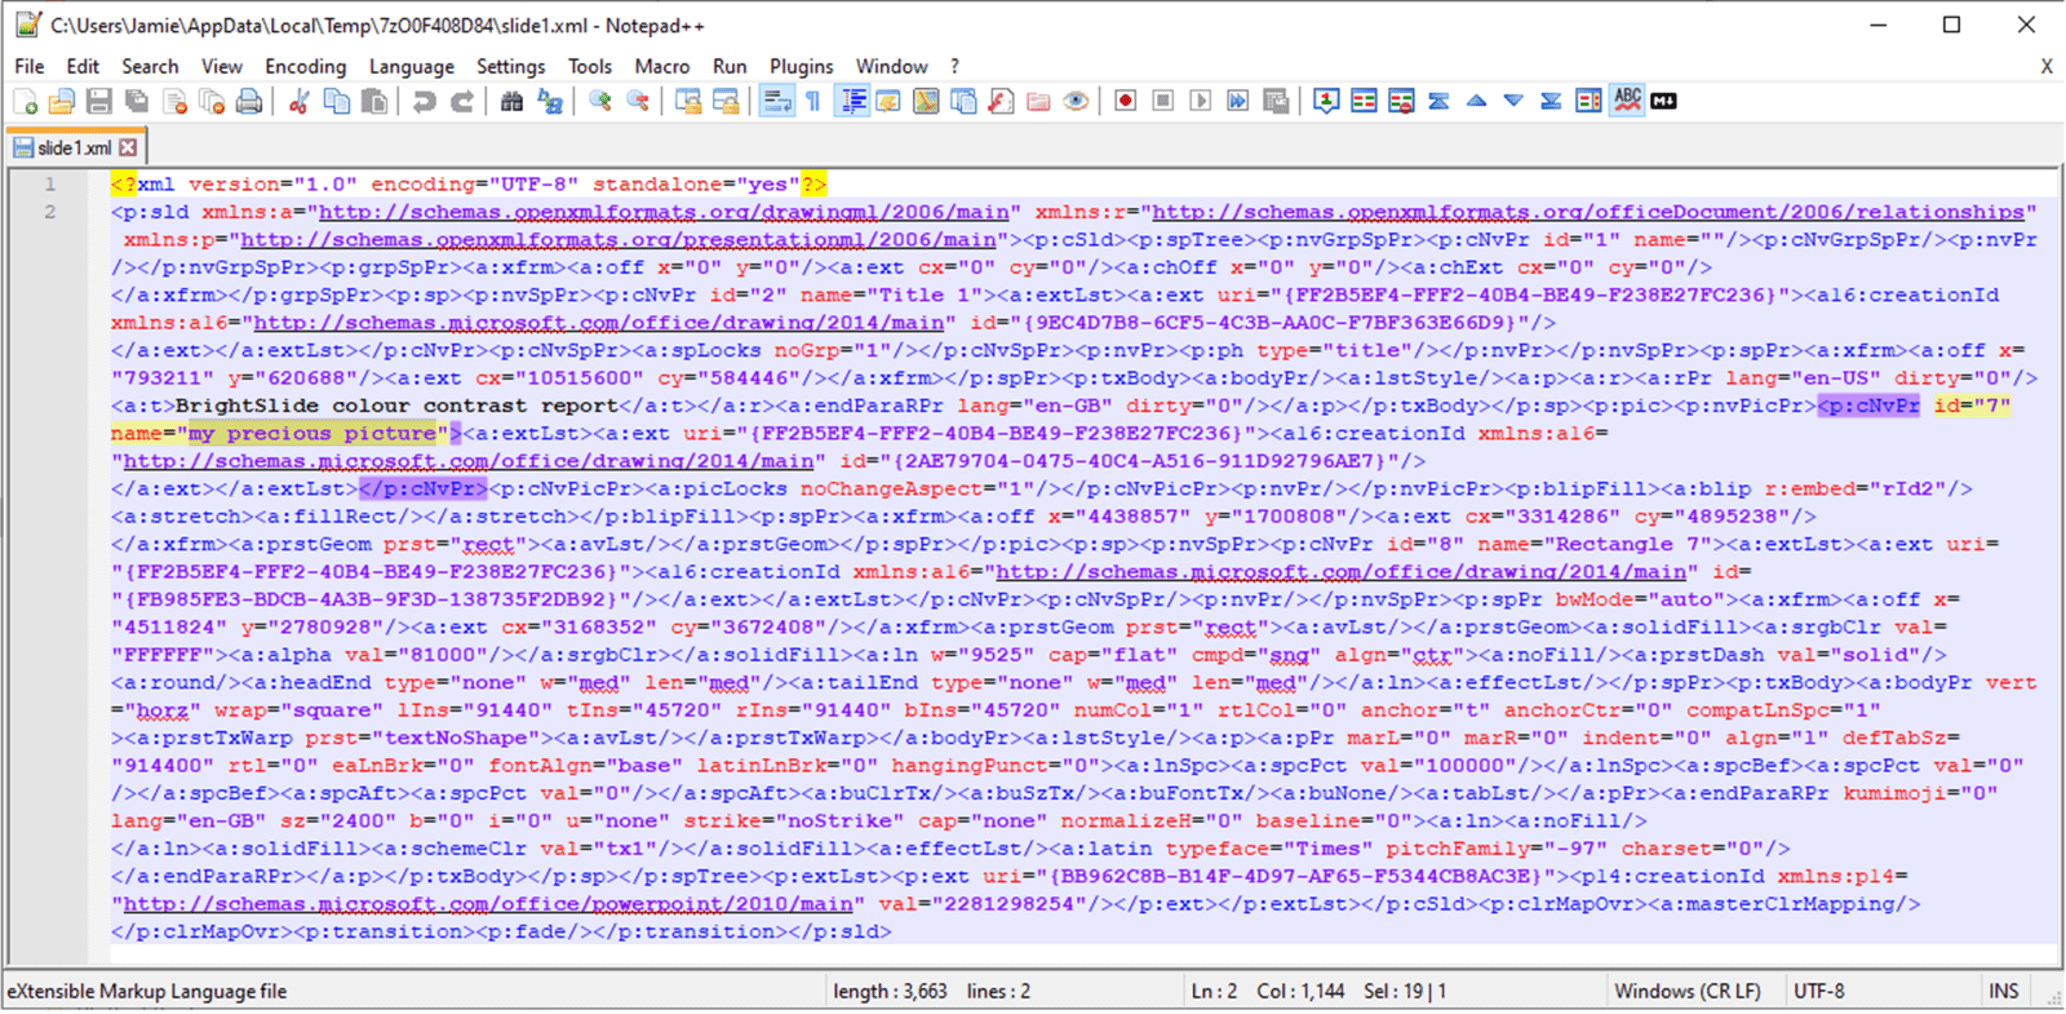
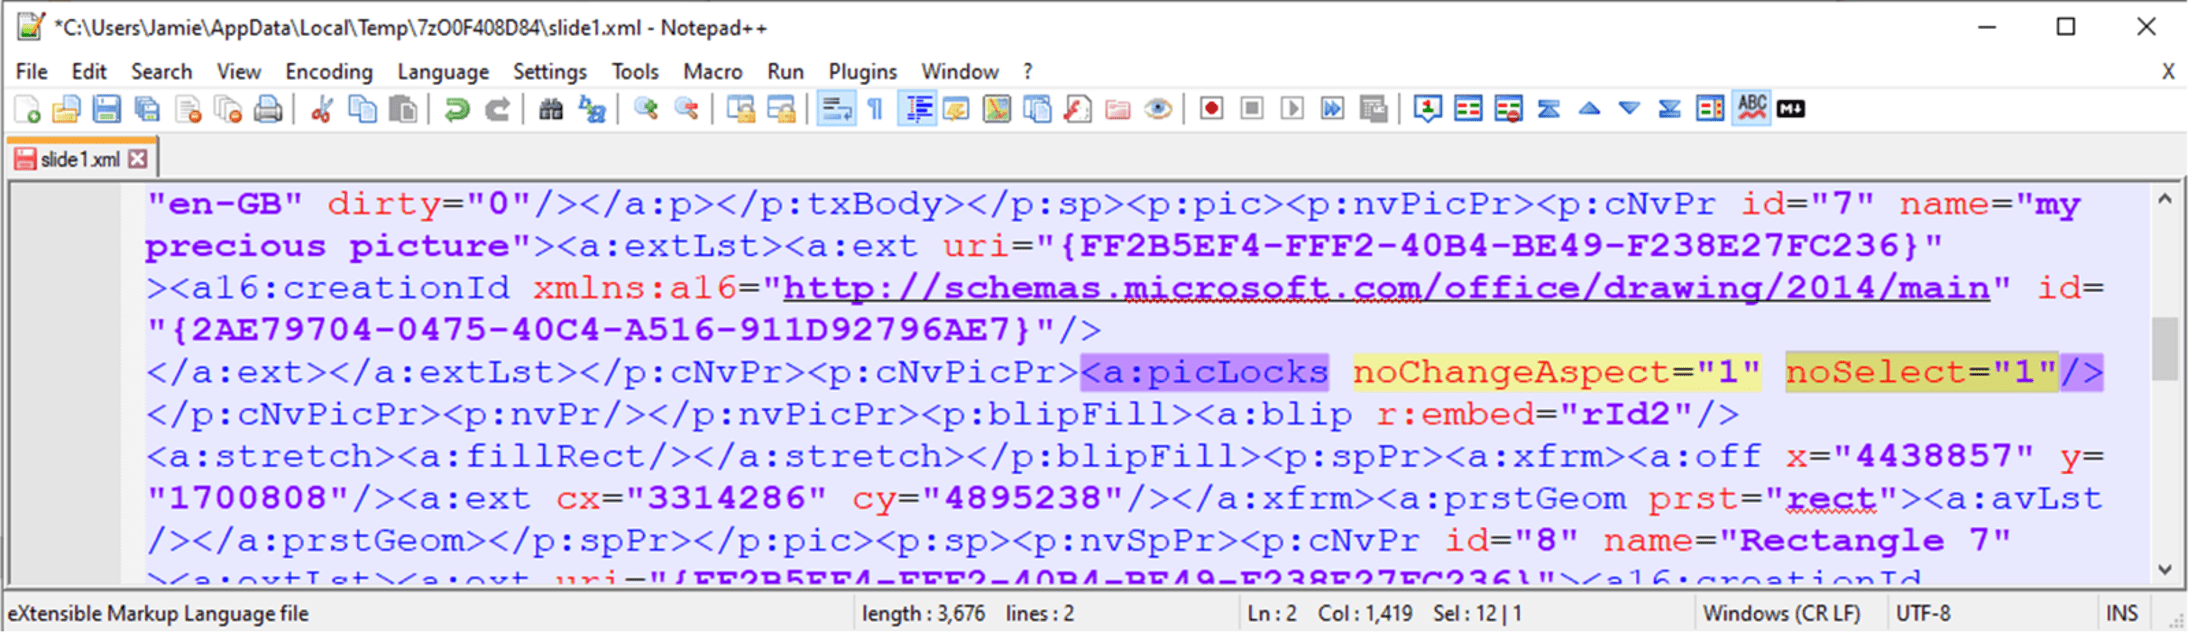
6. Search for the name of the object:
7. From that point, scan along the XML until you find <a:picLocks and then add a space and noSelect=”1″ before the closing tag:
8. Save and close the file and then close the text editor.
9. Return to 7-Zip and confirm the archive update when prompted.
10. Close the PowerPoint file and the 7-Zip app.
11. Open the pptx file in PowerPoint and confirm that the object can no longer be selected.
Unfortunately, there are pitfalls to this technique. There’s a bug in PowerPoint that causes the noSelect lock to be deleted if you click the padlock icon for that object in the Selection Pane. We’ve reported it to Microsoft and are waiting to see if they fix it.
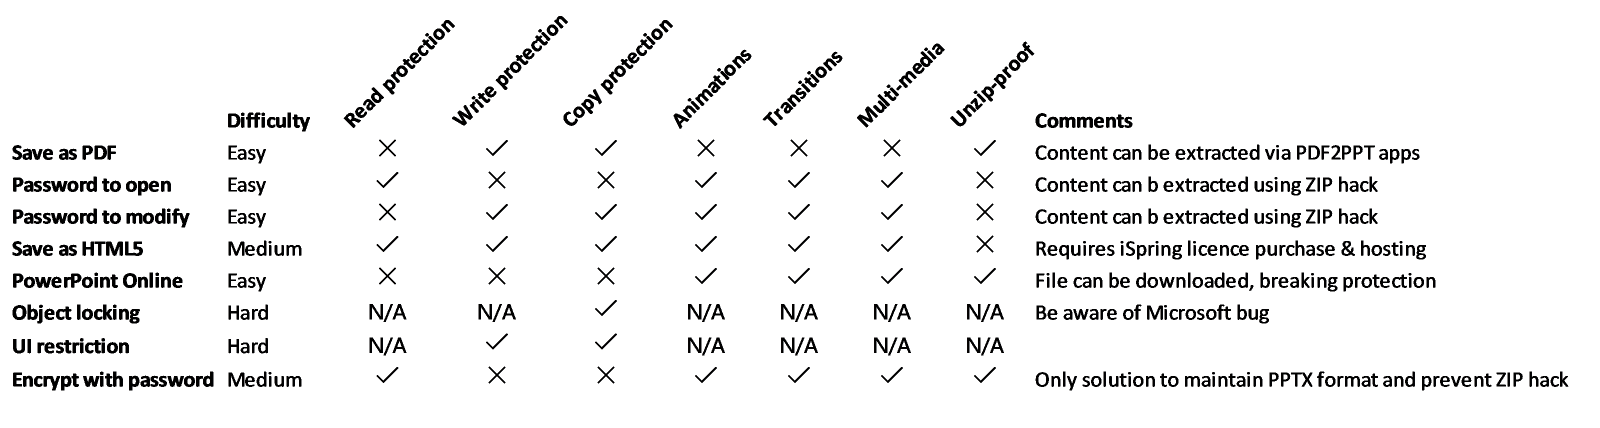
Comparison of protection methods
The table below shows a comparison between the different solutions and features we’ve explored. Some of them can be combined based on your needs. For example, you might want to add password to modify and add object lock to create the level of protection you want.
Recommendation
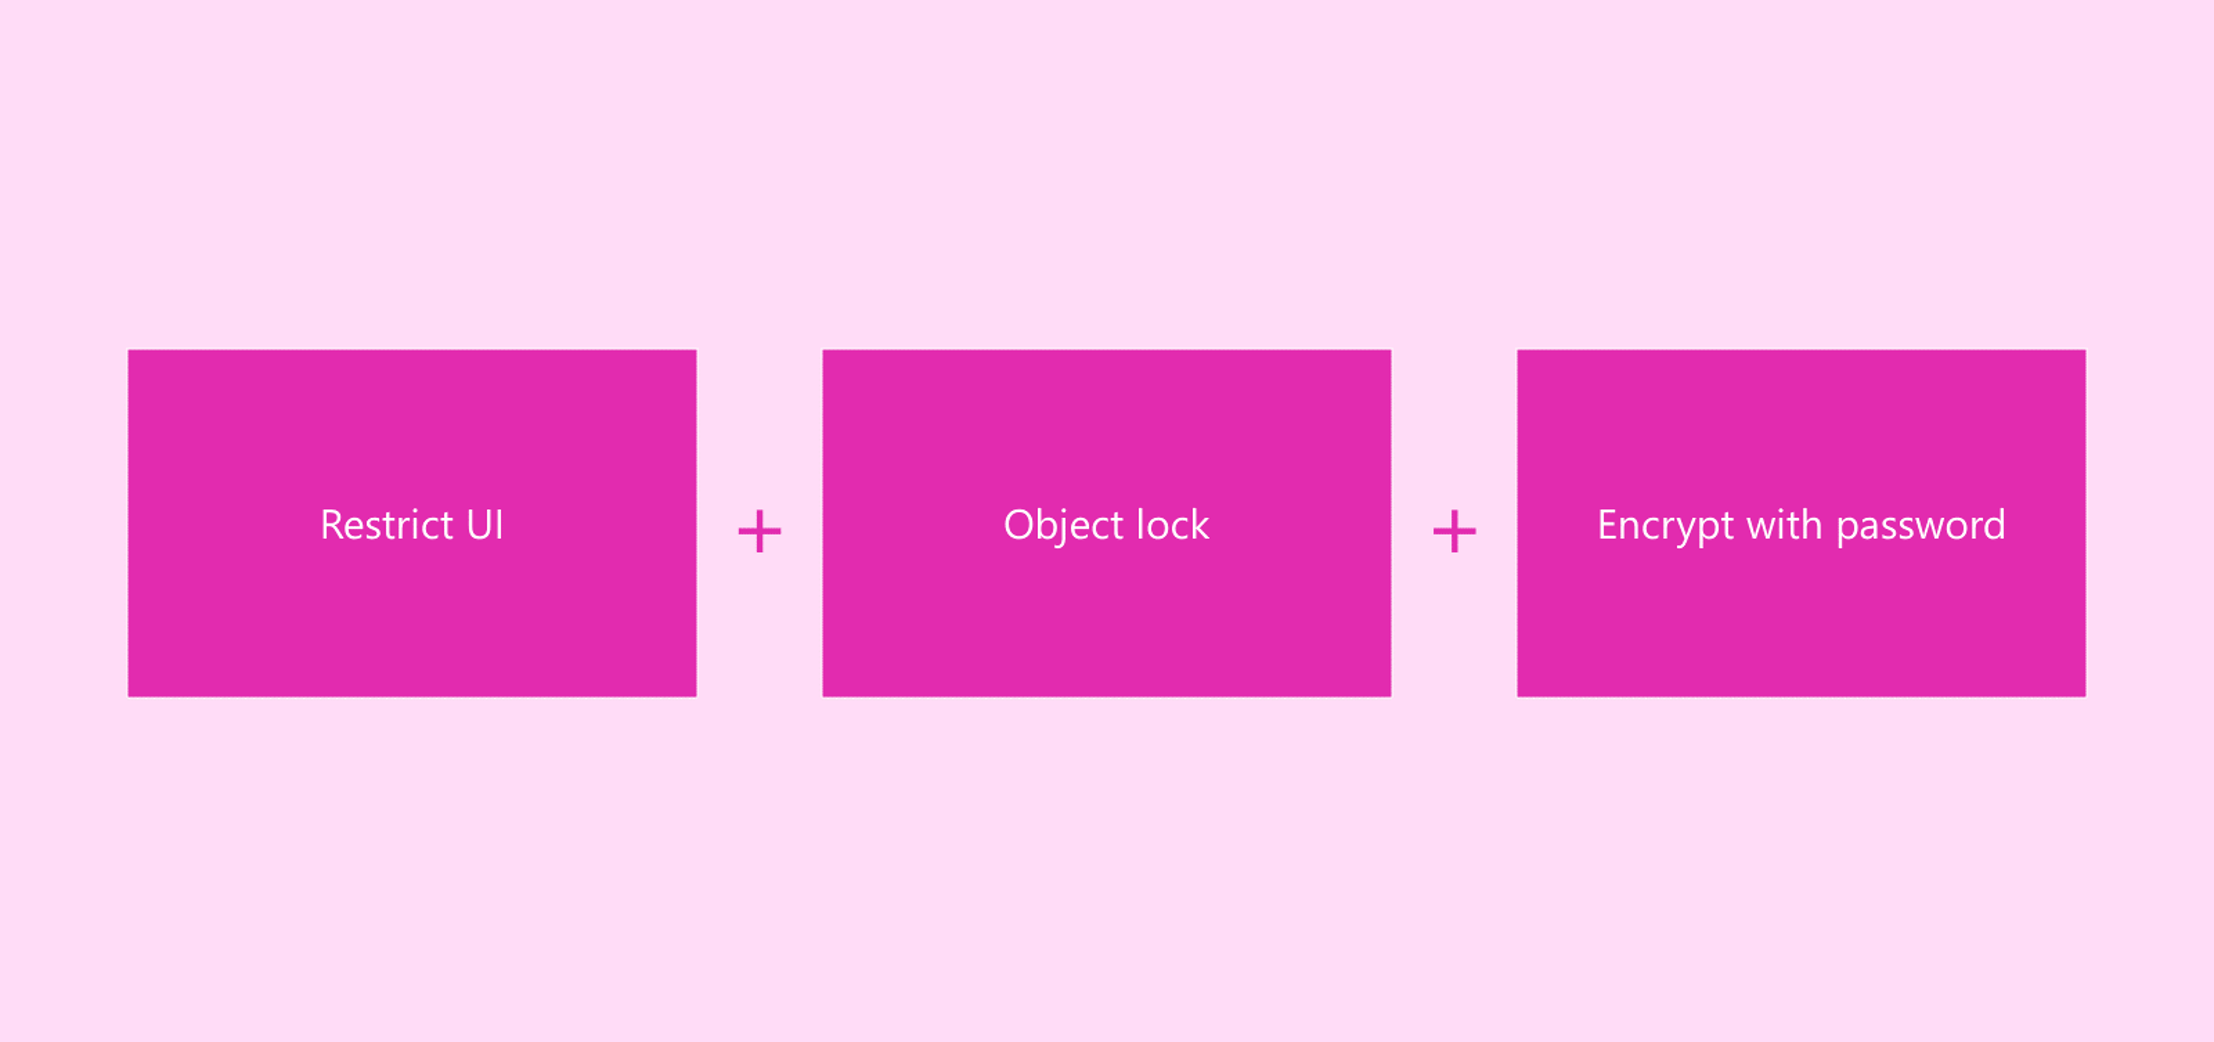
Having tested the various mechanisms, BrightCarbon recommends the following workflow to add the ultimate protection to your valuable PowerPoint files on the basis that you don’t want recipients to be able to extract/copy/repurpose/steal your content:
Note that since the required UI to add the encryption in step three has been disabled in step one, the encryption must be enabled via the VBE (Visual Basic Editor) using this command:
CommandBars.ExecuteMso "FileDocumentEncrypt"
Conclusion
There is a plethora of tools at your disposal to protect your valuable content whilst maintaining its design integrity. Some are better than others, and if you want to distribute a native PowerPoint file, you probably need a combination of approaches. The features exist in multiple places in the PowerPoint user interface due to their historical development, in other words it’s messy!
If you need help password protecting PowerPoint, modifying the way it works or creating custom automation workflows, get in touch to learn more about our custom development service.
How do you make sure that your graphs and charts have consistent branding across Excel, PowerPoint and Word? Learn how to create and use custom templates that support your brand identity across Microsoft Office.
You can do some really cool things in Microsoft Office with just a few lines of Visual Basic for Applications (VBA) - from creating your own custom formula in Excel to correcting branded content in PowerPoint to merging address data for a mail campaign in Word. And sometimes you need to share that VBA solution with colleagues and clients, via the Internet. A change that Microsoft rolled out at the end of March 2022 tweaks the process required by Windows users to gain access to this active content.
Pictures in PowerPoint can be tricky to get to grips with. Choosing the right size has an impact on both the file size of your presentation and the maximum monitor/projection size you can use without degrading quality.