Icons are a versatile tool for visual presentations, replacing boring bullets and playing an integral role in storytelling. Custom presentation icons are crucial to building a strong brand identity across presentations. But, if you don’t have access to a library of brand icons, they can seem out of reach.
Is it even possible to customise icons without special design skills? Absolutely. This blog post will show you how to source, create and animate custom presentation icons from within PowerPoint itself!
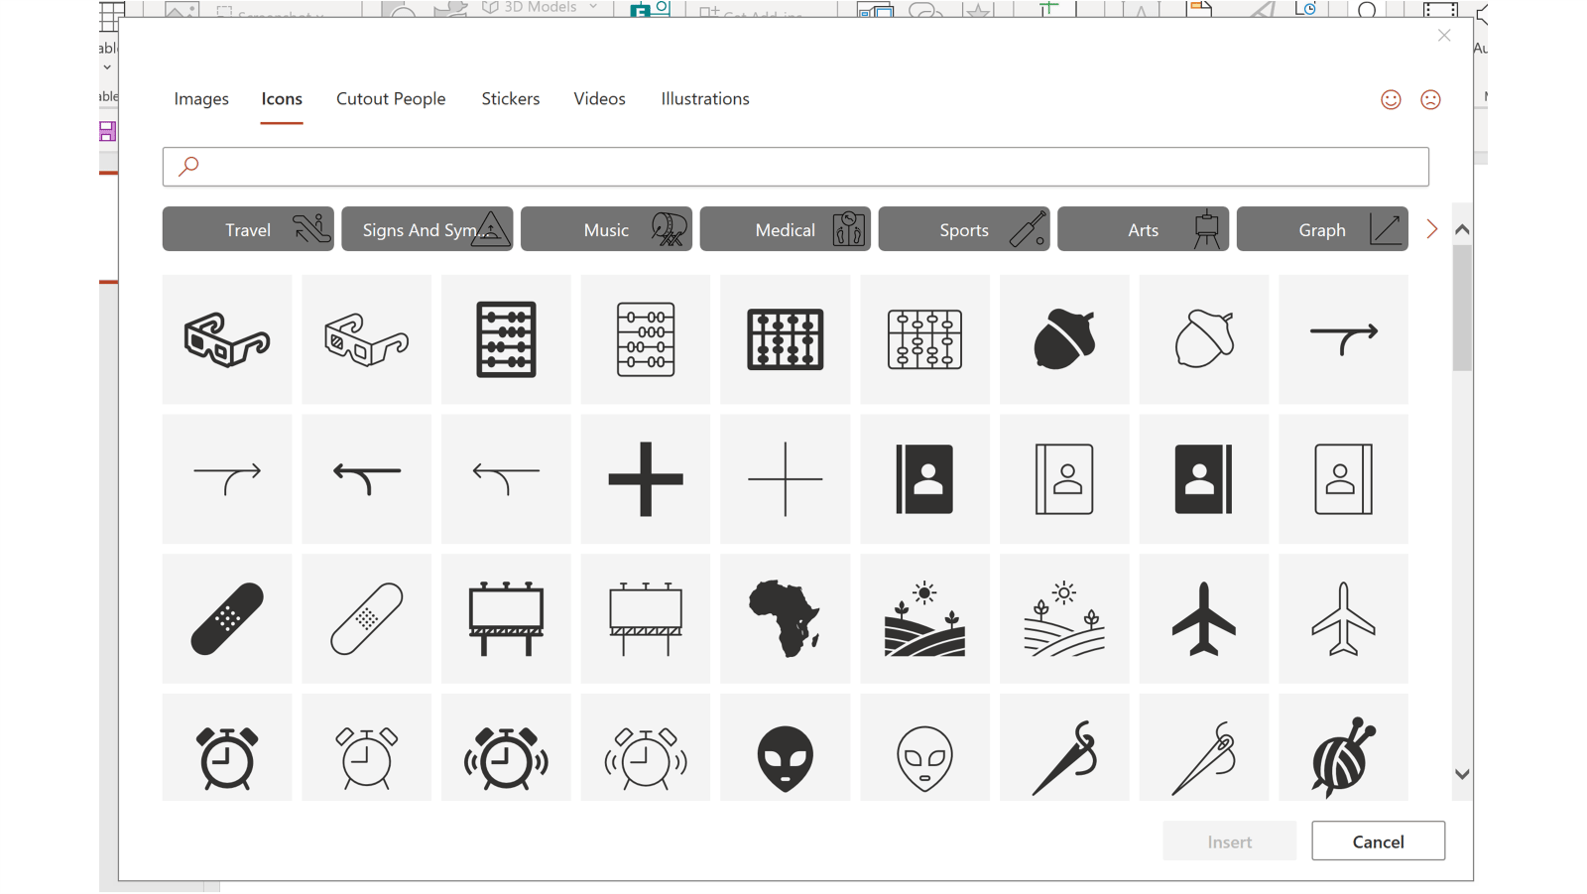
Let’s start at the very beginning: finding decent icons. If you’re using Office 365, you’ll be able to access PowerPoint’s native presentation icons. We have a blog post describing how to insert PowerPoint icons in Office 365, so hop over there to see a video tutorial.
Here’s the CliffsNotes version:
Click the Insert tab
Select Icons
Choose icons and click Insert
PowerPoint’s icon library is extensive and frequently updated, so you’ll probably find what you’re looking for. Once you’ve inserted an icon, you can format it in a similar way to PowerPoint shapes, by changing the fill colour, line colour and graphic effects. You can also crop icons just like you can crop images.
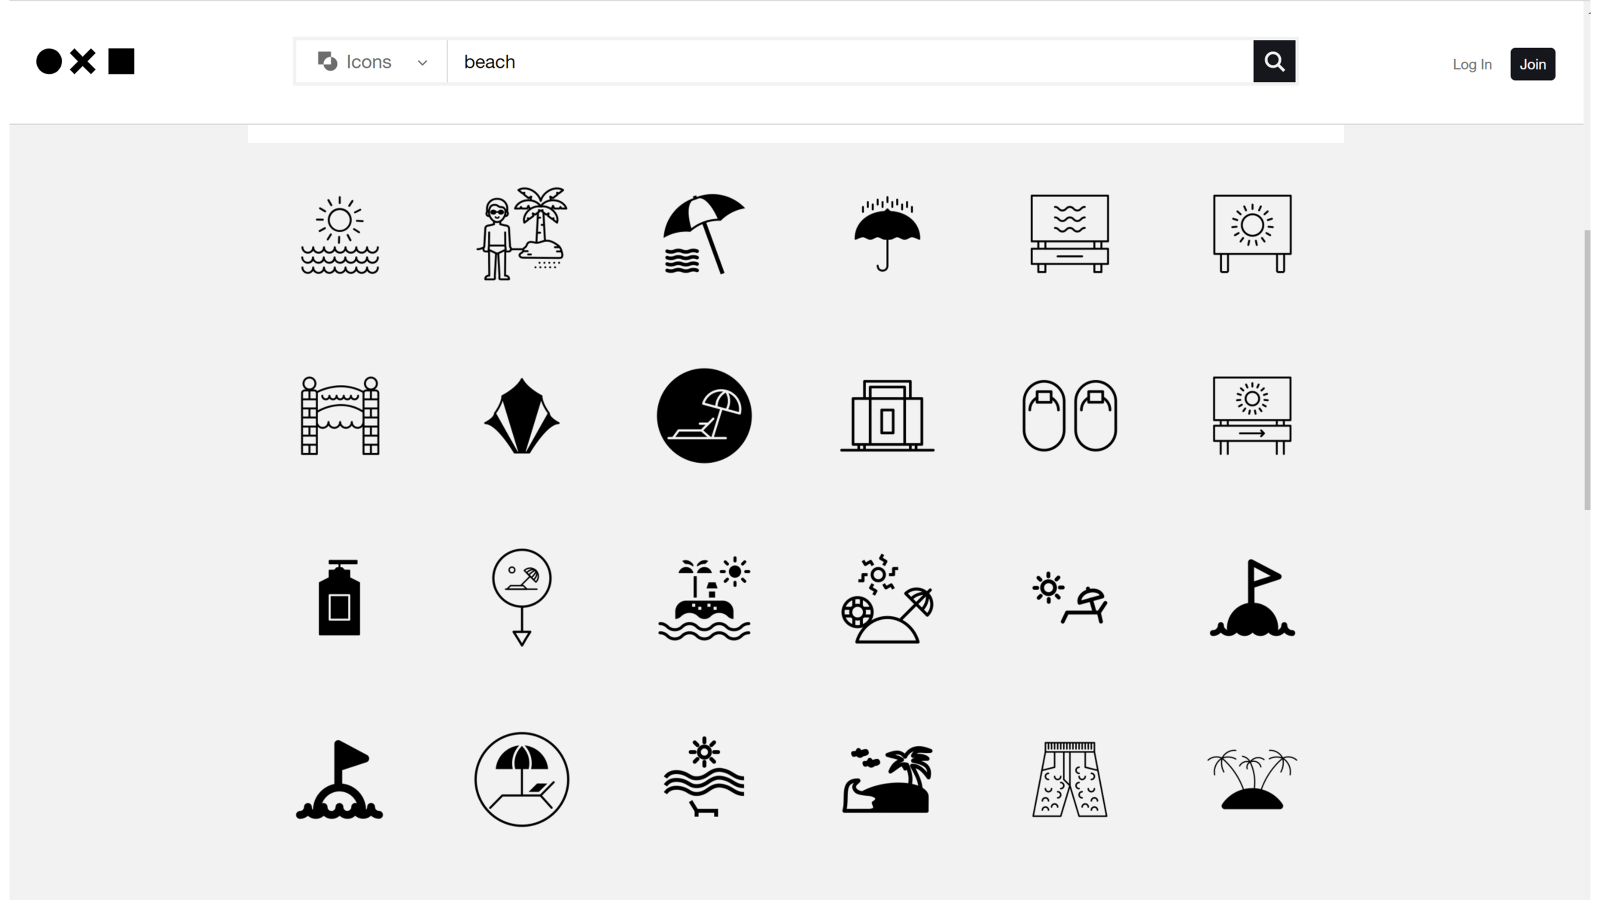
Unfortunately, the icon library isn’t available in earlier versions of PowerPoint. However, there are plenty of free presentation icon resources online like The Noun Project – an icon library with over 2 million icons!
When you’re selecting icons from an online resource, keep the design style consistent. This helps your presentation look professional. For example, the beach-related icons above are completely different styles and would look odd if they were all used on the same slide.
The Orion icon library is a great resource as you can filter the results by style – line, solid, colour, or flat.
Whenever you’re drawing on an online resource, it is important to know your way around the various licences involved. We’ve got a quick guide to Creative Commons for the uninitiated.
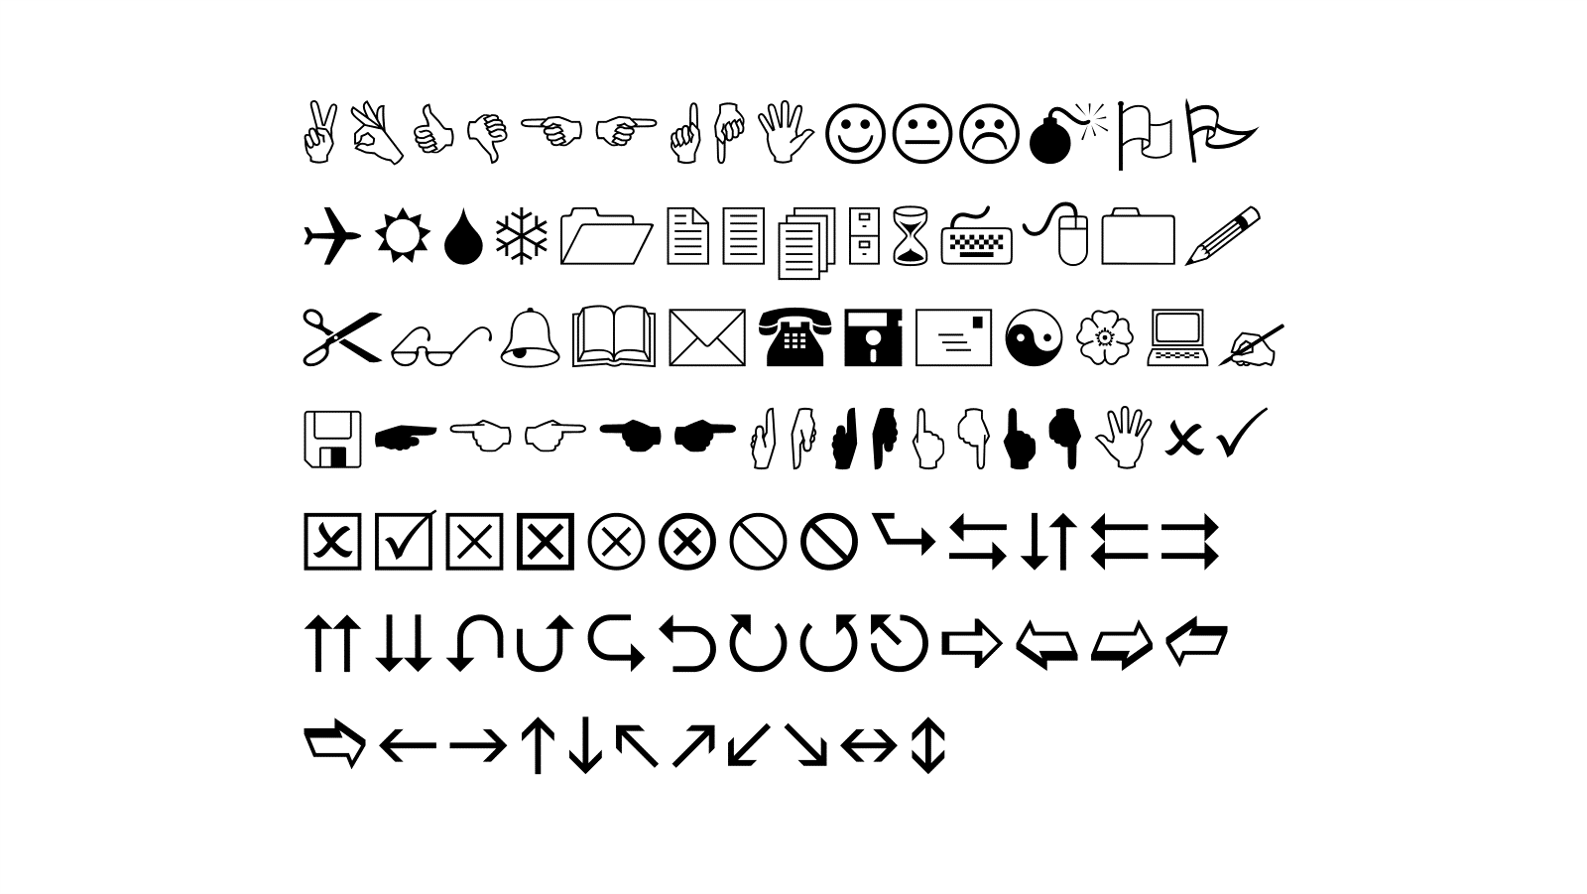
A final tactic to track down handy icons is to use a pictorial font, such as Wingdings (and Wingdings 2 and 3). You’ll have to do a bit of digging – and don’t forget the numbers and punctuation! Here’s what I found:
Mining a pictorial font for icon gold allows you to avoid crediting another creator. Wingdings is accessible no matter what version of PowerPoint you’re using. You can change the size and colour of the pictograms, increase line thickness by bolding the text, and then place them on custom icon holders to rapidly create a set of presentation icons.
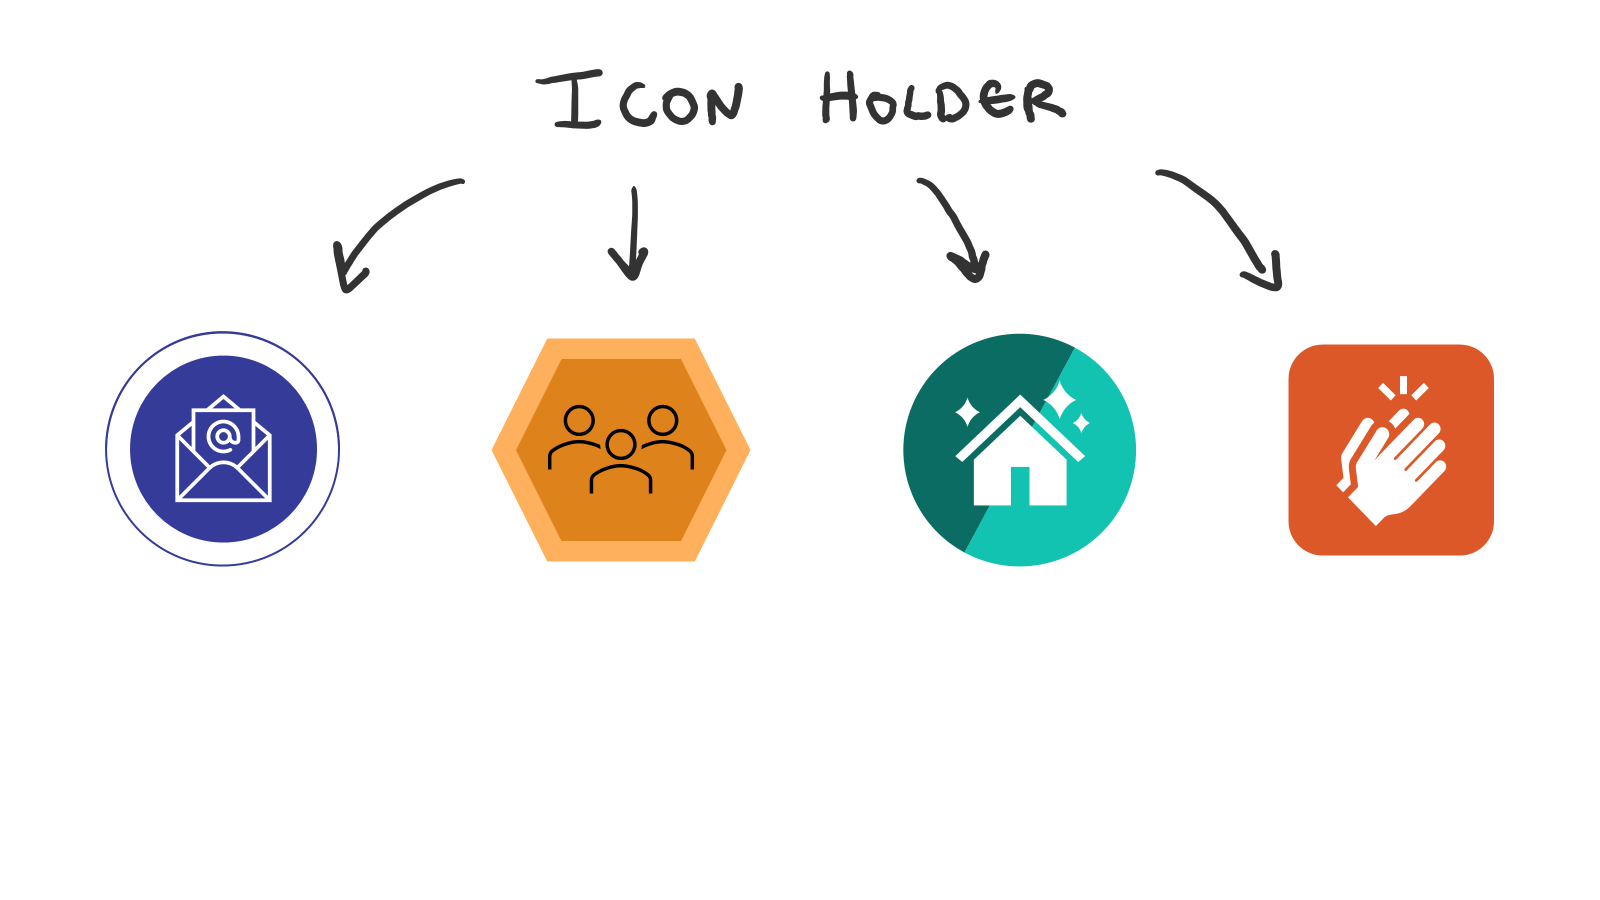
Creating custom icon holders in PowerPoint
Speaking of custom icon holders… See what I did there? Seamless. Popping icons on coloured custom holders is a quick and easy way to bring generic icons from PowerPoint, or an online resource, in line with your branding. And, once you’ve made one, you can copy and paste it to your heart’s content!
Before you start, make sure your brand colours are set as the PowerPoint theme colours. This will make it easier to stick to the right colours when you’re designing your icon holders. Not sure how to change theme colours? Read this easy-to-follow guide.
Custom icon holders: 3 ways
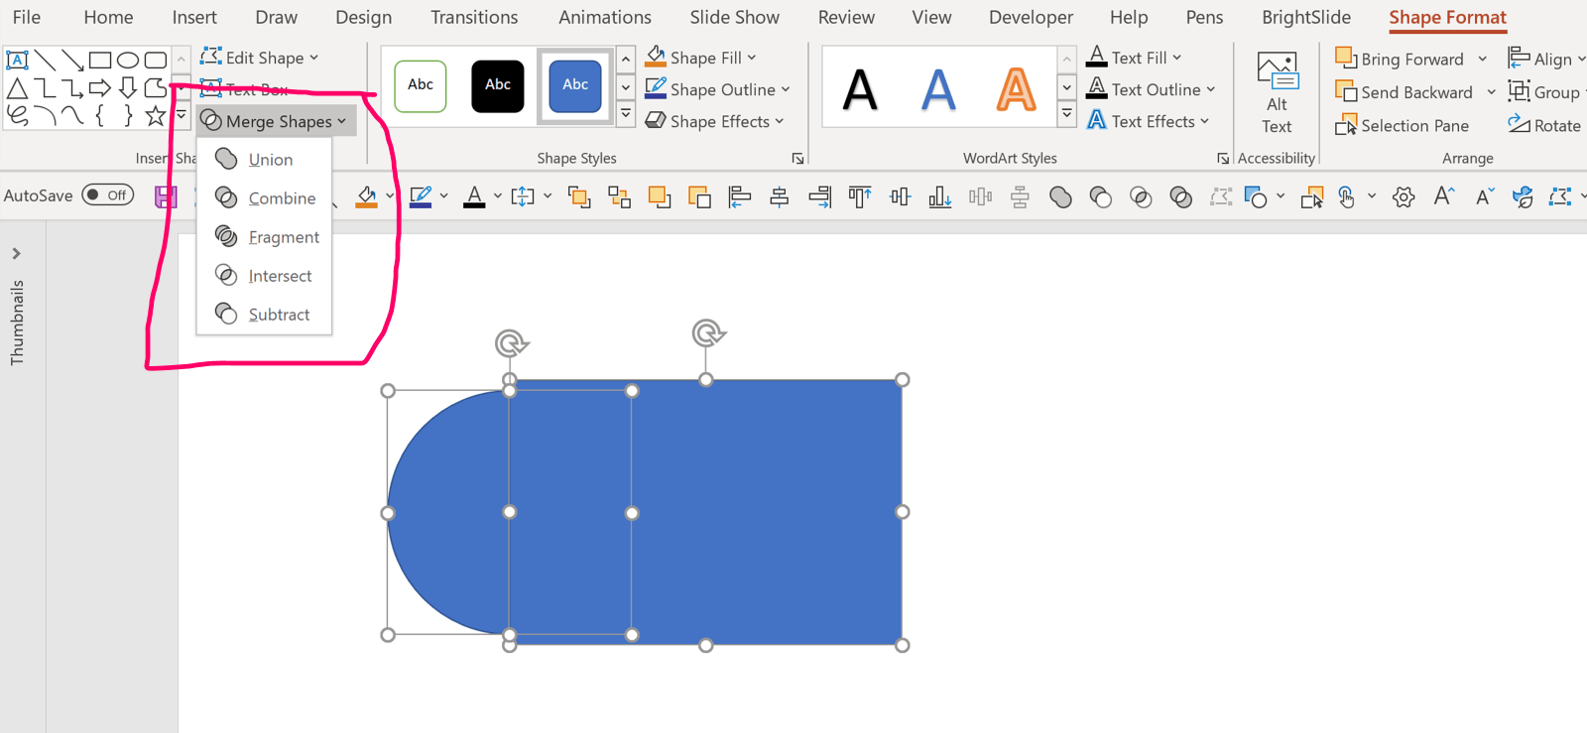
Split colour
Insert > Shapes > Circle. Draw a circle on your slide.
Cut the circle in half by inserting a rectangle, placing it halfway across the circle, and using the SubtractBoolean tool (find this on the left, under the ShapeFormat tab). This will subtract the rectangle from the circle. You should now have a semicircle.
Copy and paste the semicircle (Crtl + C > Crtl + V) and rotate it, lining up the two straight edges.
Remove the outline colour and pick your fill colours. Colours that are one shade apart work well for this style. The icon must be clearly visible, so it needs to have a high contrast with the colours you choose. Our free add-in, BrightSlide, can help you check the colour contrast between two shapes – click here to learn more.
Finish by grouping the two semicircles together, select both, right–click then select Group > Group.
You don’t have to use circles for presentation icon holders. If there’s a particular shape associated with your brand, a hexagon perhaps, you can use that as an icon holder shape instead.
Playful shapes
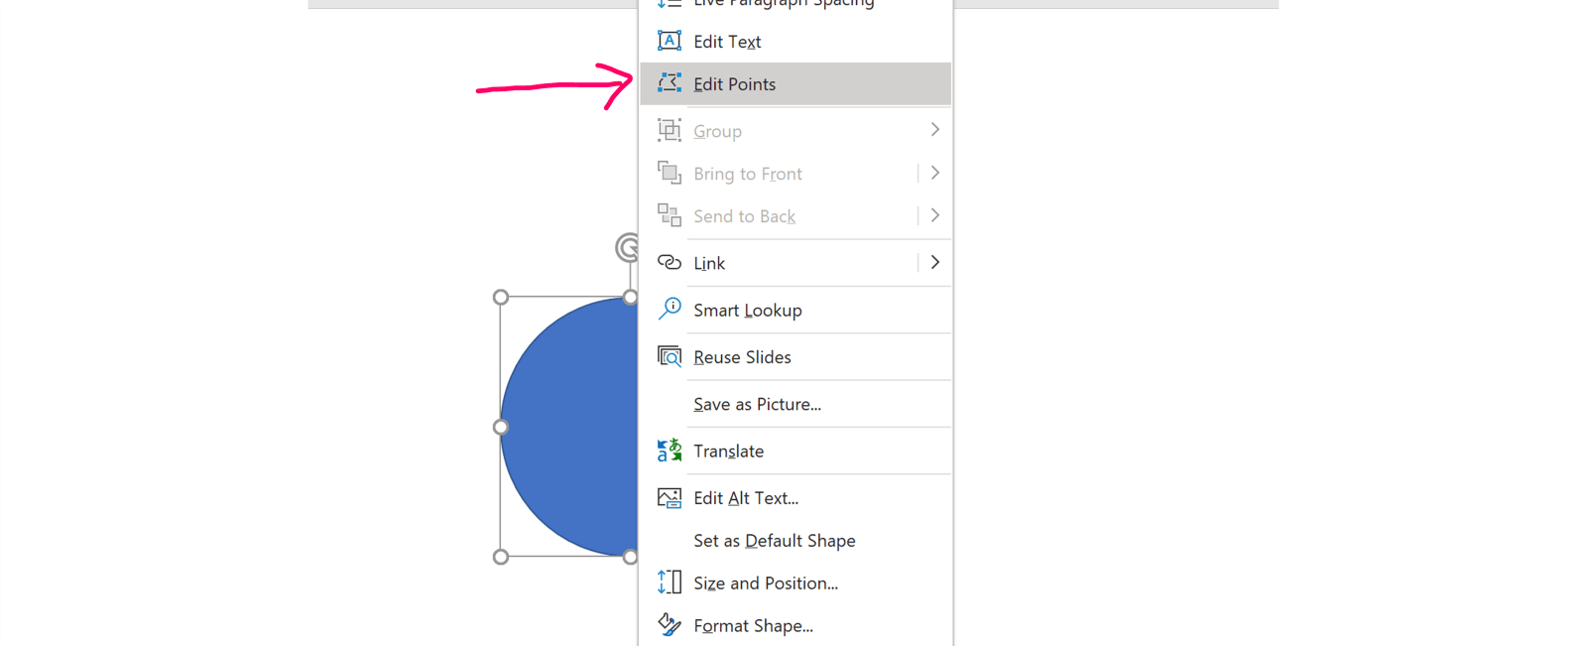
Insert > Shapes > Circle. Draw a circle on your slide.
Right–click and select EditPoints. This will bring up a thin line around the circle with square black nodes.
You can drag the black nodes around to alter the shape.
Right–click to view the options for each segment. For a blobby shape (that’s a technical term!), select SmoothPoint for each node. You can also add or delete the black nodes by right-clicking.
Have a play and see what you can come up with! Stick to two or three shapes to give a playful, informal look to your slides without descending into blobby-shape chaos!
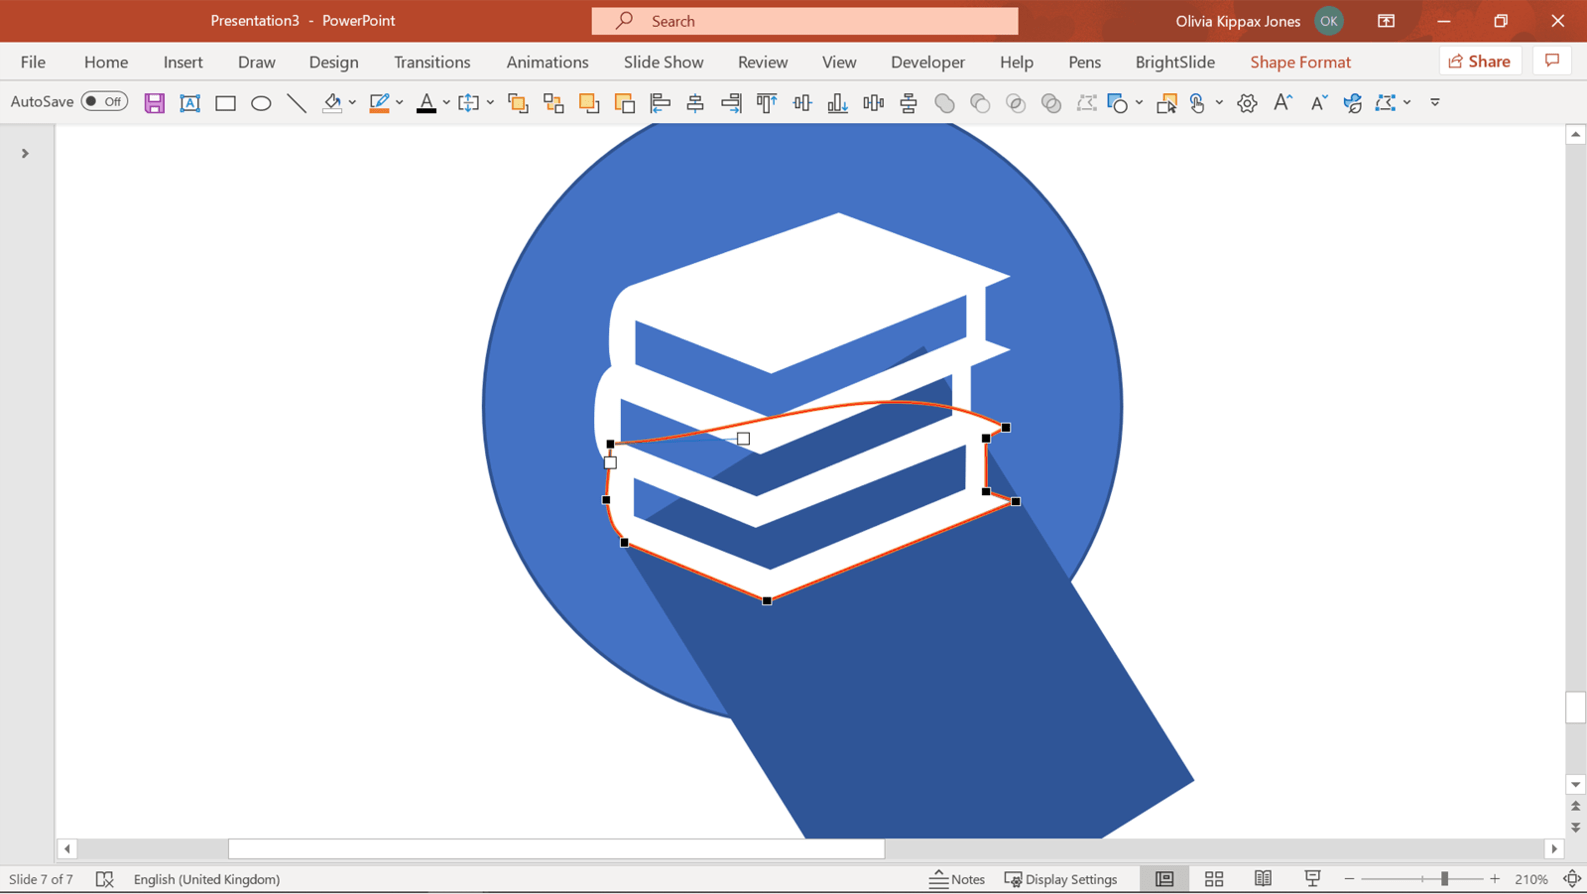
Shadow
This is the fiddliest custom icon holder idea I’m sharing, but it looks so good that it’s worth the effort!
Insert a shape onto your slide – whatever shape you want to use for the main holder.
Insert an icon and place it on top of the shape.
Inserta rectangle, remove the outline, and change the Fill Color to a shade slightly darker than your icon holder.
Move and resize the rectangle so it sits where a shadow would fall if your icon had one.
Now comes the tricky part. Use the Freeformshape tool to draw a shape following the outline of your icon. Zoom in, right–click on the finished shape, click EditPoints and drag the nodes to get a more accurate outline.
If you’re struggling, remove the fill colour and set the outline colour to something that stands out.
Select the shadow, thenselect the icon outline and use the BooleanSubtract tool to cut out the shape of your icon from the shadow.
If you’re using a non-rectangular icon holder, you’ll have to use more shapes and the Boolean tools to get the edge of your shadow to line up with the edge of the icon holder. For this example, I duplicated the icon holder and freeform shape, then used the Boolean tools to create a curved edge to the shadow.
How to tailor icons in PowerPoint
Custom icon holders are an excellent way to quickly brand presentation icons. But if you have a bit more time, you can go further and customise the icons themselves. I’ve got a few PowerPoint tricks that will help.
Convert PowerPoint icons to shapes
Insert an icon from the PowerPoint icon library, go to the GraphicsFormat tab and select ConverttoShape.
Right–click the icon and select Group > Ungroup. This will split the icon up into separate objects that you can edit individually, giving you more control over the design of each element. For example, you can fill each element with a different colour.
Most PowerPoint presentation icons only have one or two components, though, which limits what you can do with them, even when they are ungrouped.
Use sketchylines
A recent shape formatting option in PowerPoint is the sketched outline. There are a couple of different styles available, giving shapes a hand-drawn look. You can apply this style to an icon by converting it to a shape first.
Insert a PowerPoint icon and use ConverttoShape.
In the ShapeFormat tab, under ShapeOutline, select a Sketched
Sketched outlines can have all standard PowerPoint formatting options applied to them, including line thickness, shadow, colours, gradient, etc.
Addsimpleshapes
Adding extra detail to standard icons is one way to create a unique icon library. Whether you insert a basic shape behind each icon, or use the Freeform shape tool to add more detail, this is the time to let your creativity roam free! Remember to group your finished icon together to make it easy to copy, paste and move around a slide.
There you have it – 3 easy ways to customise icons in PowerPoint. Of course, it’s also possible to create custom icons from scratch using nothing more than PowerPoint shapes! This is a lot more time-consuming, so might not be the best option for everyone. However, if you’re a creative soul, there are some helpful video tutorials on YouTube to get you started.
Whenever you create a new icon, save it in a special PowerPoint file and make a note of what that icon represents (e.g., investment, innovation, retail) so you can use it consistently across multiple presentations. Whenever you need an icon, you can simply open up the file and copy and paste one you’ve made before.
If you want to get really clever about it – and we always do! – check out our blog on creating responsive SVGs and smart icons in PowerPoint. With a nifty bit of coding, you can make Smart Icons and Illustrations where you can select which parts of an SVG will change fill colour, which parts will change line colour, and which parts don’t change at all, giving you a terrific degree of creative freedom and allowing your icons and illustrations to change in response to your theme colour, template, and brand.
Animating presentation icons
The final step in creating custom icons in PowerPoint is animation – the cherry on the cake! Here are 3 sugary-sweet animation tips.
Make it pop
The first animation comes courtesy of our free add in BrightSlide. BrightSlide has a bunch of design and productivity tools, but it’s the Animation library we’re interested in today. This comes pre-loaded with some of our designers’ favourite animation combinations, perfect for creating smooth, beautifully animated slides in a few clicks.
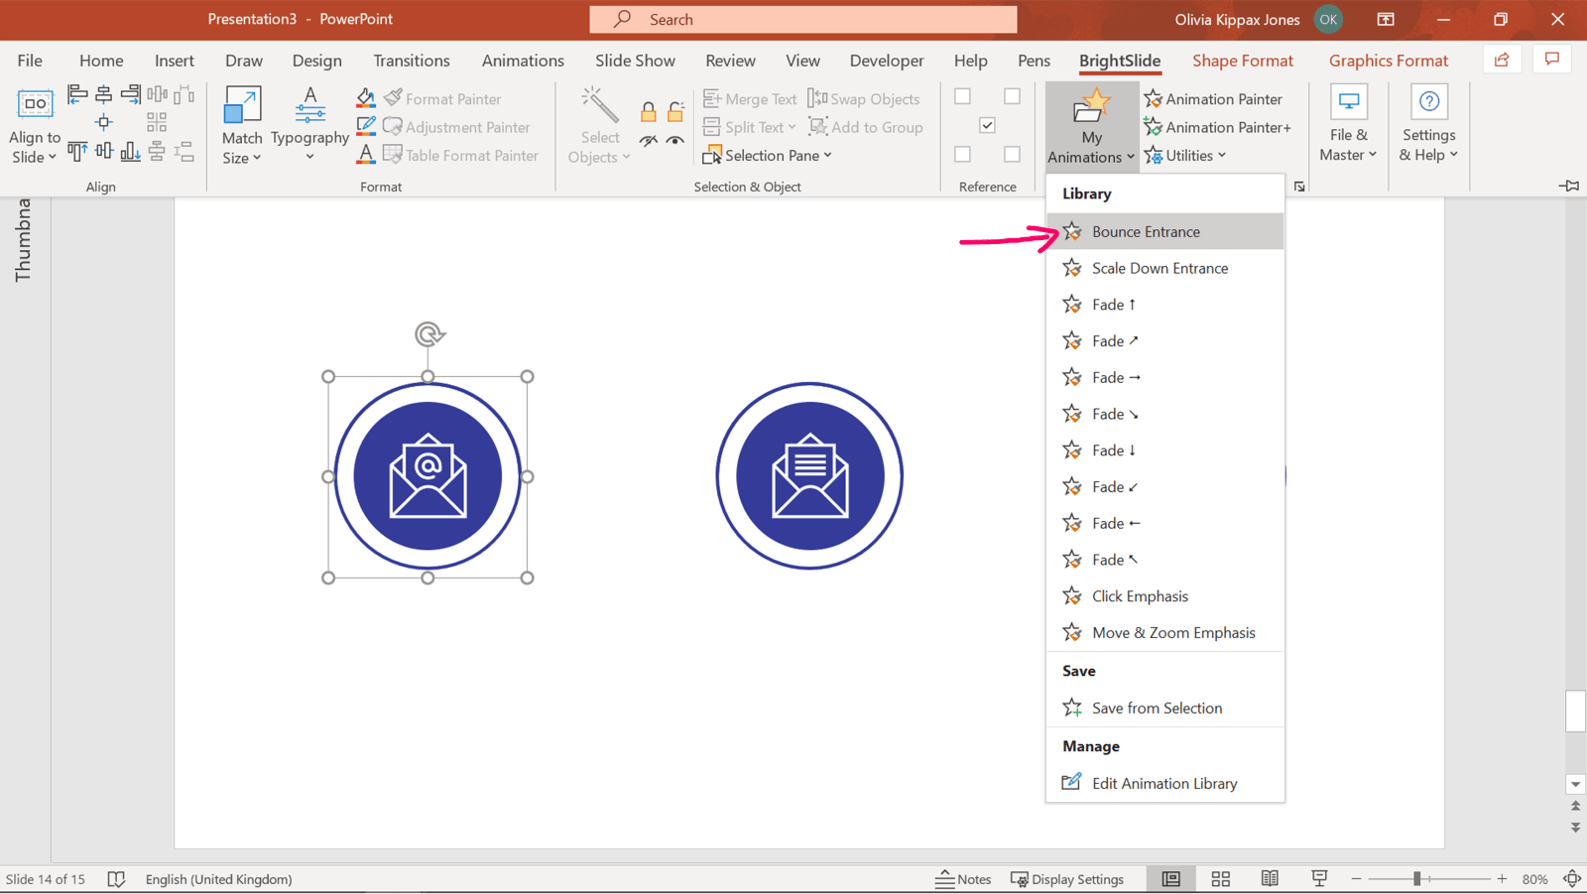
Select your icon, click on the BrightSlide tab, then MyAnimations.
From the drop-down list select BounceEntrance.
Use a mask
A mask in PowerPoint is a shape you use to hide parts of a slide or objects. Instead of using circular icon holders, with this method you insert a mask, then cut a circle or circles out using the Boolean Subtract tool.
Insert a rectangle to cover all or part of your slide. Change the fill colour to match your design.
Insert circles and use the Align tools to space them out evenly. This is where your icons will appear.
Select the rectangle, then each of the circles. Under the ShapeFormat tab, find the Boolean tools and select Subtract.
Insert your icons, place them in the centre of the cut-out circles and use the Arrange tool to move them behind the mask (select icons, right-click, SendtoBack).
Animate the icons in using a Fly In
This is one way to make a slide look dynamic and give it some depth. Masks in PowerPoint are super versatile and well worth getting to grips with. For more, check out this blog post.
Animate with purpose
You can tell visual stories using presentation icons. Animation is particularly helpful when you want to show a change (positive to negative, small to large, etc.). There are several components you can play with.
Direction
In this example, the direction the icons animate in reinforces the slide’s message about what will be left in the past and what to expect in the future.
This animation is from the BrightSlide animation library: Fade <- and Fade ->
Size
Changing the size of icon can help draw attention to a certain section of the slide, or signal a change. In this example, the icons help visualise the data, so the audience can get the main point of the slide at a glance.
Icon change
You can use the Fade in/Fade Out animations to change one icon to another, a tick to a cross, for example, to show change on a slide.
Movement and colour change
Using motion path animations in PowerPoint, you can move icons around your slide to help visualise your story. In this example, I combined a motion path and colour change to show the physical movement of children from one place to another, and the change from a negative to a positive outcome.
To apply a motion path, go to the Animation tab, select AddAnimation, then select the type of MotionPath you want. This example uses an Arc.
There are colour change animations in the Add Animation drop-down, however you cannot use them on a grouped object like an icon.
You can still achieve the colour change effect, however, by copying and pasting the icons at the end of their motion path. Downloading our free PowerPoint add-in, BrightSlide, is the easiest way to do this.
Select your icon.
In the BrightSlidetab under Utilities, select MotionPath then Duplicateat end point. This will create a copy of the icon where the motion path ends.
Recolour the icon and add a FadeIn animation that plays when the motion path ends.
If you want to take your animation even further by animating the individual components of your custom icons, then I recommend watching this YouTube tutorial.
Icon’t believe we’ve come to the end of this blog post on creating custom icons in PowerPoint! We’d love to see what you come up with, so tag us on Twitter or LinkedIn. If you have questions about how to create or animate custom icons in PowerPoint, leave them in the comments below and we’ll do our best to answer.
A PowerPoint template is the foundation on which polished and professional presentations are built. We interview BrightCarbon’s new Templates Lead, Gemma Leamy, and pick her brains on the ideal process for creating robust PowerPoint templates.
It can seem daunting to take a text-heavy slide or list of bullets and turn it into something visual, especially if you don’t think you’re super creative. However, the first step is simply reducing the amount of text on your slides – and you don’t have to be an artist to do that!


How does one DELETE the standard icons – graphs, 3D etc.
Wingdings is not accessible in my version of PowerPoint ….why?