
How to Create a WordPress Membership Site with MemberDash
Whether you’re an online educator, content creator, or course creator, you can increase your digital income and presence using memberships.
Membership sites make you money by requiring subscription payments for exclusive content. That content can include online courses, digital downloads, articles, and more. For WordPress users, you only need a plugin with membership capabilities to get started: MemberDash.
With MemberDash, you can create a WordPress membership site in just a few steps:
Step 1: Purchase and install MemberDash
Step 2: Create your first membership
Step 3: Configure payment settings
Step 4: Restrict your content
Let’s take a closer look.
Step 1: Purchase and install MemberDash
First, you’ll need to purchase MemberDash. Then, head to your admin dashboard, navigate to Plugins > Add New > Upload Plugin, and find the MemberDash .zip file.
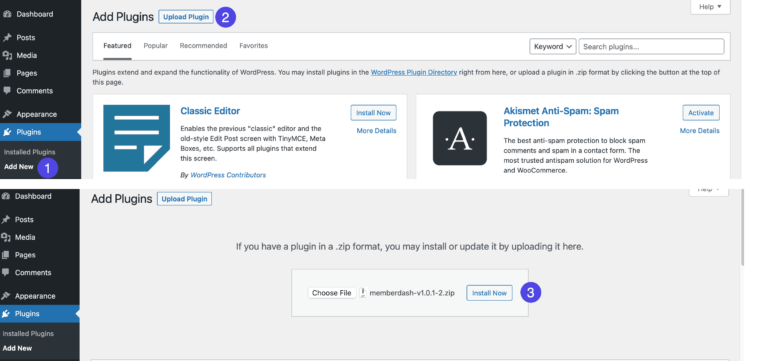
Activate it, and you’re ready to go!
Step 2: Create your first membership
After installing and activating MemberDash, you’ll see a Get Started button. Click that to start setting up your first membership. (If you’ve navigated away from that page, don’t worry–on the left-hand side of your WordPress dashboard, hover your mouse over MemberDash and click on Set Up.)
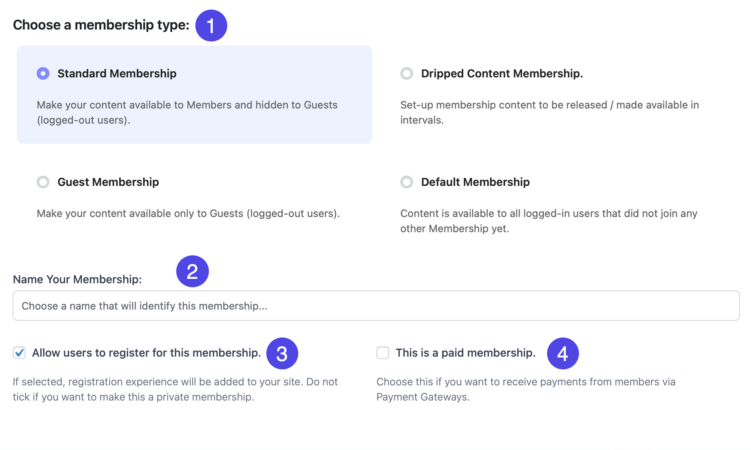
There are four different types of Memberships you can create:
- Standard Membership: This allows you to make content that is available to Members and hidden from site visitors or site users without a membership
- Dripped Content Membership: Set up membership content to be released or made available in intervals
- Guest Membership: Make content available only to guests (logged-out users)
- Default Membership: Make content available to all logged-in users that have not yet registered for a membership
To create a membership, you need to:
- Select a membership type from the options listed above
- Name the Membership
- Check the box Allow users to register for this membership if you wish to allow anyone to register
- Check the box This is a paid membership if you wish to charge for the membership
If you make it a paid membership, you will see the Payment screen. Here, you can adjust settings and add a payment gateway, which we will discuss in the next section.
Step 3: Configure payment settings
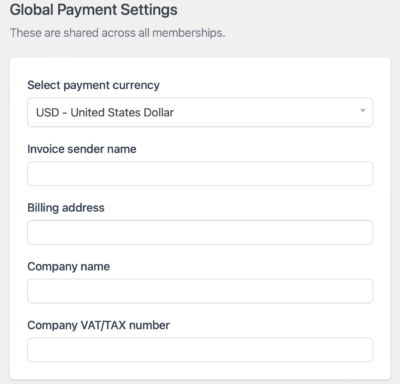
You’ll need to set up a few payment settings before launching your membership.
Start by taking a look at your Global Payment Settings. These settings apply to every transaction on your site. But don’t worry, you can change this information at any time.
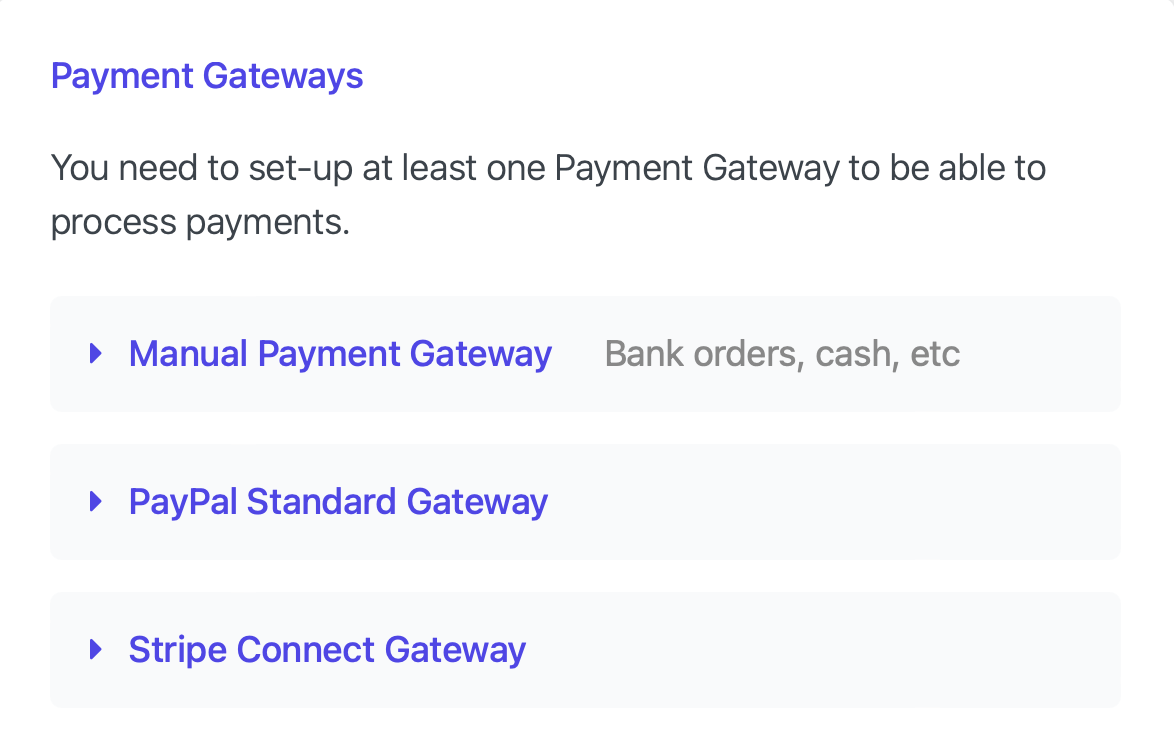
Below Global Payment Settings is Payment Gateways. You must set this up with your preferred vendor to process payments.
Using the Payment Settings column, you can also configure payment options for a specific membership, such as payment amounts and frequency.

Step 4: Restrict your content
The last step in using MemberDash to create a membership site is deciding what content to restrict. MemberDash allows you to restrict pages, posts, or custom post types. There are two ways to do this.
The first way is by opening the post or page editor and looking for the Membership Access meta box. Click the switch to Enable Protection and choose which membership types have access to that page or post.

The second way to restrict content is by navigating to MemberDash > Protection rules from your admin dashboard. Then, choose either Page, Post, or Custom Post Type from the menu. Here, you can assign a membership to a page or post.
You can even select multiple pages or posts at once and assign them all a membership. This is great for assigning pages or posts in bulk without entering each one into the editor.
You can also restrict a post category or special pages.
After deciding what content to restrict, your membership is ready to go!
Create memberships with MemberDash
Memberships can be a strong revenue generator for your business. It helps you earn passive income, generate more leads, and grow your business. Plus, you can ramp up your memberships in just four easy steps.
Ready to get started? Check out the MemberDash demo and see what you can create!

Alexis Bryan
@LearnDashLMS